How To Make Side Planer Boards
Side planer boards are an essential tool for any angler looking to expand their fishing horizons. Whether you’re trolling for big game fish or searching for a productive spot, side planer boards can greatly increase your chances of success. These specialized devices are designed to take your fishing lines away from the boat, spreading them out and covering more water. In this article, we will guide you through the process of making your own side planer boards, so you can start reeling in more fish in no time!
The first step in making your side planer boards is gathering the necessary materials. You will need a few basic items, including a sturdy piece of wood, preferably about 2 feet long and 6 inches wide. Additionally, you will need some screws, a drill, a saw, and a tape measure. For the fins, you can use plastic or metal sheets, whatever is readily available to you. The materials for this project can often be found at your local hardware store or even repurposed from items you may already have at home.
Once you have gathered all the materials, it’s time to start building your side planer boards. Begin by measuring and marking the desired length of your boards on the piece of wood. Next, using a saw, carefully cut the wood to the desired length. Remember to measure twice and cut once to ensure accuracy. Once you have your boards cut to size, it’s time to attach the fins.
Using your drill and screws, attach the fins to the sides of the boards. The fins will help stabilize the boards in the water and prevent them from flipping over. Make sure to position the fins evenly on each side of the board and securely fasten them with the screws. Once the fins are attached, give them a gentle tug to ensure they are firmly in place. You want to make sure they can withstand the force of the water and the tension from your fishing lines.
And there you have it! You have successfully made your own side planer boards. Now it’s time to take them out on the water and put them to use. Attach the boards to your fishing line, making sure they are securely fastened. Release them into the water and watch as they take your lines away from the boat, opening up new fishing opportunities. With the addition of side planer boards to your fishing arsenal, you’ll have the ability to cover more water and increase your chances of hooking that trophy fish.

What are Side Planer Boards
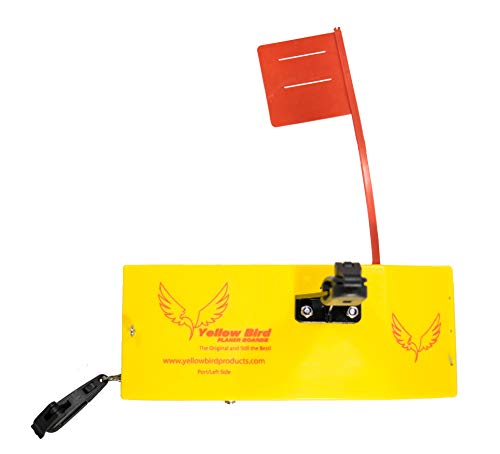
Side planer boards are an essential tool for trolling in fishing. They are devices designed to be attached to the fishing line, allowing the angler to spread their lines out to the sides of the boat. This technique is especially useful when fishing for species such as walleye, salmon, or trout, which tend to swim closer to the surface.
Side planer boards act as outriggers, keeping the lines away from the boat’s hull and multiple lines from tangling with each other. They work by displacing the fishing line to the side of the boat and away from the watercraft’s disturbance. This allows for a wider coverage area and increases the chances of catching fish.
There are different types of side planer boards available, including fixed and adjustable models. Fixed side planer boards are more suitable for calm waters, while adjustable ones can be fine-tuned for different conditions and depths. Some side planer boards are equipped with additional features, such as adjustable weights, which help in achieving the desired depth.
When using side planer boards, it is important to ensure that the boards are properly set up and that the fishing lines are appropriately attached. The boards should be positioned at a distance from the boat, allowing the lures to move freely and lure fish in. Anglers should also monitor the drag on their lines to detect when a fish has taken the bait.
Overall, side planer boards are a valuable tool for trolling anglers, enabling them to cover a larger area and increase their chances of success. By effectively spreading out lines and keeping them away from the boat’s disturbance, anglers can maximize their fishing opportunities and potentially catch more fish.

Advantages of Using Side Planer Boards
Side planer boards are a valuable tool for any angler looking to improve their fishing success. These simple yet effective devices offer a range of advantages that can greatly enhance your fishing experience. Whether you are fishing in freshwater or saltwater, using side planer boards can help you take your fishing to the next level.
1. Increased Coverage
One of the main advantages of using side planer boards is the increased coverage of your fishing area. By deploying planer boards on the sides of your boat, you can spread out your fishing lines and cover a larger area of water. This allows you to target more fish and increases your chances of getting a bite.
2. Enhanced Stealth
When fishing in clear water or in areas with wary fish, using side planer boards can help you maintain a stealthy approach. By positioning your lines away from the boat, you reduce the chances of scaring off fish. This can be especially useful when targeting finicky species such as trout or muskie.
Using planer boards also allows you to present your baits or lures in a more natural fashion. Without the disturbance of the boat, your offerings can appear more enticing to fish, increasing the likelihood of a strike.
3. Versatility
Side planer boards are incredibly versatile and can be used in various fishing scenarios. Whether you are trolling or casting, planer boards can be easily adjusted to suit your fishing style. They can be used with different types of lines, such as monofilament or braided, and can handle various sizes of baits or lures.

Furthermore, planer boards can be employed in different water depths, from shallow rivers to deep lakes or offshore waters. This versatility makes them a valuable tool for any angler, regardless of their preferred fishing techniques or target species.
In conclusion, side planer boards offer several advantages that can significantly improve your fishing experience. With increased coverage, enhanced stealth, and versatility, these devices are a must-have for any angler looking to maximize their chances of success on the water. Consider adding side planer boards to your arsenal and reap the benefits they bring to your fishing adventures.
Step-by-Step Guide to Making Side Planer Boards
Side planer boards are a must-have tool for any serious angler. They allow you to spread out your fishing lines, cover a larger area, and increase your chances of catching fish. Making your own side planer boards can be a fun and rewarding project. Here’s a step-by-step guide to help you get started.
1. Gather the necessary materials: To make side planer boards, you will need the following materials:
– A sheet of plywood

– Measuring tape
– Saw
– Drill
– Screws
– Sandpaper

– Paint or varnish
2. Measure and cut the plywood: Measure and mark the desired size of your side planer boards on the plywood sheet. Use the saw to carefully cut out the boards according to your measurements. It’s recommended to make them around 12-15 inches wide and 20-30 inches long.
3. Shape the boards: Use the sandpaper to smooth the edges and surfaces of the boards. You can also round off the corners to reduce any sharp edges.
4. Drill holes: To attach the side planer boards to your fishing line, you’ll need to drill holes on the top and bottom edges of each board. Make sure the holes are evenly spaced and large enough to accommodate your fishing line.
5. Attach hardware: Secure eye screws or clevis pins into the drilled holes on the boards. These will serve as attachment points for your fishing line and releases.
6. Paint or varnish the boards: Apply a coat of paint or varnish to protect the plywood from water damage. Choose a color that is easy to spot in the water, such as bright orange or yellow.
7. Test your side planer boards: Attach the side planer boards to your fishing line and test them in the water to ensure they function properly. Adjust the position and weight distribution of the boards as needed to achieve the desired effect.
8. Enjoy fishing with your side planer boards: Once you’re satisfied with the performance of your side planer boards, you’re ready to hit the water and start reaping the benefits of this valuable fishing tool. Happy fishing!
Gather Materials and Tools
Before you begin making side planer boards, you will need to gather the necessary materials and tools. Here is a list of what you will need:
Materials:
- Wooden boards – Choose a sturdy and durable wood, such as cedar or marine plywood.
- Fasteners – Get stainless steel screws, nuts, and bolts that will withstand water and rust.
- Weights – Use lead weights or other heavy materials to provide stability to the planer boards.
- Eye bolts – These will be used to attach the planer boards to the fishing line.
- Swivels – Get swivels to prevent the fishing line from tangling and twisting.
- PVC pipe – Use PVC pipe to create mast systems for the planer boards.
- Fishing line – Choose a strong and durable line that can withstand the weight of the planer boards.
Tools:
- Measuring tape – Use a measuring tape to measure and mark the dimensions of the planer boards.
- Saw – Use a saw to cut the wooden boards to the desired size and shape.
- Drill – Use a drill to create holes for the fasteners and eye bolts.
- Screwdriver – Use a screwdriver to tighten the screws and nuts.
- Pliers – Use pliers to attach the swivels and weights to the planer boards.
Make sure you have all the materials and tools before starting the project. This will ensure a smooth and efficient construction process. Once you have everything ready, you can move on to the next step of making the side planer boards.
Constructing the Side Planer Boards
Side planer boards are essential tools for trolling and can greatly increase your chances of catching fish. Constructing your own side planer boards is a cost-effective solution that allows you to customize them to your specific needs and preferences. Here is a step-by-step guide on how to construct your own side planer boards.
Materials Needed:
Before you begin constructing your side planer boards, gather the following materials:
- Marine-grade plywood
- Measuring tape
- Saw
- Screwdriver
- Stainless steel screws
- Drill
- Waterproof marine varnish
- Paintbrush
- Hardware: cleats, snap swivels, release clips, and adjustable keel weights
Steps to Construct Side Planer Boards:
- Measure and cut the marine-grade plywood into the desired size and shape for your side planer boards. Standard dimensions are usually around 24 inches in length and 6 inches in width, but you can adjust these measurements based on your preference.
- Smooth the edges and surfaces of the plywood boards using sandpaper, ensuring that there are no rough or splintered areas.
- Drill holes on each end of the boards for attaching the hardware. These holes should be large enough to accommodate the stainless steel screws and allow for easy attachment.
- Apply a waterproof marine varnish to all surfaces of the plywood boards. This will help protect the boards from water damage and increase their longevity.
- Allow the varnish to dry completely before proceeding.
- Attach the cleats to the topside of the boards using stainless steel screws. These cleats will provide a secure attachment point for your fishing line.
- Attach the snap swivels and release clips to the bottom side of the boards. These will allow you to attach your fishing line and adjust the distance between the board and the fishing bait.
- Add adjustable keel weights to the bottom side of the boards. These weights will help keep the boards stable and maintain their desired depth in the water.
Once you have completed these steps, your side planer boards are ready to be used. Be sure to test them out before your fishing trip to ensure they are functioning properly. With your homemade side planer boards, you can explore new fishing techniques and increase your chances of a successful catch.
Questions and answers
What materials do I need to make side planer boards?
To make side planer boards, you will need the following materials: plywood or plastic sheets for the boards, dowels or PVC pipes for the mast, screws or bolts for attaching the mast to the boards, and fishing line or wire for the release mechanism.
Can I use side planer boards for freshwater fishing?
Yes, side planer boards can be used for both freshwater and saltwater fishing. They are especially useful for trolling multiple lines and covering a larger area of water.
How do I attach the side planer boards to my fishing line?
To attach the side planer boards to your fishing line, you will need to use a release mechanism. This can be a simple clip that attaches to your line and releases when a fish strikes, or a more advanced release with an adjustable tension. Follow the manufacturer’s instructions for attaching and adjusting the release mechanism for optimal performance.


Meet Harrison Clayton, a distinguished author and home remodeling enthusiast whose expertise in the realm of renovation is second to none. With a passion for transforming houses into inviting homes, Harrison's writing at https://thehuts-eastbourne.co.uk/ brings a breath of fresh inspiration to the world of home improvement. Whether you're looking to revamp a small corner of your abode or embark on a complete home transformation, Harrison's articles provide the essential expertise and creative flair to turn your visions into reality. So, dive into the captivating world of home remodeling with Harrison Clayton and unlock the full potential of your living space with every word he writes.


