Simple Steps to Loosen a Shower Head without a Wrench – Easy DIY Guide | SiteName

When it comes to taking care of your home, it’s important to know how to handle small repairs and maintenance tasks on your own. One common issue that homeowners may encounter is a tight or stuck shower head that needs to be loosened. While a wrench is typically used to tackle this problem, not everyone has one readily available. Fortunately, there are simple steps you can take to loosen a shower head without a wrench.
To start, it’s important to gather the necessary tools and supplies for the task. You will need a pair of pliers, an adjustable wrench, and a cloth or towel to protect the shower head from scratches. It’s also a good idea to have a bucket or small container nearby to catch any dripping water. Once you have everything ready, you can proceed with the following steps.
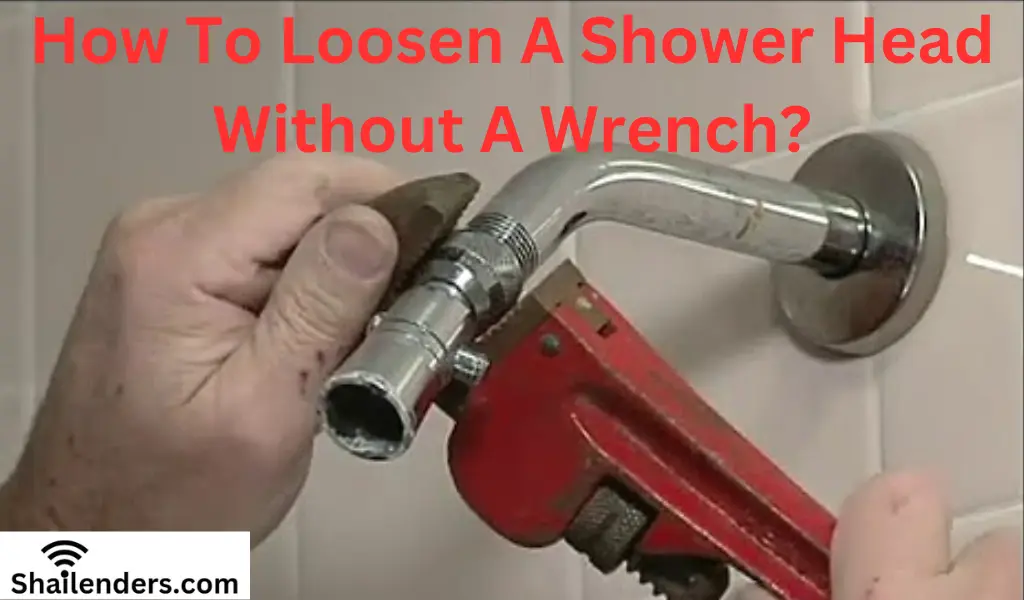
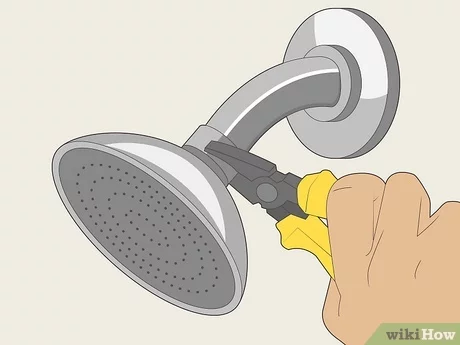
- Begin by wrapping the cloth or towel around the shower head to protect its surface.
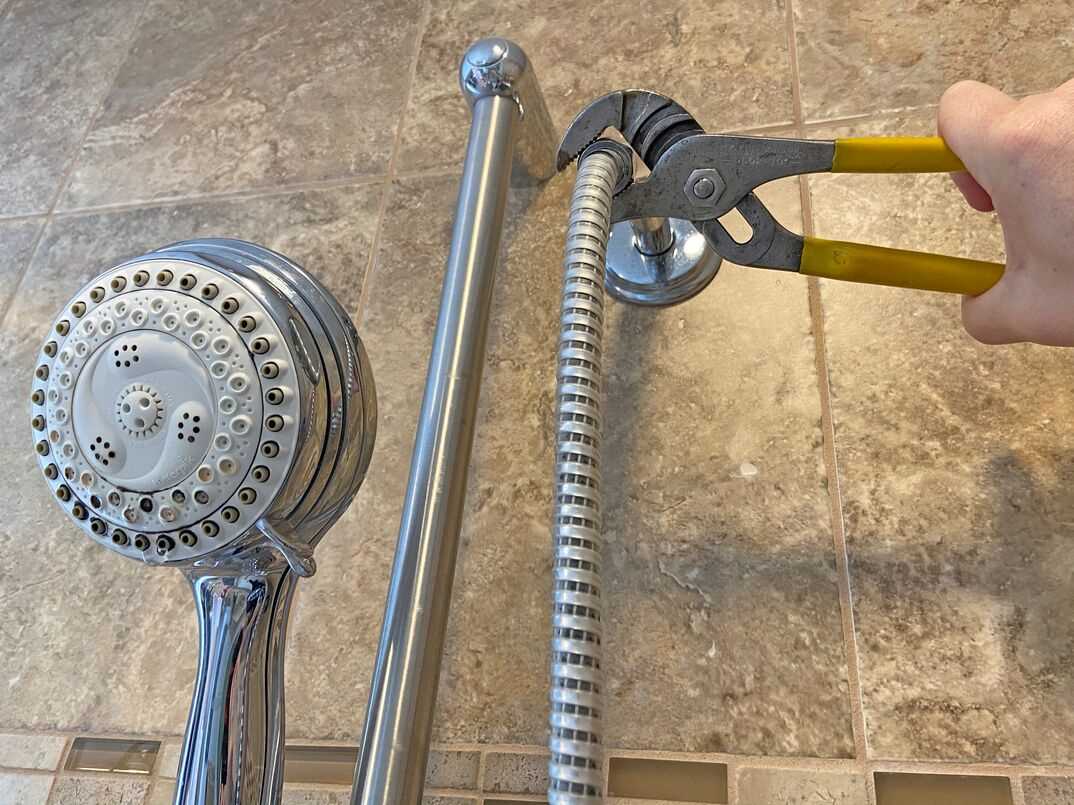
- Next, use the pliers to grip the shower head and turn it counterclockwise. Apply gentle pressure and continue to turn until the shower head starts to loosen.
- If the shower head is still not loosening, try using an adjustable wrench instead of the pliers. Place the wrench around the base of the shower head and turn it counterclockwise.
- As you turn the shower head, you may hear a slight clicking or popping sound. This is a sign that the mineral deposits or rust that may have been causing the tightness are starting to break up.
- Continue turning the shower head until it is completely loosened. Be careful not to exert too much force, as this can damage the shower head or the plumbing connections.
By following these simple steps and using basic tools, you can easily loosen a shower head without a wrench. Remember to use caution and take your time to avoid any accidents or damage. With a little patience and effort, you’ll have your shower head loosened and ready for maintenance or replacement in no time.
Step 1: Gather the Necessary Tools
Before you begin loosening your shower head, it’s important to gather all the necessary tools. While a wrench is the traditional tool used for this task, there are a few alternative tools you can use if you don’t have a wrench on hand.
Tools You Will Need:

- Adjustable wrench
- Plumbing pliers
- Slip joint pliers
- Channellock pliers
- Large flathead screwdriver
- Rubber jar opener
Having a variety of tools available will increase your chances of successfully loosening the shower head without causing any damage. If you don’t have any of these tools at home, you can easily find them at your local hardware store or online.
Items You Will Need for Loosening a Shower Head
- Adjustable pliers or wrench
- Penetrating oil or vinegar
- Rubber gloves
- Cloth or rag
To successfully loosen a shower head, you will need the following items:
- Adjustable pliers or wrench: These tools are necessary for gripping and turning the shower head. Make sure to choose pliers or a wrench that are the right size for your shower head to avoid causing damage.
- Penetrating oil or vinegar: If the shower head is stuck due to mineral deposits or rust, a penetrating oil or vinegar can help loosen the buildup. Apply the oil or vinegar to the threaded connection and allow it to sit for a few minutes before attempting to loosen the shower head.
- Rubber gloves: Gloves will protect your hands from any sharp edges or chemicals that may be present while working on the shower head.
- Cloth or rag: Having a cloth or rag on hand is useful for wiping away any excess oil or vinegar, as well as providing a better grip when attempting to loosen the shower head.
By gathering these items before starting the process, you will have everything you need to easily loosen a shower head without a wrench.
Step 2: Turn Off the Water Supply

Before you begin loosening the shower head, it is important to turn off the water supply to prevent any leaks or water damage. Follow these simple steps to turn off the water supply:

- Locate the main water valve in your home. This is usually found near the water meter or in the basement.
- Slowly turn the main water valve clockwise to shut off the water supply. Make sure to turn it all the way until it is fully closed.
- Once the water supply is turned off, open a faucet or a valve in the house to relieve any pressure in the pipes.
By turning off the water supply and relieving the pressure in the pipes, you can safely proceed with loosening the shower head without any water leaks or damage.
How to Safely Shut Off the Water
Before attempting to loosen a shower head, it is important to first shut off the water supply to prevent any leaks or flooding. Follow these simple steps to safely shut off the water:
- Locate the main water supply valve. This is usually found near the water meter or where the water enters your home. It is typically a round valve handle.
- Turn the valve handle clockwise to shut off the water supply. This will stop the flow of water throughout your house.
- Open a faucet or shower valve to relieve any pressure in the plumbing system. This will help ensure that there is no residual water left in the pipes.
- Confirm that the water is completely shut off by testing the faucets and shower. If no water comes out, then the water supply has been successfully shut off.
It is important to note that shutting off the water may affect other fixtures and appliances in your home, such as toilets, sinks, and dishwashers. It is advisable to inform other household members about the water shutdown to prevent any inconvenience.
If you are unable to locate the main water supply valve or if you are unsure about shutting off the water, it is recommended to consult a professional plumber for assistance.
Step 3: Protect the Shower Head
Before you start loosening the shower head, it’s important to protect it from any potential damage. Here are some simple steps to protect the shower head:
- Wrap a soft cloth or towel around the shower head to create a protective barrier.
- Secure the cloth or towel in place by tying it with a rubber band or using duct tape.
- This cloth or towel will help prevent scratches or dents on the shower head surface during the loosening process.
If you don’t have a soft cloth or towel, you can also use an old t-shirt or an oven mitt as a protective barrier.
Remember, the goal is to avoid any damage to the shower head while you’re applying pressure to loosen it. Taking these simple steps to protect the shower head will help ensure its longevity and functionality.
Covering the Shower Head to Prevent Damage
When removing a shower head, it’s important to take precautions to prevent damage to the fixture. One simple step you can take to protect the shower head is to cover it before using any tools or equipment.
Materials needed:
- Plastic bag
- Rubber band or zip tie
Instructions:
- Start by turning off the water supply to the shower.
- Take a plastic bag and place it over the shower head.
- Wrap the bag tightly around the shower head.
- Secure the bag in place using a rubber band or zip tie.
- Make sure the bag is tightly sealed around the shower head to prevent any water from leaking out.
- Once the bag is securely in place, you can proceed with loosening the shower head using the appropriate tools or techniques.
By covering the shower head with a plastic bag, you can protect it from scratches, dents, or other damage that may occur during the removal process. Additionally, covering the shower head can help to prevent any water from leaking out and causing a mess.

Additional tips:
- If you don’t have a plastic bag, you can also use a piece of cloth or a towel as a makeshift cover for the shower head.
- Be gentle when using tools or equipment to loosen the shower head to avoid causing any damage.
- If you encounter any difficulties in loosening the shower head, it’s advisable to seek professional help to avoid potential damage to the fixture.
Following these simple steps and taking precautions to protect the shower head can help ensure a successful and damage-free removal process.
Step 4: Apply Heat to Loosen the Connections
If the shower head is still difficult to loosen with pliers or a wrench, you can try applying heat to the connections. Heat can help expand the metal and make it easier to loosen stubborn connections.
Here’s how you can apply heat to loosen the connections:
- First, make sure the water supply to the shower head is turned off to prevent any accidents.
- Using a heat source such as a hairdryer or a heat gun, direct the heat towards the area where the shower head connects to the pipe.
- Move the heat source around the connection area, heating it evenly to avoid damaging any surrounding parts. Be cautious and avoid overheating plastic or delicate components.
- Continue applying heat for a few minutes to allow the metal to expand.
- After applying heat, use pliers or a wrench to try loosening the connections again, but be careful not to apply excessive force.
If the heat does not work or if you are still having trouble loosening the connections, it may be time to seek professional help or consider replacing the shower head.
Remember to always prioritize your safety and exercise caution when using tools or applying heat to avoid any injuries or damage to the shower head or surrounding fixtures.

Using Heat to Loosen a Stubborn Shower Head
Step 1: Gather Materials
Before attempting to loosen your stubborn shower head with heat, gather the following materials:
- Heat resistant gloves
- Hairdryer
- Towel
Step 2: Prepare the Area
Make sure to clear any objects or products near the shower head to avoid potential damage. Place a towel over the shower head and surrounding area to protect it from excess heat and prevent scratching.
Step 3: Heat the Shower Head
Put on the heat resistant gloves to protect your hands from the hot shower head. Point the hairdryer towards the base of the shower head and turn it on to the highest heat setting. Move the hairdryer around the base of the shower head, evenly distributing the heat for about 2-3 minutes.
Step 4: Remove the Shower Head
After heating the shower head, try twisting it counterclockwise using your hands. The heat should have expanded the metal, making it easier to loosen. If you still encounter resistance, use an adjustable wrench or pliers for additional leverage. Remember to protect the shower head with a cloth or towel to prevent scratches.
Step 5: Finishing Up
Once you have successfully loosened the shower head, unscrew it completely by hand. Clean any buildup or debris from the shower arm threads with a soft cloth. If necessary, apply plumber’s tape to the threads before reinstalling the shower head securely.
By using heat to loosen a stubborn shower head, you can save yourself from excessive force or potential damage. Remember to use caution when working with hot surfaces and always protect yourself with heat resistant gloves.
Step 5: Use a Rubber Strap or a Cloth for Extra Grip

If the shower head is still difficult to loosen, you can try using a rubber strap or a cloth to provide extra grip. This will help you get a better hold on the shower head, allowing you to apply more torque and loosen it.
Here’s how you can use a rubber strap or a cloth:
- Wrap the rubber strap or cloth around the base of the shower head.
- Hold onto the rubber strap or cloth with one hand, and use the other hand to turn the shower head counterclockwise.
- Apply steady pressure and try to loosen the shower head.
- If necessary, you can use a pair of pliers or an adjustable wrench on the rubber strap or cloth to increase the grip.
- Continue turning the shower head until it is fully loosened.
Using a rubber strap or a cloth can help protect the finish of the shower head from scratches or damage caused by pliers or wrenches. It also provides a more comfortable grip, making it easier to apply the necessary force to loosen the shower head.
Once the shower head is loosened, you can proceed with removing it by hand and replacing it with a new one or cleaning it as needed.
Improvised Tools to Loosen a Shower Head without a Wrench
1. Adjustable Pliers
If you don’t have a wrench, you can try using a pair of adjustable pliers to loosen a shower head. Start by wrapping a cloth around the shower head to protect it from scratches. Use the adjustable pliers to grip the base of the shower head tightly and turn it counterclockwise to loosen it.
2. Rubber Jar Opener
A rubber jar opener can also be used as an improvised tool to loosen a stubborn shower head. Place the rubber jar opener on top of the shower head for better grip and turn it counterclockwise to loosen it. The rubber will provide traction and help you get a better grip.
3. Leather Belt
If you have a leather belt available, you can use it to loosen a shower head. Wrap the belt around the base of the shower head and pull it tight. Use the belt as leverage to turn the shower head counterclockwise and loosen it.
4. Hammer and Screwdriver
If the shower head is extremely tight and difficult to loosen, you can try using a hammer and a screwdriver. Place the screwdriver on the side of the shower head and use the hammer to tap it counterclockwise. The force from the hammer should help loosen the shower head.
5. Boiling Water
If the shower head is stuck due to mineral deposits or rust, you can try using boiling water to loosen it. Fill a pot with water and bring it to a boil. Carefully pour the boiling water over the shower head and let it sit for a few minutes. The heat will help expand the metal, making it easier to loosen the shower head.
6. Vinegar Solution
If mineral deposits are causing the shower head to be stuck, you can try using a vinegar solution to break them down. Mix equal parts of vinegar and water in a bowl or plastic bag. Submerge the shower head in the solution and let it sit for at least 30 minutes. The acidity of the vinegar will help dissolve the mineral deposits, making it easier to loosen the shower head.
7. WD-40 or Penetrating Oil
If all else fails, you can try using WD-40 or a penetrating oil to loosen a stubborn shower head. Spray the WD-40 or penetrating oil onto the base of the shower head and let it sit for a few minutes. The lubrication should help loosen the shower head, making it easier to remove.
Remember to use caution when using improvised tools and chemicals. If you’re unsure or uncomfortable attempting to loosen the shower head yourself, it’s best to contact a professional plumber for assistance.
FAQ
What are some simple steps to loosen a shower head without a wrench?
There are several simple steps you can follow to loosen a shower head without a wrench. First, try applying heat to the shower head using a hairdryer or hot water. This can help loosen any rust or mineral deposits that may be causing the shower head to stick. Next, use a cloth or rubber grip to get a better grip on the shower head. Finally, try using a pair of pliers to gently twist the shower head counterclockwise.
Can I use a hairdryer to loosen a shower head?
Yes, you can use a hairdryer to loosen a shower head. Applying heat to the shower head can help loosen any rust or mineral deposits that may be causing it to stick. Simply aim the hairdryer at the shower head and turn it on to its hottest setting. Move the hairdryer around to evenly distribute the heat. After a few minutes, try using a cloth or rubber grip to twist the shower head counterclockwise.
What should I do if the shower head is stuck?
If the shower head is stuck and won’t turn, there are a few things you can try. First, make sure the water supply to the shower is turned off. Then, try applying heat to the shower head using a hairdryer or hot water. This can help loosen any rust or mineral deposits that may be causing it to stick. If the shower head is still stuck, try using a cloth or rubber grip to get a better grip and twist it counterclockwise. If all else fails, you may need to use a wrench or call a professional plumber for assistance.
What tools do I need to loosen a shower head?
You may not need any tools to loosen a shower head if it is not stuck. However, if the shower head is stuck, you may need a few tools to help you. A hairdryer or hot water can be used to apply heat to the shower head and loosen any rust or mineral deposits. A cloth or rubber grip can help you get a better grip on the shower head. If all else fails, you may need to use a wrench or call a professional plumber for assistance.
Can I call a professional plumber to loosen a shower head?
Yes, you can call a professional plumber to help you loosen a shower head. If you have tried all the DIY methods and the shower head is still stuck, a plumber will have the necessary tools and expertise to handle the situation. They can safely use a wrench or other plumbing tools to loosen the shower head without causing any damage. If you are unsure or uncomfortable attempting the task yourself, it is always best to seek professional help.
Video


Meet Harrison Clayton, a distinguished author and home remodeling enthusiast whose expertise in the realm of renovation is second to none. With a passion for transforming houses into inviting homes, Harrison's writing at https://thehuts-eastbourne.co.uk/ brings a breath of fresh inspiration to the world of home improvement. Whether you're looking to revamp a small corner of your abode or embark on a complete home transformation, Harrison's articles provide the essential expertise and creative flair to turn your visions into reality. So, dive into the captivating world of home remodeling with Harrison Clayton and unlock the full potential of your living space with every word he writes.