How To Use Rotary Polisher On Car
If you want your car to look shiny and brand-new, it’s essential to know how to properly use a rotary polisher. A rotary polisher is a powerful tool that can remove scratches, swirl marks, and other imperfections from your car’s paint. However, it can also cause damage if not used correctly.
Before using a rotary polisher, it’s important to prepare your car’s paint surface. Start by washing and drying your car thoroughly to remove any dirt or debris. Then, use a paint cleaner or a clay bar to remove any contaminants that may be stuck to the paint.
Once your car is clean and prepared, apply a suitable polishing compound to the rotary polisher pad. Use a moderate amount of the compound, as using too much can create excessive heat and friction. Spread the compound evenly across the pad before starting the machine.
When using the rotary polisher, it’s crucial to maintain a slow and steady speed. Start with a low speed setting and gradually increase it as needed. Work in small sections at a time, applying light pressure and overlapping each pass to ensure even coverage.
Remember to keep the polisher moving at all times to prevent the heat from building up in one spot. If you notice any excessive heat or burning smell, stop immediately and let the polisher cool down.

After you have completed polishing your car, wipe off the excess compound with a clean microfiber cloth. Inspect the paint surface for any remaining imperfections, and repeat the polishing process if necessary.
Using a rotary polisher on your car can be intimidating, but with the right technique and practice, you can achieve professional-looking results. Take your time, always follow the manufacturer’s instructions, and remember to protect yourself by wearing gloves and safety glasses.
Why Use a Rotary Polisher?
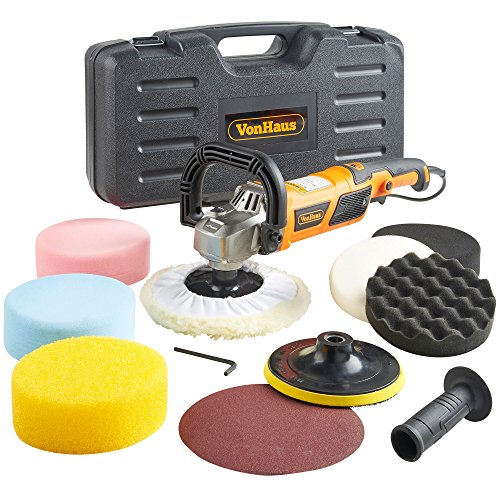
A rotary polisher is a powerful tool that is commonly used in auto detailing to achieve a high level of paint correction and polishing. It features a spinning pad that moves in a circular motion, allowing it to remove swirl marks, scratches, and other imperfections in the paintwork.
There are several reasons why using a rotary polisher is beneficial:
1. Power and Efficiency
A rotary polisher is much more powerful than other types of polishers, such as dual-action or orbital polishers. It rotates at a higher speed, which allows for quicker and more effective paint correction. This makes it ideal for removing heavy defects or oxidation from the paint surface.

2. Precision and Control
Although rotary polishers are powerful, they can also be used with a high level of precision and control. The spinning pad can be manipulated to target specific areas or imperfections on the car’s paintwork. With the right technique and experience, you can achieve excellent results without causing any damage.
3. Versatility
A rotary polisher can be used for a variety of detailing tasks, including paint correction, polishing, and applying wax or sealant. With different types of pads and compounds, you can adjust the level of aggression and achieve different levels of gloss and shine. This versatility makes it a valuable tool for professional detailers and car enthusiasts alike.
While a rotary polisher offers many benefits, it’s important to note that it requires skill and practice to use effectively. Due to its power, there is a greater risk of damaging the paint if not used correctly. It’s recommended to start with a slower speed and progressively increase it as you gain more experience.
In conclusion, a rotary polisher is a valuable tool for achieving professional-level results in auto detailing. Its power, precision, and versatility make it an essential tool for any detailer or car enthusiast looking to achieve a flawless and shining paint finish.
Prepping Your Car for Rotary Polishing
Before you begin rotary polishing your car, it’s crucial to properly prepare the surface to achieve the best results. Here are some important steps to follow when prepping your car for rotary polishing:

1. Wash Your Car: Start by thoroughly washing your car to remove any dirt, debris, and grime from the surface. Use a high-quality car shampoo and a microfiber wash mitt to ensure a gentle and scratch-free wash.
2. Clay Bar Treatment: After washing, it’s recommended to perform a clay bar treatment on your car’s paint. This process helps to remove embedded contaminants such as tree sap, tar, and industrial fallout. Use a clay bar lubricated with a detailing spray to gently glide over the surface, ensuring a smooth and clean surface.
| Tip: | Use a light-colored clay bar to easily see when contaminants are being removed. |
3. Inspect for Imperfections: Once the clay bar treatment is complete, carefully inspect your car’s paint for any imperfections such as swirl marks, scratches, or oxidation. Take note of these areas as they will require specific attention during the rotary polishing process.
4. Masking Off: To protect delicate areas from getting damaged during polishing, it’s important to mask off sections such as plastic trim, decals, and rubber moldings. Use automotive masking tape and plastic bags to cover these areas, ensuring they are fully protected.
5. Choose the Right Products: Make sure you have the appropriate rotary polishing pads and compounds for the specific paint correction needs of your car. Different pad and compound combinations will provide different levels of cutting and finishing abilities, so choose accordingly based on your requirements.

6. Test Spot: Before diving into full-on rotary polishing, it’s wise to perform a test spot on a small, inconspicuous area of your car’s paint. This will help you determine the right combination of pad and compound, as well as the speed and pressure needed to achieve the desired results.
7. Clean and Dry: Lastly, ensure that your car’s surface is completely clean and dry before starting the rotary polishing process. Any residual dirt or moisture can interfere with the polishing process and potentially lead to swirl marks or other paint defects.
By following these steps, you can effectively prep your car for rotary polishing, setting the stage for successful paint correction and a stunning finish.
Step-by-Step Guide to Rotary Polishing
Rotary polishing is an effective technique that can be used to restore the shine and luster of your car’s paint. While it may seem intimidating at first, with the right tools and technique, you can achieve professional-level results. Follow this step-by-step guide to rotary polishing to bring back the showroom finish to your car.
Step 1: Preparation
Before you begin rotary polishing, make sure your car is clean and dry. Remove any dirt, grime, or contaminants from the surface using a car wash and a clay bar if necessary. Cover any sensitive areas such as trims, plastics, or rubber with masking tape to protect them from accidental damage.

Step 2: Selecting the Polishing Pad and Compound
Choose the appropriate polishing pad based on the severity of the paint imperfections. Soft foam pads are suitable for light scratches and swirl marks, while firmer pads are better for deeper scratches and oxidation. Pair the pad with a suitable polishing compound that matches the level of correction required.
Step 3: Applying the Polishing Compound
Apply a small amount of polishing compound onto the pad. Spread the compound evenly over the surface to be polished before turning on the rotary polisher. This will prevent splatter and ensure even distribution of the compound.
Step 4: Polishing Technique
Hold the rotary polisher firmly with both hands and apply light to moderate pressure on the surface. Start at a low speed setting and gradually increase the speed as you become more comfortable. Work in small sections, moving the polisher in overlapping passes to ensure uniform coverage.
Note: Be cautious not to stay in one spot for too long, as this can cause heat buildup and damage the paint. Keep the polisher moving at all times to avoid any potential issues.
Step 5: Inspect and Repeat if Necessary
After completing a section, wipe off the excess polishing compound with a clean microfiber cloth. Inspect the surface to check the level of correction achieved. If necessary, repeat the process with a more aggressive pad and compound to further improve the finish.

Step 6: Finishing Touches
Once you are satisfied with the level of correction, remove any masking tape and clean the surface with a car wash to remove any residue. Apply a layer of wax or sealant to protect the newly polished surface and enhance its shine.
Remember: Rotary polishing requires practice and patience to master. It is always recommended to start with less aggressive pad and compound combinations, and gradually increase as needed. If in doubt, seek professional advice or consider taking a training course to perfect your rotary polishing technique.
By following this step-by-step guide, you can achieve professional-level results with your rotary polisher and enjoy a shiny, showroom-worthy finish for your car.
Tips for Using a Rotary Polisher Safely
Using a rotary polisher can be a great way to achieve a professional-looking finish on your car’s paintwork. However, it’s important to use the tool safely to avoid damaging your vehicle or injuring yourself. Here are some tips to help you use a rotary polisher safely:
1. Wear Protective Gear
Before you start using a rotary polisher, make sure you’re wearing the appropriate protective gear. This includes safety glasses to protect your eyes from flying debris, gloves to protect your hands, and a dust mask to prevent inhalation of dust particles.

2. Start with a Clean Surface
Before using a rotary polisher, it’s essential to start with a clean surface. This means washing your car thoroughly to remove any dirt, grime, or loose debris. If the surface is not clean, the rotary polisher may push the dirt or debris into the paintwork, causing scratches or swirl marks.
3. Use the Correct Polishing Pads
Using the correct polishing pads is crucial when using a rotary polisher. Different pads have different levels of abrasiveness, so it’s important to choose the right pad for the job. For example, a more aggressive pad may be needed for severe paint defects, while a softer pad may be suitable for lighter polishing jobs.
4. Work in Small Sections
When using a rotary polisher, it’s best to work in small sections at a time. This allows you to focus on a specific area and ensures even coverage. Start with a small amount of polish and gradually increase as needed, making sure not to apply too much pressure on the polisher.
5. Keep the Polisher Moving
It’s important to keep the rotary polisher moving at all times to avoid burning the paintwork. Leaving the polisher in one spot for too long can generate excess heat, potentially damaging the paint. Keep the polisher moving in a back-and-forth or circular motion to distribute the heat and prevent any damage.
6. Use Multiple Polishing Passes
To achieve the best results, it’s often necessary to make multiple polishing passes with a rotary polisher. This helps to remove imperfections and achieve a smoother finish. However, it’s crucial to avoid applying excessive pressure, as this can cause damage. Let the weight of the polisher and the rotation do the work.
By following these tips, you can use a rotary polisher safely and effectively to achieve a professional finish on your car’s paintwork. Remember to take your time, be patient, and practice on a small area before tackling larger sections.
Final Touches and Maintenance
Once you have finished polishing your car with a rotary polisher, there are a few final touches you can make to ensure a professional-looking finish.
1. Waxing: Applying a coat of wax is an essential final step in the polishing process. Wax not only protects the paint but also enhances its shine. Use a high-quality wax that suits your car’s paint type and apply it evenly using a microfiber applicator pad or a foam applicator. Allow the wax to dry and then remove it using a soft microfiber cloth, buffing in circular motions.
2. Polishing any missed spots: Inspect your car’s paint for any areas that you may have missed during the initial polishing. Use a small amount of polish on a soft hand applicator, and work it in using a circular motion. This will ensure an even and consistent finish.
3. Cleaning the residue: After applying polish and wax, there may be some residue left behind. Use a clean, dry microfiber cloth to gently wipe off any residue. Be careful not to apply too much pressure, as this can damage the paint job.
4. Regular maintenance: To keep your car looking its best, it’s essential to regularly maintain its appearance. This includes washing your car regularly using a pH-neutral car wash soap, drying it thoroughly to prevent water spots, and applying a quick detail spray or spray wax in between washes to maintain the shine and protection.
Remember, always read and follow the instructions provided by the manufacturer for any polisher or product you use. Taking the time to properly care for your car’s paint will ensure a long-lasting and glossy finish.
Questions and answers
What is a rotary polisher and why should I use it on my car?
A rotary polisher is a power tool specifically designed for polishing and buffing surfaces, including car paint. It features a circular rotating pad that spins at a high speed to remove imperfections, swirl marks, and scratches from the car’s surface. Using a rotary polisher on your car can result in a smooth and glossy finish, making your vehicle look brand new.
Is it safe to use a rotary polisher on my car’s paint?
Using a rotary polisher on your car’s paint can be safe if done correctly and with the right technique. It’s important to use the appropriate pads and polishes for your car’s specific needs and to avoid excessive pressure or prolonged buffing in one area. It’s also crucial to keep the polisher moving at a consistent pace to prevent damage to the paint. If you’re unsure or inexperienced, it’s recommended to seek professional help or practice on a small, inconspicuous area of the car first.

Meet Harrison Clayton, a distinguished author and home remodeling enthusiast whose expertise in the realm of renovation is second to none. With a passion for transforming houses into inviting homes, Harrison's writing at https://thehuts-eastbourne.co.uk/ brings a breath of fresh inspiration to the world of home improvement. Whether you're looking to revamp a small corner of your abode or embark on a complete home transformation, Harrison's articles provide the essential expertise and creative flair to turn your visions into reality. So, dive into the captivating world of home remodeling with Harrison Clayton and unlock the full potential of your living space with every word he writes.


