Step-by-step Guide: How to Drill Holes in a Plastic Bin

If you have a plastic bin that you would like to turn into a planter or a storage container, drilling holes in it is essential for proper drainage. Draining excess water is crucial for the health of your plants, as it helps prevent root rot and ensures that the soil doesn’t become oversaturated. Additionally, drilling holes in a plastic bin can also make it easier to clean and maintain, as any spills or moisture can easily drain out.
To begin, you will need a few materials. Firstly, you will need a plastic bin that you would like to drill holes in. Make sure that the bin is clean and free from any obstructions that could impede the drilling process. You will also need a power drill with a drill bit suitable for drilling through plastic. Additionally, it is recommended to have a marker or pencil, a ruler or measuring tape, and safety goggles to protect your eyes during the drilling process.
Once you have gathered your materials, the next step is to decide on the placement and number of holes you would like to drill in the plastic bin. This will depend on the purpose of the bin and the type of plants or items you will be storing. For planters, it is generally recommended to have several small holes evenly distributed on the bottom of the bin to allow for drainage. For storage containers, you may want to drill larger holes on the sides or bottom to allow for better ventilation.
Using your marker or pencil, mark the desired locations for the holes on the plastic bin. Ensure that the markings are clear and visible. Then, put on your safety goggles to protect your eyes from any debris that may be created during the drilling process. Position the drill bit on one of the marked spots and gently apply pressure while holding the bin steady. Start drilling at a slow speed to prevent the plastic from cracking or splintering. Gradually increase the speed as necessary, taking breaks to cool down the drill bit if it becomes hot.
Continue drilling until all the desired holes have been made. Take care to maintain a steady hand and to apply even pressure throughout the process. Once you have finished drilling, check the holes to ensure they are clean and free from any plastic debris. If necessary, use a small brush or compressed air to remove any leftover plastic bits. Finally, give your plastic bin a quick rinse to remove any dust or debris that may have accumulated during the drilling process.

By following these simple steps, you can successfully drill holes in a plastic bin to make it suitable for use as a planter or a storage container. Remember to always wear proper safety equipment, take breaks when necessary, and exercise caution when handling power tools. Happy drilling!
Choose the Right Drill Bit
When drilling holes in a plastic bin, it is important to select the correct drill bit. Using the wrong drill bit can result in cracks or splits in the plastic, or the hole may not be the correct size or shape. Here are some factors to consider when choosing the right drill bit for your plastic bin:
1. Material of the Plastic Bin
The material of the plastic bin will determine the type of drill bit that is most suitable. Common types of plastic used for bins include polypropylene, polyethylene, and acrylic. These plastics have different hardness levels, so it is important to choose a drill bit that is appropriate for the specific material.
2. Size of the Hole
The size of the hole you need to drill will also impact your choice of drill bit. For smaller holes, you may need a drill bit with a smaller diameter, whereas larger holes may require a larger drill bit. Check the specifications of your project or consult a drill bit size chart to determine the appropriate size for your hole.

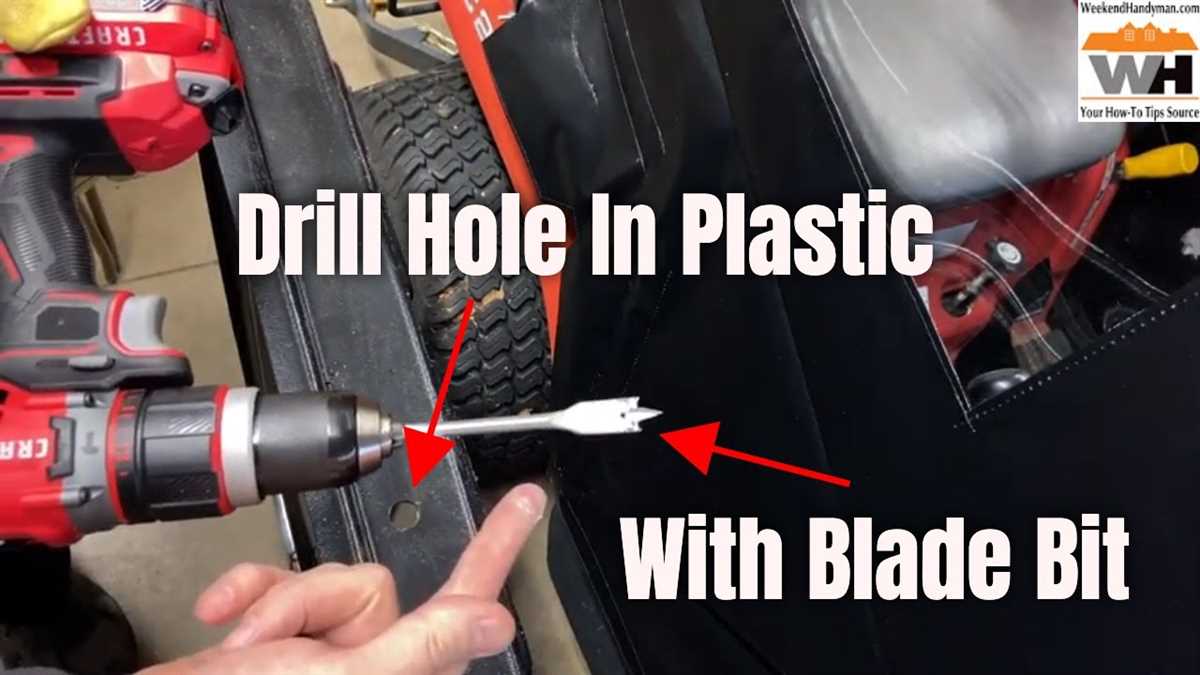
3. Type of Drill Bit
There are several types of drill bits that can be used for drilling holes in plastic. Some common options include twist drill bits, spade drill bits, and step drill bits. Twist drill bits are the most versatile and can be used for a variety of materials, including plastic. Spade drill bits are best suited for larger holes, while step drill bits are great for drilling holes of different sizes.
4. Cutting Style
The cutting style of the drill bit can also affect the drilling process. There are two main cutting styles for drill bits: standard and pilot point. Standard drill bits have a tapered point that helps to guide the drill bit into the material. Pilot point drill bits have a self-centering tip that makes it easier to start drilling without the need for a center punch.
Taking the time to choose the right drill bit for your plastic bin will help to ensure clean and accurate holes without damaging the plastic. Remember to wear safety glasses and take proper precautions when using power tools.
Measure and Mark the Hole Locations
Before starting to drill the holes in your plastic bin, it is important to measure and mark the locations where you want the holes to be. This will ensure that the holes are spaced evenly and in the correct positions.

Here are the steps to measure and mark the hole locations:
- Gather the necessary tools: You will need a measuring tape or ruler, a pencil or marker, and a straight edge. These tools will help you make precise measurements and markings on your plastic bin.
- Determine the size and number of holes: Decide on the size and number of holes you want to drill in your plastic bin. Consider the purpose of the holes and the items you will be storing in the bin. Make sure the size and number of holes will meet your needs.
- Identify the locations: Use the measuring tape or ruler to measure the distances between the holes. Use a straight edge to draw straight lines connecting the hole locations. This will help you visualize how the holes will be spaced on the bin.
- Mark the hole locations: With the measurements and straight lines as a guide, use a pencil or marker to mark the hole locations on the plastic bin. Make sure the markings are clear and visible. You can use a small dot or an “X” to indicate the exact spot where the hole should be drilled.
Note: It is a good idea to double-check your measurements and markings before proceeding to drill the holes. This will help ensure accuracy and prevent any mistakes.
Once you have measured and marked the hole locations, you are ready to move on to the next step: drilling the holes in your plastic bin.
Secure the Plastic Bin
To ensure that the plastic bin stays in place while drilling holes, you’ll need to secure it properly:

1. Choose a Stable Surface
Select a flat and stable surface to work on. A workbench or table would be ideal for this purpose.
2. Place Non-Slip Material
Place a non-slip material, such as a rubber mat or a silicone pad, underneath the plastic bin. This will prevent it from sliding or moving during the drilling process.
3. Clamp the Plastic Bin
For added stability, use clamps to secure the plastic bin to the work surface. Position the clamps on opposite sides of the bin, making sure they firmly hold it in place.
4. Check Stability
Before drilling any holes, double-check that the plastic bin is securely in place and does not move when pressure is applied.
By taking these steps to secure the plastic bin, you can ensure a stable and safe drilling process.

Wear Personal Protective Equipment
When drilling holes in a plastic bin, it is important to prioritize safety. Wearing personal protective equipment (PPE) will help minimize the risk of injury and protect you from potential hazards.
Types of PPE for Drilling Holes in a Plastic Bin:
- Safety goggles: Protect your eyes from flying plastic chips or debris.
- Dust mask: Prevent inhalation of plastic dust particles.
- Gloves: Protect your hands from cuts and scratches, as well as provide a better grip on the drill.
- Ear protection: Use earplugs or earmuffs to reduce the noise generated during drilling.
- Protective clothing: Wear long-sleeved shirts and pants to cover your skin and minimize exposure.
Tips for Using Personal Protective Equipment:
- Choose the appropriate PPE: Ensure that the PPE you use is suitable for drilling tasks and provides adequate protection.
- Inspect your PPE: Before starting, check that your equipment is in good condition without any defects or damage.
- Wear PPE correctly: Make sure to wear your safety goggles, dust mask, gloves, and other protective equipment properly to ensure maximum protection.
- Replace damaged equipment: If your PPE becomes damaged or worn-out during the drilling process, replace it immediately to maintain safety standards.
- Follow manufacturer’s instructions: Always follow the manufacturer’s guidelines and instructions for your PPE to ensure effective protection.
- Store PPE properly: After completing the drilling task, store your equipment in a safe and dry place to keep it in good condition for future use.
By wearing appropriate personal protective equipment, you can significantly reduce the chances of injuries and create a safer working environment when drilling holes in a plastic bin.
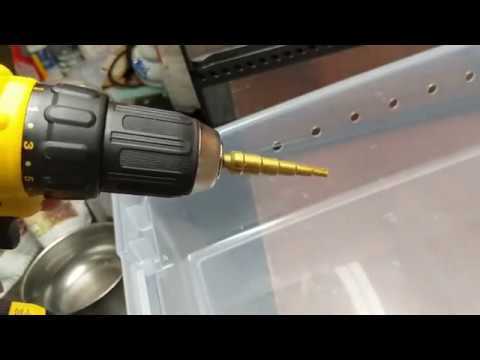
Start Drilling Slowly
Once you have marked the position of the holes on your plastic bin, it’s time to start drilling. However, it’s important to remember to start drilling slowly and carefully to ensure accuracy.
Here are the steps to follow when drilling the holes:
- Secure the bin: Place the plastic bin on a stable surface, such as a workbench or table. Make sure it is firmly secured to prevent it from moving around while drilling.
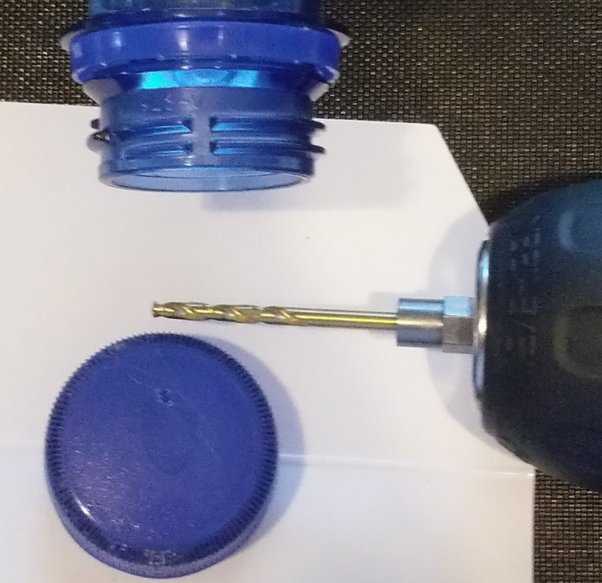
- Select the right drill bit: Choose a drill bit that is suitable for drilling into plastic. A sharp twist bit or a step drill bit are good options for this purpose.
- Put on safety gear: Before you start drilling, make sure you are wearing appropriate safety gear, including safety goggles and gloves, to protect yourself from any potential injury.
- Start at a low speed: Set your drill to a low speed setting to begin with. This will help you maintain control over the drill and prevent the plastic from cracking or breaking.
- Apply gentle pressure: Hold the drill steady and apply gentle pressure as you begin to drill into the plastic. Avoid putting too much force, as this can cause the plastic to warp or chip.
- Use a lubricant: If you are having difficulty drilling through the plastic, you can apply a small amount of lubricant, such as petroleum jelly, to the drill bit. This will help reduce friction and make the drilling process easier.
- Proceed slowly: Continue drilling at a slow and steady pace, gradually increasing the speed as needed. Take breaks if necessary to prevent overheating of the drill bit or the plastic.
- Check the holes: Periodically stop drilling to check the progress of the holes. Gently remove any plastic shavings or debris that may accumulate around the holes.
By starting slowly and following these steps, you can ensure that the holes you drill in your plastic bin are precise and clean.
Apply Consistent Pressure
When drilling holes in a plastic bin, it’s important to apply consistent pressure to ensure accurate and clean holes. Here are some steps to follow:
- Select the right drill bit: Choose a drill bit specifically designed for plastic. These bits typically have a sharp point and fluted edges to cut through the material smoothly.
- Mark the hole locations: Use a permanent marker or a pencil to mark the spots where you want to drill the holes. Measure and mark them evenly to ensure a symmetrical layout.
- Secure the plastic bin: Place the plastic bin on a stable surface or use clamps to hold it securely in place. This will prevent the bin from moving or spinning while you drill.
- Start drilling: Position the drill bit against one of the marked spots and apply light pressure to create a small indentation. This will help keep the drill bit in place as you start drilling.
- Apply consistent pressure: With the drill bit in the indentation, start drilling slowly and steadily. Apply consistent pressure to maintain a controlled drill speed. Avoid applying excessive force, as it may crack or damage the plastic.
- Keep the drill perpendicular: While drilling, make sure the drill bit remains perpendicular to the surface of the plastic bin. This will ensure clean, straight holes.
- Use a lubricant: If you’re drilling several holes or through thick plastic, consider using a lubricant like cutting oil or water. This will help reduce friction and prevent the drill bit from overheating.
- Clean up: After drilling all the holes, remove any plastic debris or shavings from the bin. Use a soft cloth or a vacuum cleaner to clean the area and make sure it’s free of any loose plastic.
By following these steps and applying consistent pressure, you’ll be able to drill precise and clean holes in your plastic bin with ease!
Cool the Drill Bit
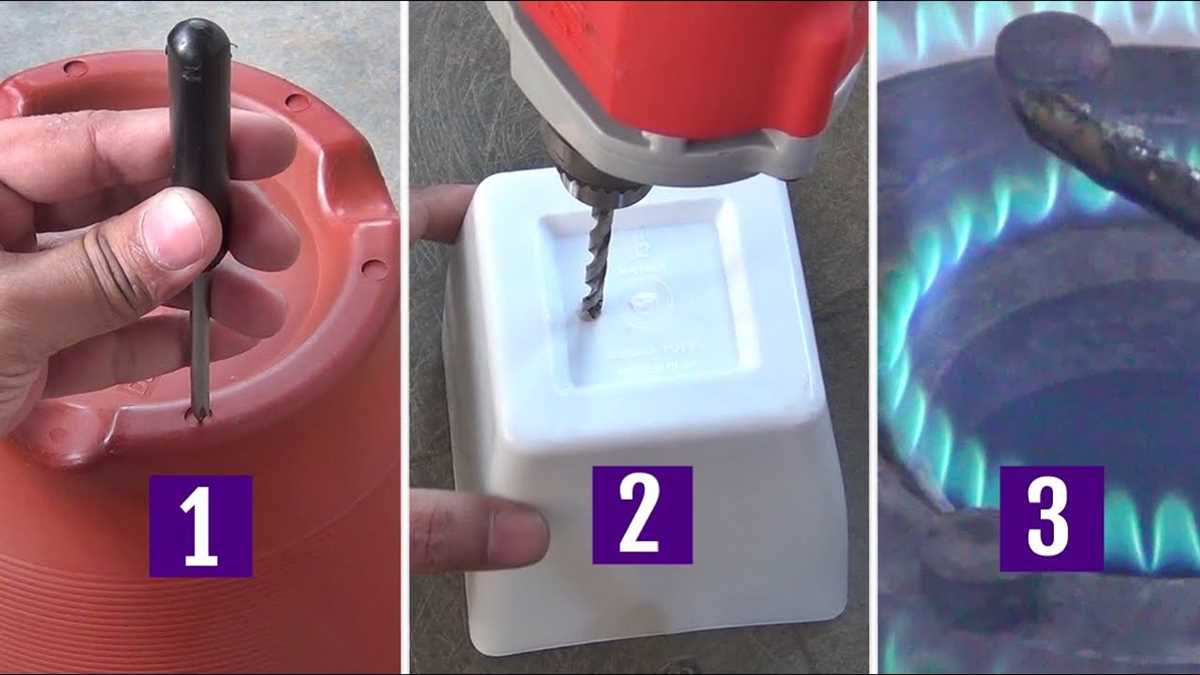
As you start drilling holes in your plastic bin, the drill bit may heat up due to friction. This heat can cause the plastic to melt or warp, making it difficult to drill accurately. To prevent this from happening, it is important to cool the drill bit periodically.
There are several methods you can use to cool the drill bit:
- Water: Keep a container of water nearby and dip the drill bit into it every few seconds. This will help to dissipate heat and keep the bit cool.
- Cooling lubricant: Apply a small amount of cooling lubricant directly onto the drill bit. This will help reduce friction and keep the bit cool.
- Air: Use a compressed air canister or an air hose to blow cool air onto the drill bit as you’re drilling. This will help to cool down the bit and prevent overheating.
Regardless of the cooling method you choose, it’s important to take regular breaks and allow the drill bit to cool down completely before continuing. This will help ensure that the plastic bin remains intact and that you achieve clean, accurate holes.
Clean Up the Plastic Bin
Before drilling holes in a plastic bin, it is important to clean it thoroughly to remove any dirt, debris, or leftover substances that may interfere with the drilling process. Follow these steps to clean your plastic bin:
1. Empty the bin
Make sure the plastic bin is completely empty before starting the cleaning process. Remove any items or substances inside the bin and place them in a safe and clean location.
2. Prepare a cleaning solution
Create a cleaning solution by mixing warm water with mild dish soap or a plastic-safe household cleaner. Avoid using harsh chemicals or abrasive cleaners that can damage the plastic material of the bin.
3. Wash the plastic bin
Dampen a soft sponge or cloth with the cleaning solution and gently scrub the inside and outside surfaces of the plastic bin. Pay special attention to any stained or dirty areas, making sure to remove any grime or residue.
4. Rinse the bin
Once you have thoroughly cleaned the plastic bin, rinse it with clean water to remove any soap or cleaning solution. Ensure that all soap residue is properly rinsed off to prevent any potential contamination.
5. Dry the bin
After rinsing, allow the plastic bin to air dry completely. You may also use a soft, clean cloth to wipe away any remaining moisture.
6. Inspect the bin
Before proceeding with drilling holes, inspect the plastic bin to ensure that it is completely clean and free from any debris. Check for any signs of damage or weak spots that may affect the drilling process.
By following these steps, you can effectively clean your plastic bin and prepare it for drilling holes without any interference or contamination.
FAQ:
What tools do I need to drill holes in a plastic bin?
To drill holes in a plastic bin, you will need a power drill, a drill bit suitable for plastic, a marker or pencil, and a ruler or measuring tape.
What should I consider when choosing a drill bit for drilling holes in a plastic bin?
When choosing a drill bit for drilling holes in a plastic bin, it is important to consider the size of the holes you need and the type of plastic the bin is made of. It is recommended to use a drill bit specifically designed for plastic to avoid cracking or damaging the bin.
How do I mark the spots for the holes on the plastic bin?
To mark the spots for the holes on the plastic bin, you can use a marker or a pencil. Measure the desired distance from the edge of the bin using a ruler or measuring tape, then make a dot or a small line with the marker or pencil. Repeat this process for each spot where you want to drill a hole.
What precautions should I take while drilling holes in a plastic bin?
While drilling holes in a plastic bin, it is important to wear safety goggles to protect your eyes from any flying debris. Additionally, it is recommended to place a piece of scrap wood or a cutting board underneath the bin to prevent the drill bit from damaging the surface you are working on.
How do I drill the holes in a plastic bin?
To drill the holes in a plastic bin, start by securely clamping the bin to a workbench or table to prevent it from moving. Select the appropriate drill bit for the size of the holes you need and attach it to the power drill. Position the drill bit on one of the marked spots, apply gentle pressure, and start drilling at a slow speed. Continue drilling until the hole is complete, then repeat the process for each marked spot.
What can I do if I accidentally crack the plastic bin while drilling holes?
If you accidentally crack the plastic bin while drilling holes, you can try repairing it with plastic glue or adhesive. Apply a small amount of the glue to the cracked area and hold it together for a few minutes to allow the adhesive to bond. Alternatively, you may need to replace the bin if the crack is too severe.
Video:


Meet Harrison Clayton, a distinguished author and home remodeling enthusiast whose expertise in the realm of renovation is second to none. With a passion for transforming houses into inviting homes, Harrison's writing at https://thehuts-eastbourne.co.uk/ brings a breath of fresh inspiration to the world of home improvement. Whether you're looking to revamp a small corner of your abode or embark on a complete home transformation, Harrison's articles provide the essential expertise and creative flair to turn your visions into reality. So, dive into the captivating world of home remodeling with Harrison Clayton and unlock the full potential of your living space with every word he writes.


