Step-by-Step Guide: How to Drill a Hole for a Door Strike Plate

Are you looking to install a new door strike plate, but not sure how to drill the hole for it? Don’t worry, we’ve got you covered! In this step-by-step guide, we’ll walk you through the process of drilling a hole for a door strike plate, so you can ensure a secure and proper installation.
Before you begin, make sure you have all the necessary tools and materials. You’ll need a power drill, a drill bit suitable for your door’s material, a tape measure, a pencil, and the door strike plate itself. Additionally, it’s a good idea to have safety glasses and gloves to protect yourself during the drilling process.
Start by measuring the exact location where the door strike plate will be installed. Place the strike plate on the door jamb, lining it up with the latch bolt on the door. Use a pencil to mark the outline of the strike plate on the door jamb. This will serve as your drilling guide.
Next, attach the appropriate drill bit to your power drill. The size of the drill bit will depend on the size of the strike plate’s hole. If you’re not sure, it’s best to start with a smaller bit and enlarge the hole if necessary. Make sure the drill bit is securely attached to the drill before proceeding.
Gather the Necessary Tools

- Power drill: You will need a power drill to drill the hole for the door strike plate. Make sure it is fully charged or have a power source nearby.
- Drill bits: Different sized drill bits are required depending on the size of the strike plate screws. It’s advisable to have a few different sizes on hand.
- Measuring tape: To ensure accuracy, a measuring tape is necessary to measure the correct distance and location for the strike plate.
- Marker or pencil: You’ll need a marker or pencil to mark the spot where you will drill the hole for the strike plate.
- Masking tape: It’s helpful to have some masking tape to prevent the drill bit from slipping while drilling.
- Safety goggles: Safety goggles are important to protect your eyes from any debris that may fly off while drilling.
- Dust mask: Wearing a dust mask is always a good idea when drilling to avoid inhaling any potential dust or particles.
- Vacuum or brush: After drilling, you’ll need a vacuum or brush to clean up any debris that may have been created.
Measure and Mark the Location
Before you start drilling, you need to measure and mark the location for the door strike plate. The strike plate is the metal plate that is attached to the door frame and the latch from the door lock goes into it when the door is closed.
Here’s how to measure and mark the location:
- Measure the height: Use a tape measure to find the height of the latch on the door. Typically, it’s around 34-36 inches from the floor. Mark this height on the door frame with a pencil or marker.
- Measure the width: Measure the width of the latch as well. It’s usually around 1 inch. From the edge of the door frame, measure in this distance and mark it on the frame.
- Align the strike plate: Place the strike plate against the door frame, aligning it with the marks you made for the height and width. Make sure it is centered and level. Use a pencil or marker to trace around the edges of the strike plate.
After marking the location, you are ready to start drilling the hole for the door strike plate. But before that, make sure you have all the necessary tools and equipment for the job.
Choose the Right Drill Bit
Before you start drilling the hole for the door strike plate, it’s important to choose the right drill bit. The drill bit you use will depend on the material of the door frame and the type of strike plate you have. Here are a few tips to help you choose the right drill bit:
- Wood Door Frame: If you have a wooden door frame, you can use a standard twist drill bit. These bits are designed for drilling into wood and will work well for most wooden door frames.
- Metal Door Frame: If you have a metal door frame, you’ll need a drill bit specifically designed for drilling into metal. Look for a high-speed steel (HSS) or cobalt drill bit, as these are the most suitable for drilling into metal.
- Composite Door Frame: If you have a composite door frame, you can use a standard twist drill bit or a spade bit. However, be careful when drilling, as composite materials can be more brittle than wood or metal.
It’s important to choose a drill bit that is the right size for your strike plate screws. Most strike plates use screws that are either #8 or #10 in size. Make sure the drill bit you choose is the right diameter for these screws.

Once you have chosen the right drill bit, make sure it is securely attached to your drill and you are ready to start drilling the hole for the door strike plate.
Secure the Door and Drill Guide
Before beginning the drilling process, it’s important to secure the door in place to ensure stability while working. You can use a door stopper or have someone hold the door steady for you.
Next, create a drill guide to help you accurately position the hole for the door strike plate. This can be done by taking a piece of cardboard or scrap wood and marking the location of the strike plate on it. Use a measuring tape or ruler to ensure that the placement is precise.
After marking the location, use a utility knife to cut out a small hole in the drill guide that matches the diameter of the drill bit you will be using. This hole will serve as a guide for the drill bit and help keep it steady when drilling.
Note: The size of the hole in the drill guide should match the diameter of the drill bit you are using for the hole.

Once the drill guide is ready, position it on the door at the marked location for the strike plate. Make sure it is securely held in place and aligned properly.
Using clamps or tape can help keep the drill guide in place while drilling.
Pro Tip: If you’re working on a metal door, you can use a center punch to create a small indentation on the marked spot before drilling. This helps prevent the drill bit from slipping and provides a more accurate hole.
Drill a Pilot Hole
Before drilling the final hole for the door strike plate, it is important to create a pilot hole. The pilot hole will act as a guide for the drill bit and help prevent any splintering or damage to the door or surrounding area.
Step 1: Choose the Correct Drill Bit

Start by selecting the appropriate drill bit size for the pilot hole. The size of the drill bit will depend on the size of the screws that will be used for the door strike plate.
Step 2: Mark the Spot
Using a pencil or a marker, mark the center spot where you want the door strike plate to be installed. This will serve as a guide for drilling the pilot hole.
Step 3: Secure the Door
Before drilling, make sure to secure the door in place. Place a shim or a wedging tool underneath the door to prevent it from moving or wobbling during the drilling process.
Step 4: Drill the Pilot Hole
- Insert the selected drill bit into the drill chuck and tighten it securely.
- Position the drill bit tip on the marked spot.
- Apply gentle and steady pressure as you start drilling the pilot hole.
- Be sure to keep the drill bit perpendicular to the surface of the door to ensure a straight hole.
- Drill slowly and steadily until the drill bit penetrates the door material.
Step 5: Test Fit the Screw
After drilling the pilot hole, test fit one of the screws that will be used for the door strike plate. The screw should fit snugly into the pilot hole without any excessive force or wobbling.
Step 6: Adjust the Pilot Hole if Necessary
If the screw does not fit properly or feels loose, it may be necessary to adjust the pilot hole. Choose a slightly larger drill bit and carefully enlarge the hole to ensure a proper fit for the screw.

It is important to drill a pilot hole before drilling the final hole for the door strike plate. This will help ensure a clean and precise installation and prevent any damage to the door or surrounding area.
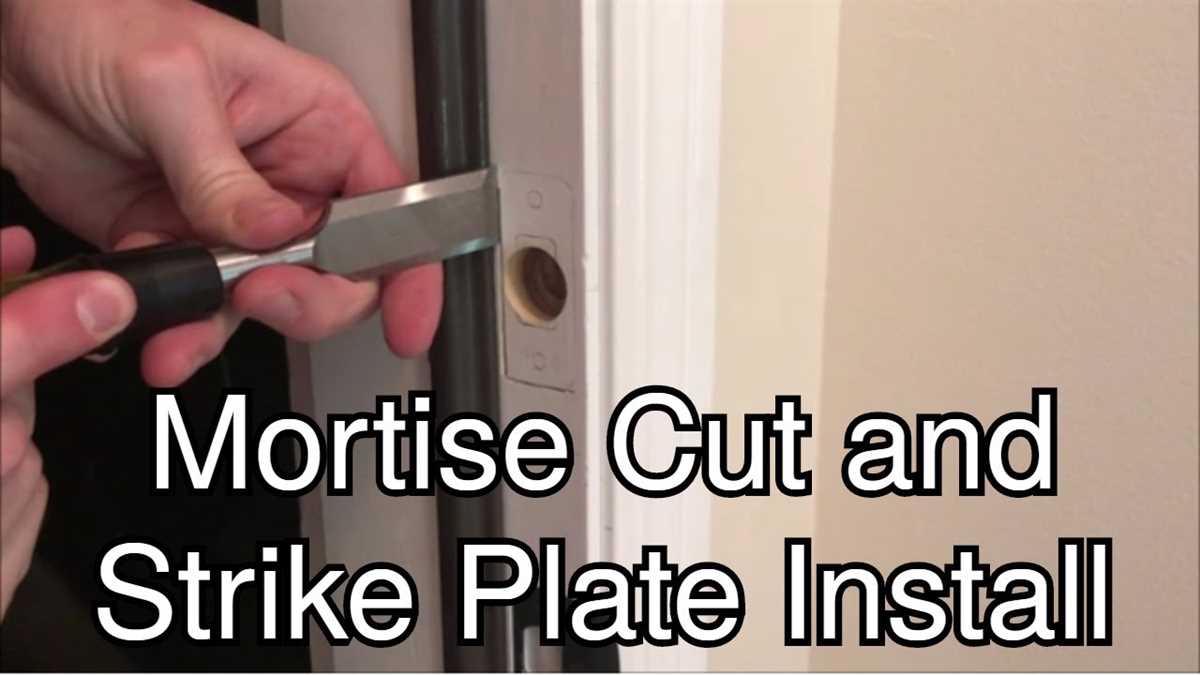
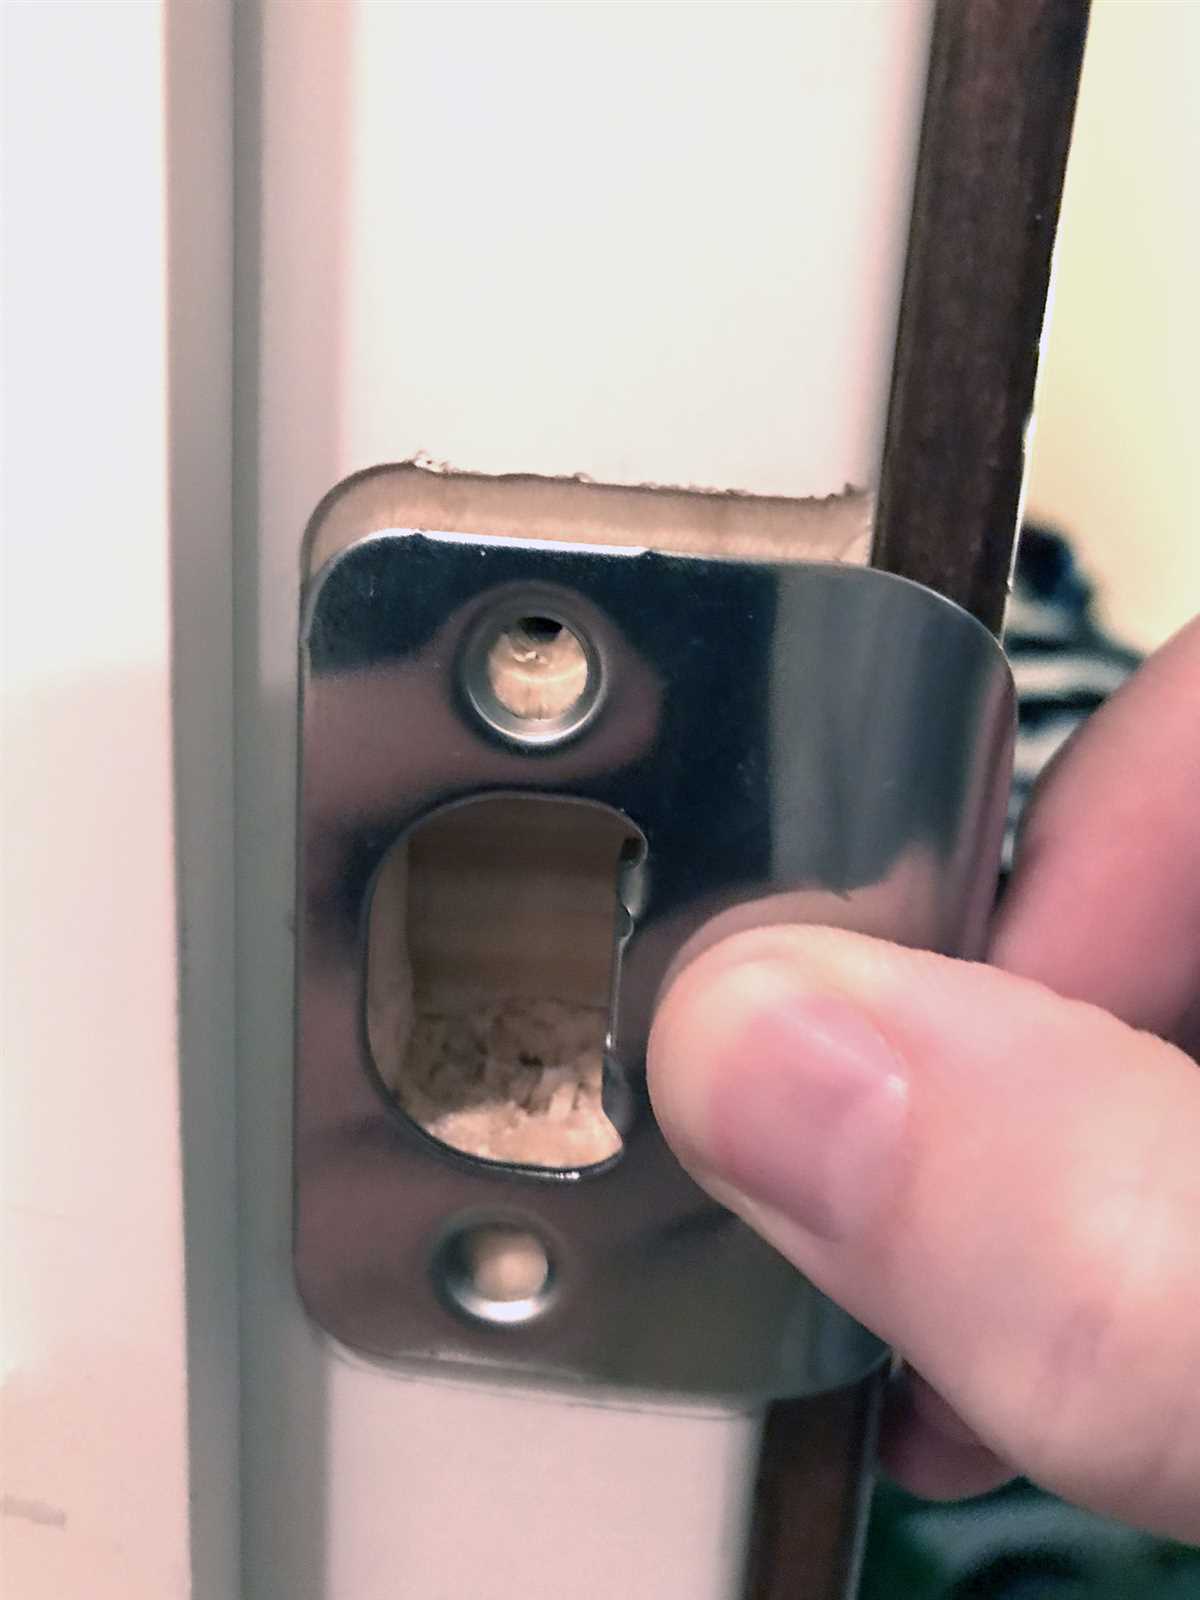
Drill the Strike Plate Hole
After you have marked the location of the strike plate on the door jamb, it’s time to drill the hole for the strike plate. Follow these steps:
- Choose the appropriate size drill bit. The size will depend on the specific strike plate you are using. Refer to the manufacturer’s instructions for the recommended drill bit size.
- Attach the drill bit to your drill. Make sure it is securely in place.
- Place the tip of the drill bit on the marked spot on the door jamb.
- Hold the drill steady and apply gentle pressure. Start the drill and begin drilling the hole. Use a slow and steady motion.
- Drill the hole to the recommended depth. Again, refer to the manufacturer’s instructions for the specific strike plate you are using.
- Periodically pull the drill out to clear away any wood chips or debris from the hole.
- Continue drilling until you have reached the recommended depth for the strike plate hole.
Note: Be careful not to drill all the way through the door jamb. The hole should only be deep enough to accommodate the strike plate.
Once you have drilled the strike plate hole, you can proceed to the next step in the installation process.
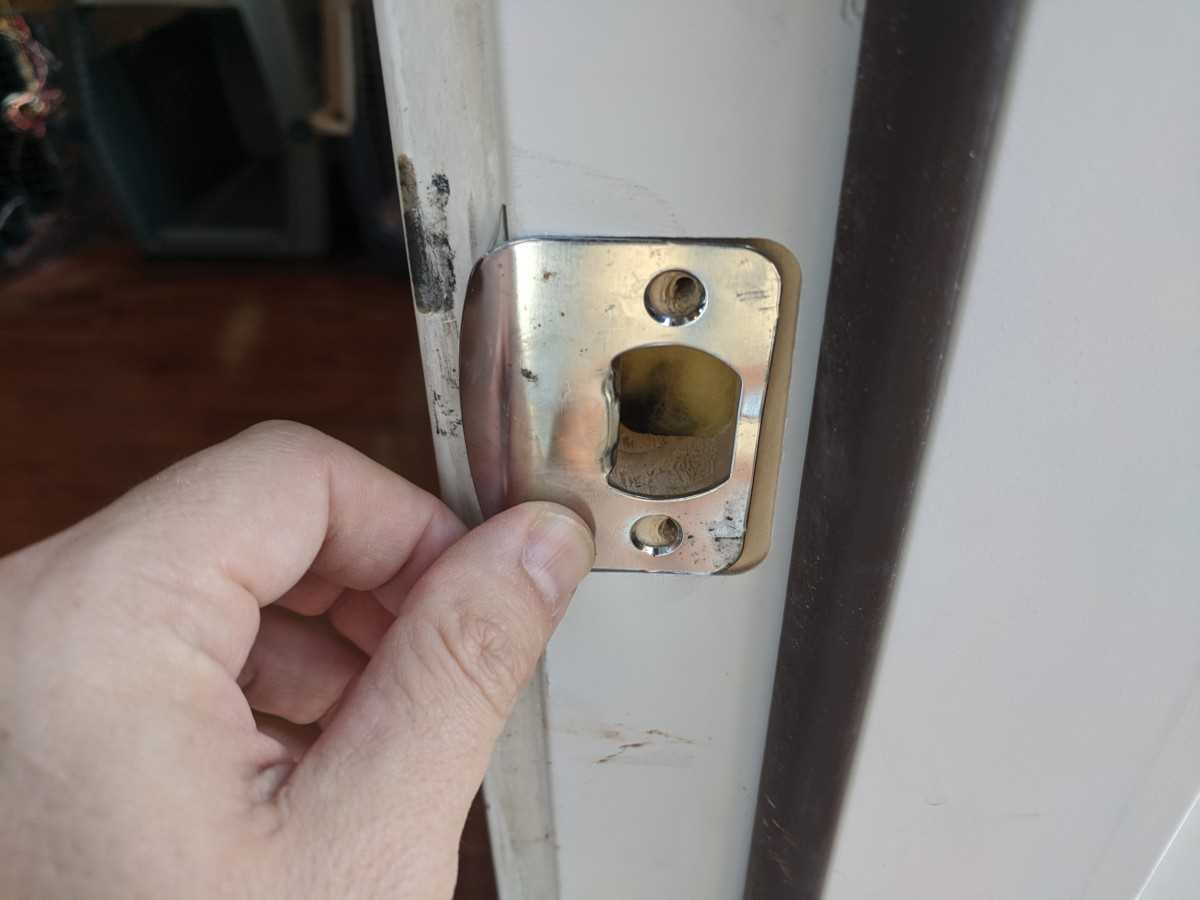
Test the Fit of the Door Strike Plate
Step 1: Place the strike plate on the door frame
Once you have drilled the hole for the strike plate, take the strike plate and place it on the door frame in the desired position. Line up the screw holes on the strike plate with the holes you drilled in the previous step.
Step 2: Check the alignment
Ensure that the strike plate is aligned properly with the latch on the door. The latch should be able to pass smoothly through the hole in the strike plate without any resistance or obstruction. If the latch does not align properly with the strike plate, you may need to reposition the strike plate or adjust the latch.
Step 3: Test the door latch
Close the door and test the door latch to ensure that it engages with the strike plate properly. The latch should fit securely into the hole in the strike plate and should not wiggle or move around. If the latch does not fit properly, you may need to make adjustments to the strike plate or latch.
Step 4: Check for any sticking or resistance
Open and close the door several times to check for any sticking or resistance when the latch engages with the strike plate. The latch should move smoothly and easily without any resistance or binding. If you notice any sticking or resistance, you may need to adjust the strike plate or latch to ensure proper alignment.
Step 5: Make any necessary adjustments
If the strike plate does not fit properly or if there are any issues with the door latch, make any necessary adjustments. This may include repositioning the strike plate, adjusting the latch, or drilling new holes for the strike plate screws.
Note: It is important to ensure that the strike plate fits properly and the door latch engages smoothly. A poorly fitting strike plate can compromise the security of your door and may cause difficulties in opening and closing the door.
Finish and Secure the Door Strike Plate
After drilling the hole for the door strike plate, you will need to finish the installation and secure the plate properly. Follow these steps to complete the process:
- Clean the area: Before securing the strike plate, make sure to clean the surrounding area on the door jamb. Remove any debris or wood shavings that may have accumulated during the drilling process.
- Align the strike plate: Place the strike plate against the door jamb, aligning it with the hole you drilled. Make sure it is centered and level before proceeding.
- Mark screw hole locations: Use a pencil or marker to mark the locations of the screw holes on the door jamb. These will indicate where you need to drill pilot holes for the screws.
- Drill pilot holes: Using a drill bit slightly smaller than the diameter of the screws, drill pilot holes into the door jamb at the marked locations. This will prevent the wood from splitting when you drive in the screws.
- Secure the strike plate: Place the strike plate back onto the door jamb, aligning it with the pilot holes. Insert the screws into the pilot holes and hand-tighten them. Once all the screws are partially threaded, use a screwdriver or drill to fully tighten them.
- Test the latch: Close the door and test the latch. If it does not catch smoothly, you may need to adjust the strike plate slightly. Loosen the screws and reposition the strike plate as needed, then tighten the screws again.
- Final check: Once the latch catches smoothly and securely, check that the door closes and locks properly. Make any necessary adjustments to the strike plate or latch if needed.
Finishing and securing the door strike plate is an important step in ensuring the proper functioning and security of your door. By following these steps, you can complete the installation successfully.
FAQ:
What is a door strike plate?
A door strike plate is a metal plate that is installed on the door jamb. It provides a secure resting place for the latch or bolt of a lock when the door is closed.
Why do I need a door strike plate?
A door strike plate is important for security reasons. It helps to reinforce the door frame and prevents the door from being kicked or forced open.
What tools do I need to drill a hole for a door strike plate?
You will need a drill, drill bits, a chisel, a hammer, a screwdriver, and a tape measure.
Can I install a door strike plate if I don’t have any drilling experience?
Yes, you can still install a door strike plate even if you don’t have any drilling experience. Just follow the step-by-step guide and take your time to ensure accuracy.
How do I determine the size of the hole for the door strike plate?
The size of the hole for the door strike plate depends on the size of the latch or bolt. Measure the width and depth of the latch or bolt, and use a drill bit that matches these measurements.
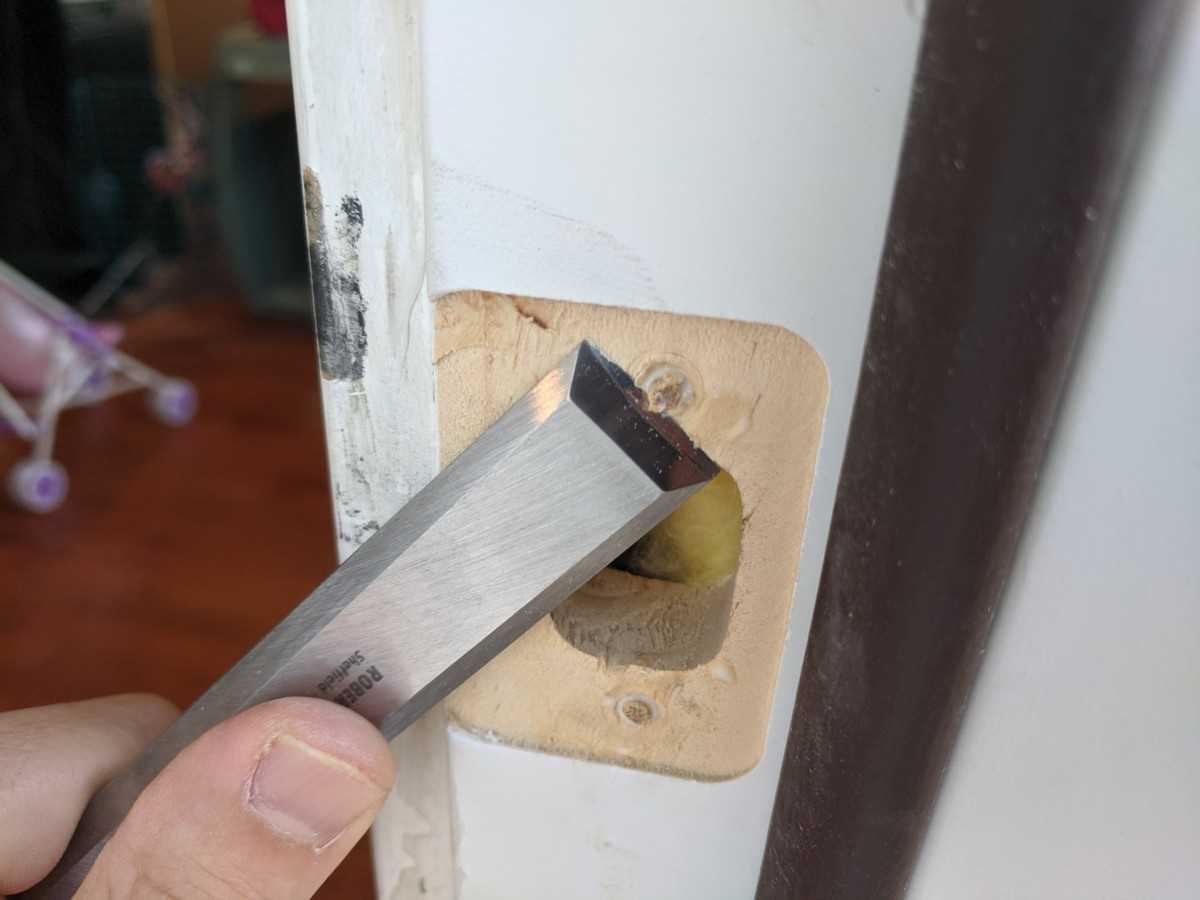
What should I do if the hole for the door strike plate is too shallow?
If the hole for the door strike plate is too shallow, you can use a chisel and a hammer to carefully deepen the hole. Take your time and ensure that the hole is the correct depth for the strike plate.
Video:


Harrison Clayton
Meet Harrison Clayton, a distinguished author and home remodeling enthusiast whose expertise in the realm of renovation is second to none. With a passion for transforming houses into inviting homes, Harrison's writing at https://thehuts-eastbourne.co.uk/ brings a breath of fresh inspiration to the world of home improvement. Whether you're looking to revamp a small corner of your abode or embark on a complete home transformation, Harrison's articles provide the essential expertise and creative flair to turn your visions into reality. So, dive into the captivating world of home remodeling with Harrison Clayton and unlock the full potential of your living space with every word he writes.


