How to Start a Generator Using a Drill: Step-by-Step Guide

Generators are an essential tool for providing power when you need it most, whether you’re out camping or experiencing a power outage. But what do you do if your generator won’t start? One solution is to use a drill to manually start the generator.
Using a drill to start a generator may sound unconventional, but it can be a lifesaver in certain situations. If you find yourself without electricity and with a dead generator battery or a faulty starter, a drill can provide the power necessary to start the generator.
Before you start, it’s important to note that not all generators can be started with a drill. This method is typically only used for generators with a pull-start or recoil-start mechanism. Additionally, using a drill to start a generator should only be done as a temporary solution until the generator can be properly repaired.
In this step-by-step guide, we will walk you through the process of starting a generator using a drill. From gathering the necessary tools and materials to safely connecting the drill to the generator, we will cover everything you need to know to get your generator up and running in no time.
So, if you’re in a pinch and need to start your generator without a working battery or starter, grab your drill and let’s get started!

Preparation for Starting the Generator
Before you start your generator with a drill, there are a few important steps you need to take to ensure a safe and successful start. This preparation process will help prevent any damage to the generator or potential injuries to yourself.
1. Safety First
Prioritize your safety by wearing personal protective equipment (PPE) such as safety glasses and gloves. Make sure you are wearing appropriate clothing and footwear to protect yourself from any potential hazards.
2. Read the Manual

Refer to the generator’s manual for specific instructions and safety guidelines. Every generator model may have unique requirements and starting procedures, so it’s essential to have a thorough understanding of the specific generator you are using.

3. Check Fuel Level
Ensure that your generator has enough fuel to operate. Check the fuel gauge or open the fuel tank to visually inspect the level. If the fuel is low, refill it with the appropriate type of fuel specified in the manual.
4. Check Oil Level
Inspect the generator’s oil level using the dipstick or oil sight glass. If the oil level is low, add the recommended oil type as specified in the manual. It’s crucial to maintain the proper oil level to prevent engine damage.
5. Turn Off All Electrical Loads
Before starting the generator, make sure all electrical loads connected to it are turned off. This will prevent any potential damage to the generator or the connected devices when the generator starts up.
6. Disconnect the Battery
If your generator has a battery, disconnect it to prevent accidental activation or electrical shock. Refer to the manual for proper instructions on how to disconnect the battery safely.
7. Set the Generator Switches
Depending on your generator, you may need to set certain switches or controls to the correct position. Some generators have a fuel valve switch, choke control, or engine switch that must be set appropriately before starting. Consult the manual for the recommended settings.
Checking the Fuel Level
Before starting a generator, it is important to check the fuel level to ensure that it has enough fuel to operate. Here are the steps to check the fuel level:
- Locate the fuel tank on the generator. It is typically located on the side or back of the generator.
- Remove the fuel cap by twisting it counterclockwise.
- Take a look inside the fuel tank to gauge the fuel level. Some generators have a clear fuel tank, making it easy to see the fuel level at a glance. If the fuel tank is not clear, you may need to use a flashlight to get a better view.
- If the fuel level is low, it’s time to fill up the tank. Use a fuel container or a funnel to pour gasoline or diesel fuel into the tank. Be careful not to spill any fuel and wipe up any spills immediately.
- Once the tank is filled with the appropriate fuel, securely screw the fuel cap back onto the tank by twisting it clockwise.
It is always a good idea to keep a spare fuel container nearby so that you can easily refill the generator when needed. Make sure to use the appropriate type of fuel recommended by the generator manufacturer, such as gasoline or diesel.
Checking the fuel level before starting the generator ensures that it has enough fuel to run smoothly and prevents any unexpected shutdowns due to fuel shortage.
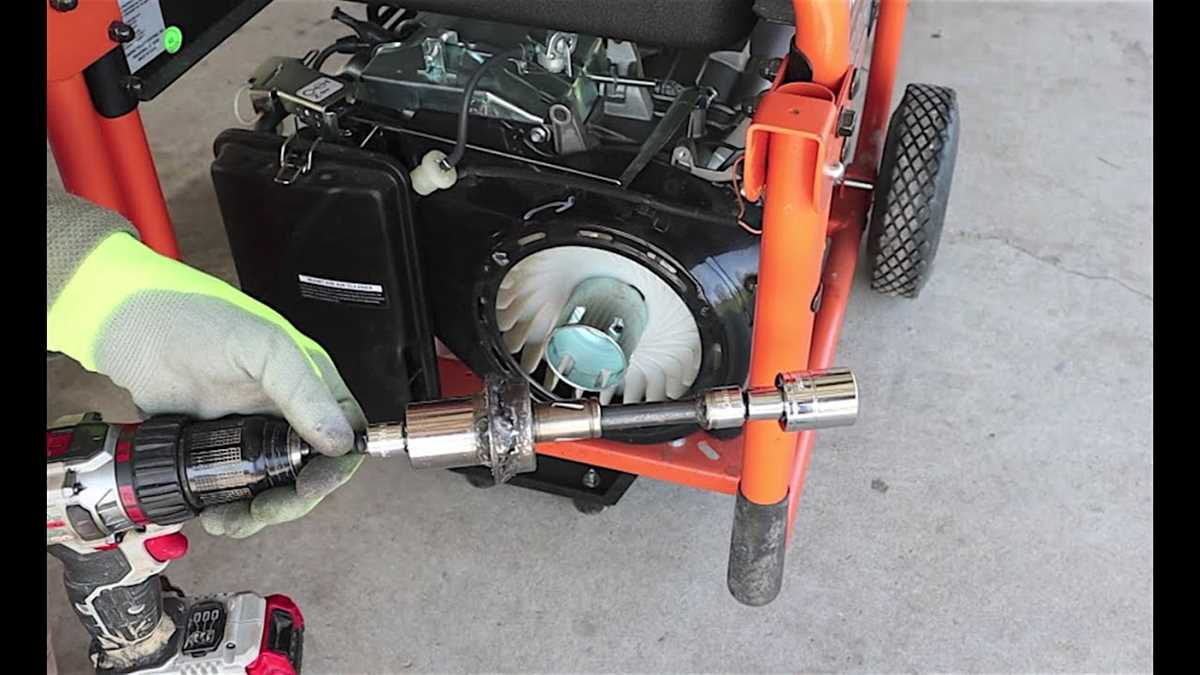
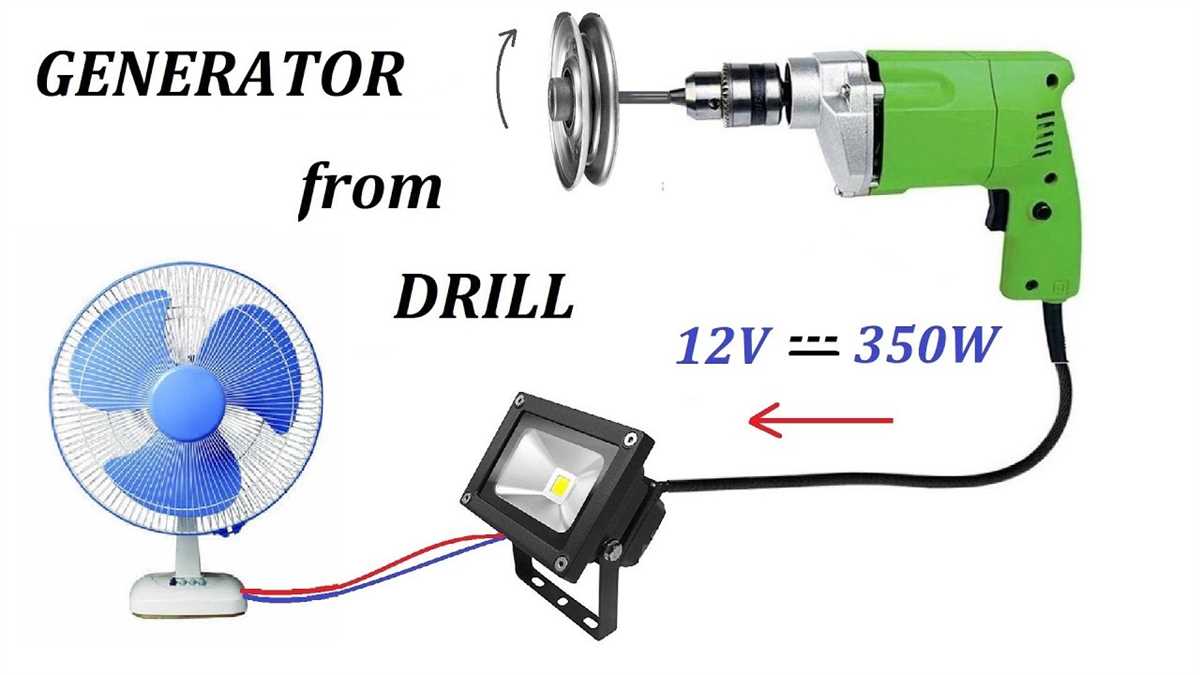
Connecting the Drill to the Generator

Before connecting the drill to the generator, make sure the generator is turned off and that both the generator and the drill are in a well-ventilated area. Safety should always be the top priority when working with electrical equipment.
Step 1: Gather the necessary materials
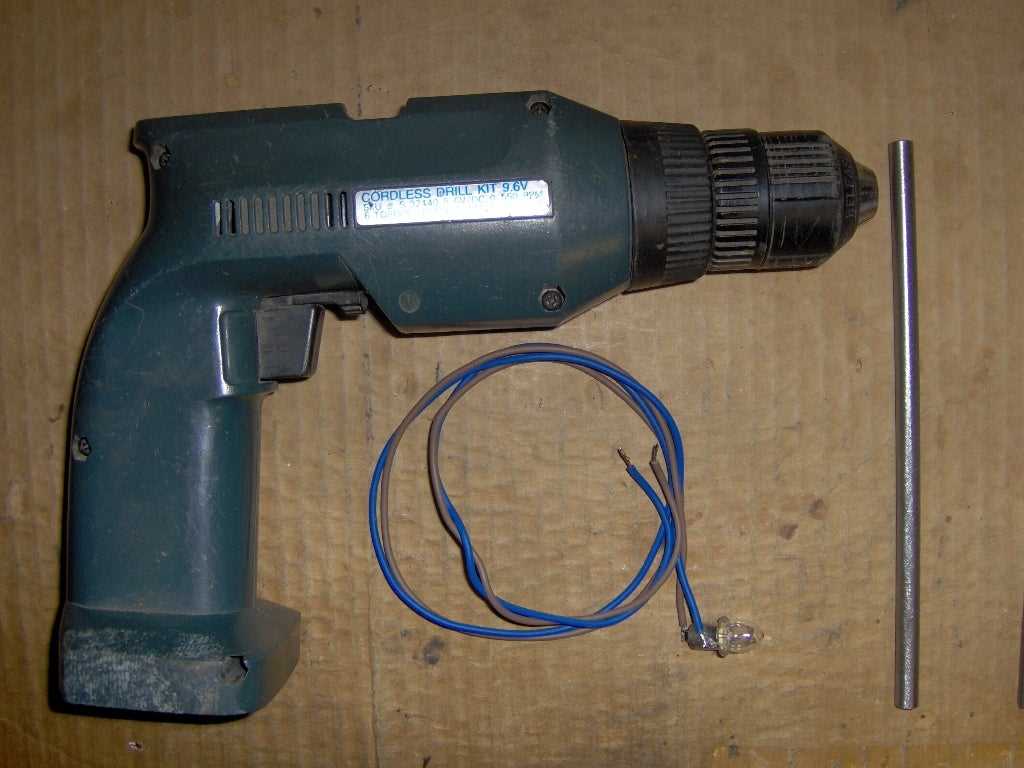
To connect the drill to the generator, you will need the following materials:
- A drill with a chuck that can accommodate the size of the generator’s shaft
- A magnetic socket or a drill adapter
- Safety gloves
Step 2: Put on safety gloves
Before handling any equipment, it is important to put on a pair of safety gloves to protect your hands from any potential harm or injuries.
Step 3: Attach the magnetic socket or drill adapter
- If using a magnetic socket, place it onto the drill bit and ensure a secure fit.
- If using a drill adapter, insert the drill bit into the adapter and tighten the chuck to secure the connection.
Step 4: Align the drill with the generator’s shaft

Hold the drill with the magnetic socket or drill adapter attached and align it with the generator’s shaft. Ensure that the drill bit is centered and straight to avoid any wobbling or misalignment.
Step 5: Connect the drill to the generator
Insert the drill bit into the generator’s shaft and apply slight pressure to ensure it is securely connected. Avoid applying excessive force that could damage the drill, generator, or both.
Step 6: Verify the connection

Check the connection between the drill and the generator to make sure it is secure. Give the drill a slight turn to ensure there is no slippage or detachment.
Now that the drill is properly connected to the generator, you are ready to start the generator using the drill as a power source. Follow the next steps in the guide to learn how to start the generator.
Setting Up the Drill’s Speed and Direction
Before starting the generator using a drill, it is important to set up the drill’s speed and direction correctly. Here are the steps to follow:
- Check the drill’s speed settings:
- Set the direction:
- Adjust the drill’s rotation direction:
- Secure the drill chuck:
Make sure the drill is set to a low or medium speed setting. High speed settings can cause unnecessary wear and tear on the generator’s components.
Determine the direction in which the drill needs to spin to start the generator. This can usually be found in the generator’s manual or by looking for an arrow on the generator indicating the correct direction.
If the drill’s rotation direction is opposite to the generator’s required direction, you will need to adjust it. Most drills have a switch near the trigger that allows you to change the rotation direction. Flip the switch to the appropriate direction.
Tighten the drill chuck securely around the shaft of the generator. This will ensure that the drill is firmly connected to the generator and can transfer the necessary torque to start it.
By properly setting up the drill’s speed and direction, you can effectively start the generator using the drill and provide power in emergency situations.
Starting the Generator Engine
Before Starting the Generator
Before starting the generator engine using a drill, it’s important to ensure that you have taken the necessary safety precautions and have the required tools and equipment. Here are a few steps to follow:
- Read the generator manual: Familiarize yourself with the instructions provided in the generator’s manual. This will help you understand the specific steps to follow for starting the engine.
- Inspect the generator: Check the generator for any visible damage or loose parts. Make sure all connections are secure and that there are no fuel or oil leaks.
- Check the fuel level: Ensure that there is enough fuel in the generator’s fuel tank. If not, fill it up with the recommended type of fuel.
- Check the oil level: Verify that the oil level in the engine is adequate. If needed, add oil as per the manufacturer’s instructions.
- Disconnect electrical loads: Before starting the generator, disconnect all electrical loads that are connected to it to prevent any potential electrical hazards.
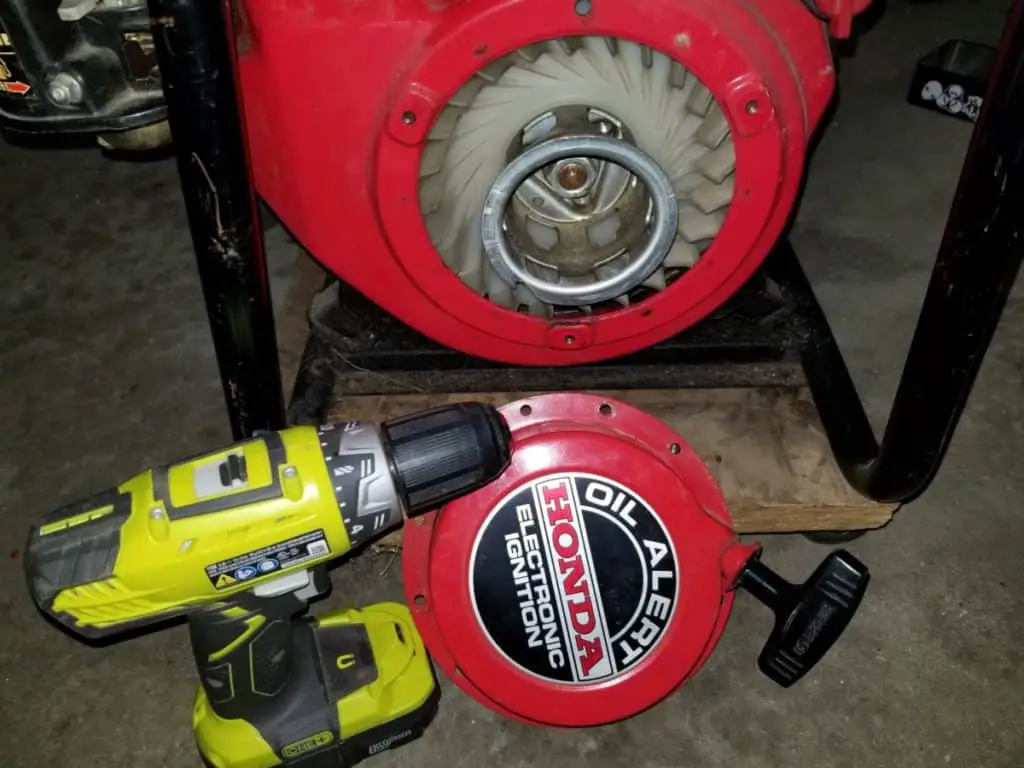
Starting the Generator Engine with a Drill
Once you have completed the necessary preparations, you can proceed with starting the generator engine using a drill. Follow these steps:
- Insert the generator’s key: Insert the generator’s key into the ignition switch and turn it to the “On” position. This will activate the generator’s electrical system.
- Set the choke: Locate the choke lever or knob on the generator. Move it to the “Choke” or “Cold Start” position. This will help prime the engine and make it easier to start.
- Attach the drill: Attach the drill to the generator’s starter system. Depending on the generator model, you may need to attach the drill to the starter handle or a special drill bit designed for starting generators.
- Start the drill: Start the drill in the clockwise direction. This will rotate the generator’s crankshaft, simulating the action of pulling the starter cord manually.
- Monitor the generator engine: As you start the drill, monitor the generator engine for signs of starting. Once the engine fires up, release the choke and keep the drill running for a few seconds to stabilize the engine.
- Disconnect the drill: Disconnect the drill from the generator’s starter system and make sure the generator is running smoothly.
Remember to always follow the manufacturer’s instructions and take all necessary safety precautions when starting the generator engine. If you encounter any issues or difficulties, consult a professional or contact the generator’s manufacturer for assistance.
Monitoring the Generator’s Operation
Once the generator is started using a drill, it is essential to monitor its operation to ensure it is working properly and to address any issues that may arise. Here are some steps to help you efficiently monitor your generator:
- Check the fuel level: Make sure that the generator has enough fuel to run for the desired duration. If the fuel is running low, refuel the generator as needed.
- Monitor the engine temperature: Keep an eye on the generator’s engine temperature gauge. If the temperature exceeds safe operating levels, take the necessary steps to cool down the generator or stop it if necessary.
- Listen for unusual noises: Pay attention to any abnormal sounds coming from the generator. Strange noises can be an indication of mechanical issues that need to be addressed promptly.
- Observe the voltage output: Use a multimeter to measure the voltage output of the generator. Ensure that it is within the recommended range for the appliances and equipment you plan to power.
- Inspect the exhaust system: Regularly check the exhaust system for any signs of damage or blockages. A blocked exhaust can be hazardous and reduce the efficiency of the generator.
- Keep an eye on the oil level: Check the oil level regularly and add more if necessary. Running the generator with low oil can cause severe damage to the engine.
- Monitor the electrical connections: Inspect the electrical connections to ensure that they are secure and free from any corrosion or loose wires. Loose connections can lead to power loss or electrical accidents.
- Check for leaks: Look for any signs of fuel or oil leaks around the generator. Leaks should be addressed immediately to prevent accidents and maintain the proper operation of the generator.
- Keep a maintenance log: Record all maintenance and monitoring activities in a logbook. This logbook will help you keep track of any issues, schedule regular maintenance, and identify any patterns or recurring problems.
By following these monitoring steps, you can ensure that your generator is running safely and efficiently. Regular monitoring and maintenance will help prolong the lifespan of the generator and prevent unexpected breakdowns.
Stopping the Generator Engine
Once you have successfully started the generator using a drill, it’s important to know how to safely stop it when you no longer need power. Follow these steps to stop the generator engine:
- Turn off all connected devices: Before stopping the generator, make sure to turn off and disconnect all devices that are connected to it. This will prevent any damage to the devices and ensure a safe shutdown.
- Disconnect the power cord: Unplug the power cord from the generator to disconnect it from the power source. This will completely stop the flow of electricity to the generator.
- Switch off the generator: Locate the generator’s control panel and find the “off” switch or button. Flip the switch or press the button to shut off the generator. This will stop the engine from running.
- Allow the generator to cool down: After stopping the engine, let the generator cool down for a few minutes. This will prevent any overheating and ensure safe handling.
- Store the generator: Once the generator has cooled down, you can safely store it in a suitable location. Make sure to follow the manufacturer’s instructions for proper storage.
Remember, when stopping the generator engine, always prioritize safety. Follow these steps carefully to ensure a smooth and safe shutdown of your generator.
Disconnecting the Drill from the Generator
Once you have successfully started the generator using the drill, it is important to disconnect the drill properly to ensure safety and avoid any damage to the generator.
Follow these steps to disconnect the drill from the generator:
- Power off the generator by turning the switch to the “Off” position.
- Unplug the drill from the generator’s power outlet. Make sure to grip the plug firmly and pull straight out to avoid any damage.
- Set the drill aside in a safe place, away from any potential hazards.
- Inspect the generator to ensure there are no loose wires or connections.
- If the generator has been running for a while, allow it to cool down before storing it or performing any maintenance tasks.
By following these steps, you can safely disconnect the drill from the generator and ensure that it is ready for future use.
FAQ:
What do I need to start a generator using a drill?
To start a generator using a drill, you will need a drill with a compatible size and power rating for the generator. You will also need a cordless drill battery or a generator battery as a power source for the drill. Additionally, make sure you have safety gear such as gloves and eye protection.
Can I use any drill to start a generator?
No, you cannot use any drill to start a generator. You need to make sure that the drill is compatible in size and power rating with the generator. Always check the manufacturer’s guidelines or user manual for the generator to determine the appropriate drill to use.
Is it safe to start a generator using a drill?
Yes, it is safe to start a generator using a drill if you follow proper safety precautions. Make sure you have the appropriate safety gear such as gloves and eye protection. Additionally, ensure that the drill is compatible with the generator in terms of size and power rating. Always refer to the manufacturer’s guidelines or user manual for proper instructions on starting the generator with a drill.
Video:


Meet Harrison Clayton, a distinguished author and home remodeling enthusiast whose expertise in the realm of renovation is second to none. With a passion for transforming houses into inviting homes, Harrison's writing at https://thehuts-eastbourne.co.uk/ brings a breath of fresh inspiration to the world of home improvement. Whether you're looking to revamp a small corner of your abode or embark on a complete home transformation, Harrison's articles provide the essential expertise and creative flair to turn your visions into reality. So, dive into the captivating world of home remodeling with Harrison Clayton and unlock the full potential of your living space with every word he writes.


