How to Safely Drill Holes in Pearls: Essential Tips and Techniques

Drilling holes in pearls can be a delicate and challenging task, as these precious gems require special care and attention. Whether you are a jewelry maker or simply want to customize your own pearl necklace, it is crucial to follow the right techniques to avoid damaging these delicate beauties. In this article, we will provide you with essential tips and techniques to safely drill holes in pearls.
Tip 1: Use a proper drill bit
When it comes to drilling holes in pearls, using the right drill bit is crucial. A pearl is a delicate gem, and any wrong move could lead to cracks or damage. It is recommended to use a small diamond drill bit specifically designed for drilling through pearls. These diamond drill bits are known for their precision and ability to cut through tough materials without causing damage.
Tip 2: Secure the pearl properly
Before drilling, it is important to secure the pearl in place to prevent it from slipping or rolling. You can use a soft cloth or a piece of clay to hold the pearl steady. Make sure that the pearl is firmly held, but avoid applying excessive pressure, as it may lead to cracking or damaging the pearl’s surface.
Tip 3: Lubricate the drill bit
Drilling through a pearl requires patience and precision. To minimize the risk of damage, it is recommended to lubricate the drill bit with water or a small amount of cutting oil. This lubrication helps to reduce friction and heat buildup, which can cause the pearl to crack. Remember to frequently lubricate the drill bit throughout the drilling process.
Tip 4: Start with a pilot hole

Before drilling the final hole, it is advisable to start with a pilot hole. A pilot hole acts as a guide for the drill bit and helps to prevent the pearl from cracking or splitting. Use a smaller drill bit to create a small indentation in the pearl, and then gradually increase the size of the drill bit until the desired hole size is achieved.
Tip 5: Take breaks and be patient
Drilling through pearls requires a steady hand and patience. It is important to take breaks during the drilling process to avoid putting too much pressure on the pearl. By being patient and working slowly, you can achieve a beautifully drilled hole without any damage to the pearl.
With these essential tips and techniques, you can safely drill holes in pearls and create stunning jewelry pieces. Remember to handle pearls with care and take your time throughout the process to ensure the best results. Happy drilling!
Preparation and Safety Measures
Gather All Necessary Tools and Materials
Before starting the drilling process, it is essential to gather all the necessary tools and materials:
- A pearl to drill
- A pearl vise or clamp
- A diamond drill bit
- A drill press or Dremel tool
- Cooling liquid (such as water or oil)
- Safety goggles
- Protective gloves
Ensure Proper Ventilation
When drilling pearls, it is important to work in a well-ventilated area. This prevents any harmful fumes or particles from accumulating and ensures a safe working environment.
Wear Safety Gear
Always wear safety goggles and protective gloves when drilling pearls. This protects your eyes from any flying debris and your hands from potential injuries.

Secure the Pearl
Place the pearl securely in a pearl vise or clamp before drilling. This ensures that the pearl remains stable and prevents any accidental slips or movements during the drilling process.
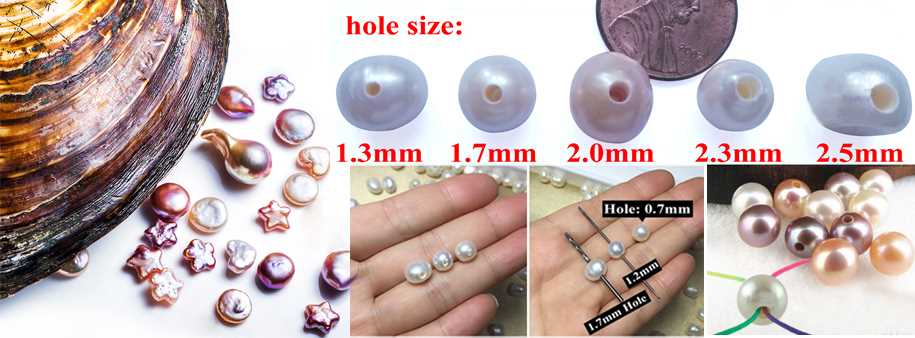
Use the Correct Size Diamond Drill Bit
Choose a diamond drill bit that is appropriate for the size of the hole you want to drill in the pearl. Using a too large or too small drill bit can damage both the pearl and the drill bit.
Use Cooling Liquid
When drilling pearls, it is crucial to use a cooling liquid, such as water or oil, to prevent overheating. Apply a small amount of cooling liquid to the pearl and drill bit while drilling to keep them cool and prolong the life of the drill bit.
Start with a Low Speed
When using a drill press or Dremel tool, start with a low-speed setting. This allows for better control and reduces the risk of damaging the pearl or drill bit. Increase the speed gradually if needed.

Keep the Area Clean
Regularly clean the drilling area to remove any debris or excess cooling liquid. This ensures better visibility and prevents any accidents or damage to the pearl.
Take Breaks and Stay Focused
Drilling holes in pearls requires patience and concentration. Take regular breaks to rest your hands and maintain focus to ensure precise and safe drilling.
Dispose of Materials Properly
Dispose of the used diamond drill bits and any other materials used in the drilling process properly. Follow local regulations for hazardous waste disposal to ensure environmental safety.
Seek Professional Help if Necessary
If you are uncertain or uncomfortable with drilling holes in pearls, it is recommended to seek professional help. A professional jeweler or pearl expert can safely and efficiently drill the pearls for you.
Choosing the Right Tools and Materials
When it comes to drilling holes in pearls, having the right tools and materials is essential for a successful and safe process. Here are some key considerations to keep in mind:

1. Drill Bits
Selecting the right drill bits is crucial for drilling holes in pearls. It is important to choose bits that are designed specifically for drilling through delicate materials like pearls. Diamond-tipped or carbide drill bits are recommended, as they provide precision and accuracy while minimizing the risk of damaging the pearls.
2. Drill
Using a handheld rotary tool with a small, high-speed drill is often the best option for drilling holes in pearls. These tools typically have adjustable speed settings, allowing you to control the drilling speed and minimize the risk of overheating or shattering the pearls.
3. Lubricant
Applying a lubricant such as water or a specialized pearl-drilling lubricant is necessary to reduce heat and friction during the drilling process. This helps to prevent the pearls from cracking or disintegrating due to the heat generated by the drilling.
4. Safety Measures
When working with tools and drilling holes in pearls, it is important to take proper safety precautions. Wear safety goggles to protect your eyes from any flying debris, and work in a well-ventilated area to avoid inhaling any fumes or dust particles. Additionally, it is advisable to wear gloves to protect your hands and fingers.

5. Work Surface
Choosing the right work surface is crucial to ensure stability and prevent accidents while drilling holes in pearls. A sturdy workbench or table is recommended, preferably with a non-slip surface to keep the pearls in place during the drilling process.
By choosing the right tools and materials, and following safety guidelines, you can successfully drill holes in pearls without causing any damage to the precious gems.
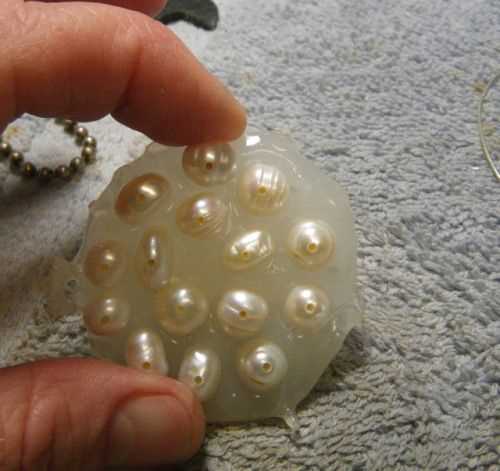
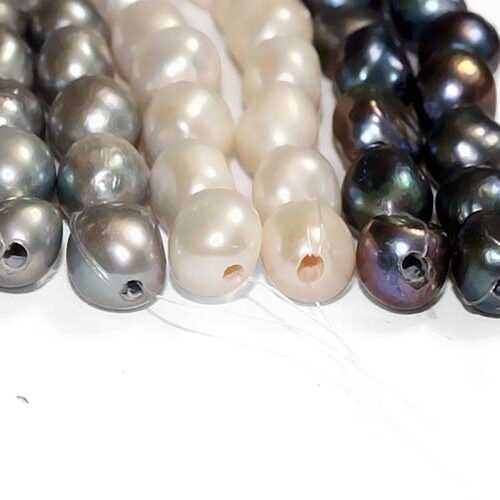
Cleaning and Inspecting the Pearls
Before drilling holes in pearls, it is essential to properly clean and inspect them to ensure their quality and integrity. Cleaning and inspecting the pearls will help identify any imperfections or damages that may affect drilling or compromise the beauty of the pearls.
Cleaning
1. Start by preparing a gentle cleaning solution. Fill a small bowl with lukewarm water and add a few drops of mild, pH-balanced dish soap. Avoid using harsh chemicals or abrasives that can damage the pearls.
2. Place the pearls in the cleaning solution and gently swirl them around for a few minutes. You can use a soft-bristled toothbrush to gently scrub the pearls if necessary.
3. Rinse the pearls thoroughly with clean water to remove any soap residue.
4. Use a soft, lint-free cloth to pat the pearls dry. Avoid rubbing as it can cause scratches.
Inspecting
1. Examine the pearls under a bright light or natural sunlight to get a clear view of their surface.
2. Look for any cracks, chips, or blemishes on the pearl’s surface. These imperfections can weaken the pearl and make it more susceptible to damage during drilling.
3. Check for any discoloration or uneven colors on the pearls. Pearls should have a consistent luster and color throughout.
4. Inspect the pearls for any loose or dangling threads from previous jewelry settings. These can interfere with drilling and should be removed.
5. If you notice any significant imperfections or damages, it is advisable to consult a professional jeweler before proceeding with drilling.
Additional Tips
- Handle pearls with clean hands to prevent transferring oils or dirt onto their surface.
- Store pearls in a soft cloth or pouch to protect them from scratches.
- Avoid exposing pearls to harsh chemicals, perfumes, or hair products that can damage their surface.
By properly cleaning and inspecting the pearls before drilling, you can ensure that the process goes smoothly and the pearls remain intact and beautiful.
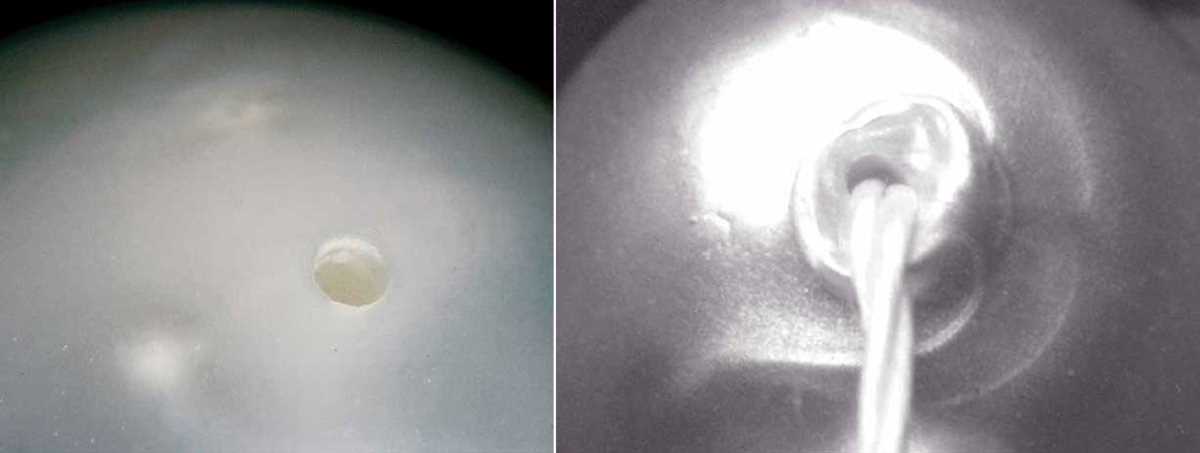
Marking the Drill Point
Before drilling a hole in a pearl, it is essential to mark the exact spot where the hole will be made. This step is crucial to ensure precision and avoid any damage to the pearl.
To mark the drill point, follow these steps:
- Inspect the pearl and determine the desired location for the hole. Keep in mind the design or layout of the piece of jewelry you are working on.
- Use a water-soluble marker or a fine-point pencil to mark the spot. Make sure to choose a color that is visible on the pearl’s surface.
- Gently place the pearl on a soft cloth or a pearl-holding fixture, making sure it is stable and won’t roll or move during the marking process.
- Hold the marker or pencil perpendicular to the pearl’s surface and carefully make a small dot at the desired spot. Avoid pressing too hard to prevent damaging the pearl’s surface.
- Double-check the alignment and accuracy of the mark. Take your time to ensure it is precisely where you want the hole to be.
- Inspect the pearl from different angles and under sufficient lighting to confirm the visibility of the mark.
Once the drill point is accurately marked on the pearl, you can proceed to the next step of drilling the hole. Ensuring a properly marked drill point is crucial for achieving the desired result without damaging the pearl.
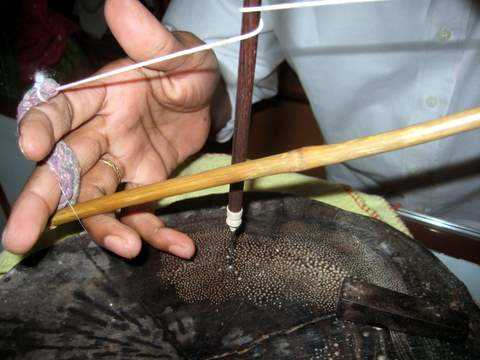
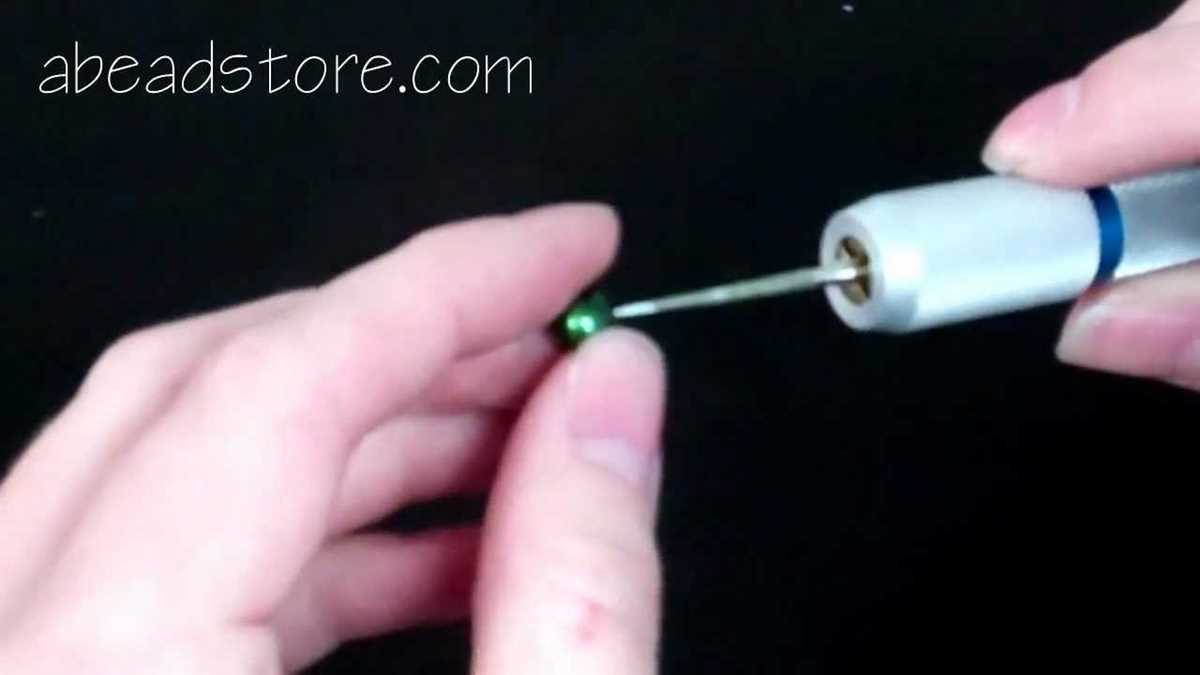
Drilling Techniques and Tips
1. Equipment and Tools
Before starting the drilling process, it is essential to gather all the necessary equipment and tools to ensure a smooth and safe drilling experience. Here are the basic tools required:
- A pearl drilling jig
- A pearl vise or clamp
- A small hand drill or a pearl drill bit
- A lubricant such as water or oil
- Safety goggles
2. Preparing the Pearl
Prior to drilling, it is important to prepare the pearl to minimize the risk of damage. Here are the steps to follow:
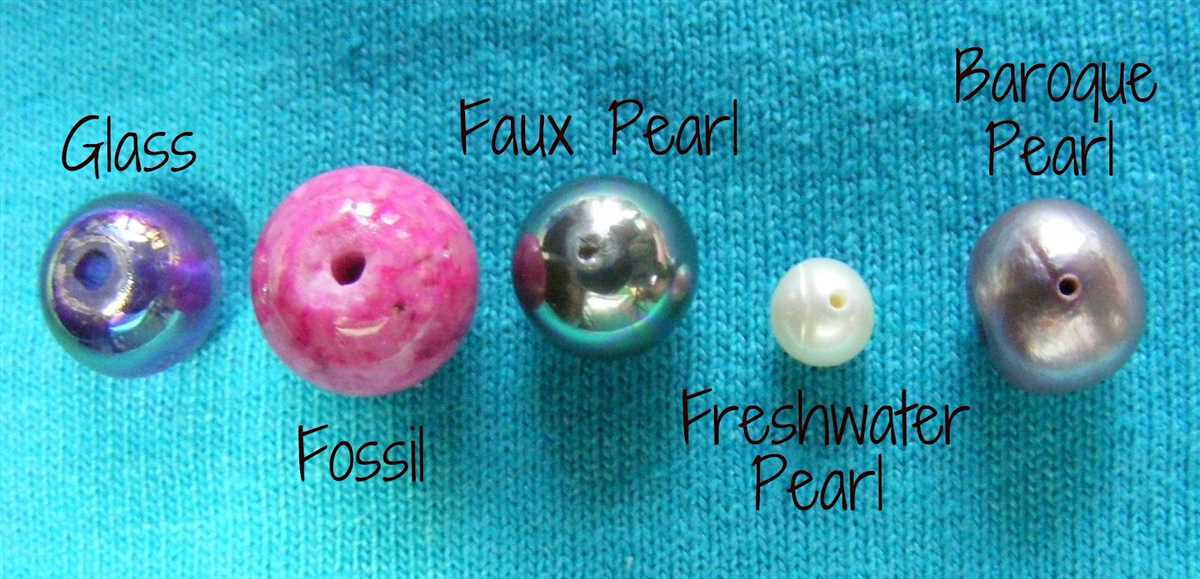
- Choose a pearl that is suitable for drilling. Avoid pearls with thin nacre layers or surface imperfections.
- Clean the surface of the pearl using a soft cloth or tissue to remove any dirt or debris. Ensure that the pearl is dry before proceeding to the next step.
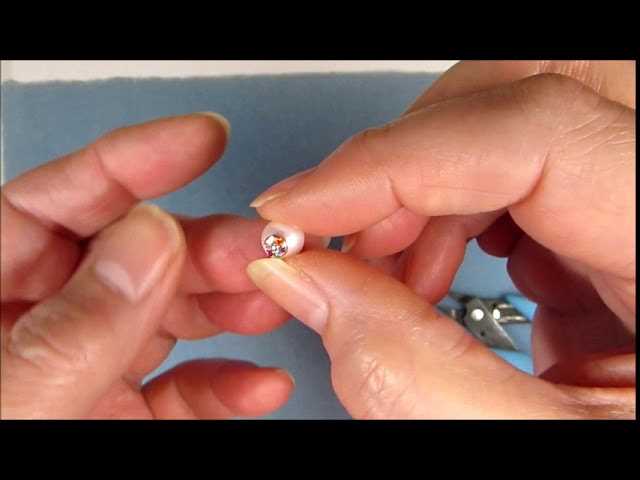
- Secure the pearl in a pearl vise or clamp to hold it firmly in place during drilling.
3. Drilling Technique
When drilling a hole in a pearl, it is crucial to use the correct technique to prevent damage. Here are some essential tips:
- Begin drilling by creating a small indent on the surface of the pearl. This can be done by gently tapping the pearl with the pearl drill bit or hand drill.
- Apply a lubricant, such as water or oil, on the drilling area to reduce friction and prevent overheating.
- Hold the drill perpendicular to the surface of the pearl and apply light, steady pressure while rotating the drill in a slow and controlled manner.
- Regularly clean the drilling area and the drill bit using a soft cloth or tissue to remove any debris that may accumulate.
- Avoid excessive force or speed during drilling, as this can cause the pearl to crack or chip.
4. Safety Precautions
When drilling pearls, it is important to prioritize safety to avoid accidents or injuries. Here are some safety precautions to keep in mind:
- Always wear safety goggles to protect your eyes from flying debris or fragments.
- Work in a well-ventilated area or use a mask to avoid inhaling any dust or particles.
- Take regular breaks to prevent fatigue and maintain focus and control.
- Keep your fingers and hands away from the drilling area to prevent accidental injury.
- Follow the manufacturer’s instructions for the drilling equipment and tools to ensure proper usage and safety.
By following these drilling techniques and tips, you can safely and effectively drill holes in pearls without any damage or accidents.
Maintaining Control and Stability
1. Use a stable work surface
When drilling holes in pearls, it is important to have a stable work surface to ensure accuracy and prevent accidents. Place a non-slip mat or a rubber pad on your work table to keep the pearls from sliding around while you drill.
2. Use a drill press or a vice grip
For better control and stability, consider using a drill press or a vice grip to hold the pearls in place while drilling. These tools provide a secure and steady hold, reducing the risk of slippage and damage to the pearl.
3. Mark the drilling spot
Before drilling, mark the exact spot where you want the hole to be. Use a fine-tip marker or a small piece of tape to mark the location. This will help you stay focused and ensure precision during the drilling process.
4. Start with a small pilot hole
To maintain control and prevent the pearl from cracking or chipping, start drilling with a small pilot hole. Use a drill bit that matches the size of the hole you intend to create. Gradually increase the size of the drill bit until you reach the desired hole diameter.
5. Use steady and gentle pressure
Apply steady and gentle pressure when drilling the hole. Avoid pushing too hard as this may cause the drill bit to slip or the pearl to crack. Maintain a consistent speed and use a light touch to ensure a smooth drilling process.
6. Consider using a lubricant
To reduce friction and prevent the pearl from overheating, consider using a lubricant while drilling. Dip the drill bit in water or a specialized pearl drilling lubricant before drilling. This will help prolong the life of the drill bit and prevent damage to the pearl.
7. Take breaks and stay focused
Drilling holes in pearls requires concentration and precision. Take regular breaks to rest your hands and maintain focus. Rushing the process can lead to mistakes and accidents. Stay patient and take your time to ensure the best results.
| Tool | Description |
|---|---|
| Drill press | A stationary tool that provides accuracy and control for drilling |
| Vice grip | A tool that securely holds the pearls in place |
| Non-slip mat | A mat or pad that prevents the pearls from sliding around |
| Drill bits | Various sizes of drill bits designed for drilling pearls |
| Lubricant | A substance that reduces friction and heat during drilling |
Post-Drilling Care and Cleaning
After you have successfully drilled holes in your pearls, it is important to take proper care of them to ensure their longevity and maintain their beauty. Here are some essential tips and techniques for post-drilling care and cleaning:
1. Rinse the Pearls
Start by rinsing the pearls under lukewarm water to remove any residue or debris left from the drilling process. Be gentle and avoid using harsh chemicals or soaps, as they can damage the pearls.
2. Pat Dry with a Soft Cloth
Once the pearls are rinsed, carefully pat them dry using a soft, lint-free cloth. Avoid rubbing or scrubbing the pearls, as this can cause scratches or damage to the surface.
3. Buff with a Pearl Polishing Cloth
Use a pearl polishing cloth to gently buff the pearls and restore their natural luster. This will help remove any remaining impurities and bring out their beautiful shine. Be sure to use a cloth specifically designed for pearls to avoid scratching the surface.
4. Store Properly
When storing your drilled pearls, it is important to keep them separate from other jewelry to prevent scratching or tangling. Place them in a soft pouch or a lined jewelry box, away from direct sunlight and extreme temperatures.
5. Avoid Chemicals and Perfumes
Avoid exposing your drilled pearls to harsh chemicals, including perfumes, hairsprays, and cleaning agents. These substances can dull the pearls’ luster and cause discoloration. It is best to put on your pearls after applying any beauty products.
6. Regular Cleaning
To keep your drilled pearls looking their best, gently wipe them with a soft cloth after each wear to remove natural oils and pollutants. This will help prevent dirt from building up and maintain their shine.
7. Professional Cleaning and Re-stringing
If your drilled pearls start to lose their luster or become loose on the string, it is recommended to take them to a professional jeweler for cleaning and re-stringing. They have the expertise and specialized equipment to handle pearls safely and ensure their longevity.
By following these post-drilling care and cleaning tips, you can keep your drilled pearls looking beautiful for years to come. Remember to handle them with care and avoid exposing them to harsh chemicals or excessive heat or sunlight.
Troubleshooting and Common Mistakes
Mistake: Using too much force
One common mistake when drilling holes in pearls is using too much force. Pearls are delicate and can easily crack or shatter if too much pressure is applied. It is important to use a gentle and steady hand when drilling, allowing the bit to do the work.
Tip: Start with a smaller drill bit and gradually increase the size as needed. This will help prevent applying too much force all at once.
Mistake: Drilling too close to the edge
Another common mistake is drilling too close to the edge of the pearl. This can weaken the structure of the pearl and increase the risk of it breaking. It is important to leave a small buffer zone around the hole to ensure the integrity of the pearl is maintained.
Tip: Use a ruler or other measuring tool to mark the drilling point. This will help ensure that the hole is drilled at an appropriate distance from the edge.
Mistake: Not using proper cooling techniques
Failure to use proper cooling techniques can lead to overheating and damage to the pearl. The friction generated from drilling can cause the pearl to become too hot, which can result in discoloration or even melting of the pearl.
Tip: Use a cooling solution, such as water or a specialized pearl drilling lubricant, to keep the pearl cool and prevent overheating. Dip the drill bit into the cooling solution periodically during the drilling process.
Mistake: Not securing the pearl properly
If the pearl is not properly secured while drilling, it can slip or move, leading to an uneven or misplaced hole. This can be frustrating and may require starting over with a new pearl.
Tip: Use a pearl vise or a soft cloth to securely hold the pearl in place while drilling. This will help prevent it from slipping and ensure a clean and accurate hole.
Mistake: Rushing the drilling process
Rushing the drilling process can lead to mistakes and accidents. It is important to take your time and proceed with caution when drilling holes in pearls.
Tip: Work at a slow and steady pace, allowing the drill to do the work. Take breaks if needed to rest your hand and avoid fatigue, which can lead to mistakes.
| Mistake | Solution |
|---|---|
| Using too much force | Gently drill and gradually increase pressure. |
| Drilling too close to the edge | Leave a small buffer zone around the hole. |
| Not using proper cooling techniques | Use a cooling solution and dip the drill bit periodically. |
| Not securing the pearl properly | Use a pearl vise or a soft cloth to hold the pearl securely. |
| Rushing the drilling process | Take your time and work at a slow, steady pace. |
FAQ:
What tools do I need to safely drill holes in pearls?
To safely drill holes in pearls, you will need a pearl drill bit, a hand drill or a Dremel tool, a clamp or vise to hold the pearl securely, and water or another lubricant to keep the pearl and drill bit cool during drilling.
Is it possible to drill holes in pearls without damaging them?
Yes, it is possible to drill holes in pearls without damaging them. By using the proper techniques and tools, and being careful and patient throughout the process, you can successfully drill holes in pearls without causing any damage.
What is the best way to secure a pearl while drilling?
The best way to secure a pearl while drilling is to use a clamp or vise. Make sure the pearl is held securely and does not move during drilling. This will help prevent any slipping or damage to the pearl.
Should I use a high-speed drill when drilling holes in pearls?
No, you should not use a high-speed drill when drilling holes in pearls. High-speed drills can generate too much heat and friction, which can cause the pearls to crack or become damaged. It is best to use a hand drill or a Dremel tool with a low-speed setting.
Why is it important to keep the pearl and drill bit cool during drilling?
It is important to keep the pearl and drill bit cool during drilling to prevent damage to the pearl. Friction and heat generated during drilling can cause the pearl to crack or become discolored. Using water or another lubricant helps keep the pearl and drill bit cool and reduces the risk of damage.
Do I need any special skills or experience to drill holes in pearls?
No, you do not need any special skills or experience to drill holes in pearls. However, it is important to be patient, careful, and follow the proper techniques and tips to ensure successful and safe drilling. If you are a beginner, it may be helpful to practice on a less valuable pearl or seek guidance from a professional.
Video:


Meet Harrison Clayton, a distinguished author and home remodeling enthusiast whose expertise in the realm of renovation is second to none. With a passion for transforming houses into inviting homes, Harrison's writing at https://thehuts-eastbourne.co.uk/ brings a breath of fresh inspiration to the world of home improvement. Whether you're looking to revamp a small corner of your abode or embark on a complete home transformation, Harrison's articles provide the essential expertise and creative flair to turn your visions into reality. So, dive into the captivating world of home remodeling with Harrison Clayton and unlock the full potential of your living space with every word he writes.


