How to Properly Drill a Hole in a Pearl

Drilling a hole in a pearl can be a delicate process, but with the right tools and techniques, it can be done successfully. Whether you’re interested in creating jewelry or repairing a damaged pearl, drilling a hole can be a useful skill to learn. However, it’s important to note that pearls are organic gemstones and require special care to prevent damage. In this article, we will guide you through the process of drilling a hole in a pearl, step by step.
Step 1: Gather the necessary tools
To drill a hole in a pearl, you will need a few specific tools. First, you will need a small hand drill or a pearl drilling machine. These tools are specifically designed to drill through the hard surface of a pearl without causing damage. You will also need a drill bit that is suitable for drilling pearls. It’s important to use a small and sharp drill bit to ensure a clean and precise hole.
Step 2: Prepare the pearl
Before you start drilling, it’s important to prepare the pearl. Begin by cleaning the pearl with a soft cloth to remove any dirt or debris. Make sure the pearl is dry before proceeding. Next, secure the pearl in a soft vice or a pearl holding device. This will help to prevent the pearl from moving while you drill.

Step 3: Start drilling
When you’re ready to start drilling, hold the drill bit firmly and position it at the desired spot on the pearl. Slowly apply pressure and begin drilling. It’s important to use a light touch and let the drill bit do the work. Applying too much pressure can cause the pearl to crack or shatter. Keep the drill bit straight and perpendicular to the surface of the pearl to ensure a straight hole.
Tip: It’s a good idea to practice drilling on a spare pearl or a piece of soft material before drilling into a valuable pearl. This will help you get a feel for the process and avoid any costly mistakes.
Step 4: Finish drilling
Once you have drilled through the pearl, remove the drill bit and check the quality of the hole. If the hole is clean and smooth, you’re done! If not, you can use a small file or a piece of sandpaper to smooth out any rough edges. Be careful not to scratch the surface of the pearl. After finishing the hole, clean the pearl once again to remove any debris.
Drilling a hole in a pearl can be a rewarding process, but it’s important to take your time and be gentle. With the right tools and techniques, you can create beautiful jewelry or restore the beauty of a damaged pearl. Remember to always practice and take precautions to ensure the safety of your pearls. Happy drilling!

The importance of drilling a hole in a pearl
Drilling a hole in a pearl is an essential step in preparing the pearl for various types of jewelry making. It allows the pearl to be strung onto a necklace, bracelet, or other jewelry pieces.
There are several reasons why drilling a hole in a pearl is important:
- Enhanced functionality: By drilling a hole in a pearl, it becomes possible to incorporate it into different types of jewelry. Whether it’s a single pearl pendant or a strand of pearls for a necklace, drilling the hole ensures that the pearl can be securely attached to the jewelry piece.
- Preservation of the pearl: When a hole is properly drilled, it minimizes the risk of damaging the pearl. A well-drilled hole ensures that the pearl’s integrity is maintained, reducing the likelihood of cracks or chips.
- Design flexibility: A drilled hole in a pearl provides designers with the freedom to experiment with various designs and arrangements. It allows for easy customization and customization of jewellery to suit individual preferences.
- Stringing pearls: Most commonly, drilling a hole in a pearl is done to string it onto a necklace or bracelet. The hole allows for the use of a thread, wire, or other materials to create the desired jewelry piece.
- Securing the pearl: Depending on the jewelry design, a drilled hole in a pearl enables it to be securely held in place using clasps, jump rings, or other findings. This ensures that the pearl doesn’t easily detach from the jewelry piece.
Overall, drilling a hole in a pearl is crucial for both its functionality and aesthetics. It opens up a world of possibilities for pearl jewelry design and allows for the creation of unique and beautiful pieces that showcase the natural beauty of pearls.
Step 1: Gather the necessary tools
Before you begin drilling a hole in a pearl, make sure you have the following tools:
- A fine-tip marker or pencil
- A pearl drill bit
- A drill or rotary tool
- A small piece of wood or foam pad
- A bowl of water or a small container with water
- A soft cloth
- Optional: a clamp or vice to hold the pearl securely
Having these tools readily available will ensure that you can approach the drilling process with ease and efficiency.

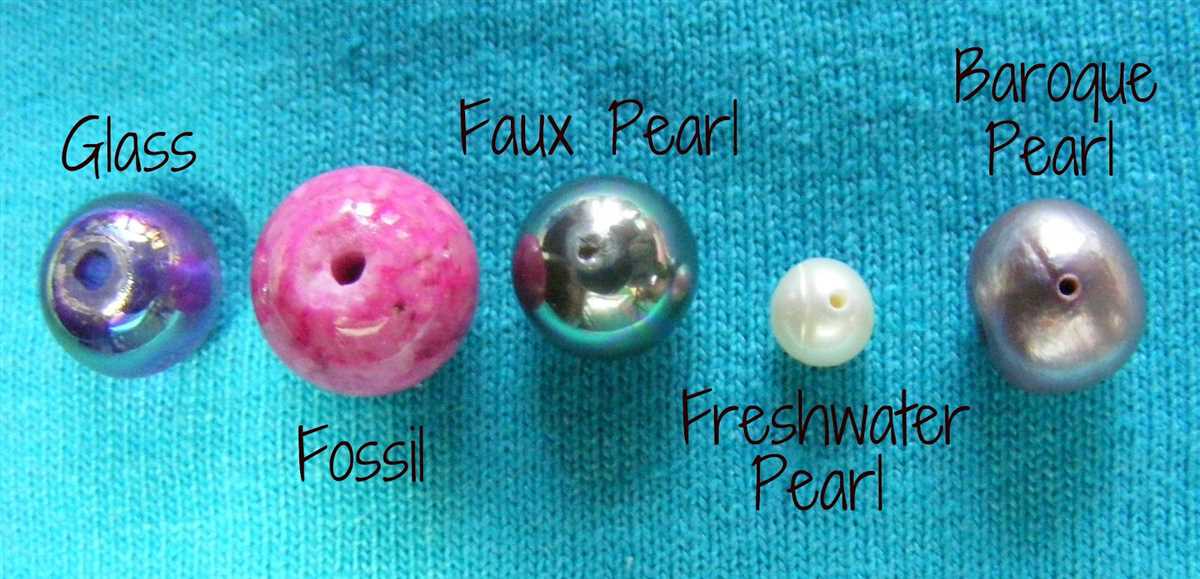
Choosing the right drill bit
When drilling a hole in a pearl, it is important to choose the right drill bit. The type of drill bit you use will depend on the type of pearl you are working with and the size of the hole you want to create.
Diamond coated drill bits
Diamond coated drill bits are the most commonly used for drilling holes in pearls. These drill bits are made with small particles of diamond electroplated onto the tip of the bit, making them extremely hard and durable. Diamond coated drill bits can be used for both freshwater and saltwater pearls.
Tungsten carbide drill bits
Tungsten carbide drill bits are another option for drilling holes in pearls. These drill bits are made from a hard and durable material called tungsten carbide, which allows them to easily drill through pearls. Tungsten carbide drill bits can be used for both freshwater and saltwater pearls.
Size of the drill bit
The size of the drill bit you choose will depend on the size of the hole you want to create in the pearl. Drill bits typically range in size from 0.5mm to 3mm. It is important to choose a drill bit that is slightly larger than the size of the hole you want to create, as pearls have a tendency to crack or chip if the drill bit is too small.
Other considerations
When choosing a drill bit, it is also important to consider the speed at which you will be drilling. Using a low speed and applying gentle pressure will help prevent the pearl from cracking or shattering. Additionally, it is recommended to use a lubricant, such as water or oil, to reduce friction and keep the pearl cool during the drilling process.

Preparing the drilling area
- Find a clean and well-lit workspace to work on the pearls. Make sure the area is free from any debris or clutter that could interfere with your work.
- Gather all the necessary tools and materials. You will need a pearl drill (preferably with a diamond drill bit), a small container of water, and a towel or soft cloth.
- Fill the small container with enough water to submerge the pearl completely. The water acts as a lubricant and coolant during the drilling process, preventing the pearl from overheating and cracking.
- Place the towel or soft cloth on your workspace to provide a cushioned surface to place the pearls on. This will protect them from scratches or damage.
- Organize the pearls you will be drilling. It is best to work on one pearl at a time to ensure accuracy and prevent any mix-ups.
- If the pearls are still inside their jewelry settings, remove them carefully using jewelry pliers or tweezers. Be gentle to avoid scratching or damaging the pearls.
Step 2: Preparing the pearl
Before drilling a hole in the pearl, it is important to properly prepare it to prevent any damage and ensure a successful outcome. Follow these steps to prepare the pearl:
- Cleaning the pearl: Start by cleaning the pearl gently with a soft, lint-free cloth. This will remove any dirt or dust particles that may be present on the surface and ensure you have a clean and smooth area to work with.
- Choosing the right location: Carefully examine the pearl and determine the best location for drilling. Look for areas that are relatively flat and don’t have any visible flaws or imperfections. It is important to avoid drilling too close to the edge of the pearl to maintain its structural integrity.
- Marking the drilling spot: Once you have identified the ideal drilling location, use a fine-tip marker or pencil to make a small dot on the surface of the pearl. This will serve as a guide for drilling and ensure accuracy.
- Securing the pearl: To prevent the pearl from moving during the drilling process, it is essential to secure it in place. You can use a pearl-holding vise or a specialized pearl-holding hand tool to grip the pearl firmly but gently. This will provide stability and minimize the risk of the pearl slipping or cracking.
- Protecting the pearl: To protect the pearl from damage caused by heat or pressure during drilling, it is advisable to place a small piece of soft cloth or rubber between the pearl and the tool. This will act as a cushion and absorb any excess force.
By following these steps to prepare the pearl, you will be ready to move on to the next stage of the drilling process.
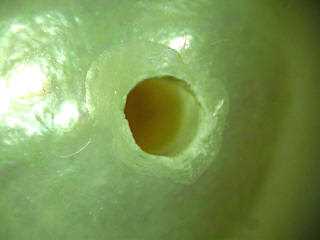
Examining the pearl for drilling
Before drilling a hole in a pearl, it is important to carefully inspect it to ensure that it is suitable for the process. Here are some key factors to consider when examining a pearl for drilling:
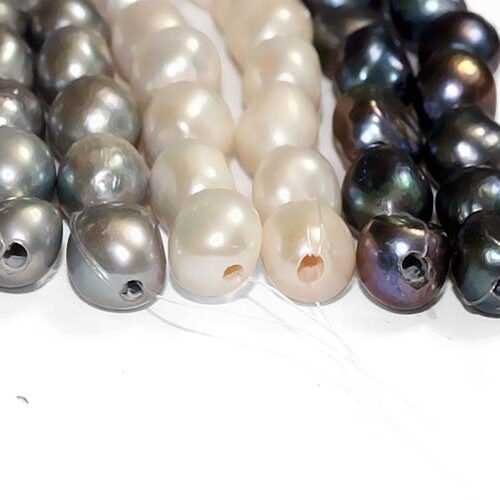
1. Size and shape
Take note of the size and shape of the pearl. Pearls come in various shapes such as round, oval, teardrop, and baroque. The size and shape will determine where and how the hole should be drilled.

2. Surface quality
Check the surface of the pearl for any imperfections or blemishes. Pearls with a smooth and flawless surface are ideal for drilling. Avoid pearls with cracks, chips, or noticeable irregularities, as these can weaken the pearl or cause it to break during the drilling process.
3. Luster
Examine the luster of the pearl. A pearl with a high luster will have a reflective and radiant quality, whereas a pearl with a dull or lackluster appearance may not be suitable for drilling.
4. Nacre thickness
Inspect the thickness of the nacre, which is the organic substance that layers the pearl. A pearl with a thick nacre is generally considered to be of higher quality and more durable. Thin or uneven nacre may affect the drilling process and compromise the overall integrity of the pearl.
5. Color
Consider the color of the pearl. Pearls come in a variety of colors, including white, black, pink, and golden. Ensure that the color is consistent and appealing before proceeding with drilling.
6. Orientations
Observe the natural orientation of the pearl. Depending on the desired design or jewelry piece, you may need to drill the hole in a specific direction or angle. Take note of any natural markings or patterns on the pearl that could influence the drilling process.
By carefully examining these factors, you can ensure that the pearl is suitable for drilling and minimize the risk of damaging or devaluing the pearl during the process.
Cleaning the Pearl
A pearl can lose its luster over time due to various factors such as dirt, oils from the skin, and other environmental elements. Proper cleaning is essential to maintain the beauty and shine of your pearls.
Follow these steps to clean your pearl:
- Gently wipe the pearl: Start by using a soft, lint-free cloth to remove any surface dirt or dust from the pearl. Be careful not to scratch the surface of the pearl.
- Prepare a mild soap solution: Fill a bowl with lukewarm water and a small amount of mild soap. Make sure the soap is free of any harsh chemicals or abrasives that could harm the pearl.
- Clean the pearl: Dip a clean, soft cloth into the soapy water and gently wipe the pearl. Avoid scrubbing or using excessive pressure, as this can damage the pearl’s surface.
- Rinse with clean water: After cleaning, rinse the pearl thoroughly under lukewarm water to remove any soap residue. Make sure not to submerge the pearl in water as this can weaken the string or the adhesive used to secure the pearl.
- Dry the pearl: Pat the pearl gently with a soft, clean cloth to remove any excess water. Allow the pearl to air dry completely before storing it.
Important: Avoid using ultrasonic cleaners, steam cleaners, or any harsh chemicals on your pearls as they can cause irreversible damage. Additionally, it is recommended to remove pearls before swimming, exercising, or applying perfumes or lotions, as these substances can also harm the pearls.
Regularly cleaning your pearls can help preserve their beauty and longevity. It is advisable to clean them after each use to remove any accumulated dirt or oils, ensuring they remain radiant and stunning for years to come.
Marking the drilling point
- Before drilling a hole in a pearl, it is important to mark the exact spot where you want the hole to be.
- Place the pearl on a flat surface and secure it with a piece of tape or putty to prevent it from rolling.
- Use a fine-tipped pen or a pencil to mark the desired drilling point on the surface of the pearl.
- Take your time to ensure that the mark is accurate and aligned with your intended design or placement.
- Remember that once the hole is drilled, it cannot be undone, so it’s crucial to be precise with your marking.
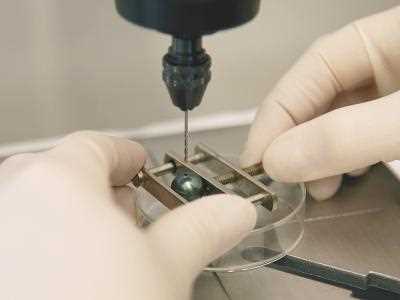
Step 3: Drilling the hole
Once you have prepared the pearl and gathered your equipment, it’s time to drill a hole in the pearl. Follow these steps to ensure a clean and precise hole:
- Select the appropriate drill bit: Choose a drill bit that is specifically designed for drilling through pearls or other delicate materials. These drill bits are usually made of tungsten carbide or diamond and have a small, pointed tip.
- Secure the pearl: Place the pearl securely in a pearl vise or clamp. This will prevent the pearl from moving or rolling during the drilling process.
- Mark the drilling spot: Use a fine-tip pen or marker to mark the spot where you want to drill the hole. Make sure the mark is clearly visible and in the desired location.
- Begin drilling: Hold the drill bit at a slight angle to the surface of the pearl and start drilling slowly. Apply gentle but steady pressure to avoid cracking or damaging the pearl. Let the drill bit do the work and allow it to penetrate the pearl gradually.
- Keep the pearl cool: To prevent overheating and damage to the pearl, dip it in water or a cooling lubricant periodically while drilling. This will keep the temperature down and reduce the risk of the pearl becoming too hot.
- Monitor your progress: As you drill, keep an eye on your progress. Check the depth of the hole periodically by withdrawing the drill bit and comparing it to the desired depth. This will help you avoid drilling too deep or too shallow.
- Finish the hole: Once you have drilled through the pearl, withdraw the drill bit slowly and carefully to avoid any damage. Clean the hole and remove any debris or dust using a fine brush or compressed air.
- Polish the hole: If desired, you can polish the inside of the hole using a small wooden dowel or a pearl reamer. This will smooth out any rough edges and give the hole a finished appearance.
- Inspect the hole: After drilling, carefully inspect the hole to ensure it is clean, smooth, and free of any cracks or damage. If necessary, you can use a magnifying glass to get a closer look.
Following these steps will help you drill a hole in a pearl safely and effectively. Remember to take your time and be patient, as drilling pearls requires a delicate touch. Good luck!
Using the proper drilling technique
When drilling a hole in a pearl, it’s important to use the proper technique to prevent damage to the pearl and achieve the desired results. Here are some key steps to follow:
1. Choose the right drill bit
Before you start drilling, make sure you have the right drill bit. Pearls are delicate and can easily crack or chip if the wrong drill bit is used. It’s recommended to use a diamond-tipped drill bit specifically designed for drilling pearls, as it provides precision and reduces the risk of damaging the pearl.
2. Mark the drilling spot
Once you have the right drill bit, mark the spot where you want to drill the hole on the pearl’s surface. You can use a fine-point marker or a small piece of masking tape to mark the spot. This will help you stay focused during the drilling process and ensure you drill in the right spot.
3. Secure the pearl
Before drilling, it’s important to secure the pearl in place to prevent it from moving or rolling around. You can use a soft cloth or a pearl-holding clamp to hold the pearl securely. Make sure it’s stable and doesn’t move while drilling.
4. Apply gentle pressure
When drilling the hole, apply gentle and steady pressure. Avoid using excessive force, as it can crack or damage the pearl. The key is to let the drill bit do the work and gradually penetrate the pearl’s surface. Take your time and be patient during the drilling process.
5. Use a cooling medium
Drilling can generate heat, which can potentially damage the pearl. To prevent this, it’s advisable to use a cooling medium such as water or oil while drilling. This will help to keep the pearl and the drill bit cool, reducing the risk of heat damage.
6. Clean and smooth the hole
After drilling the hole, clean it thoroughly using a soft cloth or a
FAQ:
What tools do I need to drill a hole in a pearl?
To drill a hole in a pearl, you will need a pearl drill bit, a clamp or vise to hold the pearl securely, and a drill.
Can I use a regular drill bit to drill a hole in a pearl?
No, you cannot use a regular drill bit to drill a hole in a pearl. Regular drill bits are too hard and can damage the delicate surface of the pearl. Pearl drill bits are specifically designed to work on soft materials like pearls.
What is the best way to hold the pearl securely while drilling?
The best way to hold the pearl securely while drilling is to use a clamp or vise. Place the pearl in the clamp or vise, making sure it is held tightly but not too tightly to avoid causing damage. This will provide stability and prevent the pearl from slipping during the drilling process.
Are there any precautions I should take when drilling a hole in a pearl?
Yes, there are a few precautions you should take when drilling a hole in a pearl. First, make sure to wear safety glasses to protect your eyes from any flying debris. Second, go slow and apply gentle pressure to avoid cracking or damaging the pearl. Finally, always use a pearl drill bit and not a regular drill bit to prevent any damage to the surface of the pearl.
Video:


Meet Harrison Clayton, a distinguished author and home remodeling enthusiast whose expertise in the realm of renovation is second to none. With a passion for transforming houses into inviting homes, Harrison's writing at https://thehuts-eastbourne.co.uk/ brings a breath of fresh inspiration to the world of home improvement. Whether you're looking to revamp a small corner of your abode or embark on a complete home transformation, Harrison's articles provide the essential expertise and creative flair to turn your visions into reality. So, dive into the captivating world of home remodeling with Harrison Clayton and unlock the full potential of your living space with every word he writes.


