How to Create Amazing Pumpkin Designs with a Drill


Halloween is just around the corner, and if you’re looking for a unique way to decorate your pumpkins this year, look no further than using a drill. This simple tool can transform your ordinary pumpkin into a masterpiece, with intricate designs and patterns that will wow your friends and family.
One of the great things about using a drill for pumpkin carving is that it’s easy and safe. Unlike traditional carving tools, there’s no risk of cutting yourself as you work. Plus, you don’t have to worry about your design falling apart as the pumpkin ages, since the holes made by the drill stay in place.
To get started, you’ll need a few supplies: a pumpkin, a drill with various sized drill bits, and a marker to draw your design. Begin by drawing your design on the pumpkin’s surface with the marker. It can be a simple pattern or a more complex design, depending on your skill level and desired outcome.
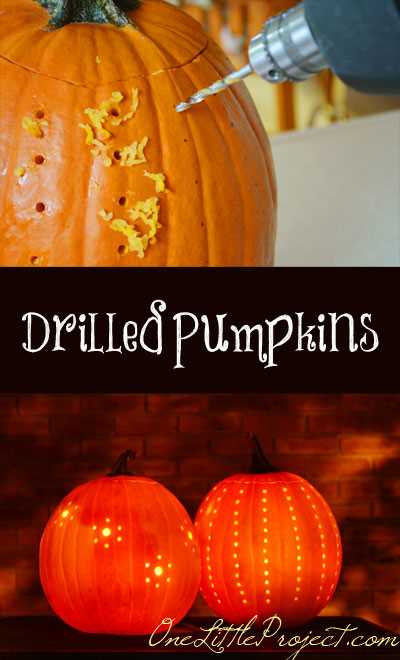
Once you have your design mapped out, begin drilling holes along the edges of your pattern. You can use different-sized drill bits to create varying hole sizes and add depth to your design. Be sure to drill straight down into the pumpkin, and avoid drilling too close to the edge to prevent breakage.
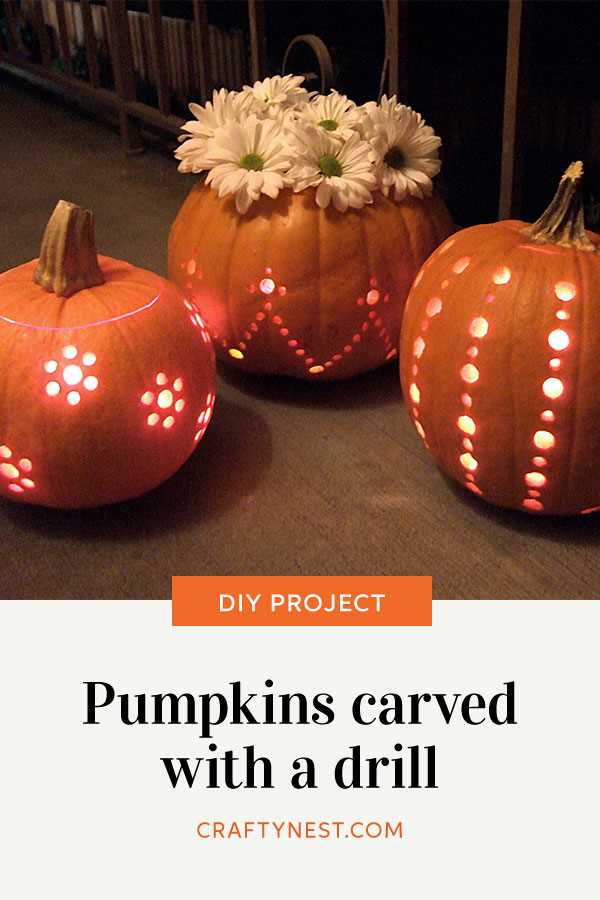
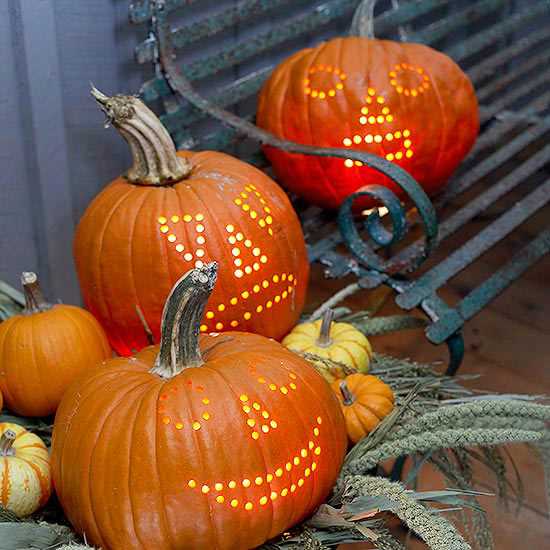
As you work your way through the design, step back occasionally and check your progress. You may need to adjust the size or placement of some holes to achieve your desired effect. Once you’re finished drilling, simply remove any excess pumpkin flesh from the inside of the pumpkin and place a tea light or LED light inside to illuminate your masterpiece.
With a little practice and creativity, you can create amazing pumpkin designs with a drill. Whether you’re carving a spooky face or a intricate pattern, using this simple tool will take your pumpkin carving skills to the next level. So grab a drill, a pumpkin, and get ready to impress this Halloween!
Getting Started: Preparing Your Pumpkins
Before you begin creating your amazing pumpkin designs with a drill, it’s important to properly prepare your pumpkins. Here are the steps to get started:
1. Choose the Right Pumpkins
When selecting pumpkins for drilling, it’s important to choose ones that are firm and have a smooth surface. Avoid pumpkins with soft spots or blemishes, as they may be difficult to work with and may not turn out as well.
2. Clean the Pumpkins
Before starting any design work, it’s crucial to clean the pumpkins to ensure a smooth working surface. Gently wash the pumpkins with mild soap and water, and pat them dry with a clean towel.
3. Gather Your Tools and Supplies
To create amazing pumpkin designs with a drill, you will need the following tools and supplies:
- A medium-sized power drill
- Drill bits of various sizes
- A pencil or marker for sketching the design
- An extension cord if needed
- Newspaper or a drop cloth to protect your work surface
- A carving kit or knife for removing the pumpkin flesh (optional)
4. Plan Your Design
Before drilling into the pumpkins, it’s a good idea to plan out your design. You can sketch the design directly onto the pumpkin with a pencil or marker. This will help guide you as you start drilling and ensure a more precise outcome.
5. Set Up a Work Area
Choose a well-ventilated area, preferably outdoors, for carving the pumpkins. Place newspaper or a drop cloth on your work surface to catch any pumpkin seeds or flesh that may fall during the carving process.
6. Keep Safety in Mind
Remember to always prioritize safety when working with power tools. Wear protective goggles to shield your eyes from flying debris and gloves to protect your hands. If you are not experienced with using a power drill, consider practicing on a spare pumpkin or a piece of scrap wood before starting on your final design.
By following these steps to prepare your pumpkins, you’ll be ready to create amazing pumpkin designs using a drill!
Choosing Your Drill and Drill Bits
When it comes to creating amazing pumpkin designs with a drill, choosing the right drill and drill bits is essential. You’ll want a drill that is powerful enough to easily cut through the pumpkin’s tough skin, but also one that is easy to handle and maneuver. Here are some tips on selecting the right drill for your pumpkin carving project:
Consider the Power
Look for a drill that has enough power to cut through the pumpkin easily. A corded drill usually offers more power than a cordless drill, so if you have access to a power outlet near your carving area, it might be your best bet. However, if you prefer the convenience and portability of a cordless drill, make sure to choose one with a high voltage rating and a powerful motor.
Check the Chuck Size
The chuck size of the drill determines the maximum size of drill bits it can hold. For pumpkin carving, you’ll want a drill with a chuck size that can accommodate bits with a diameter of at least 1/4 inch. Most drills designed for home use can handle this size, but it’s still worth checking before making a purchase.
Consider the Speed
Having variable speed settings on your drill can be beneficial for pumpkin carving. Different speeds can create different effects on the pumpkin’s surface. For example, a lower speed setting can create larger, slower holes, while a higher speed setting can create smaller, faster holes. Look for a drill with adjustable speed settings so you can experiment with different effects.
Choose the Right Drill Bits
When it comes to drill bits for pumpkin carving, you have a few options. For larger, general cuts, a spade bit or a forstner bit can work well. For more intricate designs and details, a smaller drill bit or even a diamond burr bit can be used. Choose a variety of bits to have different options for creating unique designs.
Overall, the key to choosing the right drill and drill bits for pumpkin carving is finding a balance between power, versatility, and ease of use. Experiment with different options to see what works best for you and have fun creating amazing pumpkin designs with your drill!
Design Ideas: Patterns for Amazing Pumpkin Designs
1. Traditional Jack-o’-Lantern
The classic jack-o’-lantern design is a must-have for Halloween. This traditional pattern features a smiling face with triangle eyes and nose, and a jagged mouth. It’s a great design for beginners.
2. Spooky Silhouettes
For a more eerie and mysterious look, consider creating pumpkin designs with spooky silhouettes. Use stencils or draw your own designs, such as bats, witches, black cats, or haunted houses. These designs can be simple or intricate, depending on your skill level.
3. Nature-Inspired Designs
Bring the beauty of nature to your pumpkin designs by carving images of leaves, flowers, or trees. This type of design can be as detailed as you like and can be combined with other elements to create a unique and stunning display.
4. Geometric Patterns
If you prefer a modern and minimalist look, consider using geometric patterns for your pumpkin designs. Carve squares, triangles, or circles to create an abstract and contemporary design that is sure to stand out.
5. Character-inspired Designs
Show off your love for your favorite movies, TV shows, or books by carving pumpkin designs inspired by characters. Whether it’s superheroes, Disney princesses, or iconic villains, these designs are sure to be a hit with fans of all ages.
6. Religious Symbols
For those who want to incorporate their faith into their pumpkin designs, considering carving religious symbols. This can include crosses, angels, or other symbols that hold personal meaning.
7. Words and Phrases
Make a statement with your pumpkin designs by carving words or phrases into the pumpkin. Choose spooky Halloween phrases like “Trick or Treat,” or heartfelt messages like “Happy Halloween.” This design idea allows for creativity and personalization.
8. Animal-inspired Designs
Bring your favorite animals to life with animal-inspired pumpkin designs. Carve images of cats, owls, or wolves, or try your hand at more exotic animals like elephants or lions. These designs are fun and can be customized to fit your personal style.

9. Pumpkin Dioramas
Take pumpkin carving to the next level by creating pumpkin dioramas. Rather than carving designs on the surface, hollow out the pumpkin and create a scene inside. This can include tiny figurines, moss, or other materials to bring the design to life.
10. Abstract Art
If you’re feeling adventurous, try your hand at abstract art with your pumpkin designs. Carve random shapes, lines, and patterns to create a unique and eye-catching design. This is a great opportunity to let your creativity shine.
| Design Idea | Description |
|---|---|
| Traditional Jack-o’-Lantern | A classic design with a smiling face |
| Spooky Silhouettes | Eerie designs of bats, witches, and more |
| Nature-Inspired Designs | Carved images of leaves, flowers, or trees |
| Geometric Patterns | Modern and minimalist designs with shapes |
| Character-inspired Designs | Pumpkin carvings inspired by favorite characters |
| Religious Symbols | Carvings of crosses, angels, or other symbols |
| Words and Phrases | Carving words or phrases into the pumpkin |
| Animal-inspired Designs | Carved images of cats, owls, or other animals |
| Pumpkin Dioramas | Hollowed-out pumpkins with miniature scenes inside |
| Abstract Art | Random shapes, lines, and patterns for a unique design |
Drilling Techniques: Tips for Achieving Precision
1. Choose the Right Drill Bit
The choice of drill bit is crucial for achieving precision in your pumpkin designs. For intricate designs or fine details, use a small drill bit with a sharp point. On the other hand, if you want larger holes or wider lines, opt for a larger drill bit.
2. Mark the Design on the Pumpkin
Before you start drilling, it’s important to mark the design on the pumpkin. Use a pencil or a marker to outline the areas where you will be drilling.
3. Work from the Center Outward
To ensure precision, start drilling from the center of each design element and work your way outward. This allows you to maintain control and avoid any accidental slips or mistakes.
4. Maintain a Steady Hand
Keeping a steady hand while drilling is crucial for achieving precise results. Rest your forearm on a stable surface or table to help steady your hand. Take your time and apply gentle, consistent pressure while drilling.
5. Use Different Drill Speeds
Experiment with different drill speeds to achieve varying effects in your pumpkin designs. Lower speeds are ideal for detailed work, while higher speeds can be used for larger holes or faster drilling.
6. Clear Debris Regularly
As you drill, debris and pumpkin pulp can accumulate in the holes, obstructing your view and affecting the precision of your design. Use a toothpick or a small tool to clear out the holes periodically.
7. Experiment and Practice
Creating amazing pumpkin designs with a drill requires practice and experimentation. Don’t be afraid to try different techniques and drill bit sizes to achieve the desired effects. With time, you’ll become more comfortable and skilled at creating precise designs.
8. Safety Precautions
- Wear safety goggles to protect your eyes from flying debris.
- Secure the pumpkin on a stable surface to prevent it from rolling or moving while drilling.
- Keep your fingers and hand clear of the drill bit at all times.
- Work in a well-ventilated area to avoid inhaling pumpkin fumes.
9. Finishing Touches
After you have completed drilling your pumpkin design, take the time to clean up any rough edges or imperfections. Use a small knife or a sanding tool to smooth out any uneven areas and make your design look even more polished.
Remember to have fun and enjoy the creative process! Whether you’re a beginner or an experienced pumpkin artist, these drilling techniques will help you achieve precision and create amazing pumpkin designs.
Adding Finishing Touches: Painting and Decorating your Pumpkins
Once you’ve finished drilling your pumpkin designs, it’s time to add some finishing touches to make them truly amazing! Painting and decorating your pumpkins will add depth and character to your designs, making them stand out even more.
Painting your Pumpkins
Painting your pumpkins is a great way to add color and create a unique look. Here are some tips for painting your pumpkins:
- Start by cleaning the surface of your pumpkin with a damp cloth to remove any dirt or debris. This will help the paint adhere better.
- Choose acrylic paints in various colors for your design. These paints work well on pumpkins and dry quickly.
- Use a small paintbrush or sponge to apply the paint. You can create solid colors or even try blending different shades for a more artistic effect.
- Allow the paint to dry completely before adding any additional decorations or touches.
Decorating your Pumpkins
In addition to painting, you can also decorate your pumpkins with various materials to add texture and interest. Here are some ideas for decorating your pumpkins:
- Glitter: Apply glue on specific areas of your pumpkin and sprinkle glitter over it. This will add a touch of sparkle and shine.
- Ribbons and Bows: Tie colorful ribbons or bows around the stem of your pumpkin. This will give it a festive and playful look.
- Stickers and Decals: Use stickers or decals to easily add patterns or designs to your pumpkins. You can find a wide variety of themed stickers at craft stores.
- Fabric: Cut out pieces of fabric in various shapes and sizes and glue them onto your pumpkin. This will create a visually interesting patchwork effect.
- Natural Elements: Add dried leaves, flowers, or twigs to your pumpkins for a rustic or autumnal feel. Secure them with hot glue for a long-lasting hold.
- Rhine Stones or Gems: Glue rhine stones or gems onto your pumpkin to add some sparkle and glamour.
Feel free to mix and match different techniques to create unique and eye-catching designs. Remember, the possibilities are endless when it comes to painting and decorating your pumpkins!
Displaying Your Masterpieces: Indoor and Outdoor Ideas
1. Indoor Display Ideas
Once you have finished creating your amazing pumpkin designs, you’ll want to find the perfect way to display them indoors. Here are a few ideas to inspire you:
- Place your carved pumpkins on a decorative tray or platter and display them on a mantel or shelf.
- Create a pumpkin centerpiece by grouping several pumpkins of different sizes together on a table. You can add other fall-themed decorations like leaves, acorns, or candles to enhance the display.
- If you have a large window sill or ledge, arrange your pumpkins there for a charming indoor display that can be seen from both inside and outside.
- Display your pumpkins on a tiered cake stand to create an eye-catching centerpiece for a Halloween party or gathering.
- If you have a fireplace, place your carved pumpkins inside for a cozy and festive touch.
- Use fairy lights or battery-operated candles inside your pumpkins to create a warm and inviting glow that can be admired throughout the evening.
2. Outdoor Display Ideas
If you want to show off your pumpkin designs to passersby or create a festive atmosphere in your outdoor space, here are some ideas for displaying your masterpieces outdoors:
- Create a pumpkin patch by arranging your carved pumpkins on your front porch or in your garden. You can add hay bales, scarecrows, or other fall decorations to complete the look.
- Hang your pumpkins from tree branches or hooks using sturdy twine or rope for a whimsical and unique display.
- If you have a fence or railing, line it with your carved pumpkins to create a spooky and festive border.
- Use a large basket or wheelbarrow filled with straw to display your pumpkins. This adds a rustic touch and makes it easy to move your pumpkins around if needed.
- If you have a garden bench or chair, place a carved pumpkin on it with a sign inviting visitors to take a seat and admire your handiwork.
- Illuminate your outdoor display by placing battery-operated candles or solar-powered lights inside your pumpkins. This will create a magical ambiance once the sun goes down.
Whichever way you choose to display your amazing pumpkin designs, remember to have fun and get creative. The possibilities are endless, and your unique displays will surely impress your friends and neighbors!
Preserving Your Pumpkins: Tips for Extending their Lifespan
1. Choose the Right Pumpkin
When selecting pumpkins, choose ones that are firm and free of any soft spots or blemishes. Look for pumpkins with a thick stem as they tend to last longer.
2. Clean and Disinfect
Before carving your pumpkin, wash it thoroughly with soap and water to remove any dirt or bacteria. You can also use a mixture of bleach and water to disinfect the pumpkin’s surface.
3. Keep It Cool
Pumpkins tend to last longer in cooler temperatures. Store your carved or uncarved pumpkins in a cool place, such as a garage or basement, away from direct sunlight and heat sources.
4. Seal the Edges
After carving your pumpkin, apply petroleum jelly or vegetable oil to the cut edges to help seal in moisture and slow down the decaying process.
5. Use a Preservative Spray
You can also use a commercial pumpkin preservative spray to extend the lifespan of your carved pumpkins. Simply spray the solution onto the carved areas and allow it to dry.
6. Avoid Moisture
Moisture can speed up the rotting process. Avoid placing your pumpkins on damp surfaces and keep them away from any sources of moisture, such as sprinklers or rain.
7. Avoid Touching
Try to avoid touching your pumpkins too much, as the oils from your hands can speed up the decaying process. If you need to handle your pumpkins, use gloves or a cloth to minimize contact.
8. Refresh with Water
If your pumpkins start to shrivel or dry out, you can rehydrate them by soaking them in a bucket of water for a couple of hours. This can help prolong their lifespan.
9. Light with LED Candles
Instead of using real candles, opt for LED candles to light up your carved pumpkins. This will help reduce the risk of fire and prevent the heat from accelerating decay.
10. Consider Alternative Decorations
If you want to extend the lifespan of your pumpkins even further, consider using alternative materials such as foam or artificial pumpkins. These can be carved and decorated just like real pumpkins but will last much longer.
Sharing Your Creations: Creative Ideas for Showcasing your Work
1. Social Media
One of the easiest and most effective ways to showcase your pumpkin designs is through social media platforms such as Instagram, Facebook, and Twitter. Create a dedicated hashtag for your designs, and use it when posting your photos. This will allow others to easily find and share your work, while also providing you with a way to track engagement and connect with other pumpkin enthusiasts.
2. Online Portfolios
If you want to showcase your pumpkin designs in a more professional manner, consider creating an online portfolio. There are many websites and platforms available that allow you to easily create and customize your portfolio. Include high-quality photos of your designs, along with a brief description of each piece. This will help you to stand out from the crowd and attract potential clients or collaborations.
3. Local Art Events
Check for local art events or festivals in your area where you can showcase your pumpkin designs. These events often attract a diverse range of people who appreciate and value artistic creations. Set up a booth or display area where you can showcase your designs, and consider offering live demonstrations or workshops to engage with the audience and gain exposure.
4. Collaborations
Reach out to other artists or crafters in your community and propose collaborations. For example, you could partner with a photographer to create professional photos of your pumpkin designs, or collaborate with a local shop or gallery to display your work. Collaborations not only provide exposure for your designs but also give you an opportunity to learn from and be inspired by others in your creative community.
5. Contests and Competitions

Enter your pumpkin designs in contests and competitions to gain recognition and exposure. Look for local or online contests specifically focused on pumpkin or Halloween-themed art. Read the rules and guidelines carefully, and submit your designs within the specified time frame. Winning or even being mentioned in a contest will help boost your credibility and visibility in the art community.
| Pros | Cons |
|---|---|
| Easy to reach a wide audience | May attract negative comments or criticism |
| Can track engagement and connect with other artists | Can be time-consuming to maintain an active presence |
| Opportunity to collaborate with other artists | May require investment in professional equipment or services |
| Can attract potential clients or collaborations | Can have a lot of competition |
| Provides exposure and opportunities for recognition | May not reach your target audience |
FAQ:
What tools do I need to create pumpkin designs with a drill?
To create pumpkin designs with a drill, you will need a pumpkin, a drill, carving templates or stencils, a marker or pen, and a small carving knife.
Do I need any special skills to create pumpkin designs with a drill?
No, you don’t need any special skills to create pumpkin designs with a drill. The process is quite simple and beginner-friendly.
Can I use any pumpkin for this project?
Yes, you can use any pumpkin for creating designs with a drill. However, choose a pumpkin that is fresh and has a smooth surface for better results.
What are some design ideas for pumpkin carving with a drill?
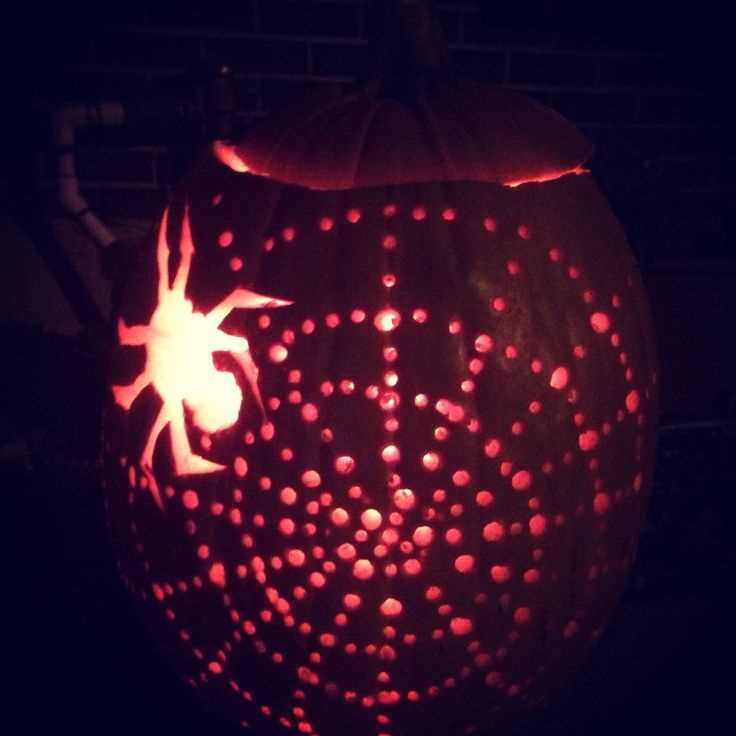
Some design ideas for pumpkin carving with a drill include geometric patterns, stars, moon and stars, spider webs, bats, and haunted houses.
How long does it take to create a pumpkin design with a drill?
The time it takes to create a pumpkin design with a drill depends on the complexity of the design and your skill level. It can range from 30 minutes to a few hours.
Can I preserve a pumpkin design created with a drill?
Yes, you can preserve a pumpkin design created with a drill by coating the carved areas with petroleum jelly or a mixture of water and bleach. This will help prevent the pumpkin from rotting quickly.
Video:

Meet Harrison Clayton, a distinguished author and home remodeling enthusiast whose expertise in the realm of renovation is second to none. With a passion for transforming houses into inviting homes, Harrison's writing at https://thehuts-eastbourne.co.uk/ brings a breath of fresh inspiration to the world of home improvement. Whether you're looking to revamp a small corner of your abode or embark on a complete home transformation, Harrison's articles provide the essential expertise and creative flair to turn your visions into reality. So, dive into the captivating world of home remodeling with Harrison Clayton and unlock the full potential of your living space with every word he writes.