Drilling into brick: Step-by-step guide

Drilling into brick can be a challenging task, but with the right tools and techniques, it can be done safely and effectively. Whether you’re looking to hang a picture, install a shelf, or mount an outdoor fixture, drilling into brick is often necessary. In this step-by-step guide, we will walk you through the process to ensure that your drilling project is a success.
Step 1: Gathering the necessary tools and materials
Before you begin drilling into brick, make sure you have all the necessary tools and materials on hand. These include a masonry drill bit, a power drill, a hammer, a level, a tape measure, and the item you will be installing. It’s also a good idea to wear safety goggles and work gloves to protect yourself during the process.
Step 2: Finding a suitable location
Next, you will need to determine a suitable location for your installation. Use a tape measure and a level to ensure that the placement is straight and aligned. Mark the spot with a pencil or a piece of chalk.

Step 3: Preparing the drill
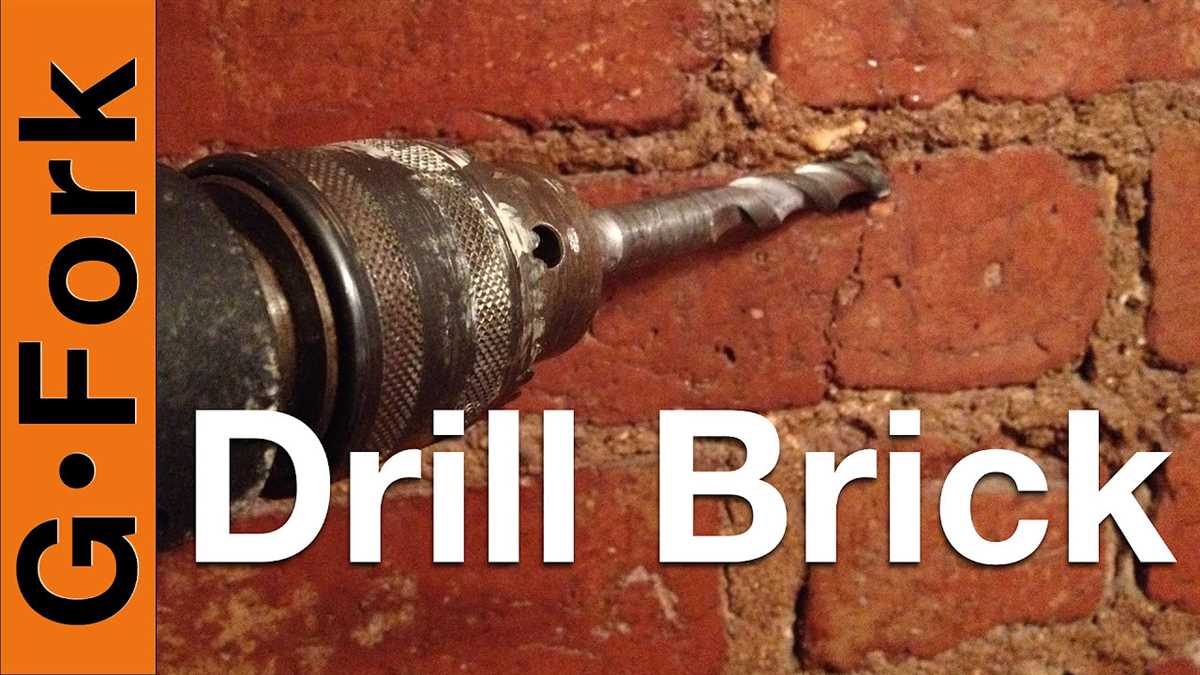
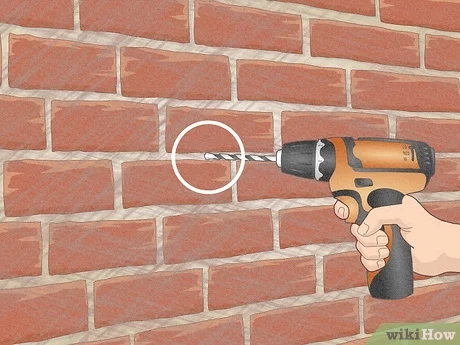
Attach the masonry drill bit to your power drill. It’s important to use a masonry bit specifically designed for drilling into brick or concrete. These bits have a carbide tip that can penetrate the tough surface of the brick. Once the bit is securely attached, set your drill to the reverse function and gently tap it against the surface of the brick to create a small indentation.
Step 4: Drilling into the brick
Now it’s time to start drilling. Hold the drill perpendicular to the surface of the brick and apply steady pressure as you drill. Take breaks every few seconds to clear away the dust and debris. Remember to work slowly and be patient, as rushing can lead to mistakes or damage to the brick.
Step 5: Finishing touches
Once the hole is drilled to the desired depth, stop the drill and brush away any remaining dust. Take your item and align the mounting holes with the hole in the brick. Insert the appropriate screws or anchors and tighten them until they are secure. Finally, double-check the alignment and make any necessary adjustments.
By following these step-by-step instructions, you can drill into brick with confidence and achieve professional-looking results. Remember to take your time, use the right tools, and prioritize safety throughout the process.
Why drill into brick
Drilling into brick can be necessary for a variety of reasons, including home improvement projects or repairs. Here are some common reasons why you might need to drill into brick:
1. Hanging decorations
Brick walls can provide a sturdy surface for hanging decorations, such as picture frames, shelves, or mirrors. By drilling into the brick, you can securely mount these items and add a personalized touch to your living space.
2. Installing fixtures
If you want to install fixtures like light fixtures, electrical outlets, or wall-mounted speakers, drilling into brick may be necessary. Brick provides a durable foundation for these fixtures and ensures they are securely attached to the wall.
3. Mounting brackets
Brick walls are often used to mount brackets for items like TV mounts, curtain rods, or shelving units. By drilling into the brick, you can create a stable anchor point for these brackets, allowing you to safely hang and support heavy objects.
4. Repairing damaged brickwork
If your brickwork has been damaged, drilling into the brick may be necessary for repair purposes. For example, you may need to drill into the damaged area to insert new bricks or apply mortar. This can help restore the structural integrity of the wall and prevent further damage.
5. Adding ventilation or ductwork
Drilling into brick can also be necessary when adding ventilation or ductwork to a building. Whether it’s for a bathroom exhaust fan or a dryer vent, drilling into the brick allows you to create an opening for the necessary pipes or ducts.
Before drilling into brick, it’s important to take proper safety precautions and use the correct tools and techniques. Make sure to wear safety goggles, use a masonry drill bit, and start with a pilot hole before drilling larger holes. This will help ensure that the drilling process is successful and avoids any unnecessary damage.
Step 1: Safety precautions
Before drilling into brick, it is important to take certain safety precautions to prevent accidents or damage. Follow these steps to ensure a safe drilling experience:
1. Wear protective gear
Always wear appropriate safety gear, including safety goggles, gloves, and a dust mask. This will protect your eyes, hands, and respiratory system from any flying debris or dust.
2. Inspect the surface
Before drilling, inspect the surface of the brick to identify any cracks, loose bricks, or other potential hazards. Avoid drilling near these areas to prevent further damage or potential collapse.
3. Check for hidden pipes or wires
Use a stud finder or a similar tool to check for any hidden pipes or wires behind the brick wall. Avoid drilling in these areas to prevent damage to the infrastructure or potential hazards.
4. Use a stable ladder or platform
If drilling in a high area, make sure to use a stable ladder or platform to reach the desired spot. This will help prevent falls or injuries while drilling.
5. Secure the workpiece
Secure the workpiece, whether it’s a template or the actual material, to prevent any movement or slipping during the drilling process. This will ensure accurate drilling and prevent accidents.
6. Use the appropriate drill bit
Choose a drill bit specifically designed for drilling into brick or masonry. Using the wrong type of bit can result in damage to the brick or the drill itself.
7. Start with a pilot hole
Begin drilling with a pilot hole to guide the larger drill bit. This will help prevent the drill from slipping and ensure a more accurate hole.
8. Work at a slow and steady pace
When drilling into brick, it’s important to work at a slow and steady pace. Applying too much pressure or drilling too quickly can result in damage to the brick or the drill bit.
9. Clean up the workspace
After drilling, clean up the workspace to remove any debris or dust. This will help maintain a safe working environment and prevent accidents.
10. Store the tools properly
When you’re finished drilling, store your tools properly in a safe and secure location. This will prevent accidents and ensure that the tools are in good condition for future use.
Step 2: Choosing the right drill bit
Choosing the right drill bit is crucial when drilling into brick. The type of drill bit you use will depend on the material of the brick and the size of the hole you need to make. Here are some factors to consider when choosing a drill bit for drilling into brick:
1. Masonry drill bit:
When drilling into brick, you will need a masonry drill bit specifically designed for masonry materials. These bits are made of hardened steel and have a carbide tip that can penetrate the tough surface of the brick. They are available in various sizes to accommodate different hole sizes.
2. Size of the hole:
The size of the hole you need to make will determine the size of the drill bit you should use. Measure the diameter of the anchor or screw you plan to use and choose a corresponding drill bit size. It is recommended to use a slightly larger drill bit to allow for expansion of the anchor or screw.
3. Type of brick:
The type of brick you are drilling into will also affect the choice of drill bit. If you are drilling into soft or common bricks, a standard masonry bit should work fine. However, if you are drilling into harder bricks, such as clay bricks or engineering bricks, you may need to use a hammer drill or a diamond-tipped drill bit for better results.
4. Depth of the hole:
Consider the depth of the hole you need to make. Some drill bits have a specific length capacity, so make sure to choose a drill bit that can accommodate the depth of the hole. It is important to mark the desired depth on the drill bit to ensure you do not drill too deep.
5. Quality of the drill bit:
Investing in a high-quality drill bit is essential for a successful drilling operation. Cheaper drill bits may wear out quickly or break while drilling into tough masonry materials. Look for drill bits with a good reputation for durability and performance.
By considering these factors and choosing the right drill bit, you can ensure a smooth and effective drilling process when working on bricks.
Step 3: Marking the drilling spot
Before you start drilling, it is important to mark the spot where you want to make a hole in the brick. This will help ensure accuracy and prevent any mistakes.
Here are the steps to follow when marking the drilling spot:
- Measure and mark the exact location where you want to drill the hole with a pencil or marker. Make sure to use a measuring tape to ensure accuracy.
- If you are drilling multiple holes, use a level to ensure that all the marks are in a straight line.
- Consider using a piece of masking tape or painter’s tape to mark the spot. This will help prevent the drill bit from slipping and provide a clean surface for marking.
- Double-check your measurements and markings to ensure they are accurate before proceeding to the next step.
By properly marking the drilling spot, you can ensure that the holes will be drilled exactly where you want them and avoid any unnecessary mistakes or errors.
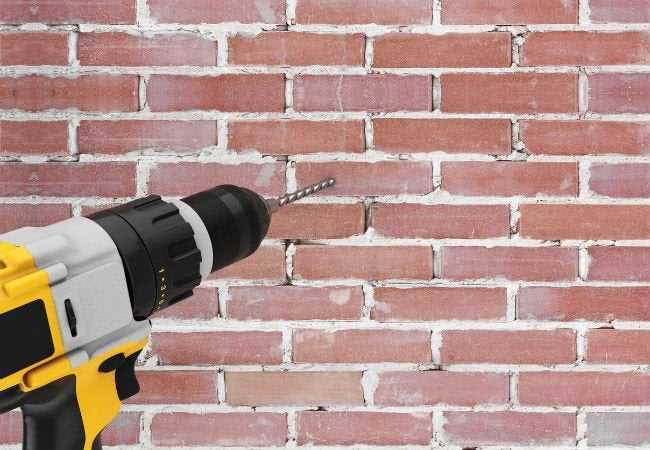
Step 4: Drilling into the brick
Once you have marked the spot on the brick where you want to drill, it’s time to start drilling. Follow these steps to drill into the brick:
Materials needed:
- Power drill
- Masonry drill bit
- Safety goggles
Instructions:
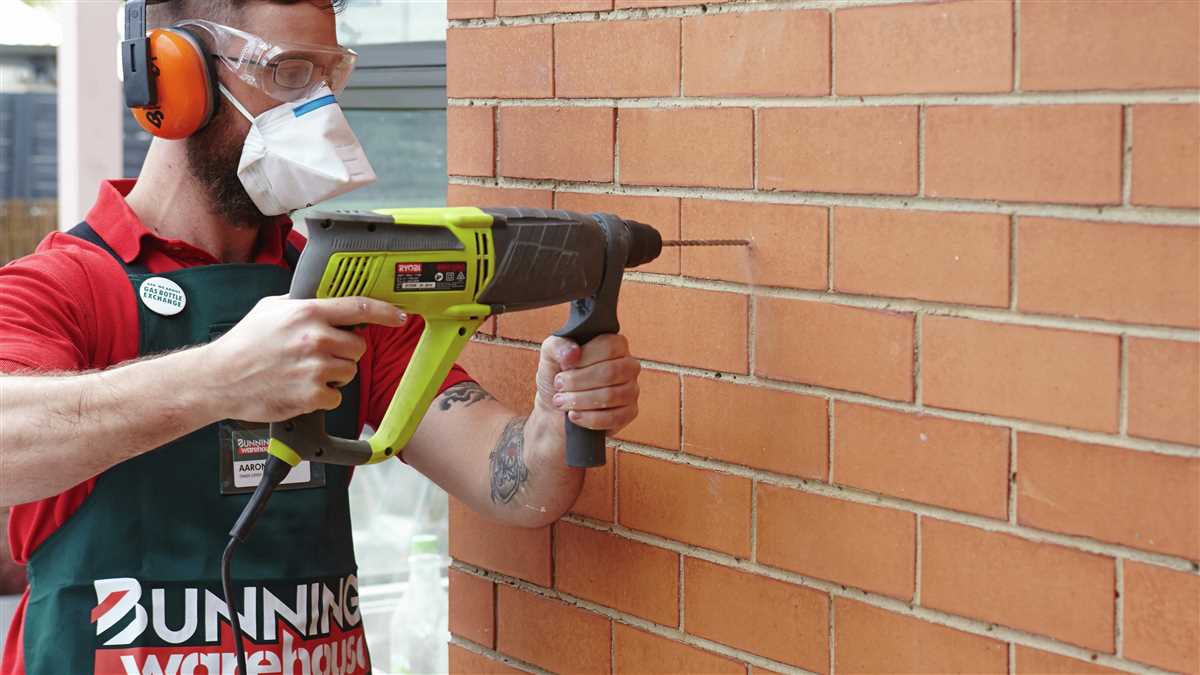
- Put on the safety goggles to protect your eyes from any flying debris.
- Attach the masonry drill bit to your power drill. Make sure the drill bit is the appropriate size for the hole you want to create.
- Select the hammer drill mode on your power drill if it has one. This will help with drilling into the brick.
- Hold the power drill with a firm grip and position the drill bit at a 90-degree angle to the marked spot on the brick.
- Begin drilling slowly and apply constant pressure. Let the drill bit do the work and avoid pushing too hard.
- Go slowly and be patient, especially if you encounter any resistance. Stop and adjust your technique if necessary.
- Continue drilling until you have reached the desired depth or the hole is complete.
- Once you have finished drilling, remove the drill bit and inspect the hole to ensure it is the correct size and shape.
Remember to always exercise caution when working with power tools and wear appropriate safety gear.
Step 5: Removing dust and debris
After drilling into brick, it is important to remove any dust and debris that may have accumulated during the process. This will help ensure a clean surface and prevent any potential damage or interference with the next steps. Here’s how to remove dust and debris effectively:
- Use a handheld brush or broom to sweep away loose dust and debris from the drilled holes and surrounding area. Make sure to brush gently to avoid damaging the brick or pushing the dust deeper into the holes.
- If there is still a significant amount of dust remaining, you can use a vacuum cleaner with a brush attachment to carefully suck up the remaining debris. Again, be gentle to prevent any damage.
- For stubborn dust or debris that is stuck in the drilled holes, you can use compressed air to blow it out. Make sure to wear protective eyewear and follow the manufacturer’s instructions for using the compressed air canister.
Once you have removed all the dust and debris, visually inspect the drilled holes to ensure they are clean and ready for the next step. If you notice any lingering dust or debris, repeat the cleaning process until the holes are completely clear.
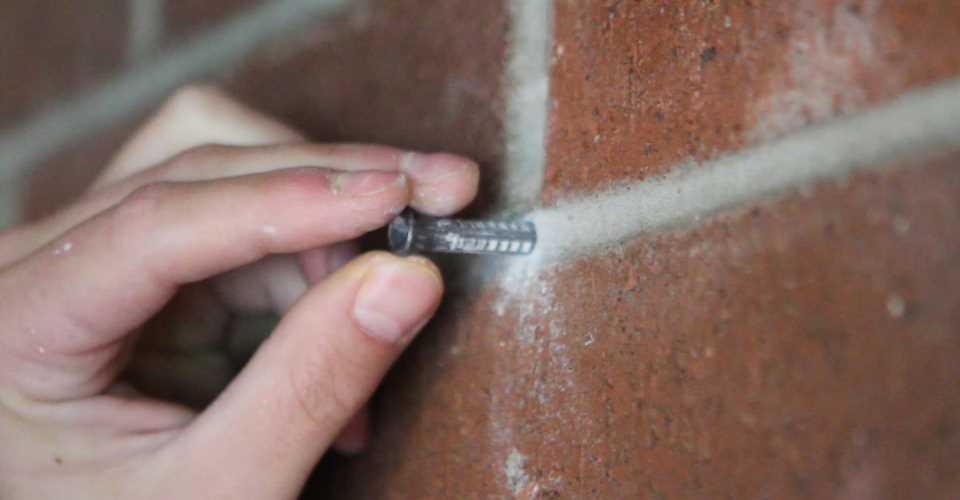
Step 6: Anchoring an object to the brick
Once you have successfully drilled the hole in the brick, you can now proceed to anchor an object to it. Anchoring an object securely will ensure that it stays in place and doesn’t come loose over time.
Materials needed:
- Anchors (plastic or metal)
- Screws
- Power drill
- Screwdriver bit
Instructions:
- Choose the appropriate anchor and screw size for the object you will be anchoring. The size of the anchor and screw will depend on the weight and size of the object.
- Insert the anchor into the hole in the brick. Make sure it fits snugly and is flush with the surface of the brick.
- Using a power drill with a screwdriver bit, drive the screw into the anchor until it is secure. Be careful not to overtighten the screw as it could damage the anchor.
- Once the screw is fully tightened, check to ensure that the object is securely anchored to the brick. Give it a gentle tug to make sure it doesn’t move.
It is important to note that the type of anchor you use will depend on the material of the object you are anchoring. For example, if you are anchoring a wooden shelf to the brick, you may want to use a different type of anchor than if you were anchoring a metal hook.
Always follow the manufacturer’s instructions for the specific anchor and screw you are using. Different anchors and screws may have slight variations in how they are installed.
By following these steps, you can successfully anchor an object to a brick surface and ensure that it remains securely in place.
Step 7: Finishing touches
Once you have completed drilling into the brick, there are a few finishing touches you can do to ensure the project is complete.
Clean up the area
After drilling, the brick dust and debris can make quite a mess. It’s important to clean up the area to prevent any accidents or damage. Use a broom or a vacuum cleaner to remove the dust from the floor or any nearby surfaces. Make sure to dispose of the debris properly.
Fill in the holes
If you have drilled any holes that are not going to be used, it’s a good idea to fill them in. You can use a brick-colored caulk or filler to fill in the holes. With a putty knife or your finger, press the filler into the holes and smooth it out. Allow it to dry according to the manufacturer’s instructions.
Seal the holes
If the holes you drilled are going to be used for anchors or screws, it’s a good idea to seal the holes to prevent any moisture from getting in. Apply a waterproof sealant or silicone caulk around the edges of the holes to create a watertight seal. Smooth out the sealant with a putty knife or your finger and allow it to dry.
Inspect the area
Once everything is cleaned up and the holes are filled and sealed, take a step back and inspect the area. Make sure everything looks neat and tidy. Check for any visible imperfections or areas that need touch-ups. If necessary, make any necessary adjustments or touch-ups to ensure a professional finish.
Following these finishing touches will ensure that your drilling project into brick is complete and that the area looks clean and professional. Remember to always exercise caution when working with power tools and to follow all safety guidelines. Enjoy your newly drilled brick surface!
Step 8: Tips and tricks
1. Choose the right drill bit
When drilling into brick, it’s important to use the right drill bit. Masonry bits are specifically designed to handle the tough materials like brick, concrete, or stone. They have a carbide tip that is much stronger and more durable than a regular drill bit. Make sure to choose the correct size masonry bit for the size of hole you need.
2. Use a hammer drill
A hammer drill is the best tool for drilling into brick. It combines rotary drilling with a forward hammering action, which helps to break up the tough surface of the brick. This makes the drilling process easier and faster. If you don’t have a hammer drill, you can still use a regular drill, but it may take more time and effort.
3. Start with a smaller pilot hole
Before drilling the actual hole, it’s a good idea to start with a smaller pilot hole. This will help you to accurately position the larger drill bit and prevent it from slipping. Use a smaller masonry bit to create the pilot hole, and then switch to the larger bit to drill the final hole.
4. Keep the drill speed moderate
When drilling into brick, it’s important to use a moderate drill speed. Using a high speed can cause the drill bit to overheat and become less effective. A slower speed will provide more control and prevent damage to the brick.
5. Use water for lubrication
Drilling into brick can generate a lot of dust and heat. To prevent the drill bit from overheating and to reduce dust, you can use water as a lubricant. Simply spray a small amount of water on the drilling area as you work. This will help to keep the drill bit cool and prolong its lifespan.
6. Clean the hole after drilling
After drilling into the brick, it’s important to clean out the hole. Use a brush or compressed air to remove any debris and dust from the hole. This will ensure a proper fit for any anchors or screws that you plan to insert.
7. Wear protective gear

When drilling into brick, make sure to wear appropriate protective gear. This includes safety goggles to protect your eyes from flying debris, a dust mask to prevent inhalation of dust particles, and gloves to protect your hands from sharp edges. Safety should always be a top priority when working with power tools.
8. Practice on a scrap piece of brick
If you’re new to drilling into brick, it’s a good idea to practice on a scrap piece of brick first. This will give you a chance to get a feel for the drilling process and make any adjustments if necessary. It’s better to make mistakes on a practice piece than on your actual project.
9. Seek professional help if needed
If you’re unsure about drilling into brick or if you’re dealing with a complex project, it’s always a good idea to seek professional help. A professional contractor or handyman will have the experience and tools necessary to get the job done properly and safely.
FAQ:
What tools do I need to drill into brick?
To drill into brick, you will need a power drill, a masonry drill bit, a hammer, a tape measure, a level, a pencil, safety glasses, and a dust mask.
Can I use a regular drill bit to drill into brick?
No, you should not use a regular drill bit to drill into brick. You need to use a masonry drill bit specifically designed for drilling into hard materials like brick.
What size drill bit should I use to drill into brick?
The size of the masonry drill bit you should use depends on the size of the hole you want to drill. For standard anchor screws, a 3/16-inch masonry drill bit is commonly used.
How do I mark the spot where I want to drill into brick?
You can mark the spot where you want to drill into brick by using a tape measure and a pencil to measure and mark the desired position. You can also use a level to ensure that your mark is straight.
Do I need to wear any protective gear when drilling into brick?
Yes, it is important to wear safety glasses and a dust mask when drilling into brick. Safety glasses will protect your eyes from any flying debris, and a dust mask will prevent you from inhaling any dust particles.
What is the best technique for drilling into brick?
The best technique for drilling into brick is to start with a low speed and gradually increase the speed as you drill. Apply steady pressure and let the drill do the work. Keep the drill perpendicular to the brick and avoid excessive force, as it may cause the drill bit to break.
How do I clean up the dust after drilling into brick?
You can clean up the dust after drilling into brick by using a brush or a vacuum cleaner. Make sure to wear a dust mask when cleaning up to avoid inhaling any dust particles.
Video:


Meet Harrison Clayton, a distinguished author and home remodeling enthusiast whose expertise in the realm of renovation is second to none. With a passion for transforming houses into inviting homes, Harrison's writing at https://thehuts-eastbourne.co.uk/ brings a breath of fresh inspiration to the world of home improvement. Whether you're looking to revamp a small corner of your abode or embark on a complete home transformation, Harrison's articles provide the essential expertise and creative flair to turn your visions into reality. So, dive into the captivating world of home remodeling with Harrison Clayton and unlock the full potential of your living space with every word he writes.


