Drilling a Hole in Glass: Step-by-Step Guide and Tips

Glass is a beautiful and versatile material that is often used in home decor and DIY projects. However, drilling a hole in glass can be a tricky task that requires precision and caution. Whether you’re trying to create a hole for a light fixture or want to repurpose a glass bottle, this step-by-step guide will help you achieve clean and accurate results.
Step 1: Gather the necessary tools: Before you begin drilling, you’ll need a few essential tools. These include a glass drill bit, a drill with adjustable speed, water, and safety equipment such as goggles and gloves. Ensuring you have the right tools will make the process easier and safer.
Step 2: Prepare the glass: To prevent cracks or breakage, it’s crucial to prepare the glass surface before drilling. Start by placing the glass on a soft and stable surface. Then, use a glass cleaner or soapy water to clean the area where you plan to drill. This will remove any dirt or debris that could interfere with the drilling process.
Step 3: Mark the drilling point: Using a waterproof marker or a small piece of tape, mark the exact spot where you want to drill the hole. Take your time to ensure accuracy, as any mistake at this stage can be difficult to fix later on. If you’re drilling multiple holes, consider using a template or guide to maintain consistency.
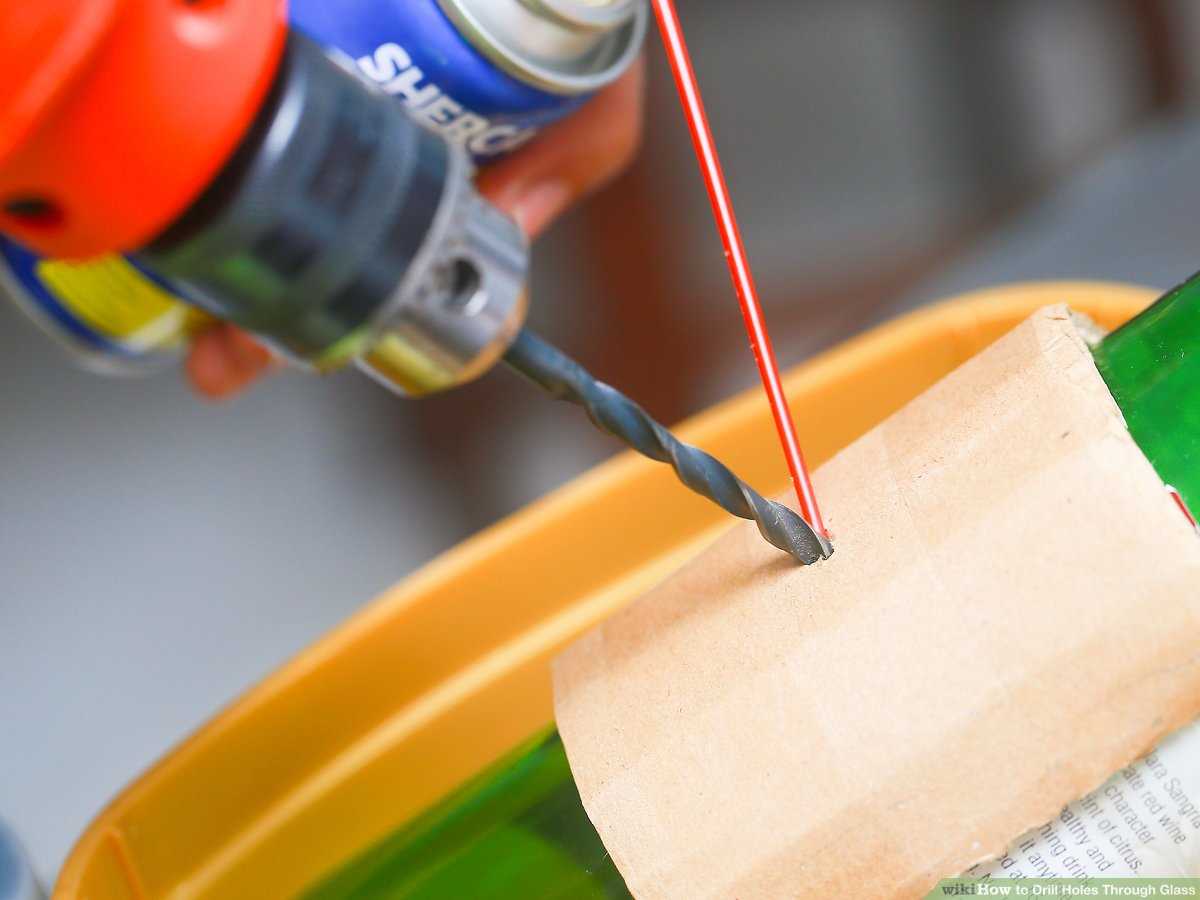
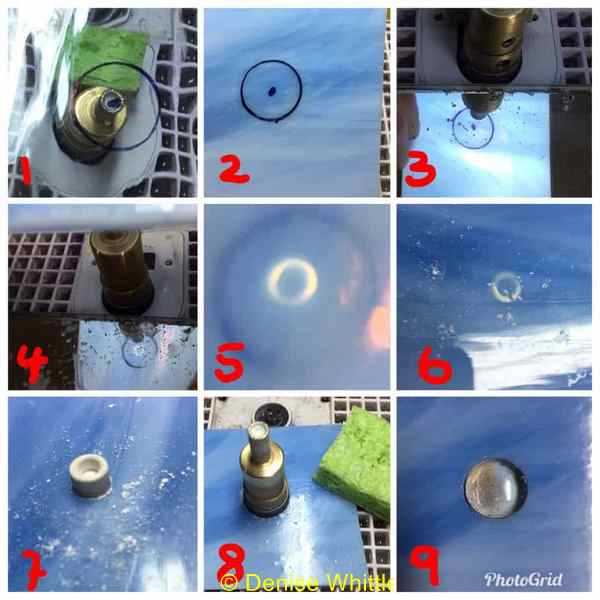
Step 4: Start drilling: Fill a container with water and place it near the drilling area. This will help cool down the glass and prevent it from cracking. Dip the glass drill bit into the water to lubricate it, and then position it on the marked spot. Start drilling with a slow and steady speed, applying gentle pressure. Avoid applying too much force, as it can cause the glass to break.

Step 5: Continue drilling: As you drill, periodically dip the drill bit into the water to keep it cool and lubricated. Continue drilling at a slow speed until you’ve reached the desired depth. If you’re drilling a larger hole, you may need to switch to a larger drill bit and repeat the process.
Tip: It’s essential to maintain a steady hand and a controlled speed throughout the drilling process. This will prevent the glass from cracking or chipping.
Step 6: Clean up: Once you’ve drilled the hole, carefully wipe away any debris or glass shavings. You can use a damp cloth or a vacuum cleaner with a brush attachment. Be sure to dispose of the glass shavings safely to avoid any injuries.
By following these steps and practicing caution, you’ll be able to successfully drill a hole in glass for your next project. Remember to take your time and be patient, as rushing can lead to mistakes and a damaged piece of glass. With practice, you’ll become more confident and skilled at working with glass.
Overview of Drilling a Hole in Glass
Drilling a hole in glass can be a delicate and precise process. Whether you are creating a hole for a glass vase, a glass bottle, or a glass pane, it is important to take the right steps to ensure a clean and successful outcome. Here is an overview of the necessary steps and some tips to make drilling a hole in glass a breeze.
Materials Needed
- Glass surface to be drilled
- Drill suitable for glass (diamond-tipped or carbide-tipped)
- Masking tape
- Lubricant or coolant (water or cutting oil)
- Safety glasses
Step-by-Step Guide
- Clean the glass surface: Ensure that the glass surface is clean and free from any dirt, dust, or debris that could interfere with the drilling process.
- Mark the drilling spot: Use a marker or masking tape to mark the exact spot where you want to drill the hole. This will help guide your drilling and prevent the drill from slipping.
- Secure the glass: Place the glass on a stable surface or use clamps to secure it in place. This will prevent the glass from moving or cracking during the drilling process.
- Apply lubricant: Apply a generous amount of lubricant or coolant to the drilling spot. This will help reduce friction and prevent overheating of the glass, which can cause cracking or shattering.
- Start drilling: Begin drilling at a slow speed with light pressure. As the drill bit makes contact with the glass, increase the speed slightly and apply steady, even pressure. Do not force the drill or put too much pressure, as this can damage the glass.
- Keep the drill cool: Periodically dip the drill bit into the lubricant or coolant to keep it cool. This will help prevent overheating and reduce the risk of cracking the glass.
- Finish the hole: Drill through the glass using a constant, steady motion until you have reached the desired depth.
- Remove any burrs: After drilling the hole, use fine-grit sandpaper to remove any rough edges or burrs around the hole.
- Clean up: Clean the glass surface and remove any remaining debris or lubricant.
Tips
- Wear safety glasses to protect your eyes from any glass shards or debris.
- Start with a small pilot hole to help guide the larger drill bit and reduce the risk of the glass cracking.
- Take breaks and allow the drill bit to cool down if it starts to get hot.
- Practice on a scrap piece of glass before drilling into your desired material.
- Use a low drilling speed to minimize the risk of the glass cracking or shattering.
By following these steps and tips, you can successfully drill a hole in glass without damaging or cracking the material. Remember to take your time, be patient, and exercise caution throughout the process.

Preparation
Before you start drilling a hole in glass, it’s important to gather all the necessary materials and ensure proper safety measures are in place. Here’s what you’ll need:
- Glass surface: Select the piece of glass you want to drill a hole in. Make sure it is clean and free from any debris.
- Drill: Use a handheld power drill or a drill press with adjustable speed settings.
- Drill bit: Choose a specialized diamond-tipped drill bit designed for glass drilling. These can be found at most hardware stores.
- Masking tape: Apply a strip of masking tape over the area where you plan to drill the hole. This will help prevent the drill bit from slipping and provide additional stability.
- Lubricant: Use a lubricant specifically made for glass drilling, such as water or a drilling oil. This will keep the drill bit cool and minimize the risk of cracks or chips.
- Safety goggles and gloves: Protect your eyes and hands from any flying glass fragments or potential injuries.
- Workbench or sturdy surface: Place the glass on a stable workbench or surface where it won’t move or shift during the drilling process.
Once you have gathered all the necessary materials, you can proceed to the next step: marking the spot where you want to drill the hole.
Gather the Necessary Tools and Materials
Before you start drilling a hole in glass, it’s important to gather all the necessary tools and materials. Having everything ready will make the process smoother and safer.
Tools

- Glass drill bit
- Power drill
- Masking tape
- Center punch or nail
- Safety glasses
- Gloves
- Marker
- Clamp or suction cup
- Water or lubricant
- Dremel tool (optional)
Materials
- Glass piece
- Water basin or bucket
- Protective covering for work surface (e.g., towel or newspaper)
Make sure you have all the tools and materials listed above before proceeding with drilling a hole in glass. Having these items at hand will ensure a successful and safe drilling experience.
Step 1: Marking the Hole
Before you start drilling a hole in glass, it’s important to mark the exact location where you want the hole to be. This ensures that you drill in the right spot and prevents any mistakes.
Here’s how you can mark the hole:
- First, clean the glass surface thoroughly to remove any dirt, dust, or fingerprints. This will make it easier to mark the hole and prevent any smudging.
- Using a permanent marker or a glass marking pen, gently mark the center of the hole. You can make a small dot or a crosshair, depending on your preference. Make sure to mark it clearly and precisely.
- To find the center, you can use a ruler or measuring tape to measure and mark the midpoint of the glass surface. Alternatively, you can use a template or guide if you want to drill multiple holes in a specific pattern.
It’s important to be careful and precise when marking the hole, as any mistakes can be difficult to fix once the drilling has started. Take your time and double-check the position before moving on to the next step.

Select the Location and Mark the Hole
Before you start drilling a hole in the glass, it’s important to carefully select the location where you want the hole to be. Take into consideration the purpose of the hole and the aesthetic aspect as well.
Once you have decided on the location, use a marker or a felt-tip pen to mark the center of the hole. Make sure the mark is clearly visible and easily identifiable.
- Choose a suitable marker or felt-tip pen that can easily make a visible mark on glass.
- Place a small piece of masking tape over the mark to prevent the drill bit from slipping during the drilling process.
- If you are drilling multiple holes, make sure to mark each hole location before starting.
By marking the hole location beforehand, you ensure accuracy and precision while drilling, reducing the risk of damage to the glass.
Step 2: Drilling

Once you have gathered all the necessary tools and materials, it is time to start drilling the hole in the glass. Follow these steps to ensure a successful drilling process:
- Prepare the glass: Place the glass on a stable surface and clean it thoroughly with glass cleaner to remove any dust or dirt. Make sure the glass is secure and won’t move during the drilling process.
- Mark the spot: Use a marker or a piece of tape to mark the exact spot where you want to drill the hole. Double-check the positioning to avoid any mistakes.
- Select the right drill bit: Choose a diamond-tipped or carbide drill bit specifically designed for drilling glass. These types of drill bits have a sharp and durable edge that can easily cut through the glass without cracking or breaking it. Make sure to select a drill bit that matches the size of the hole you want to create.
- Apply lubricant: To prevent overheating and reduce friction, apply a small amount of lubricant, such as water or drilling oil, to the surface of the glass. This will help to keep the drill bit cool and prolong its lifespan.
- Begin the drilling process: Start drilling at a slow speed with minimal pressure. Place the drill bit on the marked spot and hold it perpendicular to the glass surface. Apply gentle and steady pressure to gradually penetrate the glass. Keep the drill bit cool by periodically dipping it in a small amount of water or lubricant.
- Monitor your progress: As you drill, pay attention to the speed and depth of the hole. Avoid drilling too fast or applying excessive pressure, as this can cause the glass to crack or shatter. Take breaks if needed and allow the drill bit to cool down.
- Clean up: Once the hole is drilled, carefully remove any debris or glass shards from the surface. Clean the area with glass cleaner to ensure a tidy finish.
Remember to take your time and handle the drilling process with care. With the right tools, technique, and patience, you can successfully drill a hole in glass for various DIY projects or repairs.
Choose the Right Drill Bit and Drilling Technique
Drill Bit Selection
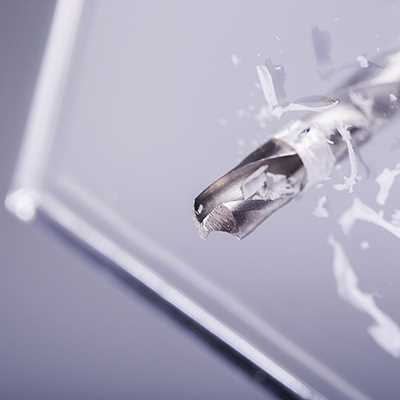
When drilling a hole in glass, it is important to choose the right drill bit for the job. Regular twist drill bits are not designed to handle the brittle nature of glass and are likely to crack or shatter it. Instead, you should opt for a specialized glass drill bit.
The most common type of glass drill bit is a diamond drill bit. These drill bits have a tip embedded with tiny diamond particles, which allows them to cut through glass smoothly and without causing damage. Other options include carbide-tipped drill bits and spear-point drill bits, both of which are suitable for drilling small holes in glass.
Drilling Technique
Drilling holes in glass requires a gentle touch and a high level of precision. Here are some tips for achieving success:
- Start with a small pilot hole: Before drilling the final hole, it is advisable to start with a small pilot hole. This will help guide the drill bit and prevent it from slipping and causing damage to the glass.
- Use lubrication: Applying lubrication to the drill bit and the glass surface can help reduce friction and heat buildup, which can cause the glass to crack. Water or a special glass-cutting oil can be used as lubricants.
- Drill at a slow speed: Glass should be drilled at a slow speed to prevent cracking. Using a high-speed drill can generate too much heat and cause the glass to break. A low-speed setting or a variable speed drill is recommended.
- Apply gentle pressure: When drilling, make sure to apply only gentle pressure to the glass. Pushing too hard can cause the drill bit to skip or skate across the surface, leading to uneven holes or glass breakage.
- Keep the glass cool: To prevent the glass from overheating during drilling, it is important to keep it cool. This can be achieved by periodically dipping the drill bit in water or using a continuous stream of water to cool the drilling area.
- Wear safety gear: Always wear protective eyewear and gloves when drilling glass to prevent injuries from flying glass shards.
By selecting the right drill bit and employing these drilling techniques, you can successfully drill a hole in glass without damaging it.
Step 3: Cooling and Lubricating
When drilling a hole in glass, it is important to keep the glass cool and lubricated throughout the process. This will help prevent the glass from cracking or shattering during drilling.
Here are some tips for cooling and lubricating the glass:
- Use a coolant: Before you start drilling, apply a coolant or lubricant to the area where you will be drilling. This can help reduce friction and heat buildup, making it easier to drill the hole. There are specialized glass drilling coolants available, but you can also use water, mineral oil, or even dish soap diluted with water as a coolant.
- Keep the glass cool: While drilling, it’s important to keep the glass cool to prevent it from cracking. You can do this by periodically dipping the drill bit in a container of water or coolant to cool it down. You can also use a spray bottle filled with water to spray the area being drilled. This will help dissipate heat and keep the glass cool.
- Apply gentle pressure: When drilling, apply gentle, steady pressure to avoid putting too much stress on the glass. Excessive pressure can cause the glass to crack or shatter. Let the drill bit do the work and avoid forcing it through the glass.
- Take breaks: If you notice the glass getting hot or if you see any signs of stress on the glass, it’s important to take breaks and allow the glass to cool down. This will help prevent any damage to the glass and ensure a smooth drilling process.
By following these cooling and lubricating tips, you can increase your chances of successfully drilling a hole in glass without any cracks or breakages.
Use Water or Lubricant During the Drilling Process
When drilling a hole in glass, it is important to use water or lubricant to help cool down the glass and prevent it from cracking. The friction caused by drilling can generate a lot of heat, which can weaken the glass and make it more prone to breaking.
Using water or lubricant can help dissipate this heat and keep the glass cool during the drilling process. This not only helps prevent cracks but also ensures that the drill bit can effectively cut through the glass without getting too hot.
Water
Water is a commonly used cooling agent when drilling glass. It is easily accessible and provides good heat dissipation. Here’s how to use water during the drilling process:
- Place the glass on a stable surface, such as a workbench or a table.
- Fill a container with water and place it near the drilling area.
- Position the glass so that the area to be drilled is directly above the container of water.
- Begin drilling at a slow speed, applying light pressure.
- Periodically dip the drill bit into the container of water to cool it down.
- Continue this process until the hole is drilled through the glass.
Using water as a cooling agent is effective, but it can create a mess. It is advisable to use a container with high sides to minimize the risk of water splashing or spilling.
Lubricant
In addition to water, lubricants can also be used during the drilling process. Lubricants provide similar heat dissipation benefits as water and can help prolong the life of the drill bit. Here’s how to use a lubricant when drilling glass:
- Apply a small amount of lubricant, such as cutting oil or glass-specific lubricant, to the area to be drilled.
- Position the glass on a stable surface.
- Start drilling at a slow speed, periodically applying more lubricant as needed.
- Continue drilling until the hole is completed.
It is important to use a lubricant specifically designed for glass drilling, as other lubricants may not provide the necessary heat dissipation or may damage the glass surface.
Both water and lubricant can be effective cooling agents during the drilling process. Choose the method that works best for you and helps keep the glass cool and protected from potential damage.
Step 4: Finishing
Once you have successfully drilled the hole in the glass, you need to take some final steps to finish the process and ensure that the glass remains intact.
- Clean the Glass: Use a glass cleaner and a lint-free cloth to thoroughly clean the glass surface around the drilled hole. This will remove any debris or glass dust that may have accumulated during the drilling process.
- Smooth the Edges: After cleaning, use a fine-grit sandpaper or a diamond file to carefully smooth the edges of the drilled hole. This will prevent any sharp or rough edges that may cause injury or damage.
- Apply Edge Sealant: To provide additional protection and prevent potential cracks or chips, apply a thin layer of edge sealant around the edges of the drilled hole. This will help to reinforce the glass and make it more resistant to stress.
- Allow to Cure: Following the manufacturer’s instructions, allow the edge sealant to cure completely. This usually takes a few hours or longer, depending on the product. Avoid using or applying any pressure to the drilled hole until the sealant has fully cured.
By following these finishing steps, you can ensure that your drilled hole in the glass is secure, durable, and aesthetically pleasing. Remember to take your time and be cautious throughout the entire drilling process to avoid any mishaps or damage to the glass.
FAQ:
What tools do I need to drill a hole in glass?
To drill a hole in glass, you will need a diamond drill bit, water or lubricant for cooling, masking tape, safety glasses, and a drill with variable speeds.
Can I use a regular drill bit to drill a hole in glass?
No, you cannot use a regular drill bit to drill a hole in glass. You need a diamond drill bit specifically designed for glass drilling.
How do I prevent the glass from cracking while drilling?
To prevent the glass from cracking while drilling, you should use water or lubricant to keep the drill bit cool, apply gentle pressure, and drill at a slow speed.
Is it necessary to wear safety glasses when drilling glass?
Yes, it is necessary to wear safety glasses when drilling glass to protect your eyes from any potential debris or fragments that may fly off during the drilling process.
What is the best technique for drilling a hole in glass?
The best technique for drilling a hole in glass involves using a diamond drill bit, keeping the glass and drill bit lubricated with water or lubricant, applying gentle pressure, and drilling at a slow speed to avoid cracking the glass.
Can I use a regular drill instead of a drill press?
Yes, you can use a regular drill instead of a drill press to drill a hole in glass. Just make sure to secure the glass properly and use a drill with variable speeds to have more control over the drilling process.
What should I do if the glass starts to crack while drilling?
If the glass starts to crack while drilling, you should immediately stop drilling, apply some lubricant or water to cool the drill bit, and reassess your technique. You may need to use a different method or consult a professional for assistance.
Video:


Meet Harrison Clayton, a distinguished author and home remodeling enthusiast whose expertise in the realm of renovation is second to none. With a passion for transforming houses into inviting homes, Harrison's writing at https://thehuts-eastbourne.co.uk/ brings a breath of fresh inspiration to the world of home improvement. Whether you're looking to revamp a small corner of your abode or embark on a complete home transformation, Harrison's articles provide the essential expertise and creative flair to turn your visions into reality. So, dive into the captivating world of home remodeling with Harrison Clayton and unlock the full potential of your living space with every word he writes.


