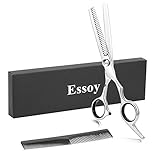
How To Use Texturizing Shears At Home

If you want to add some depth and texture to your hair without going to the salon, texturizing shears can be your new best friend. These specialized scissors are designed to remove bulk and thin out your hair, creating soft and natural-looking layers. While it may seem intimidating to use them at home, with a little practice and the right technique, you can achieve professional-looking results.
First, it’s important to understand the purpose of texturizing shears. Unlike regular scissors, texturizing shears have teeth or notches along one or both blades. These teeth create small, precise cuts in the hair, removing excess weight and adding texture. It’s essential to choose the right type of texturizing shears for your hair type and desired result.
Before you start cutting, make sure your hair is clean and dry, as wet hair can result in an uneven cut. To begin, section your hair into manageable sections using hair clips or elastics. Start with small sections at a time to ensure precise cuts. Hold the texturizing shears parallel to the hair shaft and make small, deliberate cuts about halfway down the section. Avoid cutting too close to the roots to prevent a choppy appearance.
Tips for Using Texturizing Shears at Home
Texturizing shears are a great tool for adding texture and volume to your hair at home. However, it’s important to use them properly to achieve the best results. Here are some tips to help you get started:
1. Start with clean, dry hair: Texturizing shears work best on clean and dry hair, as wet hair can be more difficult to cut. Make sure to wash and dry your hair thoroughly before using the shears.

2. Use small sections: To achieve the desired texture, it’s important to work with small sections of hair at a time. This will allow you to have more control over the shears and create more precise cuts.
3. Hold the shears at an angle: When using texturizing shears, it’s best to hold them at a slight angle to the hair. This will help you achieve a more natural-looking texture and prevent any harsh lines.
4. Start from the ends: To add texture to your hair, start by using the shears on the ends of your hair. This will create a softer, layered effect and prevent your hair from looking too thin.
5. Use a comb for guidance: To ensure even and precise cuts, use a comb to guide the shears through your hair. This will help you achieve a more balanced and controlled result.
6. Be cautious with the length: Texturizing shears are designed to remove some of the bulk from your hair, so be careful not to cut off too much length. Start with small cuts and gradually trim more if needed.

7. Practice on a small section first: If you’re new to using texturizing shears, it’s a good idea to practice on a small section of hair first. This will help you get used to the technique and prevent any major mistakes.
8. Maintain your shears: To ensure the best performance, make sure to clean and oil your texturizing shears regularly. This will help them stay sharp and prevent any snagging or pulling while cutting.
Remember, using texturizing shears at home requires some skill and practice. If you’re unsure, it’s always best to consult a professional hairstylist.
Choosing the Right Texturizing Shears
When it comes to texturizing shears, there are a few important factors to consider in order to choose the right ones for your needs. Here are some key points to keep in mind:
- Length: Texturizing shears come in various lengths, typically ranging from 5 to 7 inches. The length you choose depends on the desired level of texturizing and the type of hair you are working with. Longer shears are ideal for creating deeper and more dramatic layers, while shorter shears are better for subtle and gentle texturizing.
- Tooth count: The number of teeth on the shears is another important factor to consider. Shears with a higher tooth count (around 30-40) are great for creating softer and more blended textures, while shears with a lower tooth count (around 10-20) are better for creating chunkier and more defined textures.
- Quality: It is crucial to invest in high-quality texturizing shears to ensure the best results. Look for shears made from durable materials such as stainless steel or titanium. Make sure they have a comfortable grip and sharp, precision-cutting edges.
- Price: While it is important to consider your budget, keep in mind that cheaper shears may not offer the same level of quality and longevity as more expensive ones. It is worth investing in a good pair of shears that will last you a long time and provide excellent results.
- Personal preference: Ultimately, the right texturizing shears for you will depend on your personal preference. Try out different shears to see how they feel in your hand and how they perform with your cutting technique. Take into consideration the weight, balance, and overall comfort of the shears.
By considering these factors, you can choose the right texturizing shears that will help you achieve the desired texture and style for your hair. Remember to take good care of your shears by cleaning and sharpening them regularly to ensure their optimal performance.

Preparing Your Hair for Texturizing
Before using texturizing shears on your hair, it’s important to properly prepare your hair to achieve the best results. Follow these steps to ensure your hair is ready for texturizing:
1. Cleanse and Condition
Start by cleansing your hair using a mild shampoo to remove any product buildup or dirt. Rinse thoroughly and follow up with a nourishing conditioner. Conditioning will help to soften and hydrate your hair, making it easier to work with.
2. Detangle
Once you’ve rinsed out the conditioner, use a wide-tooth comb or a brush with flexible bristles to gently detangle your hair. Start from the ends and work your way up to avoid causing unnecessary damage or breakage.
3. Determine the Desired Look
Before picking up the texturizing shears, think about the look you want to achieve. Texturizing can add dimension, create movement, or remove bulk from your hair. Consider whether you want a subtle or a more pronounced effect, and communicate this with your stylist or refer to tutorials if you’re doing it at home.
Tip: It’s always a good idea to have a picture or a visual representation of the desired style to ensure clear communication with your hairstylist or to guide you during the process.
4. Take It Slow
Texturizing your hair is not a race, so take your time. Start with a small section of hair and trim a little bit at a time. It’s easier to take more off if needed than to put it back. Remember, you can always go back and texturize more, but you can’t undo a cut that’s too short.
Note: If you’re not comfortable using texturizing shears on your own, consider consulting a professional hairstylist who can provide you with the desired look.
By properly preparing your hair before using texturizing shears, you’ll set the stage for a successful haircut and achieve the desired results. Remember to take your time and be mindful of how much hair you’re removing to ensure a balanced and well-texturized final look.
Techniques for Using Texturizing Shears
Texturizing shears are a great tool for adding texture and movement to your hair. If you want to use texturizing shears at home, here are some techniques to help you achieve the desired results:
| 1. Point Cutting | Point cutting is a technique where you use the texturizing shears to cut into the hair at an angle, creating textured ends. Start by sectioning off the hair you want to texturize and hold the shears parallel to the hair shaft. Make small, quick cuts into the ends of the hair, being careful not to cut too much at once. |
| 2. Slide Cutting | Slide cutting is a technique where you use the texturizing shears to slide down the hair shaft, removing bulk and creating movement. Start by taking a small section of hair and hold it between your fingers. Slide the shears down the hair shaft towards the ends, while gently opening and closing the shears. This technique is great for removing weight from thick hair. |
| 3. Razoring | Razoring is a technique where you use a razor tool instead of texturizing shears to add texture to the hair. If you have a razor tool, you can use it to lightly glide over the hair strands, removing bulk and creating a more lived-in look. However, be cautious when using a razor as it can easily damage the hair if not used properly. |
| 4. Blending | Texturizing shears can also be used to blend layers and create a seamless look. To blend layers, take small sections of hair and hold the texturizing shears at a slight angle. Make light, short cuts into the hair, moving in a back and forth motion. This will help to blend different lengths and create a smooth transition between layers. |
| 5. Feathering | Feathering is a technique where you use the texturizing shears to create soft, wispy ends. To feather the hair, hold the shears at a slight angle and make small, gentle cuts into the ends of the hair. This will help to create a softer, more textured look. |
Remember, practicing these techniques with texturizing shears will take time and patience. It’s important to start with small, subtle changes and gradually work your way up to more dramatic results. If you’re uncertain, it’s always best to seek the help of a professional hairstylist.

Aftercare for Texturized Hair
After texturizing your hair with shears, it’s important to take proper care of your newly transformed locks. Here are some tips for aftercare:
1. Moisturize
Texturizing can sometimes make your hair feel drier, so it’s important to keep it moisturized. Use a good quality conditioner or deep conditioning treatment to replenish moisture and help restore the hair’s natural oils. You can also consider using leave-in conditioners or hair oils to add extra moisture.
2. Avoid Excessive Heat Styling
Texturized hair is more susceptible to damage from heat styling tools. Try to minimize the use of flat irons, curling irons, and blow dryers, as excessive heat can cause further dryness and breakage. If you must use heat styling tools, always use a heat protectant spray and keep the heat setting low.
3. Gentle Detangling
Be extra cautious when detangling your texturized hair to avoid causing breakage or damaging the newly created texture. Use a wide-toothed comb or your fingers to gently remove knots and tangles, starting from the ends and working your way up. Avoid brushing your hair when it’s wet, as it is more prone to breakage.
4. Protect Your Hair While Sleeping
To preserve your texturized hair, protect it while you sleep. Consider using a satin or silk pillowcase or wrapping your hair in a satin scarf or bonnet. This will help minimize friction, prevent frizz, and maintain the shape and texture of your hair.

By following these aftercare tips, you can keep your texturized hair looking healthy, shiny, and full of life.
Questions and answers
What are texturizing shears?
Texturizing shears are specialized hair cutting scissors that have notched or serrated edges. They are used to create texture, remove bulk, and add movement to the hair.
Can I use texturizing shears at home?
Yes, you can use texturizing shears at home, but it is important to be cautious and informed before attempting to use them. It is recommended to watch tutorials or seek guidance from a professional hairstylist.
How do I use texturizing shears to add texture to my hair?
To add texture to your hair using texturizing shears, take small sections of hair and hold the shears at a 45-degree angle. Cut into the hair using a point-cutting technique, which means opening and closing the shears while moving them upwards through the hair. This will create texture and remove bulk.
Are there any risks associated with using texturizing shears at home?
Yes, there are some risks associated with using texturizing shears at home. If not used correctly, they can cause uneven or jagged haircuts. It is important to have a clear understanding of how to use them and start with small, light cuts to avoid any mistakes.


Harrison Clayton
Meet Harrison Clayton, a distinguished author and home remodeling enthusiast whose expertise in the realm of renovation is second to none. With a passion for transforming houses into inviting homes, Harrison's writing at https://thehuts-eastbourne.co.uk/ brings a breath of fresh inspiration to the world of home improvement. Whether you're looking to revamp a small corner of your abode or embark on a complete home transformation, Harrison's articles provide the essential expertise and creative flair to turn your visions into reality. So, dive into the captivating world of home remodeling with Harrison Clayton and unlock the full potential of your living space with every word he writes.

