Choosing the Right Drill Bit to Remove Acrylic Nails: The Definitive Guide

When it’s time to remove acrylic nails, finding the right drill bit is essential. Using the wrong drill bit can lead to discomfort, damage to your natural nails, and even infection. With so many options available, it can be overwhelming to know which drill bit is best for your needs. That’s why we’ve created this definitive guide to help you choose the right drill bit for removing acrylic nails.
First and foremost, it’s important to consider the material of the drill bit. Most professionals recommend using a carbide drill bit for removing acrylic nails. Carbide is a strong and durable material that can easily file through the acrylic without causing excessive heat or friction. This can help prevent damage to your natural nails and reduce the risk of discomfort during the removal process.
Another important factor to consider is the size and shape of the drill bit. For removing acrylic nails, a barrel-shaped drill bit is often the most effective. The barrel shape allows for precision filing and helps to minimize the chance of accidentally nicking your natural nails. Additionally, it’s important to choose a drill bit that is the appropriate size for your nails. Using a drill bit that is too large can cause excessive filing and potential damage, while a drill bit that is too small may not effectively remove the acrylic.
Finally, it’s essential to choose a drill bit that is compatible with your electric file or drill. Not all drill bits are universal, so it’s important to check the compatibility before purchasing. Most electric files will specify the type of drill bits they are compatible with, so be sure to read the instructions or consult with a professional if you’re unsure.
By considering the material, size and shape, and compatibility of the drill bit, you can ensure a smooth and successful removal of your acrylic nails. Remember to always prioritize safety and consult with a professional if you’re unsure of the proper techniques or tools to use. With the right drill bit, you can say goodbye to acrylic nails and hello to healthy, natural nails in no time!

Choosing the Right Drill Bit
When it comes to removing acrylic nails, choosing the right drill bit is crucial. The type of drill bit you use can greatly affect the ease and efficiency of the removal process. Here are some factors to consider when selecting a drill bit:
1. Material
Drill bits are commonly made from various materials, such as carbide, ceramic, and diamond. Each material has its own benefits and drawbacks.
- Carbide: Carbide drill bits are known for their durability and ability to withstand high heat. They are great for removing large amounts of acrylic quickly.
- Ceramic: Ceramic drill bits are gentle on the natural nails and are less likely to cause damage or pain. They are suitable for removing small amounts of acrylic or for precision work.
- Diamond: Diamond drill bits are the most durable and long-lasting. They are ideal for professionals or frequent users, as they can withstand continuous use without dulling.
2. Size and Shape
The size and shape of the drill bit also play a crucial role in the removal process. Here are some common options:
- Flat top bit: This type of drill bit has a flat surface and is ideal for removing bulk acrylic quickly.
- Cone bit: Cone-shaped drill bits are great for precision work, such as removing acrylic from the nail edges or cuticles.
- Barrel bit: Barrel-shaped bits are versatile and can be used for both bulk removal and precision work.
3. Grit
Drill bits come in different grit levels, which refers to the coarseness of the bit. Higher grit levels indicate a finer bit, while lower grit levels indicate a coarser bit.
- Coarse grit: Coarse grit drill bits are more aggressive and are suitable for removing thick layers of acrylic.
- Medium grit: Medium grit bits strike a balance between speed and effectiveness. They are a good choice for general acrylic removal.
- Fine grit: Fine grit bits are less aggressive and are ideal for finishing touches or removing small amounts of acrylic.
4. Personal Preference

Ultimately, the choice of drill bit depends on personal preference and experience. Some technicians may prefer a specific type of bit based on their comfort and familiarity with it. It may be helpful to try out different types of drill bits to see which one works best for you.
By considering these factors and choosing the right drill bit, you can ensure a smoother and more efficient acrylic nail removal process.
Acrylic Nail Removal
Acrylic nails give you the opportunity to achieve beautiful, long-lasting manicures. However, there may come a time when you need to remove them, whether it’s because they have started to lift or you simply want a fresh set. In this guide, we will walk you through the process of acrylic nail removal, providing you with step-by-step instructions and tips for a successful and safe removal.
Materials Needed
- Acetone
- Cotton balls or pads
- Aluminium foil
- Nail file or buffing block
- Orange stick or cuticle pusher
- Nail clippers or nail tip cutter
- Moisturizer or cuticle oil
Step-by-Step Guide
- Start by trimming the acrylic nails as short as possible using nail clippers or a nail tip cutter. It’s important to remove as much of the acrylic material as possible before soaking.
- File the surface of the acrylic nails with a nail file or buffing block to remove the top layer and roughen up the surface. This will help the acetone penetrate more effectively.
- Soak a cotton ball or pad in acetone and place it on top of each nail.
- Wrap each finger with a small piece of aluminium foil to secure the cotton ball or pad in place. This will create a “soaking effect” and prevent the acetone from evaporating.
- Leave the cotton balls or pads soaked in acetone on the nails for approximately 15-20 minutes to allow the acrylic nails to soften.
- Remove the foil wraps and cotton balls or pads from each finger.
- Using an orange stick or cuticle pusher, gently push the softened acrylic material away from the natural nail. Be careful not to force or pry it off, as this can damage your natural nails.
- If there is still some acrylic left on the nails, repeat the soaking process for another 5-10 minutes.
- Once all the acrylic has been removed, gently buff the surface of your natural nails to smooth out any roughness or residue.
- Finally, apply moisturizer or cuticle oil to nourish and hydrate your nails and cuticles.
Tips for Safe Acrylic Nail Removal
- Always use acetone specifically designed for nail polish removal. Avoid using pure acetone, as it can be too harsh and drying for your nails and skin.
- Take breaks in between soaking sessions to give your nails and skin a rest.
- Avoid using excessive force or prying to remove the acrylic nails, as this can cause damage to your natural nails.
- If you experience any pain or discomfort during the removal process, stop immediately and consult a professional nail technician.
- After removing acrylic nails, it’s important to give your natural nails time to breathe and recover before applying a new set of acrylics or any other nail enhancements.
| Issue | Solution |
|---|---|
| The acrylic nails are not softening after soaking for the recommended time. | Try using fresh acetone and make sure the cotton balls or pads are saturated. You can also try wrapping your nails in a warm towel or using a heated glove to help speed up the process. |
| Some acrylic residue is still left on the nails after removal. | Gently buff the surface of your nails with a nail file or buffing block to remove any remaining residue. Be cautious not to file too aggressively, as this can damage your natural nails. |
| Your nails feel weak or brittle after acrylic nail removal. | Give your nails a break from any nail enhancements and apply a strengthening nail treatment to promote healthy nail growth. |

The Definitive Guide
Removing acrylic nails can be a tricky task, but with the right drill bit, it can be done easily and safely. In this definitive guide, we will walk you through the process of choosing the right drill bit to remove acrylic nails, ensuring a successful and pain-free removal.
Step 1: Understand the Different Drill Bit Types
There are several types of drill bits that can be used to remove acrylic nails. Each type has its own advantages and disadvantages, so it’s important to understand the differences before making a decision.
- Diamond Drill Bits: These drill bits are made with tiny diamond particles embedded in the tip, making them extremely durable and effective at removing acrylic nails.
- Carbide Drill Bits: Carbide drill bits are known for their strength and durability. They are a popular choice for acrylic nail removal due to their ability to quickly and efficiently remove the nail without causing damage.
- Sanding Bands: Sanding bands are cylindrical bands made of sandpaper. They can be attached to a drill bit and used to file down the acrylic nails gradually.
Step 2: Consider Your Skill Level
When choosing the right drill bit, it’s essential to consider your skill level. If you’re a beginner, it’s recommended to start with a less aggressive option, such as sanding bands. These provide more control and are less likely to cause damage.
Step 3: Assess the Nail Condition
The condition of the acrylic nails will also play a role in determining the right drill bit. If the nails are thick, a diamond or carbide drill bit will be more effective in removing them. However, if the nails are thin or damaged, a sanding band may be a better option to prevent further harm.

Step 4: Choose the Bit Size
Drill bits come in various sizes, so it’s important to choose the right size for your needs. If you have larger nails, a larger drill bit may be necessary for efficient removal. On the other hand, smaller nails may require a smaller bit for precision and control.
Step 5: Safety Precautions
Before using a drill bit to remove acrylic nails, it’s important to take some safety precautions. Always wear protective eyewear to shield your eyes from any debris or filings. Additionally, make sure to work in a well-ventilated area to prevent inhalation of any dust particles.
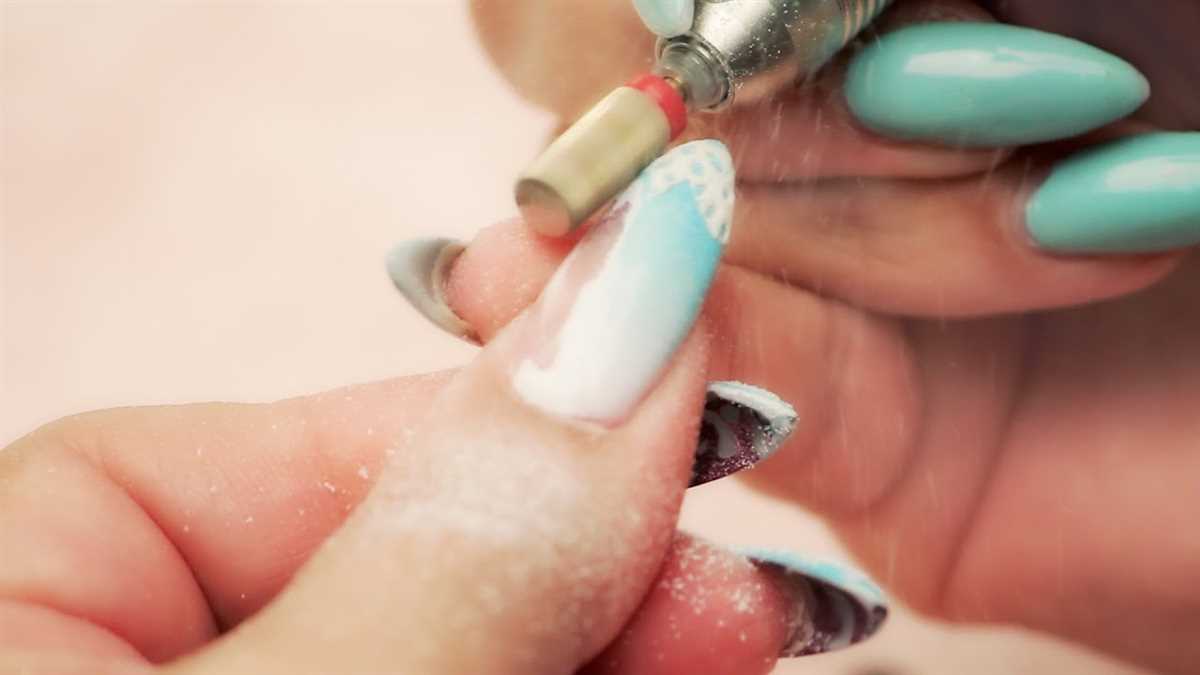
Step 6: Start the Removal Process
Once you have chosen the right drill bit and taken the necessary safety precautions, you can begin the removal process. Start by gently filing away the top layer of the acrylic nail. Be sure to apply light pressure and take breaks if needed to prevent overheating or discomfort.
Step 7: Take Breaks and Assess Progress
Removing acrylic nails can be time-consuming, so it’s important to take breaks and assess your progress. If the acrylic nails are not coming off easily, it may be necessary to change to a more aggressive drill bit or consult a professional.
Step 8: Aftercare

After the acrylic nails have been successfully removed, it’s important to take care of your natural nails. Apply a nourishing cuticle oil or moisturizer to keep them hydrated and healthy.
Conclusion
Choosing the right drill bit to remove acrylic nails is crucial for a successful and pain-free removal. By understanding the different drill bit types, considering your skill level and nail condition, and taking the necessary safety precautions, you can confidently remove your acrylic nails at home. Remember to take breaks, assess your progress, and provide aftercare to keep your natural nails in top shape.
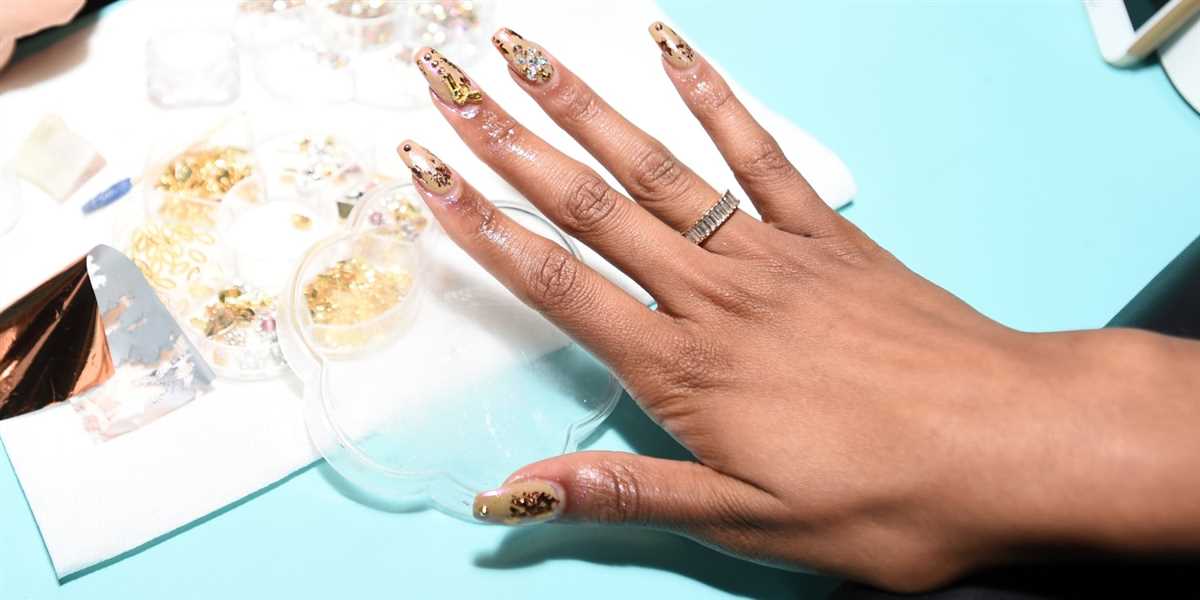
Understanding Acrylic Nails
Acrylic nails are a popular choice for many people due to their durability and versatility. They are artificial nails that are attached to the natural nail using a combination of a liquid monomer and a powder polymer.
How Acrylic Nails Are Applied
The process of applying acrylic nails involves several steps:
- Preparation: The natural nails are cleaned, shaped, and buffed to create a smooth surface for the acrylic application.
- Tip Application: Artificial nail tips are glued to the natural nails to extend their length.
- Acrylic Application: A mixture of liquid monomer and powder polymer is applied to the nails. It starts to harden within seconds, allowing the nail technician to shape and sculpt the acrylic nails into the desired shape.
- Finishing: Once the acrylic nails are formed, they are buffed, filed, and polished to create a smooth and shiny surface.
Characteristics of Acrylic Nails
Acrylic nails offer several benefits and have specific characteristics:
- Durability: Acrylic nails are known for their durability, making them last longer than natural nails.
- Strength: Acrylic nails are stronger than natural nails, making them less prone to breakage.
- Customization: They can be customized according to personal preference in terms of length, shape, and color.
- Nail Extensions: Acrylic nails can be used to extend the length of natural nails for those who struggle with nail growth.
- Nail Art: They provide a canvas for various nail art designs, allowing individuals to express their creativity.
Removing Acrylic Nails
When it comes to removing acrylic nails, it’s important to do it properly to avoid damaging the natural nails. There are various methods for removing acrylic nails, including soaking them in acetone or using a drill bit specially designed for acrylic nail removal.
| Method | Description |
|---|---|
| Soaking in Acetone | The nails are soaked in acetone to dissolve the acrylic, and then gently pushed off using a cuticle pusher. |
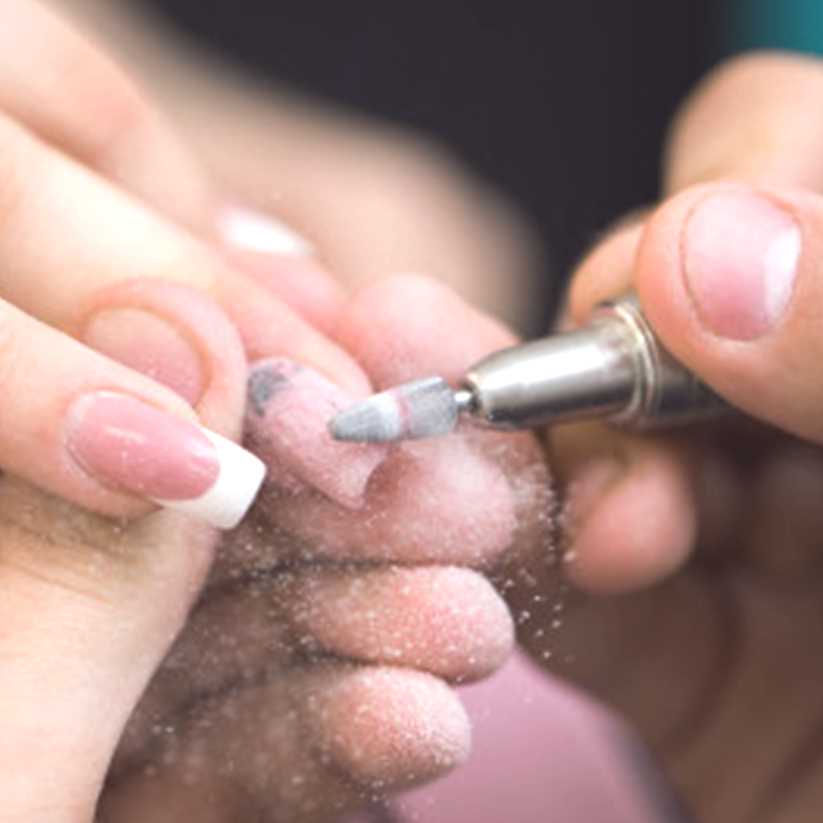
| Using a Drill Bit | A specialized drill bit is used to carefully grind away the acrylic nails, taking care not to damage the natural nails. |
It’s important to note that using a drill bit requires skill and caution to avoid injury. If you are unsure about using a drill bit, it’s recommended to seek professional assistance.
Understanding acrylic nails and the various methods for their application and removal is essential for maintaining healthy and beautiful nails.
Why Remove Acrylic Nails
Acrylic nails have become a popular choice for many people who want longer, more glamorous nails. They are created by applying layers of acrylic powder and liquid to the natural nails and then shaping and buffing them to achieve the desired look. While acrylic nails can be a great way to enhance the appearance of your hands, there are several reasons why you may want to remove them:
- Damage to natural nails: Over time, the application and removal of acrylic nails can cause damage to the natural nails. The acrylic can thin out the nails and make them more prone to breakage and splitting.
- Discomfort or pain: Some people find that acrylic nails can be uncomfortable or even painful, especially if they are applied too thickly or if there is an improper fit. The weight and length of the acrylic nails can also cause strain on the nail bed and surrounding skin.
- Infection or fungal growth: If the acrylic nails are not applied or maintained properly, they can create an environment that is prone to infection or fungal growth. Bacteria and moisture can get trapped between the acrylic and the natural nail, leading to inflammation and potential health risks.
- Change of style or preference: As with any fashion trend, personal style and preferences can change over time. If you no longer enjoy the look or feel of acrylic nails, it is important to remove them properly to avoid damage to the natural nails.
Overall, knowing when and how to remove acrylic nails is important to maintain the health and appearance of your natural nails. Whether you choose to remove them at a salon or try to remove them yourself, it is crucial to do so carefully and gently to minimize any potential damage.
The Dangers of Improper Removal
When it comes to removing acrylic nails, it’s important to do it properly to avoid any potential dangers. Improper removal can lead to various issues, including:
- Nail Damage: Using the wrong drill bit or improper techniques can cause damage to the natural nail bed. This can result in pain, sensitivity, and even infection.
- Infection: If acrylic nails are not properly removed, bacteria or fungi can thrive and cause infections. Ingrown nails, swelling, redness, and pus are all signs of an infection that may require medical attention.
- Pain and Discomfort: Improper removal techniques can cause pain and discomfort during and after the process. This can include soreness, tenderness, and throbbing sensations.
- Weakened Nails: If the acrylic nails are forcefully removed or if the natural nails are damaged during the removal process, they can become weakened and prone to breakage.
- Chemical Burns: Acetone, often used in the removal process, can cause chemical burns if not used correctly. This can result in redness, blistering, and peeling of the skin.
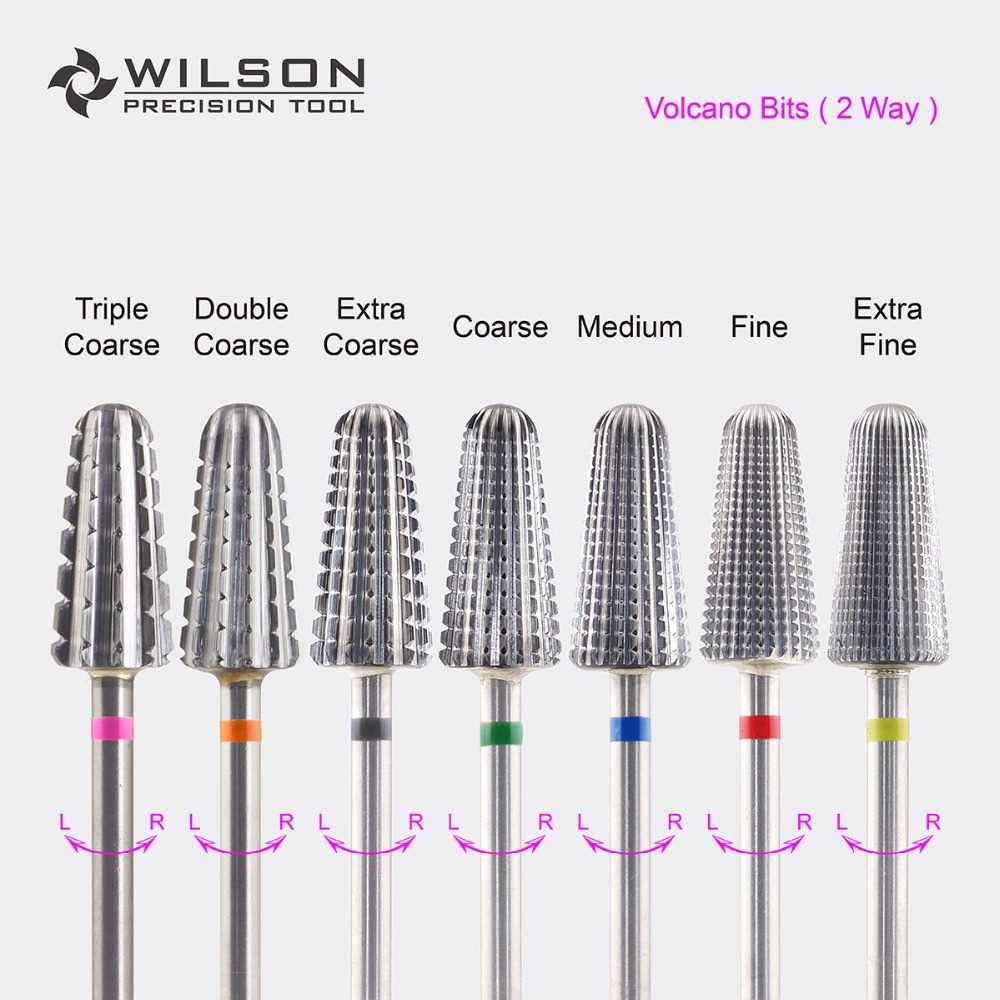
It is essential to follow proper techniques and use the right tools when removing acrylic nails to avoid these potential dangers. This includes choosing the correct drill bit for the job, allowing enough time for the acetone to work, and gently filing off the softened acrylic to minimize the risk of damage.
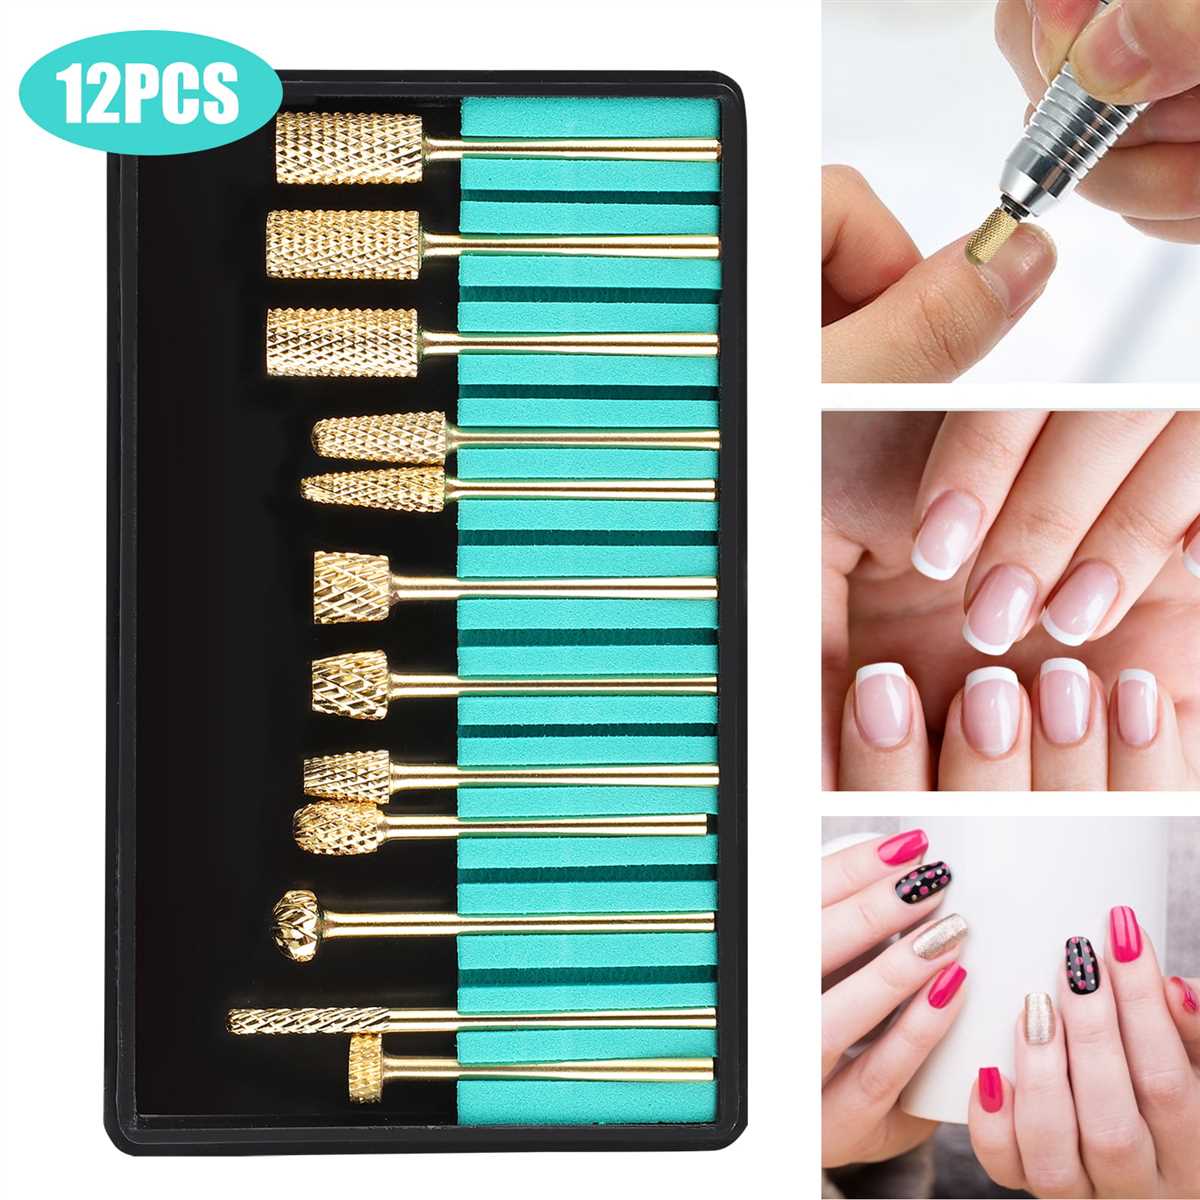
Factors to Consider
- Material of the Drill Bit: It is important to choose a drill bit that is specifically designed for acrylic nails. These bits are usually made of carbide or ceramic and are more durable and efficient in removing acrylic nails.
- Shape of the Drill Bit: There are different shapes of drill bits available, such as cone-shaped, barrel-shaped, and flame-shaped. Each shape has its own advantages and disadvantages, so it is important to choose one that suits your needs and preferences.
- Grit of the Drill Bit: The grit of the drill bit determines how quickly and effectively it can remove acrylic nails. Higher grits are more coarse and can remove the nails more quickly, while lower grits are more fine and can provide a smoother finish.
- Size of the Drill Bit: The size of the drill bit should be chosen based on the size of your nails. If the drill bit is too large, it may cause damage to your nails, while if it is too small, it may take longer to remove the acrylic nails.
- Rotational Speed: The rotational speed of the drill bit plays a crucial role in its performance. It is important to choose a drill bit with adjustable rotational speed so that you can control the speed according to your needs and preferences.
- Brand and Quality: Choosing a reliable brand and high-quality drill bit is important to ensure its durability and performance. It is recommended to read reviews and seek recommendations from professionals to make an informed decision.
Nail Thickness and Length
The thickness and length of your natural nails play a significant role in determining the appropriate drill bit for removing acrylic nails. It is important to consider these factors to ensure that you don’t damage your natural nails or cause any discomfort during the removal process.
Thickness
The thickness of your natural nails refers to the distance between the top surface of the nail and the bottom edge. It is essential to choose a drill bit that can easily and safely remove the acrylic without drilling too deeply into the natural nail.
If your natural nails are thin, it is recommended to use a drill bit specifically designed for fine nails. These drill bits are usually thinner and gentler, allowing for a more precise and controlled removal process.
On the other hand, if your natural nails are thick, you may need a drill bit with a larger diameter to effectively remove the acrylic. This type of drill bit can remove more material at once, reducing the overall time required for the removal process.
Length
The length of your natural nails refers to the distance from the cuticle to the tip of the nail. When choosing a drill bit, it is essential to consider the length of your natural nails to ensure that the removal process is efficient and safe.
If your natural nails are short, a shorter drill bit may be more suitable. This will allow for more precise control and reduce the risk of accidentally drilling too far into the nail bed.
For longer natural nails, a longer drill bit may be needed to effectively remove the acrylic. A longer drill bit can reach the entire length of the nail, making the removal process more efficient.
Conclusion
Considering the thickness and length of your natural nails is crucial when choosing the right drill bit to remove acrylic nails. By selecting a drill bit that matches the characteristics of your natural nails, you can ensure a safe and effective removal process.
Remember to always handle the drill bit with care, following the manufacturer’s instructions, and seek professional help if you are unsure or inexperienced in using a drill for acrylic nail removal.
Drill Bit Material
When it comes to choosing the right drill bit to remove acrylic nails, one of the most important factors to consider is the material of the drill bit. Different materials offer different levels of durability, sharpness, and performance. Here are some common drill bit materials used for removing acrylic nails:
- High-Speed Steel (HSS): HSS drill bits are made from a type of carbon steel that contains a high percentage of tungsten and chromium. They are known for their high durability and cutting speed. HSS drill bits are suitable for removing acrylic nails, but they can become dull over time and may require frequent sharpening.
- Carbide: Carbide drill bits are made from a combination of tungsten and carbon, which makes them extremely hard and durable. They are known for their ability to maintain a sharp cutting edge for a longer period of time compared to HSS drill bits. Carbide drill bits are ideal for removing acrylic nails, especially if you frequently use a drill for this purpose.
- Diamond-Coated: Diamond-coated drill bits are made by coating a standard drill bit with a layer of synthetic diamond particles. This coating provides enhanced sharpness and durability. Diamond-coated drill bits are highly recommended for removing acrylic nails, as they offer excellent performance and a long lifespan.
Regardless of the material, it is important to choose a drill bit that is specifically designed for acrylic nails to ensure optimal performance and safety. Using the wrong type of drill bit can result in damage to the natural nail or surrounding skin.
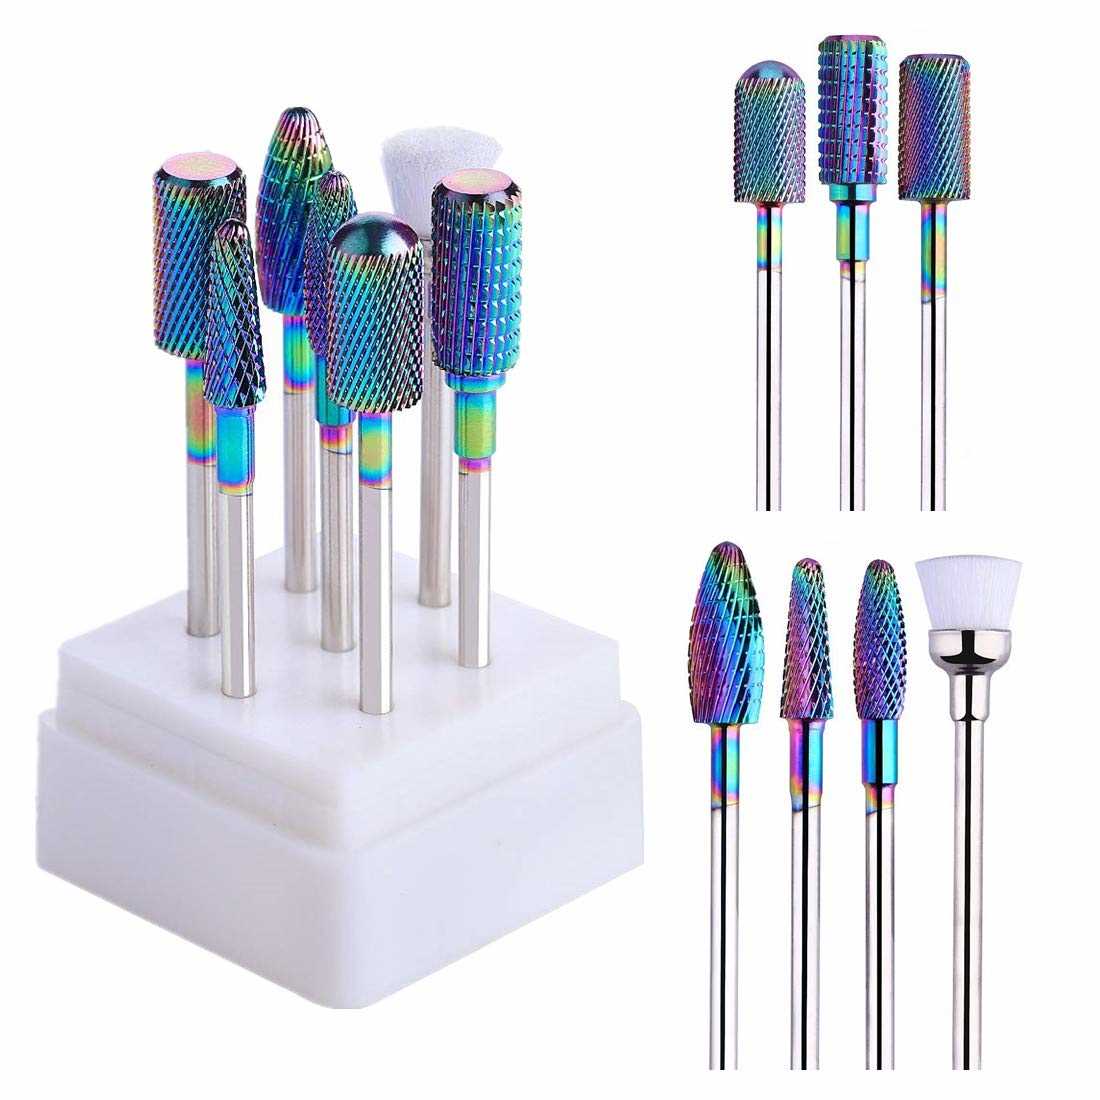
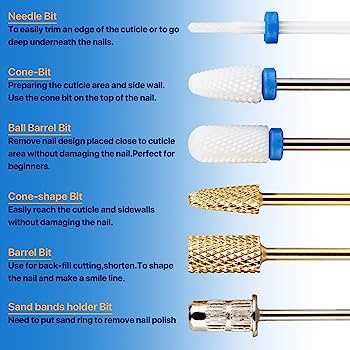
Types of Drill Bits
When it comes to removing acrylic nails using a drill, it’s important to have the right drill bit for the job. There are several types of drill bits that are commonly used for this purpose. Here are some of the most popular ones:
1. Diamond Drill Bits
Diamond drill bits are made with a coating of industrial-grade diamonds, making them extremely durable and effective for removing acrylic nails. These drill bits are known for their ability to easily cut through the tough acrylic material.
2. Carbide Drill Bits
Carbide drill bits are made from a combination of carbide and cobalt. They are known for their strength and resistance to heat, making them a great option for removing acrylic nails. Carbide drill bits are also long-lasting, so they can be used for multiple nail removals.
3. Ceramic Nail Bits
Ceramic nail bits are less abrasive than diamond or carbide drill bits, making them a gentler option for removing acrylic nails. They are great for those with sensitive nails or for removing gel polish. However, they may not be as effective in quickly removing thicker layers of acrylic.
4. Sanding Bands
Sanding bands are not technically drill bits, but they are commonly used in conjunction with a drill for acrylic nail removal. These bands are made of sandpaper material and are perfect for filing down the acrylic nails. They come in different grits, indicating how coarse or fine the sandpaper is.
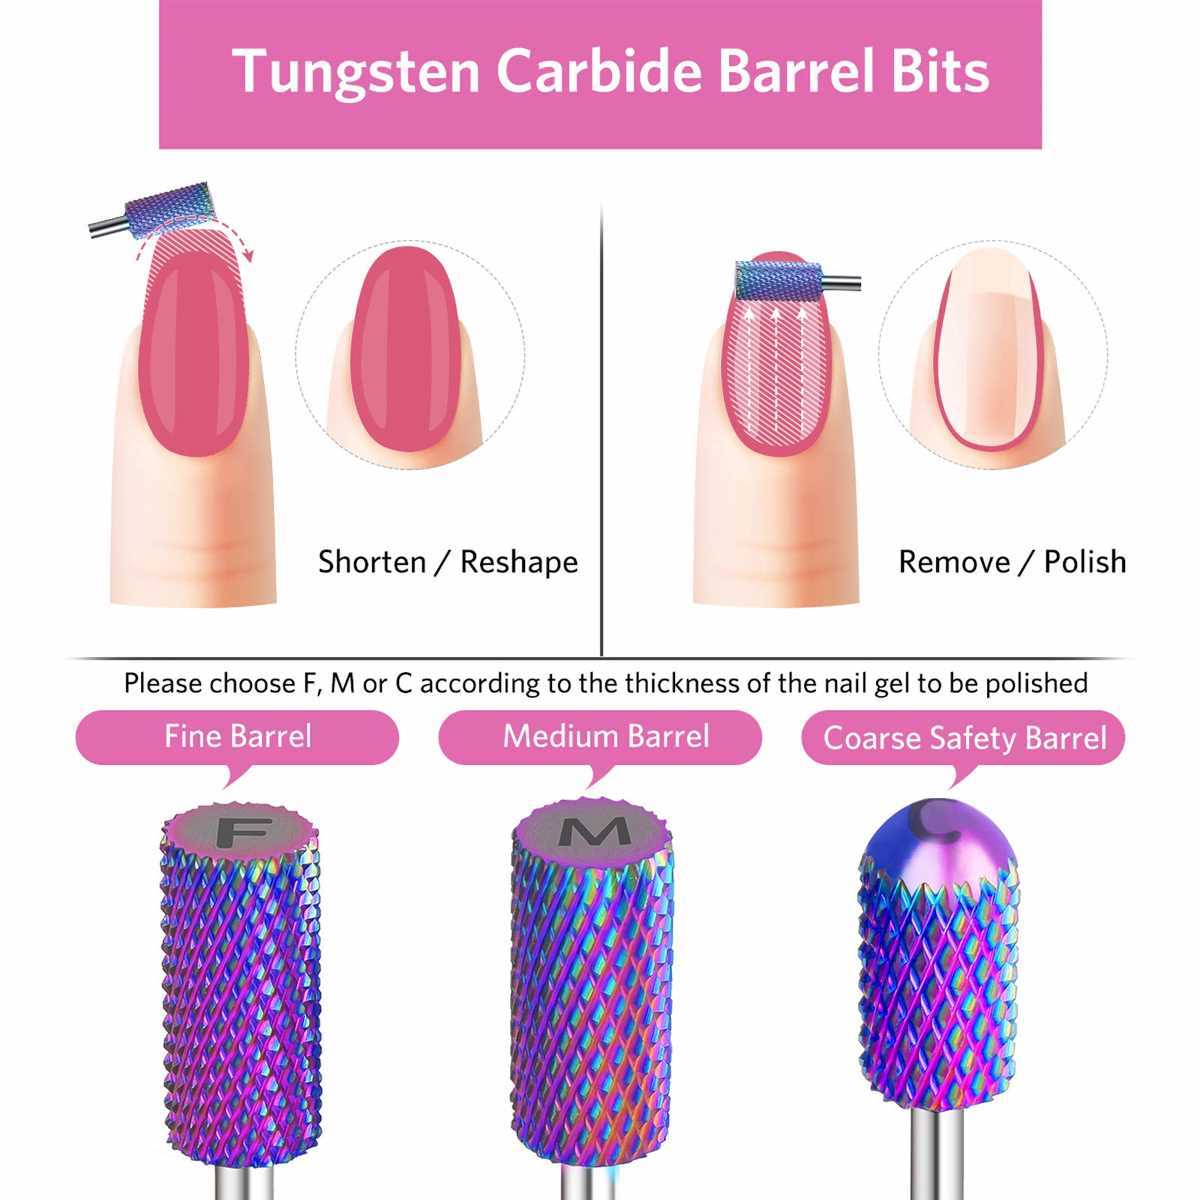
5. Tapered Barrel Bits
Tapered barrel bits are specifically designed for removing acrylic nails. They have a cone-shaped tip that allows for precision filing and shaping of the nail. These bits are great for removing nail enhancements and shaping the natural nail as well.
6. Safety Bits
Safety bits are smooth, rounded drill bits that are ideal for beginners or those who are not as comfortable using a drill. These bits are designed to be gentle on the nails, minimizing the risk of damage or accidents.
| Drill Bit Type | Advantages | Disadvantages |
|---|---|---|
| Diamond Drill Bits | Very effective for acrylic nail removal, durable | Expensive, can be too abrasive for some |
| Carbide Drill Bits | Strong, resistant to heat, long-lasting | May be too aggressive for some, can be pricier |
| Ceramic Nail Bits | Gentle on the nails, great for sensitive nails | May not be as effective on thicker acrylic layers |
| Sanding Bands | Perfect for filing down acrylic nails, versatile | May take longer to remove acrylic |
| Tapered Barrel Bits | Precision filing and shaping, suitable for enhancements | Not as effective for bulk acrylic removal |
| Safety Bits | Gentle on the nails, beginner-friendly | May take longer to remove acrylic, less precise |
FAQ:
What are the different types of drill bits for removing acrylic nails?
There are several types of drill bits that can be used to remove acrylic nails. The most common types include carbide drill bits, diamond drill bits, and sanding bands. Carbide drill bits are used for quickly breaking through the acrylic material, while diamond drill bits are more durable and can be used for longer periods of time. Sanding bands are often used for filing and shaping the nails.
How do I choose the right drill bit for removing acrylic nails?
When choosing a drill bit for removing acrylic nails, there are a few factors to consider. First, consider the type of drill bit you prefer, such as carbide or diamond. Carbide drill bits are generally more affordable, but diamond drill bits tend to be more durable. Additionally, consider the grit of the drill bit, as a higher grit will provide a more aggressive removal process. Finally, consider the size of the drill bit, as a smaller size will allow for more precision.
Can I use a regular drill bit to remove acrylic nails?
It is not recommended to use a regular drill bit to remove acrylic nails. Regular drill bits are not designed for this purpose and may not provide the necessary precision or effectiveness. It is best to use drill bits specifically designed for acrylic nail removal, such as carbide or diamond drill bits.
What precautions should I take when using a drill bit to remove acrylic nails?
When using a drill bit to remove acrylic nails, it is important to take certain precautions. First, always wear safety goggles to protect your eyes from debris. Second, work in a well-ventilated area to avoid inhaling any dust. Third, start with a low speed setting on the drill and gradually increase if necessary. Finally, be gentle and avoid applying too much pressure, as this can damage the natural nail.
How do I properly clean and store drill bits for removing acrylic nails?
To properly clean and store drill bits for removing acrylic nails, follow these steps. First, remove any debris or residue from the drill bit by rinsing it with warm water. Then, soak the drill bit in a disinfectant solution for a few minutes to kill any bacteria. After soaking, rinse the drill bit again with warm water and dry thoroughly. Finally, store the drill bit in a clean, dry place, such as a sealed container or a designated nail tool case.
Video:

How to reset hitachi tv

Harrison Clayton
Meet Harrison Clayton, a distinguished author and home remodeling enthusiast whose expertise in the realm of renovation is second to none. With a passion for transforming houses into inviting homes, Harrison's writing at https://thehuts-eastbourne.co.uk/ brings a breath of fresh inspiration to the world of home improvement. Whether you're looking to revamp a small corner of your abode or embark on a complete home transformation, Harrison's articles provide the essential expertise and creative flair to turn your visions into reality. So, dive into the captivating world of home remodeling with Harrison Clayton and unlock the full potential of your living space with every word he writes.


