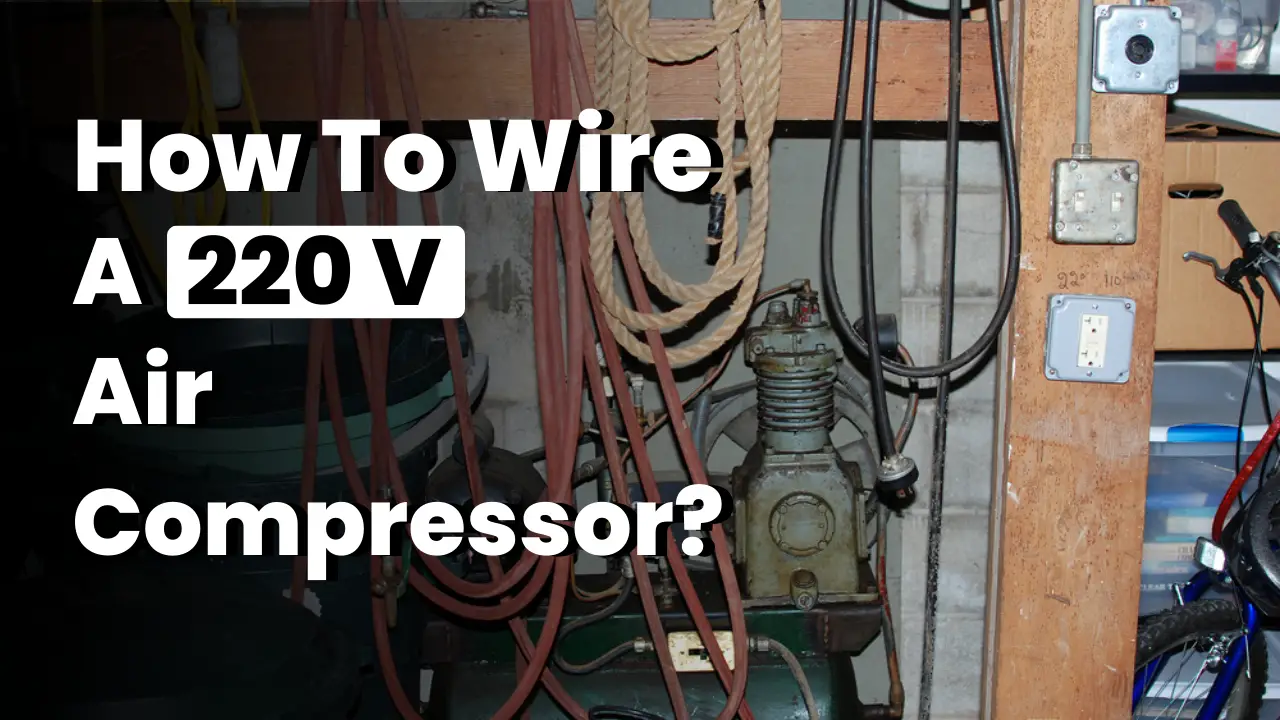
Step-by-Step Guide: How to Wire a 220 Volt Air Compressor

If you have recently purchased a 220 volt air compressor and need to wire it up, this step-by-step guide will walk you through the process. Wiring a 220 volt air compressor may seem intimidating, but with the right tools and knowledge, it can be a straightforward task. This guide will provide you with the information you need to safely and correctly wire your air compressor so that it can be used efficiently and effectively.
Step 1: Ensure Safety
Before starting any electrical work, it is important to prioritize safety. Make sure that the air compressor is unplugged and completely disconnected from any power source. This will prevent any accidents or injuries while working on the wiring.
Step 2: Check the Voltage Requirements
Determine the voltage requirements of your air compressor. Most 220 volt air compressors require a dedicated circuit, meaning it should be the only device connected to that circuit. Check the manufacturer’s instructions or specifications to confirm the voltage requirements for your specific model.

Step 3: Gather the Necessary Tools
Before proceeding with the wiring, gather all the necessary tools. You will need wire cutters, wire strippers, electrical tape, a voltage tester, and wire connectors. These tools will help you safely and effectively complete the wiring process.
Step 4: Install a Circuit Breaker
Next, install a circuit breaker into your electrical panel. The circuit breaker should match the amperage rating required by your air compressor. This will protect your air compressor from any potential electrical issues or overloads.
Gather the necessary tools and materials
Before you start wiring your 220 volt air compressor, make sure you have all the necessary tools and materials ready. Having everything prepared beforehand will help ensure a smooth and efficient installation process. Here are the tools and materials you will need:

Tools:
- A voltage tester to ensure the power is off
- A wire stripper to remove the insulation from the wires
- A pair of wire cutters to cut and trim the wires
- A screwdriver to secure the connections
- A drill with the appropriate bits for making holes in walls or panels
- A tape measure to measure and mark the locations for the wires and outlets
- A pencil or marker for marking the measurements on surfaces
- An adjustable wrench to tighten electrical connections
- A wire nut tool for secure wire connections
Materials:
- The 220 volt air compressor
- A dedicated 220 volt circuit breaker in your electrical panel
Having all these tools and materials at hand will make your wiring project much easier and safer. Make sure to gather everything before you begin so that you don’t have to pause the installation process to search for missing items.
Turn off the power
To ensure safety, the first step before wiring a 220 volt air compressor is to turn off the power. This step is crucial to avoid electrical shock or other accidents. Locate the main circuit breaker and switch it off. Make sure to test the power and ensure that it is completely turned off before proceeding with the wiring process.
Once the power is turned off, it is recommended to lock the circuit breaker panel or put up a sign to prevent anyone from turning it back on accidentally. Safety should always be the top priority when working with electrical equipment.
Locate the electrical panel

The first step in wiring a 220 volt air compressor is to locate the electrical panel. This is usually found in the basement or utility room of a home or commercial building. The electrical panel contains the main circuit breaker, which controls the power supply to the entire building.

You will need to shut off the power to the electrical panel before beginning any electrical work. To do this, locate the main circuit breaker and switch it to the “off” position. This will ensure that you are working with a safe and de-energized electrical system.
Once the power has been turned off, you can safely open the electrical panel. This is done by removing the cover, which is typically held in place by a series of screws or clips. Be sure to use a screwdriver or other appropriate tool to remove the cover, and set it aside in a safe place.
Inside the electrical panel, you will see a series of circuit breakers or fuses. Each breaker or fuse corresponds to a different electrical circuit in the building. Look for the breaker that is labeled or identified as being connected to the area where you will be installing the air compressor.
Identifying the correct breaker can be done by either referring to the labeling system in the electrical panel or by using a circuit tracer tool. A circuit tracer is a device that can be used to identify the specific breaker or fuse that controls a particular electrical circuit. It works by sending a signal through the circuit, which can be traced back to the breaker or fuse it corresponds to.
Install a double-pole circuit breaker
When wiring a 220 volt air compressor, it is important to install a double-pole circuit breaker to ensure the safety and proper functioning of the equipment. A double-pole circuit breaker is designed to handle the higher voltage and amperage required by a 220 volt system.

Before installing the circuit breaker, make sure to turn off the power to the circuit at the main electrical panel. This can be done by flipping the corresponding circuit breaker switch to the “Off” position. It is also important to wear appropriate safety gear, such as gloves and safety glasses, when working with electrical equipment.
Once the power is turned off, open the electrical panel cover and locate an available double-pole circuit breaker slot. The slot should be marked with the appropriate voltage and amperage rating for the air compressor. If there are no available slots, a licensed electrician may need to install a sub-panel to accommodate the additional circuit.
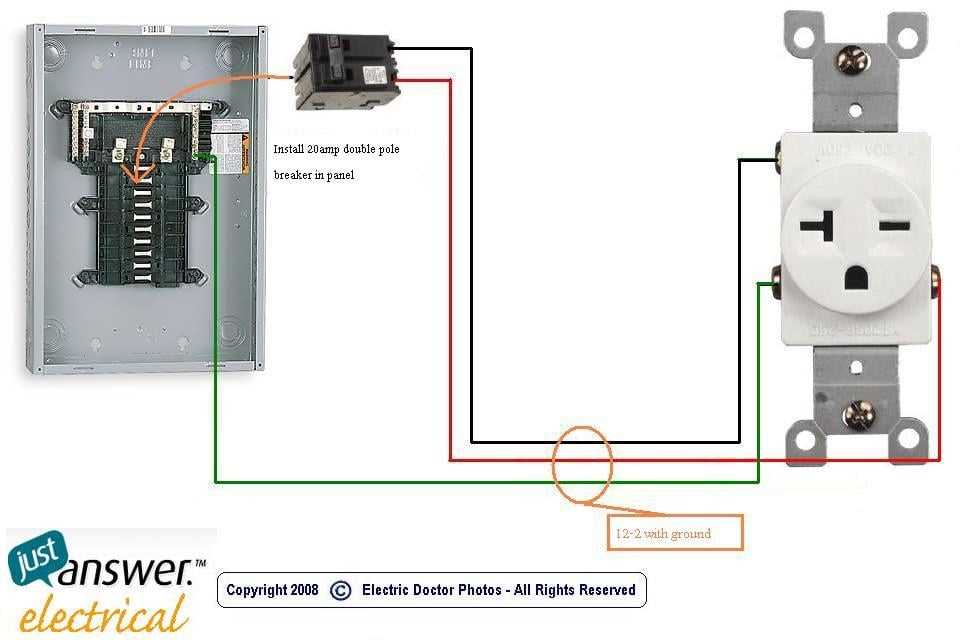
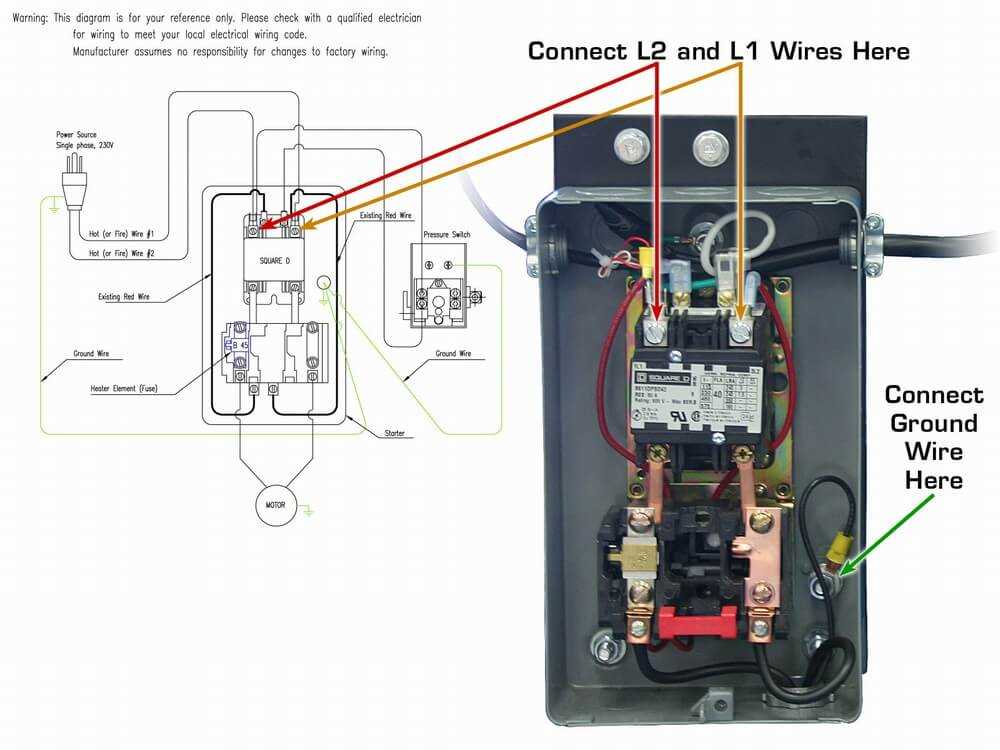
Insert the circuit breaker into the slot, making sure that the breaker is in the “Off” position. Secure the breaker in place by tightening the screws provided. Next, connect the hot wires from the air compressor to the terminals on the circuit breaker. The hot wires are typically colored red and black. It is important to connect the hot wires to the correct terminals, as reversing the wires could cause damage to the air compressor.
After connecting the hot wires, connect the neutral wire from the air compressor to the neutral bus bar in the electrical panel. The neutral wire is typically colored white. Finally, connect the ground wire from the air compressor to the grounding bus bar in the electrical panel. The ground wire is typically colored green or bare copper.
Once all connections are made, double-check that all connections are secure and tight. Replace the electrical panel cover and turn the power back on at the main electrical panel. Test the air compressor to ensure that it is running properly and producing the desired pressure.

Connect the wires to the circuit breaker
Once you have determined the correct size and type of circuit breaker for your 220 volt air compressor, it’s time to connect the wires. Here’s how to do it:
- Turn off the power: Before working with any electrical wires, always make sure to turn off the power at the main breaker panel. This will prevent any accidents or electrical shocks.
- Remove the cover: Take off the cover of the breaker panel to expose the circuit breaker slots.
- Connect the wires: Take the wires from the air compressor and connect them to the appropriate slots on the circuit breaker. The black wire should be connected to the breaker’s hot terminal, the white wire to the neutral terminal, and the green or bare copper wire to the ground terminal.
- Tighten the connections: Use a screwdriver to tighten the screws on the circuit breaker, securing the wires in place. Make sure the connections are tight and secure to avoid any loose or faulty connections.
- Replace the cover: Once the wires are connected and the connections are tightened, replace the cover of the breaker panel.
- Turn on the power: Go back to the main breaker panel and turn on the power to the circuit that you connected the air compressor to.
By following these steps, you will have successfully wired your 220 volt air compressor to the circuit breaker, allowing it to safely operate. Remember to always follow safety precautions and consult a professional electrician if you’re unsure about any steps in the process.
Install the outlet box
Before wiring your 220 volt air compressor, you will need to install an outlet box in the desired location. The outlet box should be securely mounted to a wall or post, making sure it is level and in a convenient location for accessing the air compressor.

Start by shutting off the power to the circuit where the outlet box will be installed. This can typically be done by flipping the corresponding breaker in the main electrical panel. Once the power is off, use a stud finder to locate a wall stud near the desired location for the outlet box.
Once you have located a solid wall stud, use a pencil to mark the position where the outlet box will be installed. Then, using a hammer and chisel or a reciprocating saw, carefully cut a hole in the wall at the marked location. Make sure the hole is large enough to accommodate the outlet box.
Next, insert the outlet box into the hole and secure it to the wall stud using screws or nails. Make sure the outlet box is flush with the wall surface and securely fastened in place. If necessary, use a level to ensure the box is straight and level.
After the outlet box is installed, you can proceed to wire the 220 volt air compressor according to the manufacturer’s instructions.
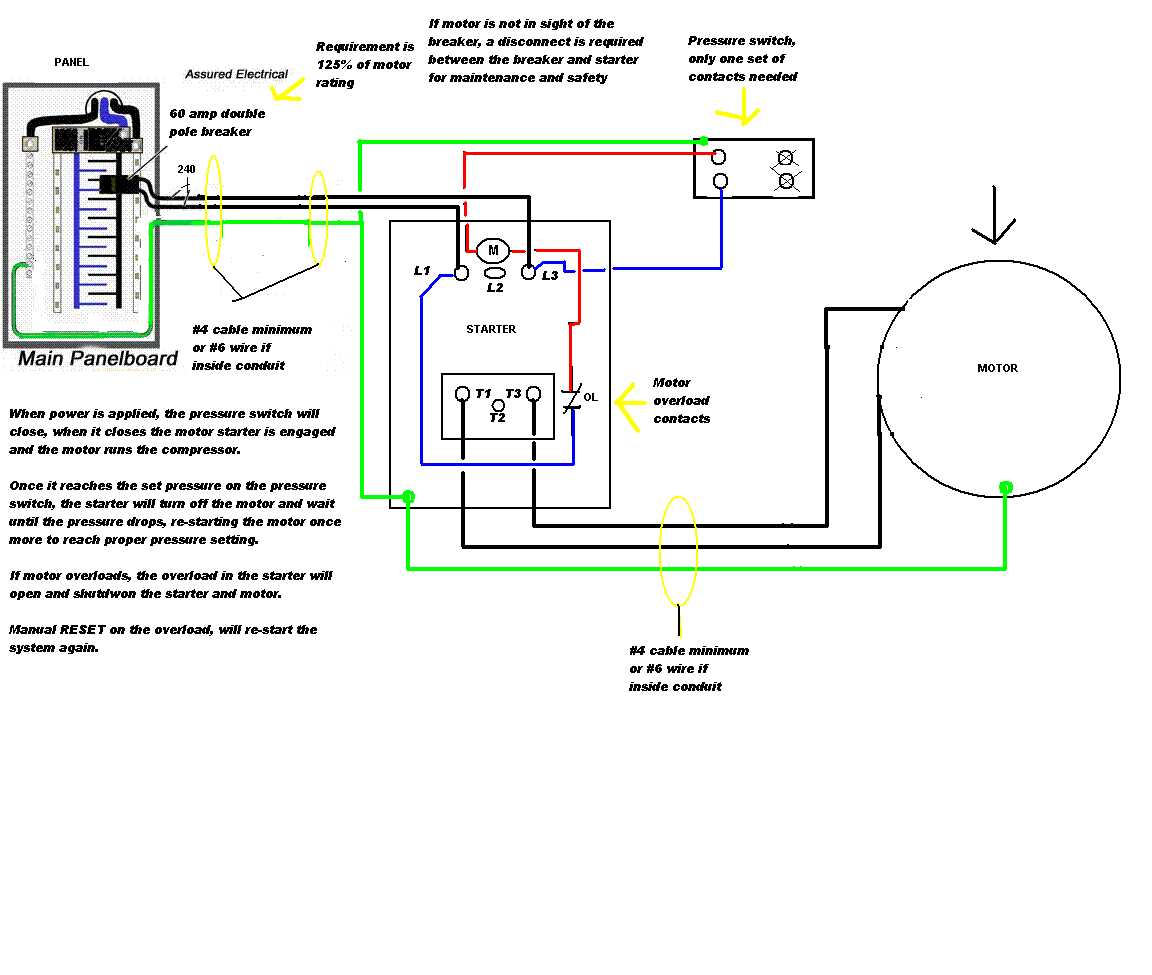
Wire the air compressor motor

Wiring the air compressor motor requires careful attention to detail to ensure proper operation and safety. Follow these steps:
Gather necessary materials
Before starting, gather the necessary materials including wire strippers, wire connectors, electrical tape, and a voltage tester. These tools will be essential for properly wiring the air compressor motor.
Check the motor specifications
Refer to the motor’s specifications to determine the type and size of wires needed for the job. The specifications should also indicate the voltage and amp requirements for the motor.
Turn off power
Before working on any electrical wiring, it is important to turn off the power supply to the area. This can be done by switching off the appropriate circuit breaker in the electrical panel.
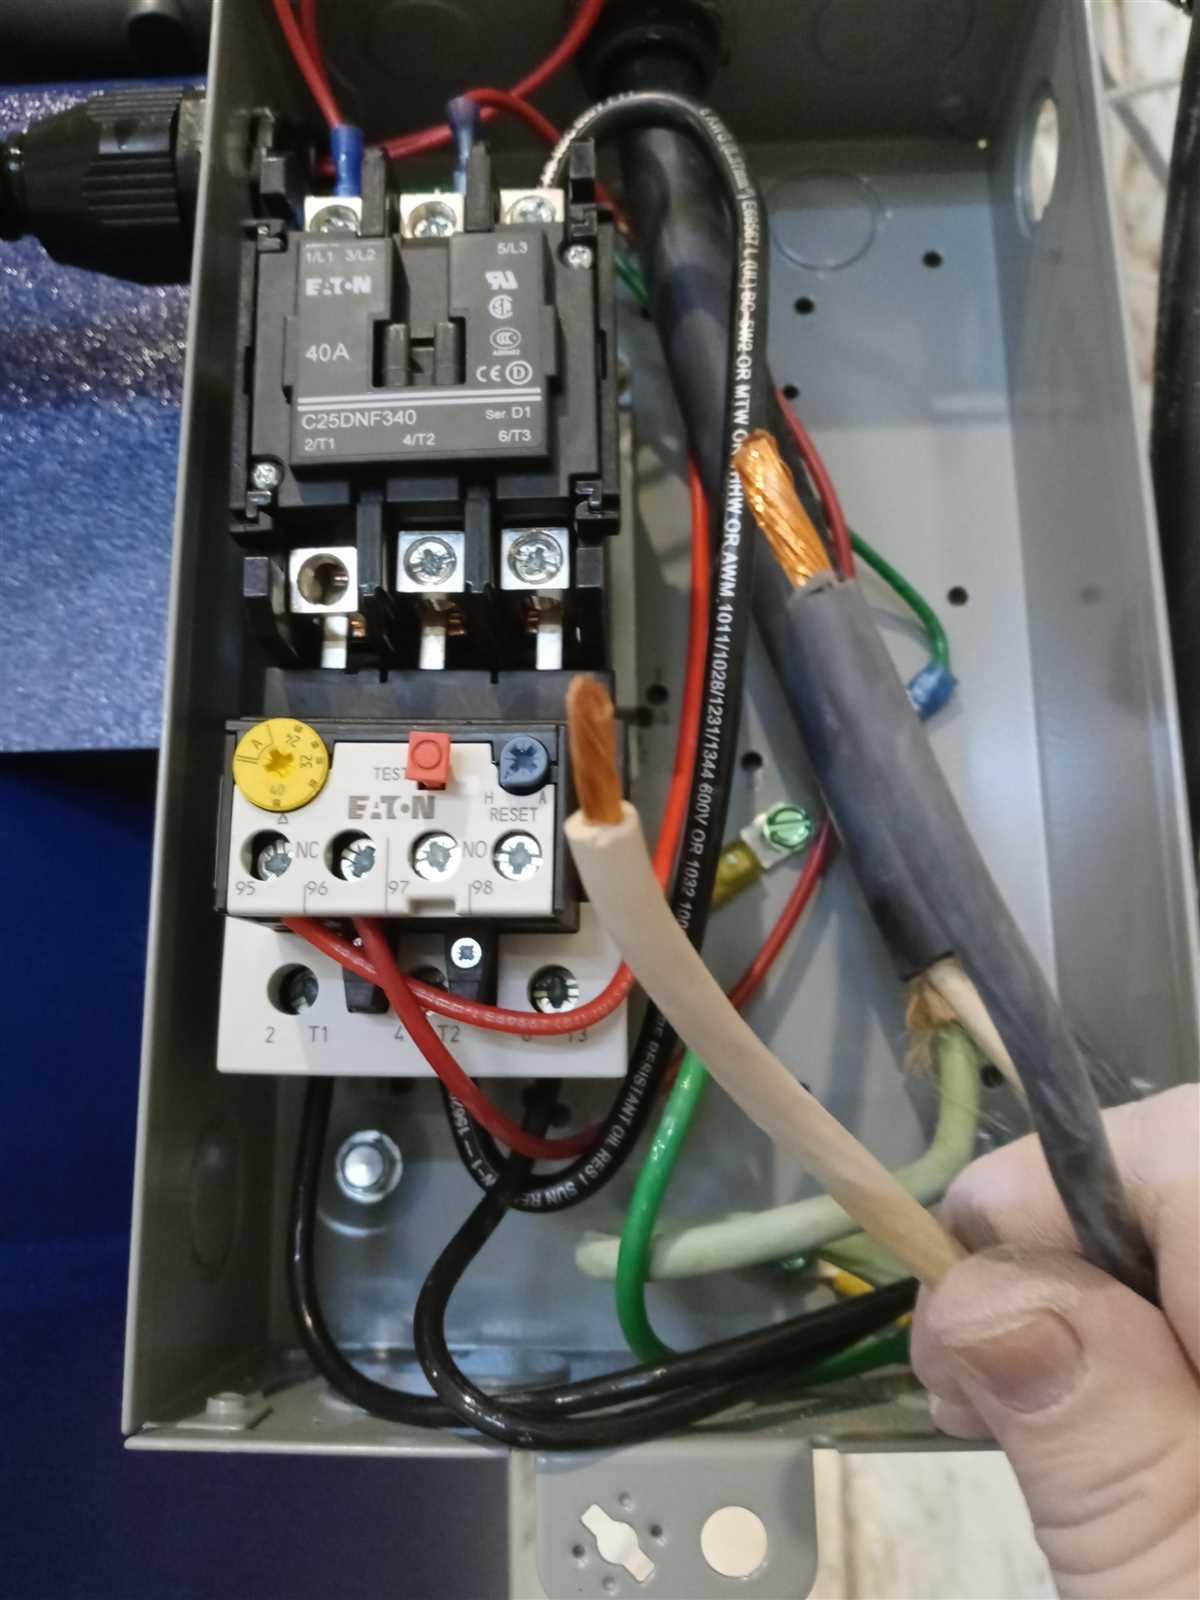
Remove the motor cover
Once the power supply is turned off, remove the cover of the air compressor motor to expose the wiring terminals. This can usually be done by removing a few screws or clips.
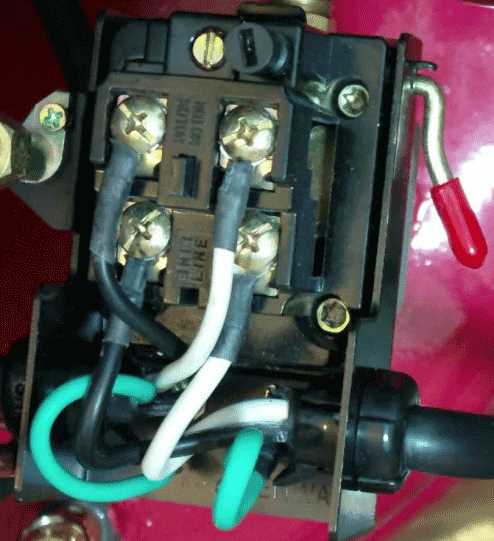
Connect wires to motor terminals
Using the wire strippers, strip the ends of the wires to expose the bare metal. Then, connect the wires to the motor terminals according to the motor’s wiring diagram. Ensure that the wire connections are secure and tight.
Test the wiring
After wiring the motor, use a voltage tester to check if there is power to the motor. Touch the voltage tester to the wires to confirm that there is no electricity flowing through them.
Secure and insulate the connections
Once the wiring is confirmed to be correct, secure the wire connections with wire connectors and wrap them with electrical tape. This will help prevent any accidental loosening or exposure of the wires.
Replace the motor cover
Finally, replace the motor cover and fasten it securely. This will protect the wiring and motor from dust, debris, and other potential hazards.
By following these steps and ensuring proper wiring, the air compressor motor should be ready for use. Always double-check the wiring and consult a professional if needed to ensure safety and proper operation of the air compressor.
Test the wiring
Once you have completed the wiring process for your 220 volt air compressor, it is important to test the wiring to ensure it has been installed correctly and is functioning properly. This step is crucial for the safety and efficiency of your air compressor.
Before testing the wiring, make sure that the power supply to the compressor is turned off and the circuit breaker is in the “off” position. This will prevent any accidents or electric shocks during the testing process.
Start by using a voltage tester or a multimeter to check for the presence of electricity in the wires. Carefully touch the tester’s probes to the exposed ends of the wires to determine if there is any live electricity flowing through them. It is important to note that if the wires are live, you should not touch them directly, as this can be dangerous.
If the tester indicates that there is electricity in the wires, double-check your wiring connections to ensure they are all correct. Inspect the connections for any loose or exposed wires that could be causing the issue. Tighten or secure any loose connections and cover any exposed wires with electrical tape.
If the tester indicates that there is no electricity in the wires, you can proceed with testing the air compressor by plugging it in and turning it on. Observe the compressor closely and listen for any unusual noises or vibrations. It should start running smoothly and quietly.
After the air compressor has been running for a few minutes, check the voltage levels on the multimeter or voltage tester. The reading should be close to the expected 220 volts. If the reading is significantly different, there may be an issue with the wiring or the electrical supply.
Finally, check the pressure gauge on the air compressor to ensure it is within the recommended range. Adjust the settings if necessary to achieve the desired pressure level.
In conclusion, testing the wiring of your 220 volt air compressor is an essential step to ensure safe and proper operation. By following these steps, you can identify any wiring issues and address them before they cause any damage or accidents.
FAQ:
What is a 220 volt air compressor?
A 220 volt air compressor is a type of air compressor that requires a 220 volt power supply to operate. It is typically used for industrial or heavy-duty applications.
Why do I need to wire a 220 volt air compressor?
You need to wire a 220 volt air compressor because it requires a higher voltage than a standard household outlet can provide. This allows the compressor to generate more power and operate more efficiently.
What materials do I need to wire a 220 volt air compressor?
To wire a 220 volt air compressor, you will need a 220 volt power supply, electrical wire, an appropriately sized circuit breaker, electrical connectors, and basic electrical tools such as pliers and wire cutters.
Can I wire a 220 volt air compressor myself?
Yes, you can wire a 220 volt air compressor yourself if you have a basic understanding of electrical systems and the necessary tools. However, if you are not comfortable or experienced with electrical work, it is recommended to hire a professional electrician to ensure the job is done safely and correctly.
How long does it take to wire a 220 volt air compressor?
The time it takes to wire a 220 volt air compressor can vary depending on your experience with electrical work and the complexity of the installation. It could take anywhere from a few hours to a full day to complete the wiring process.
Video:


Harrison Clayton
Meet Harrison Clayton, a distinguished author and home remodeling enthusiast whose expertise in the realm of renovation is second to none. With a passion for transforming houses into inviting homes, Harrison's writing at https://thehuts-eastbourne.co.uk/ brings a breath of fresh inspiration to the world of home improvement. Whether you're looking to revamp a small corner of your abode or embark on a complete home transformation, Harrison's articles provide the essential expertise and creative flair to turn your visions into reality. So, dive into the captivating world of home remodeling with Harrison Clayton and unlock the full potential of your living space with every word he writes.


