How to Build Your Own Air Compressor at Home: A Step-by-Step Guide

If you are a DIY enthusiast or a professional looking to save money, building your own air compressor at home can be a rewarding project. An air compressor is a versatile tool that can power various pneumatic tools and equipment, making it a valuable addition to any workshop or garage. By following this step-by-step guide, you can create your very own air compressor tailored to your specific needs and requirements.
Before starting the construction process, it is important to gather the necessary materials and tools. You will need a suitable motor, a compressor pump, an air tank, pressure gauges, fittings, hoses, and various other components. These can be found at auto parts stores, hardware stores, or online retailers. It is essential to ensure that all the components are compatible and of high quality to ensure safe and efficient operation.
The first step in building your air compressor is to mount the motor and the compressor pump to a sturdy base. This can be done by securing them with bolts and nuts or by using a mounting bracket. It is important to position the motor and pump in a way that allows for proper airflow and cooling. Once the motor and pump are securely mounted, connect them using a belt or a direct drive system, depending on the type of motor and pump you are using.
Next, you will need to install the air tank, which acts as a reservoir for storing compressed air. The size of the tank will depend on the intended use of the air compressor. It is important to position the tank in a location where it is easily accessible for maintenance and inspection. Connect the tank to the compressor pump using appropriate fittings and secure them tightly to prevent any air leaks.
Once the main components are in place, you can proceed to install the pressure gauges, safety valves, and other control devices. These components are essential for monitoring and regulating the air pressure produced by the compressor. Connect them to the air tank and compressor pump using suitable fittings and hoses. It is important to follow the manufacturer’s instructions for proper installation and calibration of these components.

Finally, test the air compressor for any leaks or malfunctions before putting it into regular use. Start the motor and allow the air tank to fill up to the desired pressure level. Check for any air leaks and ensure that all the control devices are functioning properly. If everything is in order, you can start using your homemade air compressor for various applications, such as powering pneumatic tools, inflating tires, or cleaning surfaces.
In conclusion, building your own air compressor at home can be a challenging but rewarding project. By following this step-by-step guide, you can create a customized air compressor that meets your specific needs. Remember to always prioritize safety and quality when selecting the components and during the construction process. With your homemade air compressor, you can enhance your DIY projects and save money in the long run.
The Importance of Air Compressors
Air compressors play a crucial role in various industries and everyday activities. They are versatile machines that use compressed air to power different tools and equipment. The ability to generate and store compressed air provides a wide range of benefits in many applications.
One of the key advantages of air compressors is their efficiency and reliability. They can deliver high levels of power without the need for bulky and heavy equipment. With the right compressor, you can easily inflate vehicle tires, operate pneumatic tools, and even clean surfaces with compressed air.
Furthermore, air compressors are essential in industrial settings where compressed air is necessary for powering heavy machinery and equipment. They are used in manufacturing plants for operating conveyor belts, pneumatic tools, and machinery in assembly lines. Compressed air is also often used in construction sites for tasks such as drilling, sandblasting, and painting.
In addition, air compressors are environmentally friendly as they do not produce harmful emissions like gas-powered tools do. They are also cost-effective in the long run since compressed air is readily available and can replace other types of fuel or energy sources. Compressed air systems can be designed to minimize energy consumption, making them more efficient and economical.

Overall, air compressors are versatile and essential tools in various industries and everyday life. Their ability to generate and store compressed air provides numerous advantages, including efficiency, reliability, versatility, and environmental friendliness. Whether it’s for small tasks at home or large-scale industrial applications, having an air compressor can greatly simplify and improve various activities.
Benefits of Building Your Own Air Compressor
1. Cost Savings
One of the main benefits of building your own air compressor is the cost savings. Purchasing a new air compressor can be expensive, especially if you require a high-quality and powerful model. By building your own, you can save a significant amount of money by purchasing individual components and assembling them yourself.
2. Customization
When you build your own air compressor, you have the freedom to customize it according to your specific needs. You can choose the size, power output, and capacity that best suits your requirements. This allows you to create an air compressor that is perfectly suited to the type of work you need it for, whether it’s for home use or professional applications.
3. Knowledge and Learning Experience
Building your own air compressor provides an opportunity to gain knowledge and hands-on experience with the inner workings of the machine. You will learn about the various components, how they function together, and how to troubleshoot any issues that may arise. This can be a valuable learning experience for those interested in mechanical engineering or DIY projects.
4. Maintenance and Repair

Another advantage of building your own air compressor is that you will have a better understanding of how to maintain and repair it. Since you built the machine yourself, you will be familiar with its components and how they should be maintained. This can save you time and money in the long run, as you will be able to troubleshoot and fix any issues that may occur without needing to rely on professional help.
5. Satisfaction of Building Something Yourself

Building your own air compressor can provide a sense of satisfaction and accomplishment. Seeing the finished product, knowing that you put in the time and effort to create it, can be highly rewarding. It can also give you a sense of pride in your abilities and encourage you to take on more DIY projects in the future.
In conclusion, building your own air compressor offers several benefits, including cost savings, customization options, knowledge and learning experience, maintenance and repair capabilities, and a sense of satisfaction and accomplishment. If you have the mechanical skills and enjoy DIY projects, building your own air compressor can be a worthwhile endeavor.
Step 1: Gathering Materials
Before you can start building your own air compressor at home, it’s important to gather all the necessary materials. Here is a list of items you will need:

- Motor: The heart of your air compressor, you will need an electric motor with sufficient power to drive the compressor pump. Look for a motor with a high horsepower rating.
- Compressor Pump: This is the component that will compress the air. You can choose between reciprocating or rotary screw pumps, depending on your needs and budget.
- Tank: A sturdy tank is essential to store the compressed air. Look for a tank that is large enough to hold the desired amount of air pressure.
- Pressure Switch: This device will regulate the air pressure in the tank. Make sure it is compatible with your motor and compressor pump.
- Compressor Oil: To ensure smooth operation, you will need compressor oil to lubricate the moving parts. Check the specifications of your compressor pump for the recommended type of oil.
- Piping and Fittings: You will need a variety of piping and fittings to connect the different components of your air compressor system. Make sure to choose materials that are compatible with compressed air.
- Pressure Gauge: This gauge will allow you to monitor the air pressure inside the tank. Look for a gauge that is accurate and easy to read.
- Safety Valve: A safety valve is essential to relieve excess pressure in case of a malfunction. Choose a valve with the appropriate pressure rating for your system.
- Tools: You will need a variety of tools, including wrenches, screwdrivers, and pliers, to assemble your air compressor. Make sure you have the necessary tools on hand before you begin.
Once you have gathered all the necessary materials, you will be ready to move on to the next step in building your own air compressor at home.
Essential Components
Building your own air compressor requires a few essential components that are necessary for its proper functionality:
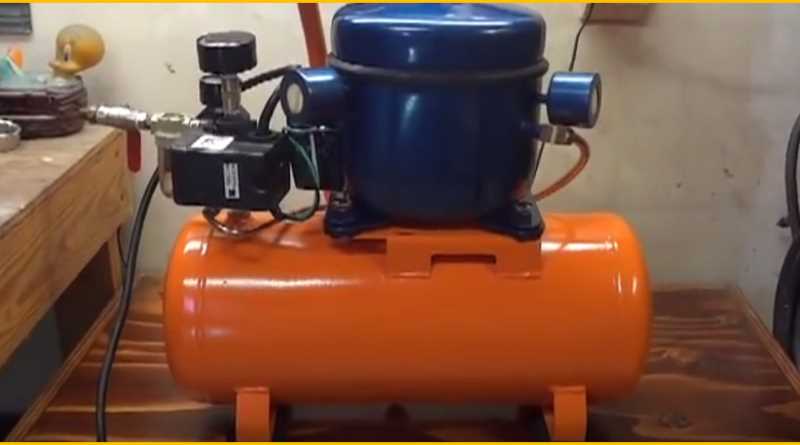
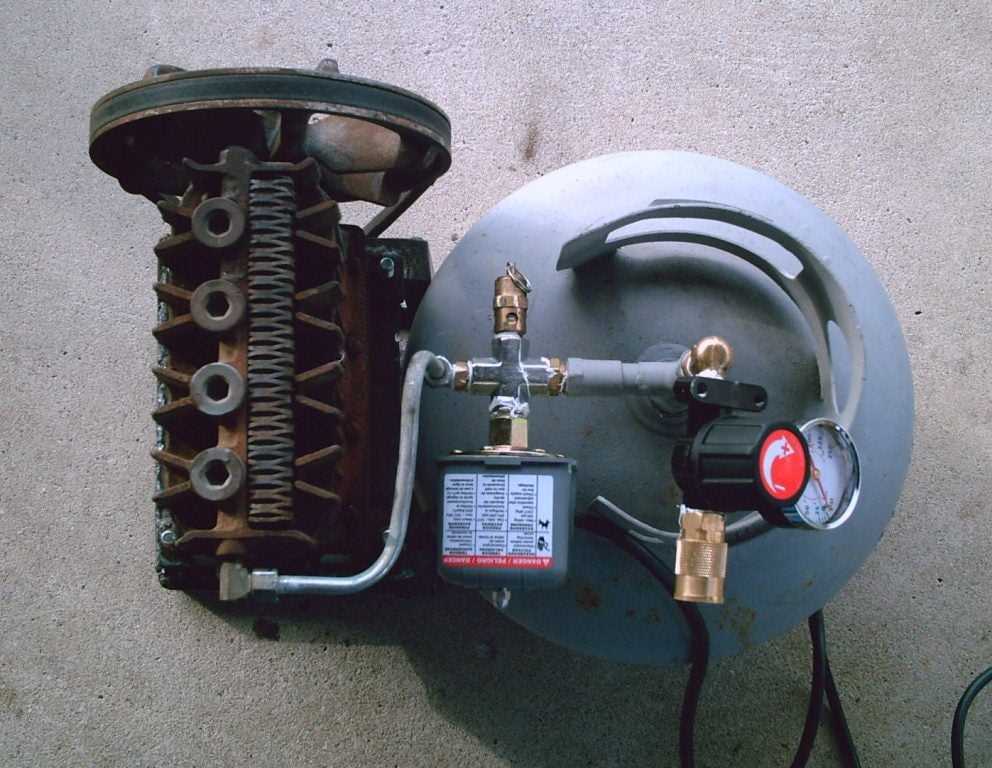
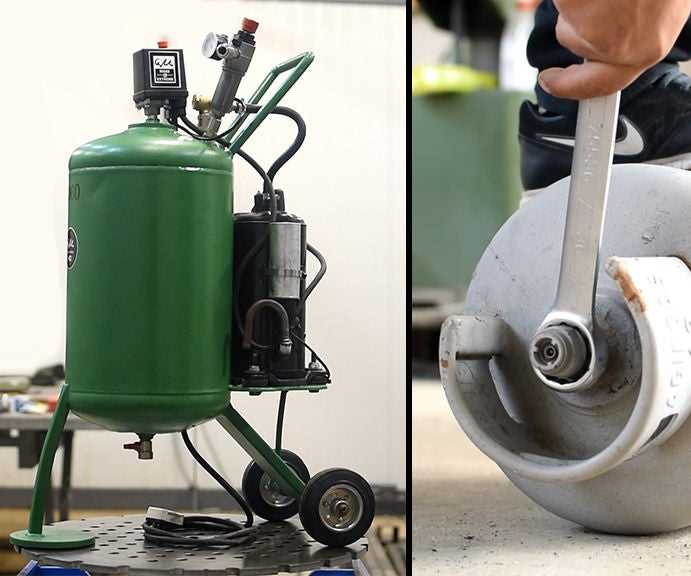
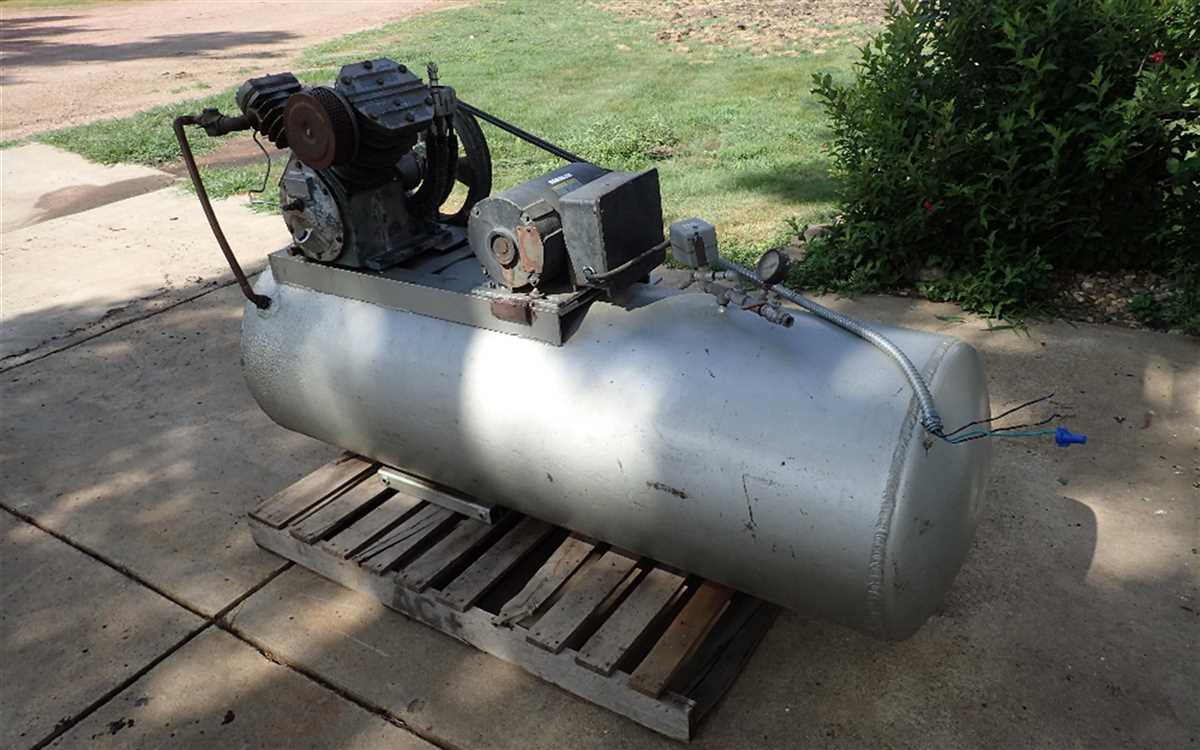
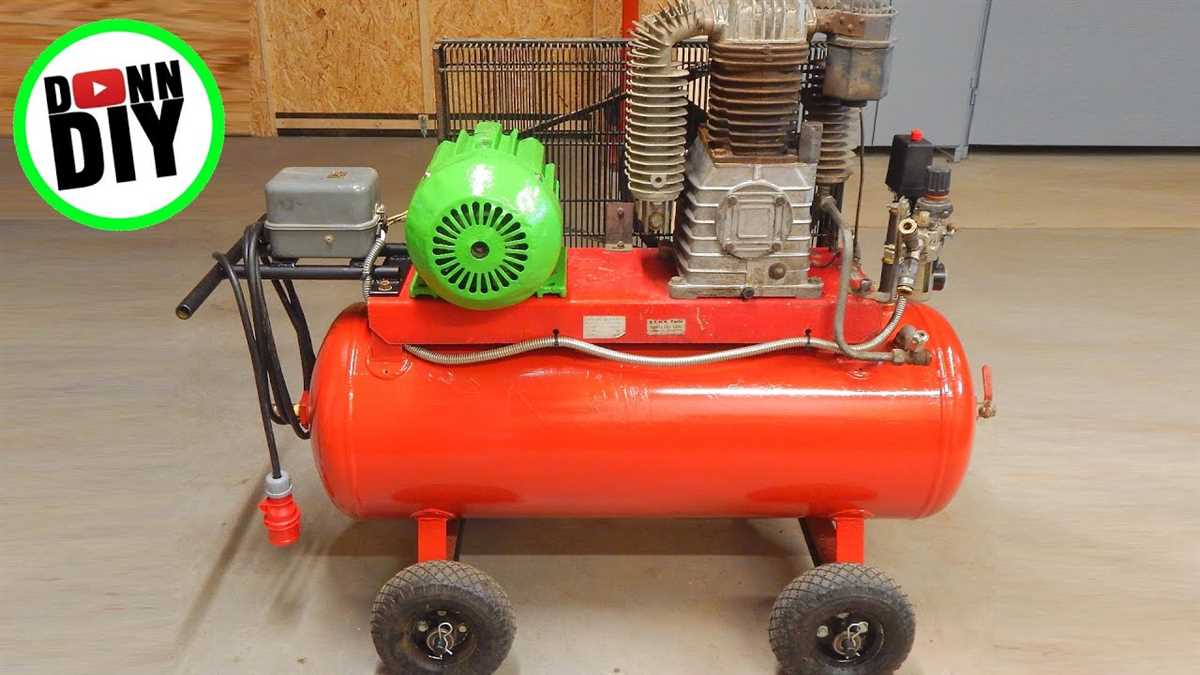
- Air Tank: This is the main component of the air compressor, where the compressed air is stored. It is usually made of sturdy steel and comes in different sizes, depending on your needs.
- Compressor Pump: The pump is responsible for compressing the air and filling up the air tank. It is typically driven by an electric motor, which powers the pump’s piston or rotary mechanism.
- Pressure Switch: The pressure switch is connected to the air tank and acts as a control mechanism. It automatically starts the compressor when the pressure in the tank drops below a set level and stops it when the tank reaches the desired pressure.
- Motor: The motor provides the power to drive the compressor pump. It is usually an electric motor, but in some cases, a gasoline engine may be used for portable air compressors.
- Regulator: The regulator allows you to control the pressure at which the air is released from the tank. It is essential for adjusting the output pressure according to your specific application.
- Filters: Filters are necessary to remove impurities and contaminants from the compressed air to ensure clean and high-quality output. They typically include a particulate filter, oil filter, and moisture separator.
- Gauges and Valves: Gauges provide a visual representation of the pressure inside the tank and the regulated output pressure. Valves help in controlling the flow of air through the system and allow for easy maintenance and repairs.
These components work together to create a functional air compressor that can be used for various applications, such as filling tires, powering pneumatic tools, or operating airbrushes. It is important to choose high-quality components and ensure proper installation for optimal performance and safety.
Optional Accessories
If you want to enhance your DIY air compressor, there are several optional accessories that you can consider adding to your setup. These accessories can help improve performance, increase efficiency, and make your overall experience more convenient.

Air Hose and Reels
An air hose is an essential accessory for your air compressor. It allows you to transport compressed air from the compressor to your desired location. Make sure to choose a high-quality air hose that is durable and can withstand high pressures. Additionally, consider investing in a reel to keep the air hose organized and prevent tangles.
Air Tools
With an air compressor, you open yourself up to a wide range of pneumatic tools that can be powered by compressed air. Some common air tools include impact wrenches, nail guns, and paint sprayers. Depending on your needs, you can add specific air tools to your setup to tackle different tasks more efficiently.
Air Pressure Regulator
An air pressure regulator allows you to control and adjust the pressure output of your air compressor. This accessory is especially useful if you work with different tools or applications that require varying air pressure levels. It ensures that you can always match the right pressure to the task at hand, preventing damage and ensuring optimal performance.
Air Filter and Lubricator
An air filter helps remove moisture, dust, and other contaminants from the compressed air, protecting your tools and equipment from potential damage. A lubricator, on the other hand, adds a controlled amount of oil to the compressed air, which can help extend the lifespan of your tools and improve their performance. Both accessories are recommended for maintaining the longevity and efficiency of your air compressor system.
By considering these optional accessories, you can customize your DIY air compressor to better suit your needs and optimize its performance. Each accessory serves a specific purpose and can make your compressor more versatile and efficient. Remember to choose high-quality accessories and properly maintain them for the best results.

Step 2: Understanding Air Compressor Principles
Before proceeding with building your own air compressor at home, it is essential to have a clear understanding of the principles that govern its operation. This knowledge will enable you to make informed decisions during the construction process and ensure the functionality and safety of your homemade air compressor.
1. Compressor Types
There are several types of air compressors available, each with its own set of advantages and disadvantages. These include reciprocating compressors, rotary screw compressors, and centrifugal compressors. Take time to research and determine which type best suits your needs and budget for your DIY project.
2. Air Pressure and Volume
Two vital factors you need to understand are air pressure and volume. Air pressure is measured in pounds per square inch (PSI) and determines the force with which the compressed air is delivered. Air volume, also known as air flow or cubic feet per minute (CFM), indicates the amount of compressed air that the compressor can generate and deliver.

3. Compression Cycle
The compression cycle is the process by which the air is compressed inside the compressor. It typically involves an intake stroke, compression stroke, and discharge stroke. Understanding this cycle will help you troubleshoot any potential issues with your homemade air compressor and ensure optimal performance.
4. Safety Considerations
Building your own air compressor requires careful attention to safety considerations. Ensure that you understand and follow all applicable safety guidelines, such as wearing protective gear, using proper ventilation, and installing safety devices, including pressure relief valves and pressure switches. Safety should always be a top priority when working with compressed air.
By familiarizing yourself with these air compressor principles, you will be well-equipped to move forward in the construction of your own air compressor and enjoy the benefits it provides. Remember to refer back to this knowledge as needed throughout the building process to ensure a successful outcome.
Working Principle of an Air Compressor
Air compressors work based on the principle of converting power into potential energy stored in pressurized air. They do this by using a motor or engine to drive a piston or impeller, which pressurizes the air. There are several types of air compressors, including reciprocating, rotary screw, and centrifugal compressors. Each type operates on slightly different principles, but the basic idea is the same.
In a reciprocating air compressor, a piston moves back and forth inside a cylinder. On the intake stroke, the piston moves downward, creating a vacuum that draws in air. On the compression stroke, the piston moves upward, compressing the air and increasing its pressure. The compressed air is then stored in a tank or released directly for use.
Rotary screw compressors use helical screws to compress the air. As the screws rotate, the air is trapped between the screws and the housing, reducing the volume and increasing the pressure. This type of compressor is known for its efficiency and quiet operation.
Centrifugal compressors use a rotating impeller to accelerate the air, which is then slowed down by a diffuser, causing the air to become compressed. This type of compressor is commonly used in large-scale industrial applications.
The compressed air produced by an air compressor can be used for a variety of purposes, including powering pneumatic tools, filling tires, and supplying air to industrial processes. Air compressors are an essential tool in many industries and can be built at home with the right knowledge and materials.
Types of Air Compressors
1. Reciprocating Air Compressors
A reciprocating air compressor is one of the most common types of compressors used in various applications. It uses a piston cylinder arrangement to compress air. The piston moves up and down within the cylinder, creating a vacuum during the downward stroke and compressing the air during the upward stroke. Reciprocating compressors are known for their high pressure output and are often used in industries such as automotive, manufacturing, and construction.
2. Rotary Screw Air Compressors
Rotary screw air compressors are another popular type of compressor commonly used in industrial applications. They use two helical screws, known as rotors, to compress air. As the rotors rotate, they trap air in the space between them and the compressor housing, gradually reducing the volume and increasing the pressure. Rotary screw compressors are known for their continuous and efficient operation, making them suitable for applications that require a steady supply of compressed air.
3. Centrifugal Air Compressors
Centrifugal air compressors are typically used in large-scale industrial applications where a high volume of compressed air is required. These compressors use a rotating impeller to accelerate the air and then direct it to a diffuser where the velocity is converted into pressure. Centrifugal compressors are known for their high flow rates and can deliver large amounts of compressed air at a constant pressure.
4. Scroll Air Compressors
Scroll air compressors are compact and quiet compressors that are often used in smaller applications and environments where noise is a concern. They use two spiral-shaped scrolls, one stationary and one rotating, to compress the air. As the scrolls interlock and rotate, they trap and compress the air, creating a continuous flow of compressed air. Scroll compressors are known for their low maintenance requirements and energy efficiency.
5. Axial Air Compressors
Axial air compressors are typically used in applications that require a high flow rate at a relatively low pressure. They use a series of rotating disks or vanes to compress the air. As the disks or vanes rotate, they push the air along the axial direction, gradually compressing it. Axial compressors are known for their compact size and high flow rates, making them suitable for applications such as ventilation systems and aircraft engines.
In addition to these main types, there are also other specialized air compressors such as oil-free air compressors, portable air compressors, and high-pressure air compressors, each designed to meet specific requirements in various industries and applications.
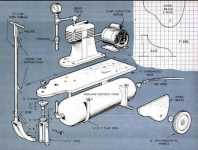
Step 3: Assembling the Air Compressor
Once you have gathered all the necessary components and tools, it’s time to start assembling your homemade air compressor. Follow these steps to ensure a proper and secure assembly:
1. Mounting the motor:
Begin by mounting the motor to a sturdy base or frame using bolts or screws. Make sure the motor is securely attached, as it will be the main power source for your air compressor.
2. Attaching the tank:
Next, position the air tank in a convenient location near the motor. Use a mounting bracket or straps to secure the tank to the frame. Ensure that the tank is stable and level to prevent any leaks or accidents.
3. Connecting the motor to the tank:
Now, it’s time to connect the motor to the air tank. Use a suitable-length air hose or pipe to link the motor’s output port to the tank’s intake port. Make sure the connection is tight and sealed properly to prevent any air leakage.
4. Installing the pressure switch:
In order to control the compressor’s operation, you’ll need to install a pressure switch. This switch is responsible for turning the motor on and off based on the desired air pressure. Follow the manufacturer’s instructions to connect the switch to the motor and tank.
5. Adding the pressure relief valve:
For safety purposes, it’s important to include a pressure relief valve in your air compressor setup. This valve will release excess pressure in case the system becomes overloaded. Install the valve on the tank and ensure it is easily accessible.
6. Connecting the air filter and regulator:
To keep the compressed air clean and adjust its pressure, connect an air filter and regulator to the output side of the tank. The filter will remove any contaminants, while the regulator will allow you to adjust the pressure according to your needs. Attach these components securely to the tank.
By following these steps, you can assemble your own air compressor at home. Remember to double-check all connections, test for any leaks, and always prioritize safety during the assembly process.
Setting Up the Tank
Once you have gathered all the necessary materials and components for your air compressor, it’s time to start setting up the tank. The tank is an essential part of the air compressor as it stores the compressed air for future use.
1. Choose the right tank: Select a tank that is suitable for your needs and the amount of compressed air you plan to store. Tanks come in various sizes and capacities, so consider the size of your compressor and the amount of air you anticipate using.
2. Mount the tank: Position the tank in a secure and accessible location. Make sure it is placed on a sturdy surface that can handle the weight of the tank and the pressure it will contain. You may need to use mounting brackets or straps to secure the tank to a wall or other structure.
3. Connect the tank to the compressor: Attach the compressor to the tank using the appropriate fittings and hoses. Ensure that all connections are tight and secure to prevent any leaks. It is recommended to use Teflon tape or thread sealant on the fittings to create an airtight seal.
4. Install safety features: Install any necessary safety devices, such as pressure relief valves or pressure gauges, to ensure the safe operation of your air compressor. These devices help control the pressure inside the tank and provide protection in case of any malfunctions or overpressure situations.
5. Test for leaks: Before fully using the air compressor, perform a leak test to ensure that all connections are properly sealed. Apply a mixture of soapy water to all fittings and connections and observe for any bubbles indicating a leak. If you detect any leaks, tighten the connections accordingly.
6. Follow manufacturer’s instructions: It is important to follow the manufacturer’s instructions for your specific air compressor and tank. This ensures that you properly set up and maintain your equipment for optimal performance and safety.
7. Maintenance: Regularly inspect and maintain your air compressor tank to ensure its longevity and reliability. Check for any signs of corrosion, wear, or damage and address any issues promptly. This includes draining the tank regularly to remove any accumulated moisture or debris.
8. Safety precautions: Always wear appropriate safety gear, such as safety glasses and ear protection, when working with your air compressor. Follow all safety guidelines and precautions provided by the manufacturer to avoid any accidents or injuries.
FAQ:
How much does it cost to build your own air compressor?
The cost of building your own air compressor can vary depending on the quality of materials you choose. On average, the cost can range from $200 to $500. However, it is important to note that by building your own air compressor, you can save money compared to buying a brand new one.
What are the benefits of building your own air compressor?
There are several benefits to building your own air compressor. Firstly, it allows you to customize the design and specifications according to your specific needs. Secondly, it can be a cost-effective option compared to buying a new air compressor. Additionally, building your own air compressor can be a fun and rewarding DIY project.
Is it difficult to build an air compressor at home?
Building an air compressor at home can be a moderately difficult project, especially if you have little experience with pneumatic systems. It requires basic knowledge of tools and machinery, as well as following safety precautions. However, with the right guidance and patience, it can be a rewarding project for DIY enthusiasts.
Are there any safety precautions I should take when building an air compressor at home?
Yes, there are several safety precautions you should take when building an air compressor at home. Firstly, always wear safety goggles and gloves to protect your eyes and hands. Secondly, make sure to work in a well-ventilated area to prevent inhalation of fumes. Additionally, follow the manufacturer’s instructions and guidelines for the air compressor pump and other components. Lastly, regularly inspect the air compressor for any signs of wear or damage to avoid accidents.
Video:


Harrison Clayton
Meet Harrison Clayton, a distinguished author and home remodeling enthusiast whose expertise in the realm of renovation is second to none. With a passion for transforming houses into inviting homes, Harrison's writing at https://thehuts-eastbourne.co.uk/ brings a breath of fresh inspiration to the world of home improvement. Whether you're looking to revamp a small corner of your abode or embark on a complete home transformation, Harrison's articles provide the essential expertise and creative flair to turn your visions into reality. So, dive into the captivating world of home remodeling with Harrison Clayton and unlock the full potential of your living space with every word he writes.


