How to Repair Lathe and Plaster Wall: Step-by-Step Guide

Lathe and plaster walls, a popular building material from the late 18th century to the early 20th century, add a touch of historical charm to any home. However, over time, these walls can develop cracks, holes, and other forms of damage. Repairing lathe and plaster walls is a bit more involved than repairing drywall, but with the right tools and techniques, it can be done effectively.
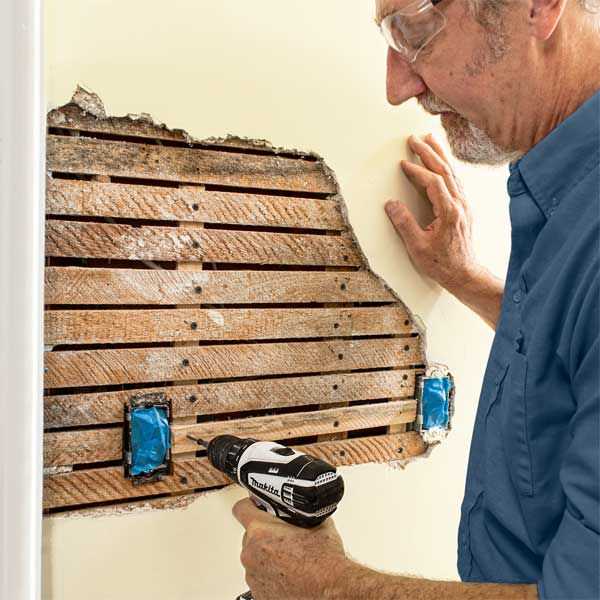
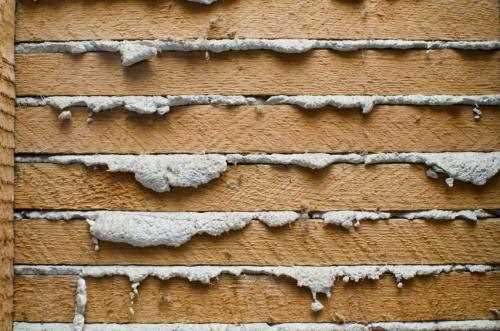
Before diving into the repair process, it’s important to understand the anatomy of a lathe and plaster wall. Typically, lathe and plaster walls are made up of horizontal wooden strips known as lathes, which are nailed to the wall studs. A mixture of sand, lime, and water, known as plaster, is then applied over the lathes to create a smooth and durable wall surface.
Step 1: Preparation
First, assess the extent of the damage to determine whether a simple patch or a more extensive repair is needed. Gather the necessary tools, including a utility knife, a scraper, a hammer, a drill, a wire brush, a bucket, a mixing paddle, plaster, and plaster adhesive. Protect your workspace with drop cloths and ensure proper ventilation.
Step 2: Remove Loose Plaster
Using a utility knife or scraper, carefully remove any loose or damaged plaster from the wall. Be gentle to avoid causing further damage. If necessary, use a wire brush or sandpaper to smooth the edges of the damaged area.
Step 3: Apply Plaster Adhesive

Before applying new plaster, it’s important to apply a layer of plaster adhesive to the damaged area. This adhesive will help the new plaster adhere to the wall more effectively. Follow the manufacturer’s instructions for the specific adhesive being used.
Step 4: Mix and Apply Plaster
In a clean bucket, mix the plaster according to the manufacturer’s instructions. Use a mixing paddle attached to a drill to ensure a smooth and even consistency. Once mixed, apply the plaster to the damaged area using a trowel or putty knife. Build up the layers, allowing each layer to dry before applying the next, until the damaged area is even with the surrounding wall.
Step 5: Smooth and Finish
Once the plaster has fully dried, use sandpaper or a sponge to smooth out any rough spots or uneven surfaces. Apply a coat of primer, followed by paint or wallpaper, to match the surrounding wall. Allow the primer and paint to dry completely before enjoying your newly repaired lathe and plaster wall.

Repairing lathe and plaster walls may require some time and effort, but the end result is well worth it. With these step-by-step instructions, you can confidently tackle the repair process and restore the beauty and integrity of your walls.
Preparation and Safety
- Before starting any repair work on a lathe and plaster wall, it is important to take the necessary safety precautions.
- Wear protective equipment, such as safety goggles, gloves, and a dust mask, to protect yourself from any hazards.
- Cover the surrounding area with drop cloths or plastic sheets to protect furniture and flooring from dust and debris.
- Turn off any electrical power to the room or areas where the repair work will take place.
- If there are any cracks or loose plaster on the wall, it is essential to remove them before starting the repair process.
- Use a utility knife to carefully cut along any cracks and remove the loose plaster using a putty knife or scraper.
- Inspect the lath underneath the plaster for any signs of damage or rot. Replace any damaged or rotted lath to ensure a stable foundation for the new plaster.
- Once the damaged plaster and lath have been removed, clean the wall thoroughly using a brush or vacuum to remove any dust or debris.
- Fill any large voids or gaps in the wall with a plaster repair compound or patching compound. Smooth out the compound using a putty knife or trowel.
- Allow the patching compound to dry completely before moving on to the next step.
It is important to follow these preparation steps to ensure a safe and successful repair of a lathe and plaster wall. By taking the time to prepare the wall and protect yourself and the surrounding area, you can minimize the risk of injury and create a strong and durable repair.
Removing Loose Plaster and Lath
Before you can begin repairing a lathe and plaster wall, it’s important to remove any loose plaster and lath first. Here are the steps to remove loose plaster and lath:
- Prepare the work area by covering the floor and any nearby furniture with drop cloths to protect them from falling debris.
- Put on safety goggles, a dust mask, and gloves to protect yourself from dust and debris.
- Use a stiff-bristle brush or a wire brush to remove any loose plaster from the wall surface. Brush in a downward motion to avoid causing further damage.
- Inspect the wall for any loose lath. Lath are the wooden slats behind the plaster that hold it in place. If you notice any loose or damaged lath, use a pry bar or a hammer and chisel to remove them.
- Carefully remove the loose lath pieces by prying them away from the wall. Be cautious not to damage any stable pieces of lath that are still in place.
- Once all the loose plaster and lath have been removed, clean up any debris on the floor and surrounding area.
By removing the loose plaster and lath before making repairs, you ensure that the new plaster will adhere properly and that the repaired wall will be structurally sound.
Cleaning and Drying the Wall
Before repairing a lathe and plaster wall, it is important to clean and dry the wall properly. This step will ensure that the repair materials adhere well and provide a long-lasting result.

Tools and Materials Needed:
- Dust mask
- Protective gloves
- Drop cloth or plastic sheeting
- Soft-bristle brush or vacuum cleaner with brush attachment
- Bucket of warm water
- Mild detergent or wall cleaner
- Clean cloth or sponge
- Fans or dehumidifier (if needed)
Steps:
- Start by preparing the work area. Lay down a drop cloth or plastic sheeting to protect the floor and furniture from dust and debris.
- Put on a dust mask and protective gloves to protect yourself from dust and cleaning chemicals.
- Use a soft-bristle brush or a vacuum cleaner with a brush attachment to remove any loose dirt, dust, or cobwebs from the wall surface. Pay close attention to the cracks and damaged areas.
- If there are stains or marks on the wall, mix a mild detergent or wall cleaner with warm water in a bucket according to the manufacturer’s instructions.
- Dip a clean cloth or sponge into the soapy water and gently scrub the wall surface. Be careful not to apply too much pressure as it may further damage the plaster.
- Rinse the cloth or sponge with clean water and wipe off any soap residue from the wall.
- Allow the wall to air dry completely. If necessary, use fans or a dehumidifier to speed up the drying process. It is important to ensure that the wall is completely dry before proceeding with the repair.
Cleaning and drying the wall thoroughly is crucial for a successful repair of a lathe and plaster wall. By following these steps, you will create a clean and smooth surface to work with, which will ultimately result in a professional-looking repair.
Mixing Plaster Compound
Before you can start repairing your lathe and plaster wall, you need to mix the plaster compound properly. Follow these steps to ensure a smooth and even mixture:
- Start by preparing the area where you will be mixing the plaster compound. Lay down a drop cloth or plastic sheet to protect your work surface.
- Put on protective gear such as gloves and a dust mask to protect yourself from any harmful particles.
- In a clean bucket or mixing container, pour the desired amount of plaster compound. Read the manufacturer’s instructions for the correct amount of water to use.
- Add water gradually to the plaster compound while stirring continuously. Use a mixing paddle or a clean wooden stick for stirring. Avoid adding too much water at once to prevent lumps from forming.
- Continue stirring the mixture until it reaches a smooth and creamy consistency. The plaster should not be too runny or too thick.
- Allow the mixture to sit for a few minutes to let any air bubbles rise to the surface. You can gently tap the container on the ground to release any trapped air.
- After the bubbles have risen to the surface, give the mixture a final stir to ensure it is well-mixed.
It is important to mix the plaster compound properly to achieve the best results when repairing your lathe and plaster wall. A well-mixed compound will be easier to work with and will adhere better to the wall surface.
Applying Plaster Compound to the Wall

Once you have prepared the damaged area of the lathe and plaster wall, it’s time to apply the plaster compound. Follow these steps to ensure a smooth and professional-looking repair:
- Clean the area: Use a soft brush or vacuum cleaner to remove any dust or debris from the damaged area. This will ensure that the plaster compound adheres properly.
- Prepare the plaster compound: Mix the plaster compound according to the manufacturer’s instructions. Use a clean bucket and a mixing paddle to achieve a smooth and lump-free consistency.
- Apply the plaster compound: Using a trowel or a putty knife, apply a thin layer of plaster compound to the damaged area. Start from the center and work your way outwards, feathering the edges to blend with the surrounding wall.
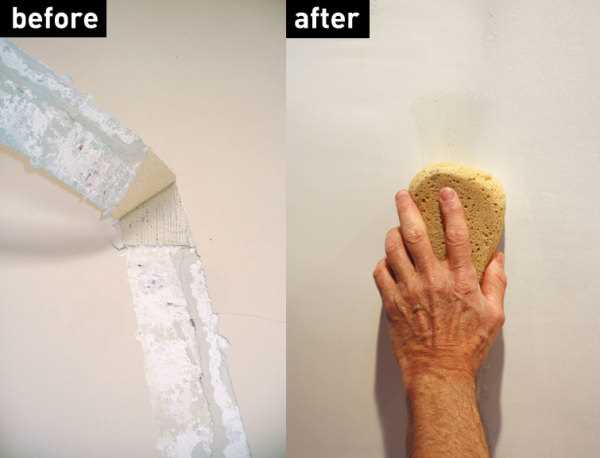
- Smooth the surface: After applying the first coat, use a damp sponge or a trowel to smooth the surface of the compound. This will help to remove any excess and create a seamless finish.
- Allow it to dry: Let the first coat of plaster compound dry for the recommended time, usually 24 hours. Avoid touching or disturbing the area during this time.
- Apply additional coats: If necessary, apply additional coats of plaster compound to achieve a completely leveled and smooth surface. Follow the same steps of applying, smoothing, and drying between each coat.
- Sand and finish: Once all the layers have dried, use sandpaper to smooth out any imperfections and create a uniform surface. Wipe away any dust with a cloth or sponge.
- Prime and paint: Before painting, apply a coat of primer to the repaired area. This will ensure proper adhesion and a consistent finish. Once the primer has dried, paint the area to match the rest of the wall.
Following these steps will help you successfully repair and restore your lathe and plaster wall. Remember to take your time, work carefully, and maintain patience throughout the process for the best results.
Smoothing and Leveling the Surface
Materials and tools needed:
- Joint compound
- Putty knife
- Sanding block
- 120-grit sandpaper
- Tape measure
- Pencil
Once you have repaired any cracks or holes in your lathe and plaster wall, it’s time to smooth and level the surface. This step is important to ensure a seamless finish when you paint or wallpaper the wall.
Step 1: Prepare the joint compound
- Open the joint compound container and stir it well with a putty knife to ensure it is smooth and free of lumps.
- If the consistency of the joint compound is too thick, you can add a small amount of water to thin it out. Mix it well until you achieve a smooth and workable texture.
Step 2: Apply the joint compound

- Using a putty knife, scoop a small amount of the joint compound onto the blade.
- Hold the putty knife at a 45-degree angle and apply the joint compound to the repaired area in a thin, even layer. Use smooth and steady strokes to spread the compound across the surface.
- Continue applying the joint compound until the entire repaired area is covered. Be sure to feather out the edges to blend it seamlessly with the surrounding wall.
- Allow the joint compound to dry completely according to the manufacturer’s instructions. This usually takes about 24 hours.
Step 3: Sand the surface
- Once the joint compound is dry, use a sanding block with 120-grit sandpaper to gently sand the repaired area.
- Start by sanding the high spots or ridges to level the surface. Use light pressure and smooth, even strokes.
- Continue sanding until the surface feels smooth and even to the touch. Be careful not to sand too much or you may damage the surrounding wall.
- Wipe away any dust or debris with a clean cloth.
Congratulations! Your lathe and plaster wall is now smooth and level, ready for further finishing touches such as painting or wallpapering.

Drying and Sanding the Repair
After applying the plaster, it is important to allow it sufficient time to dry before proceeding to the next step. Drying time can vary depending on various factors such as temperature and humidity, so it is recommended to follow the manufacturer’s guidelines for drying time. Typically, it may take anywhere from 24 to 48 hours for the plaster to fully dry.
Once the plaster has dried completely, it is time to sand the repair. Sanding helps to smooth out any imperfections and create a seamless finish. Here’s how you can go about sanding the repair:
- Start by inspecting the repaired area for any rough patches or high spots. Use your hands to feel for any unevenness.
- Using a medium-grit sandpaper (around 120-150 grit), begin sanding the repaired area. Use smooth and even strokes, applying gentle pressure.
- Continue sanding until the repaired area is level with the surrounding wall. Take breaks in between if needed to avoid over-sanding.
- Once you have achieved a smooth and level surface, switch to a finer-grit sandpaper (around 220-240 grit) for a final sanding. This will help to refine the surface and prepare it for painting or further finishing.
- Wipe away the dust created during sanding with a damp cloth or vacuum cleaner. Make sure the area is clean and free from dust particles before moving on to the next step.
Note: It is important to wear a mask and protective goggles while sanding to protect yourself from inhaling dust particles and debris. You may also want to cover nearby furniture and floors to prevent them from getting dirty during the sanding process.
Once the repair has been dried and sanded, it is ready for further finishing or painting. If you plan to paint the repaired wall, it is recommended to apply a primer before painting to ensure better adhesion and a more uniform finish.
Painting and Finishing Touches
Once the repaired area is completely dry, it’s time to paint and add the finishing touches to your lathe and plaster wall. Follow these steps to successfully complete the painting process:
1. Choose the paint color
Select a paint color that matches the existing wall color or choose a new color to give your room a fresh look. Consider using a paint with a semi-gloss or satin finish as it tends to hide imperfections better.
2. Sand the repaired area
Start by lightly sanding the repaired area using a fine-grit sandpaper. This will help to smoothen the surface and ensure that the paint adheres properly.
3. Clean the wall
Before painting, make sure to clean the wall surface to remove any dust or debris. Use a damp cloth or sponge to wipe down the repaired area and the surrounding wall.
4. Prime the repaired area
Apply a coat of primer to the repaired area. This will help the paint to adhere better and provide an even finish. Allow the primer to dry according to the manufacturer’s instructions.
5. Paint the repaired area
Using a paintbrush or roller, apply the desired paint color to the repaired area. Make sure to blend the new paint with the surrounding wall for a seamless finish. Apply multiple coats if needed, allowing each coat to dry fully before applying the next.
6. Apply a top coat
To protect the painted surface and add a smooth finish, apply a top coat of clear sealer or varnish. This will help to extend the lifespan of the paint and provide a more durable surface.
7. Clean up
Once you have finished painting, clean up any paint brushes or rollers using water or the appropriate cleaning solution. Remove any drop cloths and put away any tools or materials used during the repair process.
With these steps, you can successfully repair, paint, and add the finishing touches to your lathe and plaster wall. Remember to take your time and ensure each layer is dry before proceeding to the next step for the best results.
FAQ
What tools will I need to repair a lathe and plaster wall?
You will need the following tools to repair a lathe and plaster wall: a utility knife, a hammer, a chisel, a plastering trowel, a putty knife, sandpaper, a sponge, a bucket, and a mixing paddle.
Can I repair a lathe and plaster wall by myself, or do I need to hire a professional?
You can definitely repair a lathe and plaster wall by yourself. It may take some time and effort, but with the right tools and materials, it is a doable DIY project.
What are the common issues that can occur in a lathe and plaster wall?
Some common issues that can occur in a lathe and plaster wall include cracks, holes, loose plaster, and bulging. These issues can be caused by various factors such as settling of the house, moisture damage, or simply wear and tear over time.
What is the first step in repairing a lathe and plaster wall?
The first step in repairing a lathe and plaster wall is to assess the extent of the damage. You should carefully inspect the wall for cracks, holes, or loose plaster. This will help you determine the appropriate repair method.
How do I patch a hole in a lathe and plaster wall?
To patch a hole in a lathe and plaster wall, you will first need to remove any loose plaster around the hole. Then, you can fill the hole with a patching compound, such as joint compound or plaster of Paris. After the compound has dried, you can sand it smooth and paint over it to blend it with the rest of the wall.
Can I repair a bulging area in a lathe and plaster wall?
Yes, you can repair a bulging area in a lathe and plaster wall. The first step is to cut a small hole in the bulging area to release any pressure. Then, you can use screws and washers to secure the lathe back to the wall. Finally, you can patch the hole and repaint the area.
Video


Meet Harrison Clayton, a distinguished author and home remodeling enthusiast whose expertise in the realm of renovation is second to none. With a passion for transforming houses into inviting homes, Harrison's writing at https://thehuts-eastbourne.co.uk/ brings a breath of fresh inspiration to the world of home improvement. Whether you're looking to revamp a small corner of your abode or embark on a complete home transformation, Harrison's articles provide the essential expertise and creative flair to turn your visions into reality. So, dive into the captivating world of home remodeling with Harrison Clayton and unlock the full potential of your living space with every word he writes.