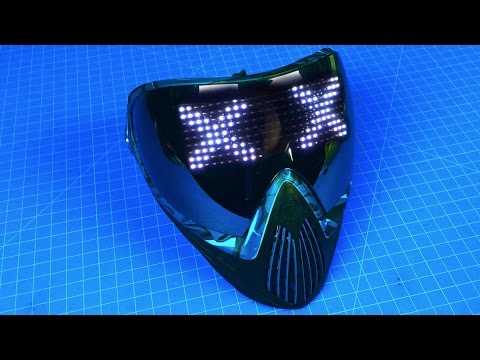
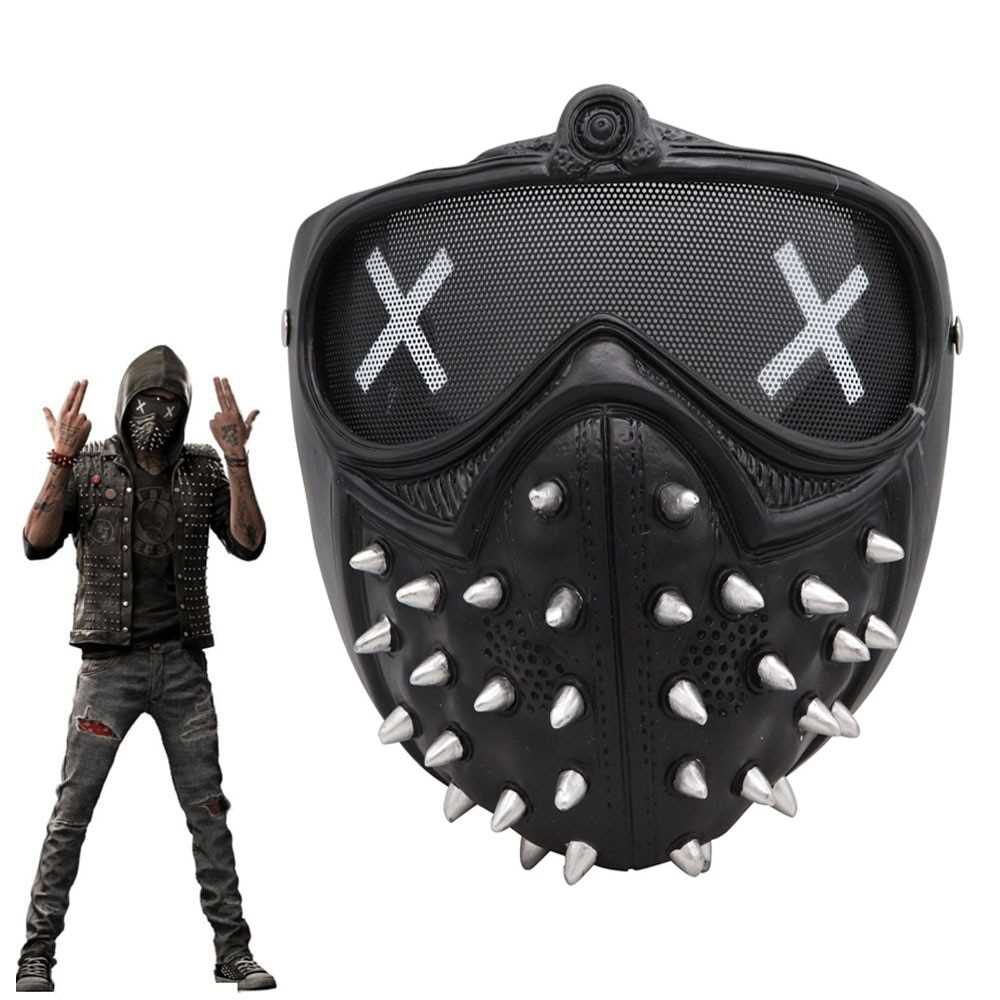
Watch Dogs 2: How to Make Wrench Mask – Step-by-Step Guide

Watch Dogs 2 is a popular action-adventure video game that allows players to hack into a fictionalized version of the San Francisco Bay Area. One of the game’s most iconic characters is Wrench, a member of the hacking group DedSec, known for his distinctive LED mask. If you’re a fan of Wrench and want to recreate his look, this step-by-step guide will show you how to make your very own Wrench mask.
To start, you’ll need a few basic materials. First, find a blank white mask that covers your face. This can be a basic Halloween mask or a plain white masquerade mask. Next, gather some LED lights, which will be the most eye-catching part of the mask. You can find LED lights at most electronics stores or online. Finally, you’ll need some basic tools like a hot glue gun, scissors, and a craft knife.
Once you have your materials, it’s time to start creating the Wrench mask. Begin by carefully cutting out the eye holes in the mask. Make sure the holes are big enough for you to see clearly, but not so big that they detract from the overall shape of the mask. Next, use the craft knife to carefully carve out a small rectangular opening on the front of the mask, where the mouth would be.
Now it’s time to attach the LED lights to the mask. Start by determining where you want the lights to go. Most Wrench masks have the lights arranged in a pattern, such as a grid, across the front of the mask. Use the hot glue gun to attach the lights, making sure they are evenly spaced and securely attached. Once the lights are in place, carefully thread the wires behind the mask and secure them with tape to keep them out of the way.
Finally, it’s time to test your Wrench mask. Connect the LED lights to a battery pack or power source and turn them on. Put on the mask and look in the mirror to see how it looks. If everything looks good, you’re ready to become the ultimate hacker vigilante!

This step-by-step guide will help you create your own Wrench mask, so you can show off your love for Watch Dogs 2 and bring a bit of the game into your everyday life. Whether you want to wear the mask to a Halloween party or just for fun, this DIY project is a great way to express your creativity and show off your hacker skills!
Supplies Needed for Making Wrench Mask
Creating your own Wrench Mask from Watch Dogs 2 requires a few supplies. Here is a list of everything you will need:
- Plain White Mask: You can use a plain white mask as a base for your Wrench Mask. Look for a mask that covers your entire face and has a strap to hold it in place.
- Black Paint: You will need black paint to recreate the signature Wrench Mask design. Look for acrylic or fabric paint that can be easily applied to the mask.
- Paintbrushes: Different sizes of paintbrushes will be helpful for applying the black paint to the mask. Choose brushes that are suitable for small, detailed work.
- Stencil: A stencil of the Wrench Mask design will save you time and effort. Look for a stencil that matches the size and shape of your mask.
- Painter’s Tape: Painter’s tape will help you secure the stencil to the mask and prevent any paint from bleeding outside the design.
- Scissors: You will need scissors to carefully cut out the stencil and any excess tape.
- Newspaper or Plastic Wrap: To protect your workspace, lay down newspaper or plastic wrap to catch any paint drips or spills.
- Optional Accessories: If you want to fully embrace the Wrench character, you can also consider adding accessories like Wrench’s goggles or a bandana.
With these supplies on hand, you will be ready to create your own Wrench Mask and channel your inner hacker from Watch Dogs 2.
Gathering the Materials
1. Mask Template
First, you’ll need to find a mask template to use as a base for your Wrench mask. You can either create your own template or use a pre-made one that you can find online. Make sure the template is the correct size and shape for your face.
2. Foam or Plastic Sheets
To create the Wrench mask, you’ll need a durable material to construct it with. Foam or plastic sheets are a good option because they are lightweight and easy to work with. You can find these materials at craft stores or online.

3. Craft Knife

A craft knife will come in handy for cutting out the mask shape from the foam or plastic sheets. Make sure to use caution when using the knife.
4. Marker or Pencil
Before cutting out the mask shape, it’s helpful to outline it first with a marker or pencil. This will ensure you have a clear guide to follow when cutting.
5. Scissors
In addition to the craft knife, you’ll also need a pair of scissors to trim any excess material and refine the shape of the mask.

6. Glue or Adhesive
To assemble the mask, you’ll need a strong adhesive to hold the pieces together. A strong craft glue or adhesive tape should work well for this purpose.
7. Paint and Brushes
Finally, you’ll need some paint and brushes to add the finishing touches to your Wrench mask. Choose colors that match the character’s mask in the game, such as silver, black, and red.
Once you have gathered all the necessary materials, you can proceed to the next step of creating your own Wrench mask from Watch Dogs 2.
Step 1: Creating the Base
Gather the Materials
Before you start creating the Wrench mask, you will need to gather the necessary materials. Here’s a list of what you’ll need:

- White hockey mask
- Black permanent marker
- Scissors
- Clear plastic sheet
- Super glue
- Black elastic cord
- Black paint
- Paintbrush
Prepare the Hockey Mask
Start by cleaning the hockey mask and ensuring it’s free from any dirt or debris. This will help the paint adhere better to the surface.
Draw the Design
Using the black permanent marker, draw the outline of the Wrench mask design on the hockey mask. Take reference from images or screenshots of the Wrench character in Watch Dogs 2.
Cut out the Eyes and Mouth
Using the scissors, carefully cut out the eye and mouth holes from the hockey mask. Make sure they are precise and smooth for better visibility and comfort.
Attach the Clear Plastic Sheet
Measure and cut a piece of clear plastic sheet that can fit over the eye and mouth holes. Apply a small amount of super glue around the edges of the holes and press the plastic sheet firmly onto the mask. Allow it to dry completely.
Paint the Mask
Using the black paint and paintbrush, carefully paint the entire mask, including the drawn design and the clear plastic areas. Make sure to cover all visible areas evenly and let it dry completely.

Add the Elastic Cord
Measure and cut a piece of black elastic cord that can fit around your head comfortably. Attach the ends of the elastic cord to the sides of the mask using super glue or by sewing them in place.
You have now completed the first step of creating your very own Wrench mask from Watch Dogs 2! Move on to the next step to add more detail and finalize your mask.
Step 2: Sculpting the Wrench Details
Once you have the basic shape of the mask, it’s time to focus on adding the details that make it look like Wrench’s iconic mask. Here’s how you can sculpt the wrench details:
- Gather your materials: For this step, you will need a sculpting material, such as air-dry clay or polymer clay, a sculpting tool, and reference images of Wrench’s mask for guidance.
- Start with the eyes: Use your sculpting tool to create two hollow areas where Wrench’s eyes will be. Refer to the reference images to get the right size and shape.
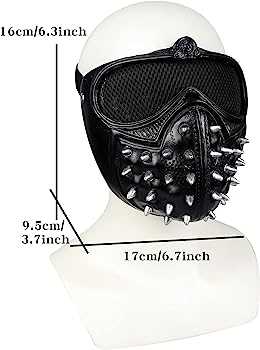
- Create the mouthpiece: Sculpt a rectangular shape in the lower portion of the mask to represent Wrench’s mouthpiece. Make sure it is symmetrical and proportional to the overall mask.
- Add the bolts: Take small pieces of clay and shape them into bolt-like forms. Attach them to the sides of the mask to mimic the bolts on Wrench’s mask. You can use a reference image to determine the placement and number of bolts.
- Refine the details: Use your sculpting tool to smooth out any rough edges and refine the shape of the mask. Pay attention to the curves and contours to make it look more like Wrench’s mask.
- Let it dry: Once you are satisfied with the sculpted details, let the clay dry completely according to the instructions of the specific clay you are using. This might take several hours or even days.
By following these steps, you will be able to sculpt the wrench details onto your mask and bring it closer to resembling Wrench’s iconic mask from Watch Dogs 2.
Step 3: Painting the Mask

Gather your painting supplies
Before you start painting your mask, make sure you have all the necessary supplies. You will need:
- A blank white mask
- Acrylic paint in your desired colors
- Paintbrushes in various sizes
- Water and a palette for mixing colors
- A smock or old clothes to protect yourself from paint
- Newspaper or a drop cloth to protect your work surface
Choose your design
Decide on the design you want for your Wrench mask. You can recreate the mask exactly as it appears in the game or create your own unique design. Consider using reference images or sketches to guide your painting process.
Prepare your mask
Before you begin painting, it’s a good idea to prepare your mask by cleaning it with a damp cloth to remove any dirt or dust. This will ensure that the paint adheres properly to the surface of the mask.
Start painting
Dip your paintbrush into one of the colors you’ve chosen and begin applying the paint to the mask. Take your time and use small, careful strokes to ensure accuracy. You can start with the base color and then add details and shading as you go.
Layering and blending

If you want to add depth and dimension to your mask, consider layering and blending different colors. You can do this by applying a thin layer of one color and then adding another color on top while the paint is still wet. Use a clean brush or your finger to blend the colors together for a smooth transition.
Drying and touch-ups
Once you’ve finished painting your mask, set it aside to dry completely. This may take a few hours or overnight, depending on the type of paint you used. Once the mask is dry, carefully inspect it for any areas that may need touch-ups. Use a smaller brush to fix any mistakes or add additional details.
Sealing the paint
To protect your paint job and prevent it from chipping or fading, it’s a good idea to seal your mask with a clear acrylic sealer. This will also give your mask a shiny finish. Follow the instructions on the sealer label for best results.
Enjoy your Wrench mask!
Once the paint and sealer are dry, your Wrench mask is ready to wear or display. Put it on and show off your creation or hang it on the wall as a unique piece of art.
Step 4: Adding Additional Details
Now that you have the basic structure of the Wrench mask figured out, it’s time to add some additional details to make it look more realistic and unique. Here are a few ideas:
1. Paint:
Use acrylic paints or spray paints to add color to different parts of the mask. You can customize it to fit your personal style or mimic the colors of Wrench’s mask from the game.
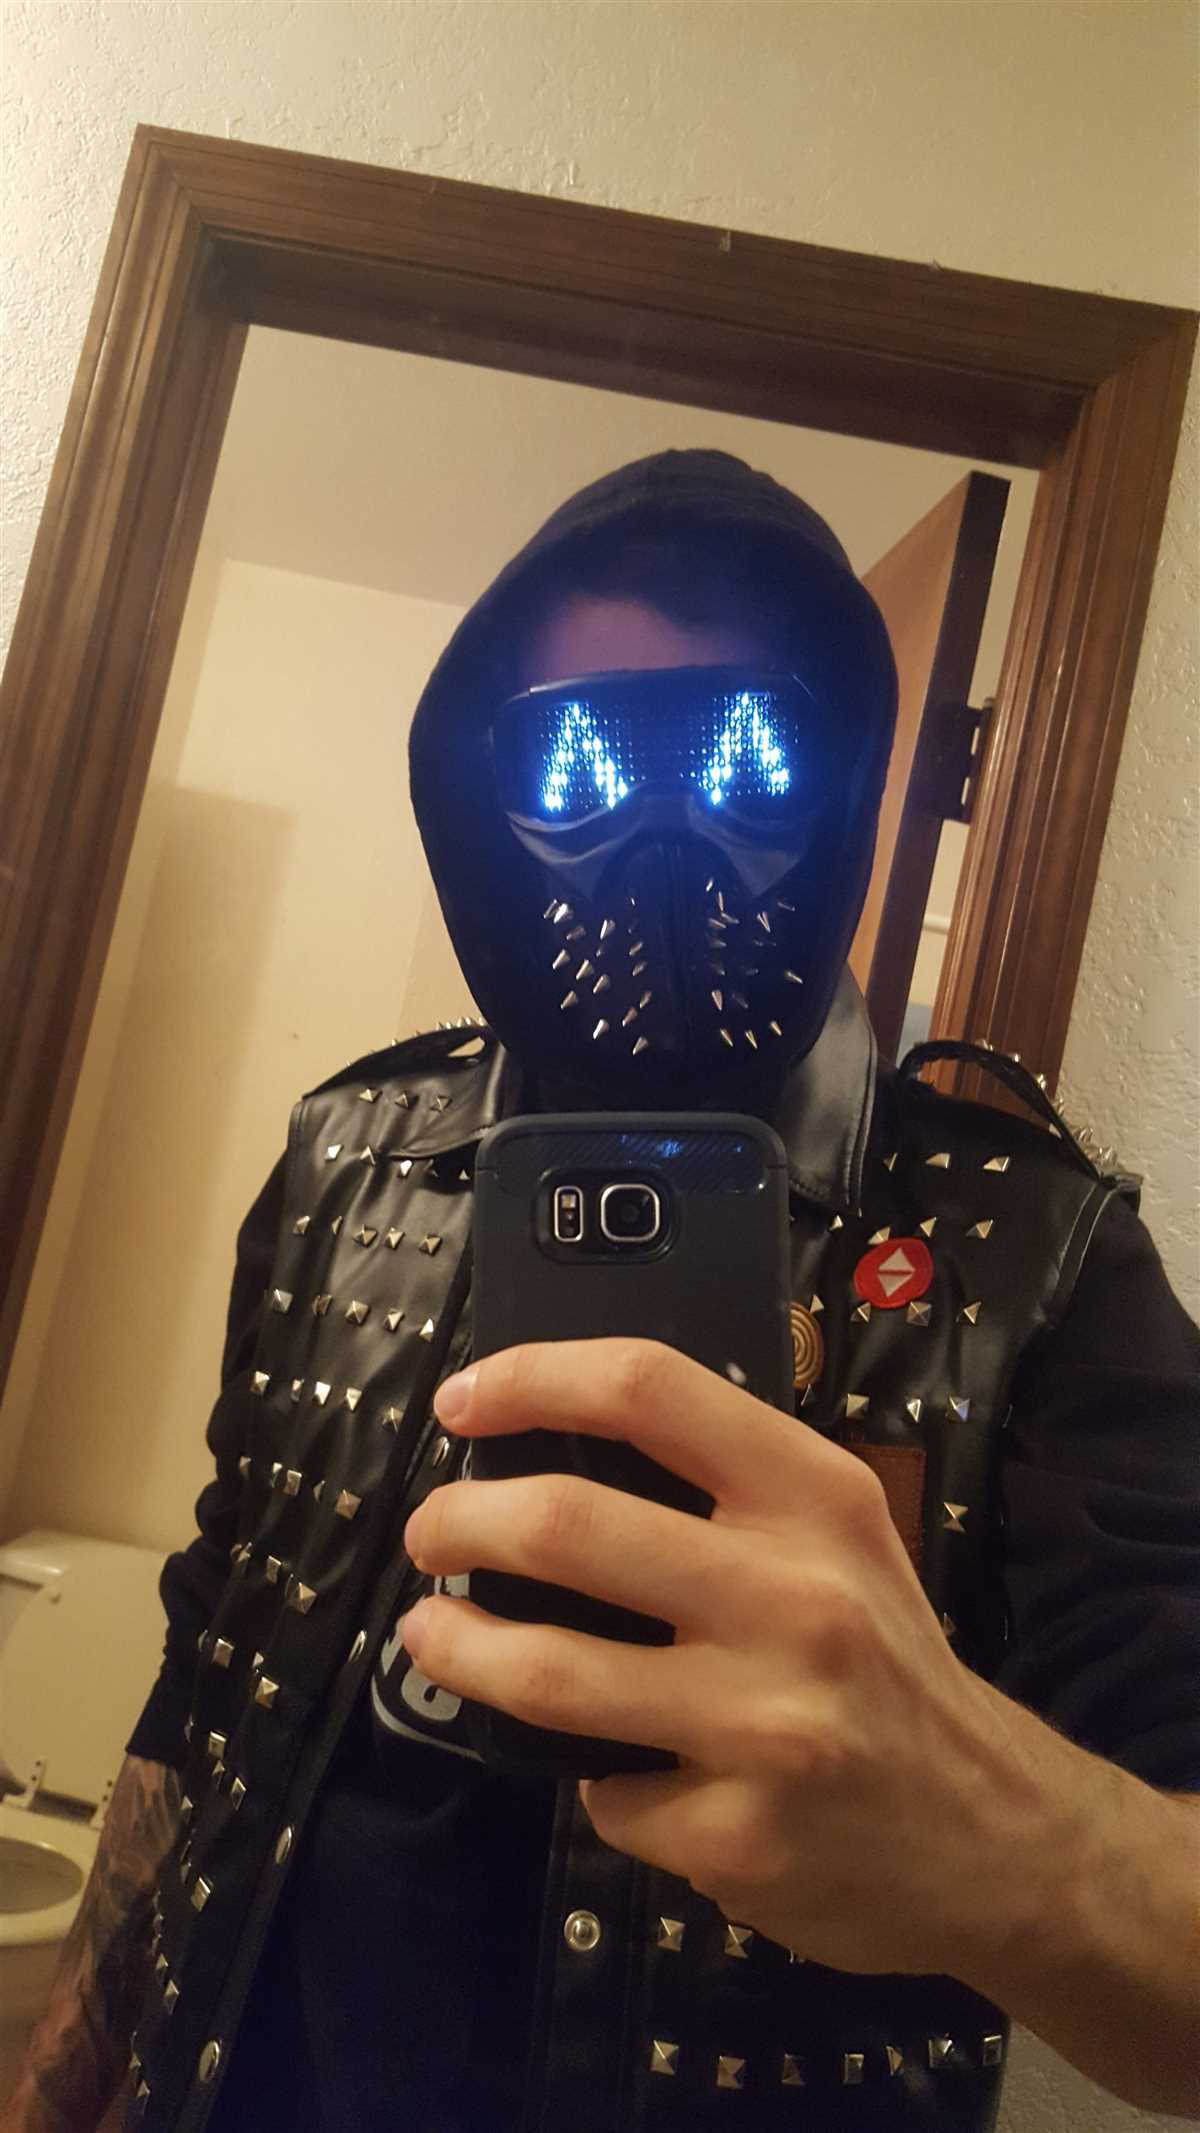
2. LEDs:
If you want to take your mask to the next level, consider adding LED lights. You can attach small LED lights to the eyes or any other part of the mask to give it an extra techy look. Don’t forget to connect them to a battery pack or USB power source!
3. Textures:
Experiment with different materials to achieve various textures. You can use fabric, faux leather, or even pieces of old electronics and wires to give the mask a more realistic and futuristic appearance.
4. Stickers or Decals:
Add stickers or create your own decals to give your mask a more personal touch. You can find stickers with technological or hacker-related symbols or even create your own designs using printable sticker paper or adhesive vinyl.
5. Weathering:
For a worn-in look, consider adding weathering effects such as scratches, dirt, or rust. You can achieve this by using sandpaper or a fine-grit nail file to scuff up the surface, then applying brown or black paint to create the appearance of dirt or rust.
6. Accessories:
Complete your Wrench-inspired look by adding accessories such as goggles, headphones, or even a hooded jacket. These accessories will help tie the whole costume together and make it more recognizable.
7. Final Touches:
Once you’re satisfied with the additional details you’ve added to your mask, take a step back and evaluate the overall appearance. Make any final adjustments or touch-ups as needed to ensure it matches your vision for the finished product.
Remember, this is your chance to get creative and make the mask truly your own. Don’t be afraid to experiment and have fun with different ideas until you achieve the desired look. Now that you’ve completed all the steps, you’re ready to show off your very own Wrench mask from Watch Dogs 2!
Step 5: Adding Straps
Once you have finished painting and weathering your Wrench mask, it’s time to add the straps. The straps will ensure that the mask stays securely in place while you’re wearing it.
- Start by cutting two long strips of black elastic. The length will depend on how long you want the straps to be, but it’s a good idea to make them long enough to comfortably fit around your head.
- Take one end of each strip and sew or glue it to the inside of the mask, near the top edge. You want to attach the straps so that they sit just above your ears when the mask is on.
- Once the first end of each strap is securely attached, put the mask on and hold the straps in place. Adjust the length of the straps if necessary, and then mark where the second end of each strap should go on the inside of the mask.
- Take the mask off and sew or glue the second ends of the straps in place. Make sure they are securely attached.
- Test the mask to make sure the straps fit comfortably and keep the mask in place. If necessary, make any adjustments to the strap length.
With the straps added, your Wrench mask is now complete and ready to wear! Put it on and get ready to join the DedSec team in style.
Final Touches and Tips for Wearing the Wrench Mask
1. Adjusting the Fit
Once you have created your own Wrench Mask, it is important to make sure it fits comfortably on your face. You can adjust the fit by adding or removing padding inside the mask, or by tightening or loosening the straps. It is crucial to have a secure fit so that the mask stays in place while you wear it.
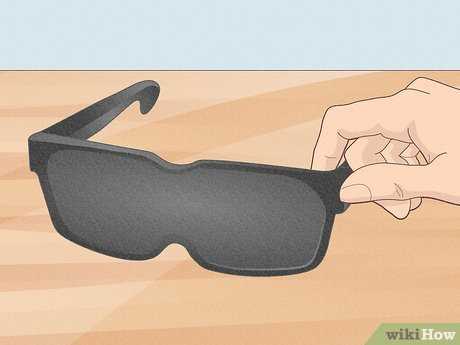
2. Adding Eye Protection
While the Wrench Mask is a great choice for a cosplay or a fun accessory, it does not provide any eye protection. To ensure your eyes are shielded from debris or bright lights, consider wearing goggles or sunglasses along with the mask. This will not only complete the look, but also provide the necessary eye safety.
3. Maintaining Hygiene
Regularly cleaning and maintaining your Wrench Mask is crucial to keep it looking its best for longer. Depending on the materials used, you can either hand wash or machine wash the mask. Be sure to follow the care instructions carefully to prevent any damage. Additionally, avoid sharing the mask with others to maintain hygiene and prevent the spread of germs.
4. Staying Safe and Aware
While wearing the Wrench Mask, it is important to be mindful of your surroundings and ensure your safety. Make sure the mask does not obstruct your vision or restrict your breathing. If you experience any discomfort or difficulty, remove the mask immediately. Avoid wearing the mask in situations where it may be mistaken for a real weapon or cause panic.
5. Showcasing Your Wrench Mask
The Wrench Mask is a creative and unique accessory, so make sure to show it off! Take pictures with friends or at events where it can be appreciated. Share your creation on social media platforms like Instagram or Reddit. You can even consider joining online communities or forums where fellow fans of Watch Dogs 2 can discuss and showcase their masks.
6. Customizing the Mask
The Wrench Mask can be customized to reflect your own style and preferences. Feel free to add additional paint, stickers, or other decorations to make it truly your own. You can also experiment with different materials and colors to create a unique version of the mask that stands out.
7. Connecting with Other Fans
If you are passionate about Watch Dogs 2 and the Wrench character, consider connecting with other fans. Attend gaming conventions or meetups where you can engage with like-minded individuals. Collaborate on group cosplays or participate in fan art contests to share your love for the game and the iconic Wrench Mask.
8. Remembering the Spirit of Wrench
As you wear the Wrench Mask, remember the spirit of the character from Watch Dogs 2. Wrench is known for his rebellious attitude and commitment to fighting against injustice. Embrace his values of freedom, individuality, and challenging authority.
FAQ
What materials do I need to make the Wrench mask?
You will need a white plastic mask, black spray paint, a black permanent marker, and a wrench-shaped keychain.
Can I use a different color mask instead of white?
Yes, you can use a different color mask if you prefer. However, keep in mind that the black spray paint and the black permanent marker will not show up as well on a dark-colored mask.
Where can I find a wrench-shaped keychain?
You can find a wrench-shaped keychain at most hardware stores or online. Look for one that is small enough to fit on the mask and has a realistic shape.
Do I need any artistic skills to make the Wrench mask?
No, you don’t need any artistic skills to make the Wrench mask. The steps are simple and straightforward, and you can easily customize the mask to fit your style.
Can I use a different image instead of a wrench on the mask?
Yes, you can definitely use a different image if you prefer. Just make sure it is small enough to fit on the mask and can be traced with a permanent marker.
Video


Meet Harrison Clayton, a distinguished author and home remodeling enthusiast whose expertise in the realm of renovation is second to none. With a passion for transforming houses into inviting homes, Harrison's writing at https://thehuts-eastbourne.co.uk/ brings a breath of fresh inspiration to the world of home improvement. Whether you're looking to revamp a small corner of your abode or embark on a complete home transformation, Harrison's articles provide the essential expertise and creative flair to turn your visions into reality. So, dive into the captivating world of home remodeling with Harrison Clayton and unlock the full potential of your living space with every word he writes.