Step-by-Step Guide: How to Use a Wrench to Tighten a Bolt

Using a wrench to tighten a bolt is a fundamental skill that every DIY enthusiast should have. Whether you’re assembling furniture, fixing a leaky pipe, or working on your car, knowing how to properly tighten a bolt can save you time and frustration. In this step-by-step guide, we’ll walk you through the process of using a wrench to tighten a bolt, ensuring a secure and sturdy connection.
Step 1: Choose the Right Wrench
Before you begin, it’s important to select the right wrench for the job. Wrenches come in different sizes and styles, so be sure to choose one that matches the size of the bolt you’re working with. An adjustable wrench is a versatile option that can be adjusted to fit various sizes, while a socket wrench provides a stronger grip and is ideal for larger bolts.
Pro tip: Make sure the wrench is in good condition, with no signs of wear or damage. A damaged wrench may slip or round off the edges of the bolt, making it difficult to tighten.
Step 2: Position the Wrench

Once you have the right wrench, position it over the bolt so that the jaws of the wrench are securely around the head of the bolt. The wrench should be at a right angle to the bolt, allowing you to apply even pressure. If the bolt is in a tight space, you may need to use an extension or an angled wrench to reach it.
Pro tip: If the bolt is rusty or difficult to turn, apply a penetrating oil or rust dissolver to loosen it before attempting to tighten.
Step 3: Turn the Wrench
With the wrench in position, use your hand to grip the handle firmly and apply steady pressure in the direction you need to tighten the bolt. For most bolts, turning the wrench clockwise will tighten it. If the bolt is particularly large or tight, you may need to use a longer wrench or a cheater bar for added leverage.
Pro tip: Avoid over-tightening the bolt, as this can strip the threads or cause the bolt to break. Use a torque wrench if you need to tighten the bolt to a specific torque value.

Step 4: Check the Tightness
Once you feel that the bolt is tight enough, double-check the tightness by giving it a gentle tug or using a wrench to test its resistance. The bolt should be secure and not move or wiggle. If the bolt feels loose, continue tightening it until it is snug.
Pro tip: If the bolt is part of a larger assembly, consult the manufacturer’s instructions or specifications for the recommended torque value.
By following these simple steps, you can effectively use a wrench to tighten any bolt, ensuring a reliable and secure connection. Remember to always use caution and apply the appropriate amount of force to avoid any accidents or damage. With practice, you’ll become proficient in using a wrench and be ready to tackle any DIY project that comes your way.
Step-by-step Guide: How to Use a Wrench to Tighten a Bolt
Step 1: Gather the necessary tools and materials
Before you begin, make sure you have the following items:

- A wrench
- A bolt that needs tightening
- A suitable workspace
Step 2: Choose the correct size wrench
Ensure you have a wrench that fits the specific bolt you are working with. Using the wrong size wrench may damage the bolt or the wrench itself.
Step 3: Position yourself and the wrench
Stand or position yourself in a way that allows you to have a firm grip on the wrench handle. Ensure you have enough space to apply force without any physical obstructions.
Step 4: Hold the bolt steady
Before tightening the bolt, hold it steady to prevent it from rotating while you are turning the wrench. You can use your other hand or a pair of pliers to hold the bolt in place.

Step 5: Place the wrench on the bolt
Slide the wrench over the bolt head or nut, making sure it fits securely.
Step 6: Turn the wrench clockwise
Apply force in a clockwise direction to tighten the bolt. Make sure to apply steady pressure, avoiding excessive force that could damage the bolt or wrench.
Step 7: Test the tightness
After tightening the bolt, test its tightness by attempting to rotate it with your hand. If it does not move or feels secure, you have successfully tightened the bolt.
Step 8: Clean up

Once you have finished tightening the bolt, clean up your workspace and store your tools properly.
Note:
It’s important not to overtighten the bolt, as this can lead to damage or breakage. Use caution and stop tightening once the bolt feels secure.
Choose the Right Wrench Size
Before you begin tightening a bolt with a wrench, it’s important to make sure you have the right wrench size. Using the wrong size wrench can damage the bolt or the wrench itself, making the task much more difficult.
Here are some steps to help you choose the right wrench size:
- Examine the bolt: Take a close look at the bolt you need to tighten. It will have a set of numbers or markings on the top or side, indicating its size.
- Measure the bolt: If the bolt doesn’t have any markings indicating its size, you can measure it manually. Use a ruler or a caliper to measure the diameter of the bolt’s head or the size of the nut it screws into.
- Match the wrench size: Once you have determined the size of the bolt, find a wrench with a size that matches. Wrench sizes are typically marked on the handle or the head, and they correspond to the standard units of measurement, such as inches or millimeters.
It’s important to note that wrench sizes are not always the same as the bolt or nut sizes. In some cases, the wrench size may be slightly larger or smaller to accommodate for different types of fasteners.

If you don’t have a wrench with the exact size, it’s recommended to use a slightly larger wrench rather than a smaller one. Using a smaller wrench can lead to rounded corners on the bolt or nut, making it difficult to remove or tighten it properly.
Once you have chosen the right wrench size, you’re ready to proceed with tightening the bolt using the wrench. Make sure to position the wrench properly on the bolt, applying steady pressure in the direction needed to tighten it.
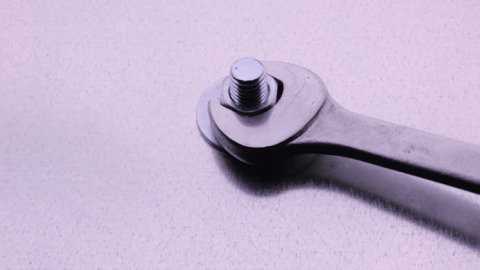
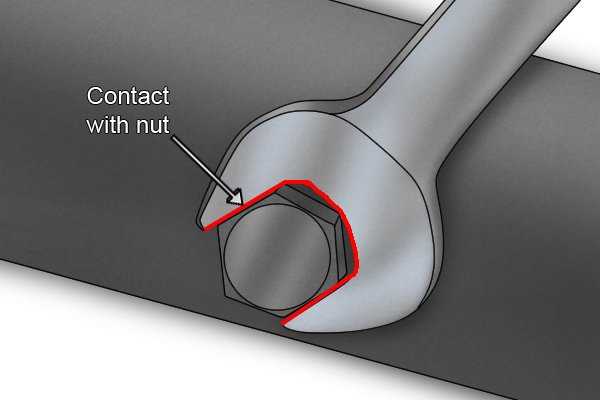
Position the Wrench on the Bolt Head
Once you have selected the appropriate wrench size for your bolt, you can now position the wrench on the bolt head. Make sure that the wrench is securely fitted around the bolt head to prevent any slipping or damaging the bolt. Here are the steps to follow:
- Hold the wrench by the handle, making sure your grip is secure.
- Align the opening of the wrench with the bolt head, ensuring that the jaws of the wrench are positioned correctly.
- Slide the wrench onto the bolt head, ensuring that the jaws engage with the flat sides of the bolt head.
- Apply downward pressure on the wrench to ensure a tight fit between the wrench and the bolt head.
- If necessary, adjust the position of the wrench to ensure a secure grip on the bolt head.
Once the wrench is properly positioned on the bolt head, you are ready to begin tightening or loosening the bolt as needed. Remember to turn the wrench in the direction that corresponds with the direction in which you want to tighten or loosen the bolt.
Turn the Wrench Clockwise

Once you have positioned the wrench securely onto the bolt head or nut, the next step is to turn the wrench clockwise to tighten the bolt.
Turning the wrench clockwise applies force in a tightening direction, allowing you to secure the bolt or nut firmly in place. Always remember the mantra “righty tighty, lefty loosey” to ensure you are turning the wrench in the correct direction.
It is important to use steady, controlled force when turning the wrench. Applying too much force can strip the threads on the bolt or nut, making it difficult to loosen or tighten in the future. On the other hand, not applying enough force may result in a loose connection.
If you are tightening a series of bolts, it is often best to start with the bolt in the middle and work your way outward. This ensures even pressure distribution and helps prevent warping or uneven tightening.
Remember to periodically check the tightness of the bolt as you turn the wrench. This will help ensure that you do not overtighten or undertighten the bolt. Some bolts may require a specific torque specification, so refer to the manufacturer’s guidelines if necessary.
Once the bolt or nut feels sufficiently tight, stop turning the wrench. Over-tightening can lead to damage and may cause the bolt or nut to break.
With one bolt tightened, you can move on to the next and repeat the process until all bolts are secure.
- Position the wrench on the next bolt or nut.
- Turn the wrench clockwise to tighten.
- Check the tightness periodically.
In summary, turning the wrench clockwise is a key step in tightening a bolt. By following these steps and using the right amount of force, you can securely fasten bolts and nuts using a wrench.
Apply Steady Pressure
Once you have positioned the wrench properly on the bolt head, it’s time to start applying pressure. Start by holding onto the handle of the wrench with a firm grip.
Using your other hand, support the wrench near the head to provide additional stability. This will help you maintain control and prevent the wrench from slipping off the bolt.
Next, start slowly turning the wrench handle in a clockwise direction to tighten the bolt. The key here is to apply steady pressure, rather than trying to rush the process.
Continue rotating the wrench until you feel resistance, indicating that the bolt is tightening. At this point, you can increase the pressure slightly to ensure a secure fit.
Be careful not to apply too much force, as this can strip the bolt or cause damage. Remember, it’s better to tighten the bolt gradually and check for tightness along the way, rather than overtightening it at once.
Use a Cheater Bar for Extra Leverage
Sometimes, bolts can be incredibly tight and difficult to loosen or tighten. In these situations, using a cheater bar can provide the extra leverage you need to get the job done.
A cheater bar is simply a long pipe or a sturdy metal rod that you can attach to the end of your wrench. By extending the length of the wrench, you can increase the torque and apply more force to the bolt.
Here’s how you can use a cheater bar:
- First, select a strong and sturdy pipe or metal rod that fits securely over the handle of your wrench.
- Make sure the cheater bar is long enough to provide the leverage you need.
- Attach one end of the cheater bar to the handle of your wrench.
- Hold onto the other end of the cheater bar firmly with one hand.
- Apply force to the cheater bar in the direction you need to turn the bolt. Keep your hand as close to the end of the cheater bar as possible to maximize the leverage.
- Use your other hand to stabilize the wrench and prevent it from slipping.
- With the extra leverage from the cheater bar, you should be able to easily loosen or tighten even the most stubborn bolts.
It’s important to note that using a cheater bar can increase the risk of over-tightening or stripping the bolt, so be cautious and apply force gradually. Also, make sure to use a cheater bar that is appropriate for the size and strength of your wrench.
By using a cheater bar, you can tackle even the toughest bolts with ease and get the job done efficiently.
Check the Tightness of the Bolt
Before using a wrench to tighten a bolt, it’s important to check the current tightness of the bolt. This will help ensure that the bolt is correctly tightened and prevent any potential issues down the line.
Step 1: Inspect the Bolt
Start by visually inspecting the bolt to see if there are any signs of looseness. Look for any gaps or movement between the bolt and the surface it’s attached to. A loose bolt may cause vibrations or allow for movement, which can lead to damage or failure of the connected parts.
Step 2: Wiggle the Bolt
Gently try to wiggle the bolt using your hand to check for any additional movement. If the bolt is loose, it will easily move or rotate. This is a clear indication that the bolt needs tightening.
Step 3: Listen for Unusual Sounds
While inspecting the bolt, listen for any unusual sounds, such as rattling or clanking. These sounds can indicate that the bolt is loose and needs to be tightened.
Step 4: Use a Torque Wrench or Socket Wrench
To accurately check the tightness of the bolt, use a torque wrench or socket wrench. Attach the wrench to the bolt and apply gentle pressure in the tightening direction. If the bolt moves or rotates further, it indicates that it needs tightening.
Step 5: Check the Manufacturer’s Specifications
Refer to the manufacturer’s specifications for the recommended torque or tightening specifications for the specific bolt. This will provide you with the proper guidelines on how tight the bolt should be.
Step 6: Retighten if Necessary
If the bolt is found to be loose or not tightened to the specified torque, use the wrench to tighten it. Apply force gradually and ensure that the bolt is tightened to the recommended specifications.
By checking the tightness of the bolt before using a wrench, you can ensure that it is securely fastened and avoid any potential problems or safety hazards.
Secure the Wrench in Place
Before tightening the bolt, it’s important to make sure that the wrench is securely in place. This will ensure that you have control over the tool and prevent any accidents from occurring.
Follow these steps to securely position the wrench:
- Hold the wrench by the handle with one hand.
- Position the opening of the wrench around the bolt head.
- Slide the wrench onto the bolt head until it fits securely.
- Ensure that the wrench is aligned correctly with the bolt. This will help prevent slipping or stripping of the bolt.
- Hold onto the handle of the wrench with a firm grip.
Once the wrench is secure, you are ready to begin tightening the bolt. Remember to always use a steady and controlled motion to avoid any damage to the bolt or surrounding components.
Properly Store the Wrench after Use
Once you have finished using your wrench, it is important to store it properly to ensure it remains in good condition and is easily accessible for future use. Follow these steps to properly store your wrench:
- Clean the wrench: Before storing your wrench, make sure to clean it to remove any dirt, grease, or debris. This will help prevent corrosion and maintain the functionality of the wrench.
- Inspect the wrench: Take a close look at the wrench to check for any signs of damage or wear. Look for bent or broken parts, rust, or any other issues that may affect the performance of the wrench. If you notice any problems, it may be necessary to repair or replace the wrench before storing it.
- Choose a suitable storage location: Find a dry and secure location to store your wrench. This can be a toolbox, a tool chest, or a designated space on a wall or pegboard. Make sure the storage area is easily accessible and protected from moisture or extreme temperatures.
- Organize your tools: Consider organizing your wrenches and other tools in a logical and efficient manner. This can be done by using tool organizers, trays, or racks. By keeping your tools organized, you will be able to easily find the wrench you need when you need it.
- Protect your wrench: To prevent your wrench from getting damaged, consider using a protective cover or wrap. This can be as simple as using a cloth or towel to cover the wrench, or using a tool roll or pouch specifically designed for wrench storage.
- Label or mark your wrench: To quickly identify your wrench, you can label or mark it with your name, initials, or a unique identifier. This can be especially useful if you share tools with others or work in a communal space.
- Maintain regular maintenance: To keep your wrench in good working condition, it is important to regularly inspect and maintain it. This includes lubricating moving parts, checking for loose screws or bolts, and keeping the wrench clean and free from dirt and debris.
By following these steps, you can ensure that your wrench remains in good condition and is ready to use whenever you need it. Properly storing your wrench will not only extend its lifespan but also contribute to a safe and organized workspace.
FAQ
What is the purpose of using a wrench to tighten a bolt?
The purpose of using a wrench to tighten a bolt is to secure two or more objects together. A properly tightened bolt ensures that the parts will not come loose or separate, providing stability and safety.
Can I use a wrench to tighten any type of bolt?
Yes, a wrench can be used to tighten various types of bolts. However, it is important to use the correct size and type of wrench for the specific bolt you are working with to ensure a proper fit and prevent damage.
How do I choose the right size wrench for a bolt?
To choose the right size wrench for a bolt, you need to measure the bolt’s diameter. Wrench sizes are usually labeled in inches or millimeters, and you should select a wrench that matches the size of the bolt as closely as possible for a secure and effective tightening.
What should I do if the bolt is too tight to turn with a wrench?
If the bolt is too tight to turn with a wrench, you can try using a longer handle or pipe for extra leverage. You can also use a penetrating oil or lubricant to loosen the bolt before attempting to tighten it.
Is there a specific technique to tighten a bolt with a wrench?
Yes, there are a few techniques that can be used when tightening a bolt with a wrench. One common technique is to push with your dominant hand while pulling with your other hand to apply equal force and prevent the bolt from slipping. It is also important to position yourself in a comfortable and stable position to ensure proper control.
Can a wrench be used to loosen a tight bolt as well?
Yes, a wrench can be used to loosen a tight bolt by turning it counterclockwise. However, if the bolt is excessively tight, you may need to use additional tools or techniques such as applying heat, using penetrating oil, or using a breaker bar for extra leverage.
Video


Harrison Clayton
Meet Harrison Clayton, a distinguished author and home remodeling enthusiast whose expertise in the realm of renovation is second to none. With a passion for transforming houses into inviting homes, Harrison's writing at https://thehuts-eastbourne.co.uk/ brings a breath of fresh inspiration to the world of home improvement. Whether you're looking to revamp a small corner of your abode or embark on a complete home transformation, Harrison's articles provide the essential expertise and creative flair to turn your visions into reality. So, dive into the captivating world of home remodeling with Harrison Clayton and unlock the full potential of your living space with every word he writes.


