Simple Ways to Remove a Shower Head Without a Wrench | Expert Tips

Removing a shower head without a wrench may seem like a daunting task, but it can actually be quite simple. Whether you’re dealing with a stuck shower head or you simply don’t have a wrench on hand, there are a few techniques you can try to successfully remove the shower head. In this article, we will explore some expert tips on how to remove a shower head without a wrench.
One of the simplest methods to remove a shower head without a wrench is by using a pair of pliers. Start by securing a cloth or towel around the shower head to protect it from scratches. Then, use the pliers to grip the base of the shower head, making sure to hold onto it firmly. With a gentle twisting motion, you should be able to loosen the shower head and remove it from the pipe.
If you don’t have pliers or prefer not to use them, another technique you can try is using a rubber band or a jar opener. Wrap a rubber band around the base of the shower head, making sure it’s tight and secure. Then, use the rubber band for better grip and leverage to twist and remove the shower head. Similarly, a jar opener can also provide the necessary grip to loosen and remove the shower head without a wrench.
Lastly, if all else fails, you can try using heat to loosen a stuck shower head. Start by heating up a pot of water on the stove or using a hairdryer to apply heat directly to the shower head. The heat can help expand the metal and make it easier to twist and remove the shower head. Just be cautious when using heat and make sure to protect yourself from any hot water or steam.
Remember, it’s important to approach the removal of a shower head without a wrench with caution and care. If you’re unsure or uncomfortable with the process, it’s always best to consult a professional plumber who can safely remove the shower head for you.
By following these simple tips and techniques, you can successfully remove a shower head without a wrench. Whether you’re in a pinch or prefer to use alternative methods, these expert tips will help you get the job done effectively and efficiently.

How to Remove a Shower Head Without a Wrench
If you need to remove a shower head but don’t have a wrench handy, don’t worry! There are several simple methods you can use to remove the shower head without needing any specialized tools.
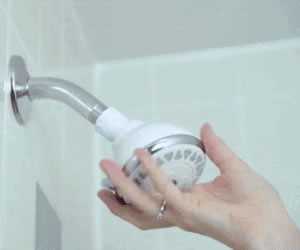
Method 1: Using Your Hands
One of the easiest ways to remove a shower head is by using your hands. Start by turning off the water supply to the shower. Then, firmly grasp the shower head with both hands and twist it counterclockwise. Apply steady pressure and continue twisting until the shower head comes loose. Be careful not to use too much force to avoid damaging the plumbing.
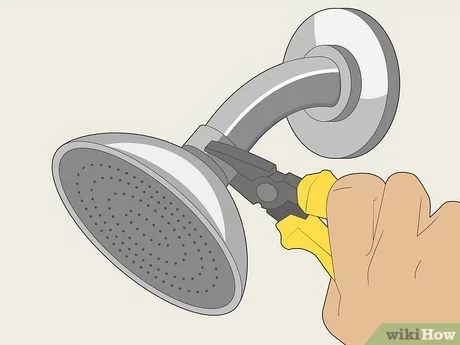
Method 2: Using a Pair of Pliers
If the shower head is stuck and you’re unable to remove it with your hands alone, you can use a pair of pliers as a makeshift wrench. Wrap a cloth or towel around the shower head to protect the finish, then use the pliers to grip the shower head firmly. Apply gentle pressure and slowly turn the pliers counterclockwise to loosen the shower head. Once it’s loose, you should be able to remove it by hand.
Method 3: Using a Rubber Strap Wrench
If you have a rubber strap wrench available, it can be a handy tool for removing a stubborn shower head. Wrap the rubber strap around the shower head and adjust it so that it grips the head tightly. Hold the strap wrench securely and turn it counterclockwise to loosen the shower head. This tool provides a firm grip without damaging the finish, making it ideal for delicate or chrome-plated shower heads.

Method 4: Using a Duct Tape
If you don’t have any tools available, you can try using duct tape to remove the shower head. First, wrap several layers of duct tape around the shower head, ensuring that it adheres to itself and forms a tight grip. Then, use your hands to twist counterclockwise, applying steady pressure. The duct tape should provide enough grip to loosen the shower head and allow you to remove it.
Remember to always use caution when removing a shower head, and if you encounter any difficulties or are unsure, it’s best to consult a professional plumber for assistance.
Gather Necessary Tools
Before you begin removing a shower head without a wrench, make sure you have the following tools on hand:
- Adjustable pliers or channel lock pliers
- Slip-joint pliers
- Vice grips
- Rubber gloves
These tools will help you get a good grip on the shower head and provide the leverage you need to remove it.
Note: It’s important to wear rubber gloves when working on your shower head to protect yourself from any sharp edges or potential water leaks.

Turn off the Water Supply
Before attempting to remove a shower head, it is important to turn off the water supply to avoid any potential water damage or flooding. Here are the steps to turn off the water supply:
- Locate the main water shut-off valve in your home.
- Turn the valve clockwise to shut off the water supply.
- Once the water supply is turned off, open the shower faucet to release any remaining water in the pipes.
- Make sure the water is completely drained before proceeding with the removal process.
By following these steps, you can ensure a safe and mess-free removal of your shower head without any water leakage. It is crucial to take these precautions to protect both yourself and your bathroom from any potential water damage.
Clean the Shower Head
Keeping your shower head clean is essential for maintaining good water flow and preventing clogs. Here are some simple steps to help you clean your shower head:
1. Remove the shower head
The first step in cleaning your shower head is to remove it from the wall. If you have already removed it to replace it, skip this step. Otherwise, follow the instructions in the previous section to remove the shower head without using a wrench.
2. Prepare the cleaning solution

You can use a couple of different cleaning solutions to clean your shower head. One popular option is to use a mixture of equal parts white vinegar and water. Alternatively, you can use a commercial lime scale remover or a mild detergent. Fill a bowl or a bucket with the cleaning solution.
3. Soak the shower head
Place the shower head in the bowl or bucket filled with the cleaning solution. Make sure that the cleaning solution fully covers the shower head. If necessary, you can use a plastic bag or a rubber band to secure the solution-soaked cloth or paper towel around the shower head.
4. Let it sit
Let the shower head soak in the cleaning solution for at least 30 minutes. This will allow the solution to break down any mineral deposits or grime that has built up on the surface of the shower head.
5. Scrub away the residue
After the soaking time has elapsed, use a small brush or an old toothbrush to scrub away any remaining residue on the shower head. Pay special attention to the spray nozzles, as these tend to collect the most build-up. Rinse the shower head with clean water to remove any loosened debris.
6. Reassemble the shower head
Once the shower head is clean, reassemble it by following the instructions in the previous section. Make sure to properly tighten any screws or connections to ensure a secure fit.

7. Test the water flow
Turn on the shower and check if the water flow has improved. If you notice any decrease in water pressure, repeat the cleaning process or consider replacing the shower head.
8. Regular maintenance
To keep your shower head clean and prevent build-up in the future, it is recommended to clean it every few months. This will help maintain good water pressure and ensure a refreshing shower experience.
By following these simple steps, you can easily clean your shower head and keep it in optimal condition. Remember to consult the manufacturer’s instructions for specific cleaning recommendations, as different shower heads may require different cleaning methods.
Apply Lubricant
If the shower head is stuck and won’t budge, applying lubricant can help loosen it up. Lubricants such as WD-40 or a penetrating oil can work wonders in loosening the connections and making it easier to remove the shower head.

To apply the lubricant, follow these steps:
- Turn off the water supply to the shower.
- Wrap a rag or towel around the shower head to protect it from scratches
- Apply a liberal amount of lubricant to the connection point between the shower head and the shower arm.
- Allow the lubricant to penetrate for a few minutes.
- Use a cloth or a pair of pliers with a grip to turn the shower head counterclockwise.
If the shower head still doesn’t come off after applying lubricant, you may need to let it soak for a longer period of time or try using more force to turn it. Be careful not to apply too much force as it can damage the shower head or the shower arm.
After successfully removing the shower head, clean the lubricant residue from the threads of the shower arm before installing a new shower head.
Use a Cloth and Adjustable Pliers
If you don’t have a wrench on hand, don’t worry! You can still remove your shower head using a cloth and a pair of adjustable pliers. Here’s how:
- Start by wrapping a cloth around the base of the shower head to protect it from scratches.
- Next, use the adjustable pliers to grip the shower head firmly. Be careful not to squeeze too hard and damage the shower head.
- Once you have a good grip, turn the pliers counterclockwise to loosen the shower head.
- Continue turning until you can unscrew the shower head completely by hand.
Using a cloth and adjustable pliers is a simple and effective way to remove a shower head without a wrench. Just remember to be gentle and take your time to avoid causing any damage.

Make a DIY Wrench
If you don’t have a wrench available, don’t worry! You can easily make a DIY wrench using common household items. Here are a few options:
1. Pliers
One of the easiest ways to remove a shower head without a wrench is by using a pair of pliers. Simply grip the shower head firmly with the pliers and twist it counterclockwise to unscrew it. Make sure to protect the shower head and the pliers by wrapping them with a cloth or using rubber grips to prevent any damage.
2. Adjustable Wrench
If you have an adjustable wrench or a spanner, you can use it as a makeshift wrench to remove the shower head. Adjust the jaws of the wrench to fit the size of the shower head and then use it to turn the shower head counterclockwise until it comes loose.
3. Strap Wrench
If you have a strap wrench or a rubber strap, you can use it as an alternative to a regular wrench. Wrap the strap around the shower head and hold one end of the strap firmly. Use the other end to turn the shower head counterclockwise and remove it.
4. Channel Lock Pliers
Channel lock pliers can be used to remove a shower head without a wrench. Adjust the jaws of the pliers to fit the size of the shower head and then use them to grip the shower head firmly. Twist the pliers counterclockwise to unscrew the shower head.
Remember to always exercise caution when using DIY wrenches and be careful not to damage the shower head or surrounding fixtures. If you’re unsure or uncomfortable with removing the shower head yourself, it’s best to seek professional help.
Use Heat for Stubborn Shower Heads
If your shower head is particularly stubborn and won’t come off using the methods mentioned above, you can try using heat to loosen it. Applying heat can help to expand the metal and break up any rust or mineral deposits that might be causing the shower head to stick.
Here’s how you can use heat to remove a stubborn shower head:
- Start by turning off the water supply to the shower.
- Use a hairdryer to apply heat to the shower head for about 2-3 minutes. Make sure to move the hairdryer around to distribute the heat evenly. Be careful not to overheat the shower head, as this can damage it.
- Once the shower head is heated, use a pair of thick gloves or a towel to grip it firmly and try to twist it counterclockwise to loosen it. The heat should have made the metal more pliable, making it easier to remove.
- If the shower head still won’t budge, you can try using a pair of adjustable pliers or a wrench to grip it and give it a gentle twist. Just be careful not to apply too much force and damage the shower head or the pipes behind it.
If all else fails, it may be best to call a professional plumber for assistance in removing the stubborn shower head.
Remember, it’s important to be patient and take your time when removing a shower head. Rushing the process can result in damage to the shower head or the pipes, which can lead to costly repairs.
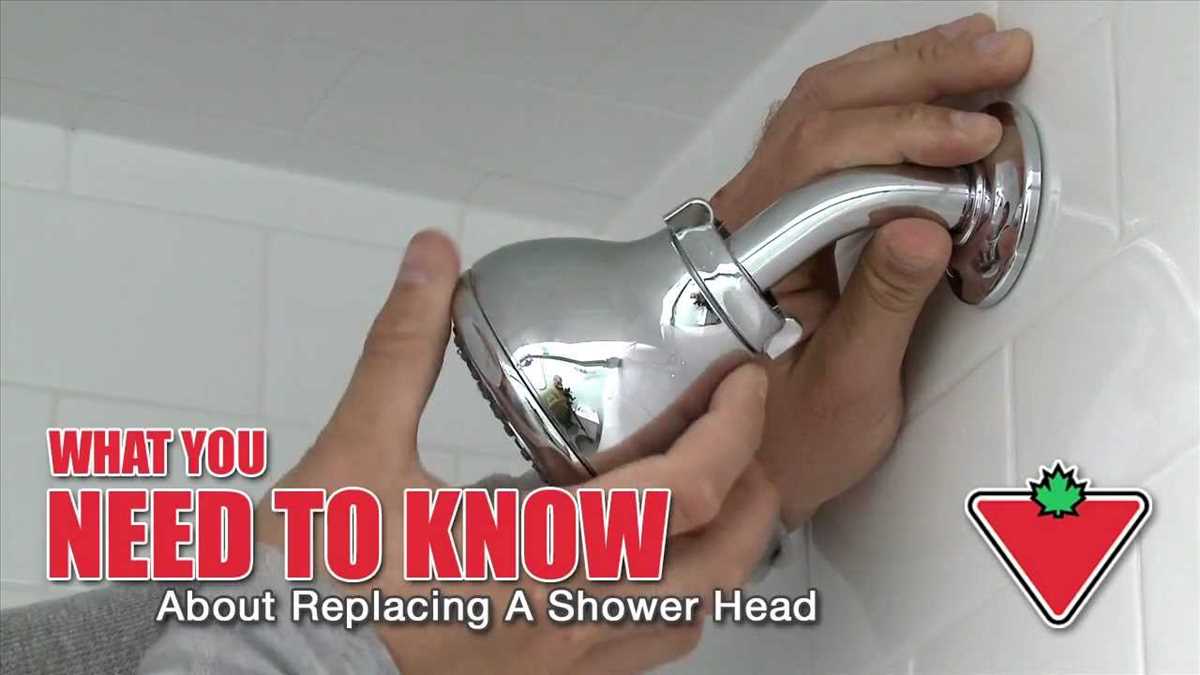
Reinstall the Shower Head
Step 1: Clean the shower head
Before reinstalling the shower head, it is important to clean it thoroughly. Use a mixture of vinegar and water to remove any mineral deposits or grime that may have accumulated on the shower head. Soak the shower head in the mixture for a few minutes and then scrub it gently with a brush to remove any remaining buildup. Rinse the shower head thoroughly with water.
Step 2: Apply plumber’s tape
Plumber’s tape is a thin, white tape used to create a watertight seal. Before reinstalling the shower head, wrap a few layers of plumber’s tape clockwise around the threads of the shower arm. This will help prevent any leaks when the shower head is reattached.
Step 3: Attach the shower head
- Hold the shower head near the shower arm and align the threads.
- Gently twist the shower head clockwise onto the shower arm.
- Use your hand to tighten the shower head firmly, but be careful not to overtighten it. Overtightening may cause damage to the shower head or the shower arm threads.
Step 4: Test for leaks
Once the shower head is reinstalled, turn on the water supply to check for any leaks. If you notice any leaks, gently tighten the shower head a bit more until the leaks stop. Be careful not to overtighten.
Step 5: Adjust the shower head angle
If the shower head is not angled properly, you can adjust it to your preferred position. Most shower heads can be swiveled to change the direction of the water spray. Hold the shower head firmly and twist it in the desired direction until it is angled correctly.
Step 6: Enjoy your shower
With the shower head securely reinstalled, you can now enjoy a refreshing shower. If you ever need to remove the shower head again in the future, you can refer back to this guide for step-by-step instructions.
FAQ
What should I do if I don’t have a wrench to remove a shower head?
If you don’t have a wrench, you can try using a pair of pliers or an adjustable wrench to loosen the shower head. Alternatively, you can wrap a rubber band around the shower head and grip it with a pair of pliers for added leverage.
Is it possible to remove a shower head without any tools?
Yes, it is possible to remove a shower head without any tools. One method is to wrap a rubber band around the shower head and grip it firmly with your hands while turning counterclockwise. Another method is to use a cloth or towel to provide better grip and leverage.
Can I use a wrench substitute to remove a shower head?
Yes, if you don’t have a wrench, you can use a few household items as substitutes. One option is to use a pair of pliers or an adjustable wrench. Another option is to use a pair of channel locks or a pipe wrench. These tools can provide enough grip and leverage to loosen the shower head.
What are some alternative ways to remove a shower head without a wrench?
If you don’t have a wrench, there are several alternative methods you can try. One method is to use a pair of pliers or an adjustable wrench. Another method is to use a pair of channel locks or a pipe wrench. If these tools are not available, you can wrap a rubber band around the shower head and grip it with a pair of pliers for added leverage. Additionally, using a cloth or towel can provide better grip and make it easier to unscrew the shower head.
Can I remove a shower head without damaging it?
Yes, it is possible to remove a shower head without damaging it. It is important to use the correct tools or alternative methods and apply the right amount of pressure to avoid causing any damage. Using a cloth or towel to protect the shower head can also help prevent scratches or other damage.
Is it difficult to remove a shower head without a wrench?
Removing a shower head without a wrench can be a bit challenging, but it is not impossible. With the right tools or alternative methods, it can be done without much difficulty. It may require a bit more effort and patience, but following the proper steps can make the process easier.
Are there any DIY methods to remove a stuck shower head?
Yes, there are several DIY methods you can try to remove a stuck shower head. One method is to use a pair of pliers or an adjustable wrench. Another method is to use a pair of channel locks or a pipe wrench. You can also try using a rubber band for added leverage or wrapping a cloth around the shower head for better grip. Applying heat or using a lubricating agent, such as vinegar or WD-40, can also help loosen the shower head.
Video


Harrison Clayton
Meet Harrison Clayton, a distinguished author and home remodeling enthusiast whose expertise in the realm of renovation is second to none. With a passion for transforming houses into inviting homes, Harrison's writing at https://thehuts-eastbourne.co.uk/ brings a breath of fresh inspiration to the world of home improvement. Whether you're looking to revamp a small corner of your abode or embark on a complete home transformation, Harrison's articles provide the essential expertise and creative flair to turn your visions into reality. So, dive into the captivating world of home remodeling with Harrison Clayton and unlock the full potential of your living space with every word he writes.


