Learn how to repair a wrench in 7 Days to Die

7 Days to Die is a popular survival horror video game set in a post-apocalyptic world infested with zombies. In this game, players must scavenge for resources and build fortifications to survive. One essential tool for survival is the wrench, as it can be used to repair various items and structures.
However, the wrench in 7 Days to Die has durability and will eventually break with excessive use. This can be a problem, especially if you rely heavily on the wrench for repairs. Fortunately, there is a way to repair the wrench and extend its lifespan.
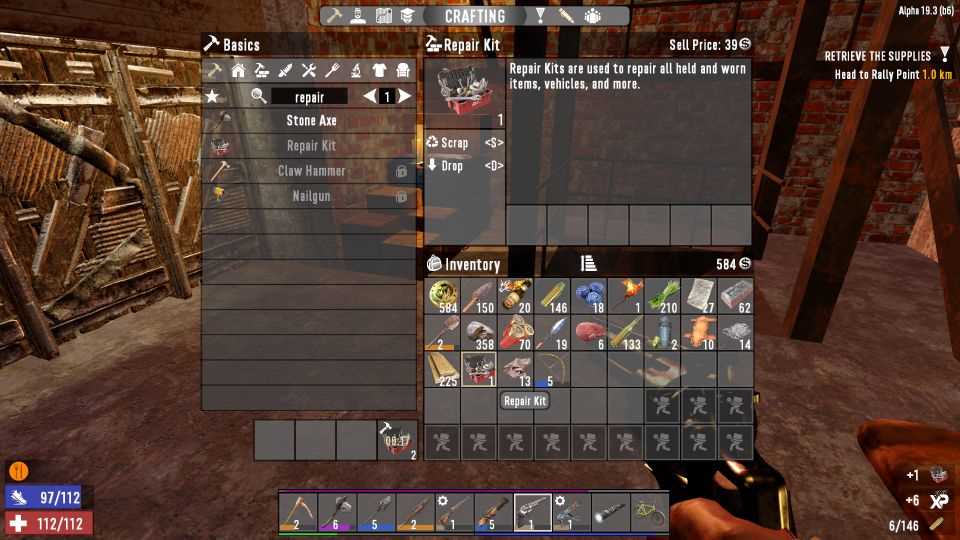
To repair a wrench in 7 Days to Die, you will need a few key resources. Firstly, you will need forged iron, which can be obtained by smelting iron fragments in a forge. You will also need a repair kit, which can be crafted using duct tape, cloth fragments, and a sewing kit.
Once you have gathered these resources, you can start the process of repairing your wrench. To do this, open your inventory and select the wrench. Then, right-click on the repair kit and choose the “repair” option. This will initiate the repair process and consume the necessary resources.
Keep in mind that the repair process will restore the wrench’s durability to a certain extent, but it will not be as good as new. Therefore, it is important to use the wrench carefully and avoid excessive use to maximize its lifespan. Additionally, it is always a good idea to have a backup wrench or alternative tools in case your main wrench breaks.

By learning how to repair a wrench in 7 Days to Die, you can ensure that you always have a reliable tool for repairs in the game. This knowledge will be crucial for survival and will help you maintain your base and equipment in top condition.
Tools needed for repairing a wrench in 7 Days to Die
Repairing a wrench in 7 Days to Die requires a few specific tools to ensure a successful repair. These tools are essential for maintaining your wrench and keeping it in good working condition. Below is a list of the tools you will need:
- Repair Kit: A repair kit is a must-have item for repairing a wrench. It contains all the necessary components and materials needed to fix any damage or wear on your wrench.
- Forged Iron: Forged Iron is a strong and durable material that is used to reinforce and strengthen the wrench. It is an essential component for repairing and improving the overall quality of the wrench.
- Screwdriver: A screwdriver is a versatile tool that is used for various repair tasks, including repairing a wrench. It is used to disassemble and reassemble the different parts of the wrench during the repair process.
- Hammer: A hammer is used to gently tap and adjust the different parts of the wrench during the repair process. It helps to align and fix any misaligned or damaged components.
- Workbench: A workbench provides a stable and secure surface for performing intricate repairs on the wrench. It is essential for holding the wrench in place and providing a comfortable working environment.
- Repair Tools: Various repair tools, such as pliers, wrenches, and files, may be needed depending on the specific repairs required for the wrench. These tools help in removing, adjusting, and fixing different parts of the wrench as needed.
Having these tools readily available will ensure that you are prepared to repair your wrench whenever necessary. It is important to regularly inspect and maintain your wrench to prevent further damage and prolong its lifespan.
Step-by-step guide to dismantling a wrench
In the game 7 Days to Die, being able to repair tools is crucial for survival. One of the most important tools in the game is the wrench. However, like any other tool, the wrench can become damaged and eventually break. In this step-by-step guide, we will walk you through the process of dismantling a wrench to repair it.
Step 1: Gather the necessary materials


Before you can start dismantling a wrench, you will need the following materials:
- A damaged wrench
- A wrench workbench
- Forged iron or mechanical parts
- A repair kit (optional, but recommended)
Step 2: Locate a wrench workbench
In order to repair your wrench, you will need to find a wrench workbench. These workbenches are scattered throughout the game world, so you may need to explore and search for one. Once you find a workbench, make sure you have it in your inventory.
Step 3: Open the wrench workbench
With the wrench workbench in your inventory, open your inventory menu and locate the workbench. Select the workbench to open it.
Step 4: Place the damaged wrench in the workbench
Inside the wrench workbench, you will see slots where you can place items. Take the damaged wrench from your inventory and place it in one of these slots. This will allow you to start the dismantling process.
Step 5: Add forged iron or mechanical parts
In order to repair the wrench, you will need to add forged iron or mechanical parts to the workbench. These materials can be found by looting or crafting. Place them in the workbench along with the damaged wrench.

Step 6: Start the dismantling process
Once you have placed the damaged wrench and the required materials in the workbench, you can start the dismantling process. Select the option to repair the wrench, and the workbench will begin repairing it.
Step 7: Wait for the repair to complete
The repair process will take some time to complete. It is recommended to have a repair kit in your inventory, as it can speed up the repair process. Wait patiently for the repair to finish.
Step 8: Retrieve the repaired wrench
Once the repair is complete, you can retrieve the repaired wrench from the workbench. Simply select it and add it back to your inventory.
Step 9: Test the repaired wrench
After retrieving the repaired wrench, it is important to test it to ensure it is functioning properly. Use it on various objects in the game to verify its effectiveness.
Following these step-by-step instructions, you should now be able to repair a wrench and continue using it in 7 Days to Die.

Cleaning the components of a wrench
Regular maintenance and cleaning of your wrench can help prolong its lifespan and ensure that it remains in good working condition. Cleaning the various components of a wrench involves removing dirt, debris, and rust, as well as lubricating certain parts for smoother operation.
Here are the steps to clean the components of a wrench:
- Disassemble the wrench: Start by removing any adjustable parts or accessories from the wrench to ensure easier access to all the components.
- Remove dirt and debris: Use a soft brush or toothbrush to gently scrub away any accumulated dirt, dust, or debris from the surface of the wrench. Pay attention to hard-to-reach areas and crevices.
- Remove rust: If your wrench has any rust patches, you can use a rust remover solution or a mixture of vinegar and baking soda to help dissolve the rust. Apply the solution on the affected areas and let it sit for a few minutes before scrubbing with a brush or abrasive pad.
- Clean the threads and moving parts: Wipe down the threads of the wrench with a clean cloth or paper towel to remove any grease or dirt that may have accumulated. For moving parts or hinges, use a small amount of lubricating oil or silicone spray to keep them functioning smoothly.
- Inspect for damages: While cleaning, inspect the wrench for any signs of wear, cracks, or damage. If you notice any issues, it may be necessary to replace the affected components or the entire wrench.
- Reassemble the wrench: Once all the components are clean and dry, reassemble the wrench by carefully fitting each part back in place. Ensure that all adjustable parts are properly aligned and tightened.
- Store the wrench properly: After cleaning, store the wrench in a dry and clean place to prevent any further accumulation of dirt or moisture. Consider using a protective case or tool box to keep it organized and protected.
Cleaning your wrench regularly and maintaining its components can help prevent corrosion, improve functionality, and extend its overall lifespan. By following these steps, you can ensure that your wrench remains in optimal condition for various repair and construction tasks.
Identifying and replacing damaged parts
When repairing a wrench in 7 Days to Die, it is important to identify and replace any damaged parts. Damaged parts can significantly affect the performance and durability of the wrench, so it is crucial to address them promptly.
Identifying damaged parts
To identify damaged parts on your wrench, you can follow these steps:
- Open your inventory by pressing the corresponding key.
- Select the wrench from your inventory.
- Inspect the wrench to see its current condition.
- Look for any text or icons that indicate damage or wear.
Common indicators of damaged parts include text descriptions like “damaged,” “broken,” or icons such as a cracked or red-colored component. These signs show that specific parts of the wrench need to be replaced.

Replacing damaged parts
Once you have identified the damaged parts, you can replace them by following these steps:
- Find or craft replacement parts for the damaged components.
- Open your inventory and select the wrench.
- Right-click on the wrench to enter modify mode.
- Locate the damaged parts in the modify menu.
- Select the damaged parts and replace them with the new ones.
Make sure you have the necessary replacement parts in your inventory before attempting to repair the wrench. If you don’t have the required parts, you can search for them in the game world or craft them using the appropriate materials and tools.
After replacing the damaged parts, your wrench should have improved performance and durability. Remember to regularly check the condition of your tools to ensure they are always in optimal working condition.
Conclusion


Identifying and replacing damaged parts is an essential aspect of repairing a wrench in 7 Days to Die. By following the steps outlined in this guide, you can effectively identify and replace any damaged components, ensuring the longevity and efficiency of your wrench.
Lubricating the wrench for smooth operation
One essential maintenance task for keeping your wrench in good working condition is lubrication. Proper lubrication ensures smooth operation and extends the lifespan of your tool.
Step 1: Gather the necessary materials
Before starting the lubrication process, make sure you have the following materials:
- Multi-purpose oil or WD-40
- Clean cloth or paper towels
Step 2: Clean the wrench
Before applying lubrication, it’s important to clean the wrench to remove any dirt or debris that might interfere with the lubricant’s effectiveness. Use a clean cloth or paper towels to wipe down the tool, paying extra attention to the joints and movable parts.
Step 3: Apply lubricant
Once the wrench is clean, apply a small amount of multi-purpose oil or WD-40 to the joints and movable parts. Be careful not to over-lubricate, as this can attract more dirt and cause the wrench to become sticky.

Step 4: Move the parts
After applying the lubricant, move the wrench’s parts back and forth to distribute the oil evenly. This will help to ensure all moving components are properly lubricated. Repeat this step a few times to ensure thorough coverage.
Step 5: Wipe off excess lubricant
Using a clean cloth or paper towel, wipe off any excess lubricant from the wrench. Leaving excess oil can attract dirt and cause buildup, which can negatively impact the wrench’s performance.
Step 6: Store the wrench properly
Once you’ve lubricated your wrench, store it in a clean, dry place away from moisture and dust. This will help to maintain the lubrication and prevent any further damage or corrosion.
By following these steps and regularly lubricating your wrench, you can ensure smooth operation and prolong the life of your tool.
Reassembling the wrench
Once you have collected all the necessary parts to repair the wrench, it’s time to start reassembling it. Follow these steps carefully to ensure a successful repair:
- Clean the parts: Before reassembling the wrench, make sure to clean all the parts. Use a brush or cloth to remove any dirt or debris that may have accumulated.
- Inspect the parts: After cleaning, inspect each part for any damage or wear. If you notice any, replace the damaged part with a new one.
- Place the spring: Begin the reassembly process by placing the spring into the wrench handle. Make sure it is properly seated and aligned.
- Attach the jaw: Next, position the jaw of the wrench onto the handle. Align the holes in the jaw with the corresponding holes in the handle.
- Insert the pin: Once the jaw is in place, insert the pin through the holes in the jaw and handle. This will secure the jaw to the handle.
- Secure the pin: Use pliers or a small hammer to secure the pin in place. Make sure it is tightly fastened to prevent any movement or loosening.
- Test the wrench: Finally, give the reassembled wrench a test by opening and closing the jaw. Make sure it operates smoothly and without any issues.
By following these steps, you should be able to successfully reassemble your wrench and have it ready for use. Remember to always exercise caution when working with tools and follow safety guidelines to prevent any accidents.
Testing the repaired wrench
After successfully repairing your wrench, it is important to test it to ensure that it is functioning properly. Here are some steps you can follow to test your repaired wrench:
- Inspect the wrench: Carefully examine the repaired wrench for any visible damages or defects. Check that all the parts are securely fastened and there are no loose components.
- Test the grip: Hold the repaired wrench in your hand and test its grip. Ensure that it feels comfortable and secure, allowing you to exert force without slipping.
- Try loosening and tightening bolts: Use the wrench to loosen and tighten a few bolts of different sizes. Pay attention to how smoothly the wrench turns and how effectively it grips the bolts.
- Check for excessive play: While using the wrench, check for any excessive play or wobbling. If you notice any irregular movements or instability, it may indicate that the wrench requires further adjustments.
- Inspect the results: Examine the bolts that you tightened using the repaired wrench. Ensure that they are adequately secured and there are no signs of stripping or damage.
- Repeat the test: Repeat the testing process multiple times to ensure consistency in the performance of the repaired wrench.
It is important to remember that a properly repaired wrench should function without any issues and provide a reliable tool for your future tasks. If you notice any problems during testing, it may be necessary to revisit the repair process or seek professional assistance.
Tips for maintaining a wrench in 7 Days to Die
1. Repairing the wrench
Repairing your wrench is essential to keep it in good working condition. To repair a wrench, you will need the Repair Kits which can be found in various locations such as loot containers, houses, or by crafting them using forged iron and duct tape.
2. Use your wrench wisely
Using the wrench for its intended purpose is important to prevent unnecessary wear and tear. The wrench is primarily used for disassembling mechanical items like cars, air conditioners, and workbenches. Avoid using it as a weapon or hitting other objects as it will cause damage and reduce its durability.
3. Prioritize repair over modification
When it comes to maintaining your wrench, it is better to focus on repairing it rather than modifying it. While modifications can enhance its performance, they also reduce its durability. Therefore, it is recommended to repair it before adding any modifications to ensure its longevity.
4. Carry spare wrenches
Having spare wrenches in your inventory is a smart move as it allows you to continue working even if your current wrench breaks. Carry multiple wrenches and always keep an eye on their durability. Replace them when necessary to avoid any downtime in your scavenging or crafting activities.
5. Upgrade to a higher tier wrench
As you progress in the game and gain access to better resources, consider upgrading your wrench to a higher tier. Higher tier wrenches have improved durability and performance, making them more efficient for disassembling mechanical objects. Look out for opportunities to acquire or craft stronger wrenches.
6. Store your wrenches properly
When not in use, store your wrenches in a secure location to prevent unnecessary damage. Keep them in a toolbox, storage chest, or your base’s inventory to protect them from environmental hazards and potential theft by other players or zombies.
7. Maintain your character’s skills
Investing skill points in the appropriate attribute, such as the Toolsmithing skill, can enhance the durability and effectiveness of your wrench. Continuously upgrading your character’s skills will help you maintain your wrench for longer periods of time.
8. Repair broken wrenches with a workbench
If your wrench is broken and cannot be repaired through the normal Repair Kits, you can use a workbench to fix it. Place the broken wrench in the workbench’s repair slot along with mechanical parts and forged iron to restore it to its full durability.
Conclusion
Maintaining a wrench in 7 Days to Die is crucial for your survival and success in the game. By following these tips, you can prolong its lifespan and ensure that it remains a valuable tool in your arsenal.
FAQ
What is “7 Days to Die”?
“7 Days to Die” is a survival horror video game set in an open world. It combines elements of first-person shooter, role-playing, and tower defense games. The game takes place in a post-apocalyptic world, where players must scavenge for resources, build shelters, and fight off hordes of zombies.
Why would I need to repair a wrench in “7 Days to Die”?
In “7 Days to Die”, the wrench is a valuable tool that can be used to repair various items and structures. It is particularly useful for repairing weapons, tools, and vehicles. By learning how to repair a wrench, you can ensure that it remains in good condition and can be used whenever needed.
How can I repair a wrench in “7 Days to Die”?
To repair a wrench in “7 Days to Die”, you will need to have a repair tool, such as a repair kit or a repair station. Once you have the necessary tool, simply interact with the wrench to bring up the repair menu. Follow the prompts to repair the wrench using the required resources. It’s important to note that the higher your character’s level in the construction skill, the easier it will be to repair the wrench.
What resources do I need to repair a wrench?
To repair a wrench in “7 Days to Die”, you will need specific resources, such as mechanical parts, duct tape, and forged iron. The exact resources required may vary depending on the condition of the wrench and your character’s crafting skill level. Make sure to gather these resources beforehand or scavenge for them in the game world.
Can I repair a wrench without a repair tool?
No, you cannot repair a wrench in “7 Days to Die” without a repair tool. The repair tool, such as a repair kit or a repair station, is necessary to perform any repairs in the game. Without it, you won’t be able to access the repair menu and fix your wrench. So, it’s essential to have a repair tool in your possession.
Are there any alternatives to repairing a wrench in “7 Days to Die”?
Yes, there are alternatives to repairing a wrench in “7 Days to Die”. If you are unable to repair your current wrench, you can always try to find a new one by exploring buildings, looting containers, or killing zombies. Additionally, you can trade with non-player characters (NPCs) for a new wrench or look for one in the in-game marketplace. However, repairing the wrench is often a more cost-effective and resource-efficient option.
Video


Meet Harrison Clayton, a distinguished author and home remodeling enthusiast whose expertise in the realm of renovation is second to none. With a passion for transforming houses into inviting homes, Harrison's writing at https://thehuts-eastbourne.co.uk/ brings a breath of fresh inspiration to the world of home improvement. Whether you're looking to revamp a small corner of your abode or embark on a complete home transformation, Harrison's articles provide the essential expertise and creative flair to turn your visions into reality. So, dive into the captivating world of home remodeling with Harrison Clayton and unlock the full potential of your living space with every word he writes.