How to True a Bike Wheel Without a Spoke Wrench – Easy DIY Guide

If you’re a cyclist, you know that having a true bike wheel is crucial for smooth and safe rides. A true wheel is one that spins without wobbling, ensuring better handling and preventing unnecessary wear on your bike. While it may seem like you need a specialized tool like a spoke wrench to true your bike wheel, there are actually a few simple DIY methods that can help you achieve the same result without the need for any specialized tools. In this guide, we will show you how to true a bike wheel without a spoke wrench, using everyday items you may already have at home.
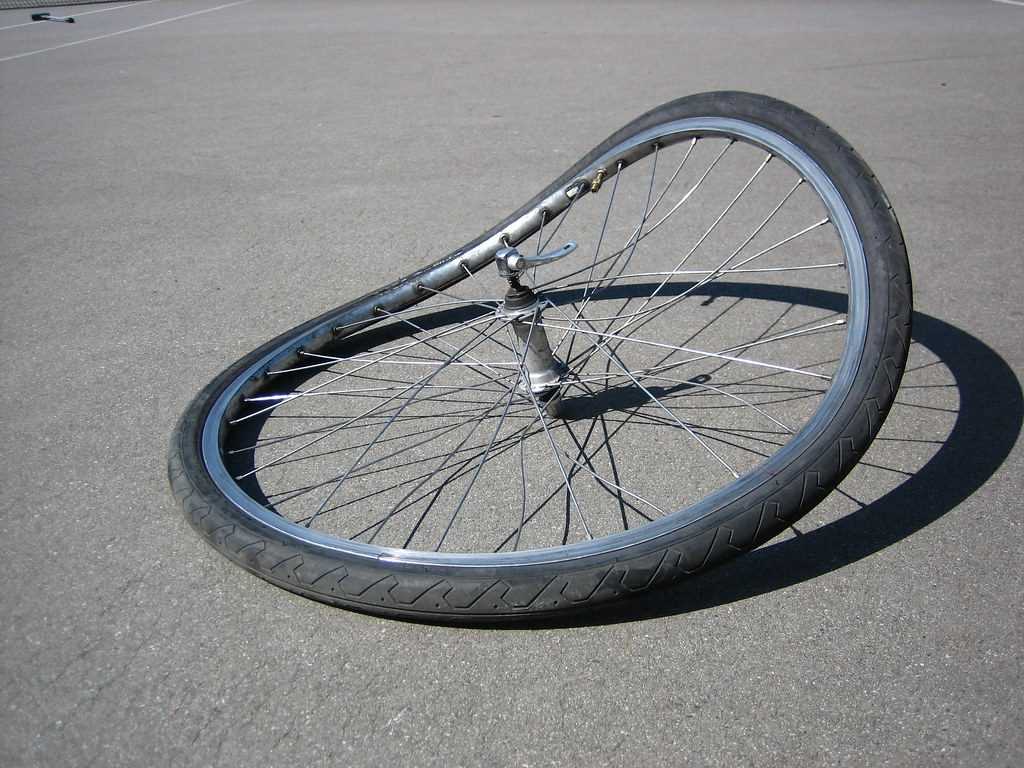
Before we dive into the DIY methods, it’s important to understand the basics of why a bike wheel becomes untrue in the first place. A wheel becomes untrue when the tension on its spokes becomes uneven, causing it to wobble. This can happen due to various reasons, such as hitting a pothole or curb, or simply from the normal wear and tear of riding. Truing a wheel involves adjusting the tension on the spokes to bring the wheel back into alignment.
So, how can you true a bike wheel without a spoke wrench? One method is to use your bike frame as a guide. Start by flipping your bike upside down and placing it on a stable surface. Spin the wheel and observe the area where it rubs against the brake pads. This will give you a rough idea of which spokes need adjustment. Using your hands or a pair of pliers, give the loose spokes a gentle turn to tighten them, and the tight spokes a gentle turn to loosen them. Keep adjusting and spinning the wheel until it no longer rubs against the brake pads.
What is a spoke wrench?
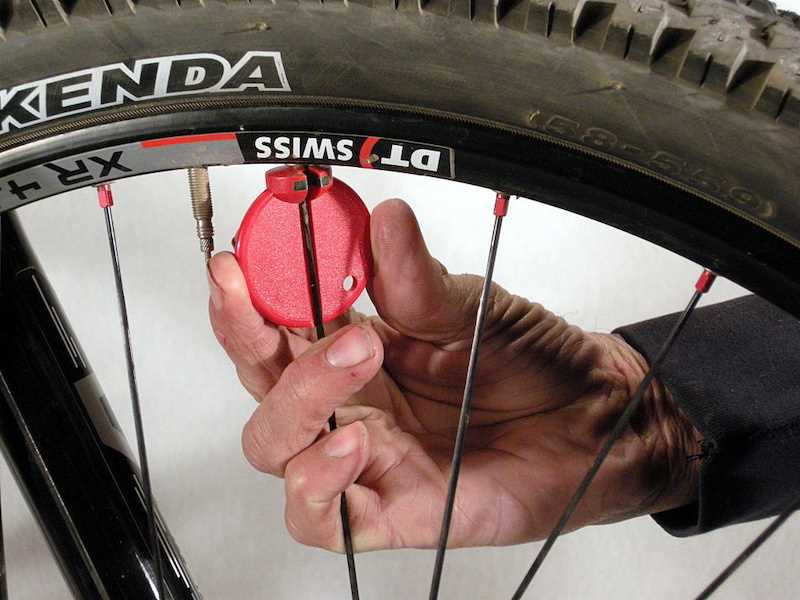
A spoke wrench is a specialized tool used for adjusting the tension of the spokes in a bicycle wheel. It is designed to fit the nipples on the ends of the spokes, allowing the user to tighten or loosen them as needed. By adjusting the tension of the spokes, a spoke wrench can help to true the wheel, ensuring that it spins straight and evenly.

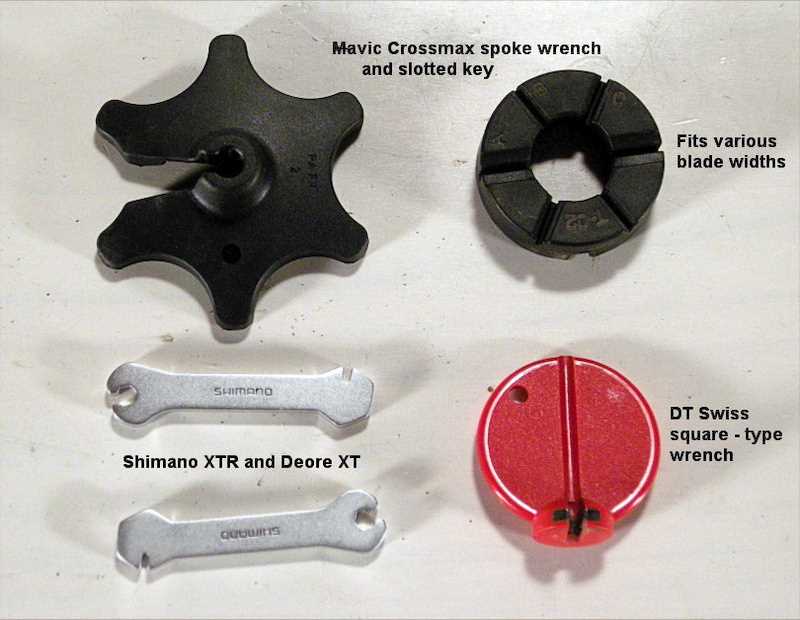
Spoke wrenches come in different sizes to fit different nipple sizes, so it is important to choose the correct size for your specific wheel. Using the wrong size wrench can damage the nipples or make it difficult to adjust the tension properly.
Typically, a spoke wrench has a small handle or grip that allows the user to easily turn the nipples. Some wrenches also have a slot or notch to help hold the wrench in place while adjusting the spokes. This can be especially helpful when truing a wheel, as it allows for precise adjustments.
While a spoke wrench is the most common tool used for adjusting spokes, there are also other methods available, such as using pliers or a small adjustable wrench. However, these methods can be more challenging and may not provide the same level of precision as a dedicated spoke wrench.
Overall, a spoke wrench is an essential tool for any cyclist or bike mechanic who wants to maintain the performance and longevity of their bicycle wheels. With proper use, it allows for accurate and reliable adjustments to the tension of the spokes, ensuring a smoother and more enjoyable ride.
Why do you need to true a bike wheel?

When riding a bike, it is essential to have a properly aligned and balanced wheel. Over time, the spokes on a bike wheel may become loose or unevenly tensioned, causing the wheel to wobble or rub against the brake pads. This misalignment can affect the overall stability, performance, and safety of the bicycle.
Truing a bike wheel is the process of adjusting the tension in the spokes to bring the wheel back into alignment. This ensures that the wheel rotates smoothly and is centered between the fork or frame. Truing a wheel is particularly important for riders who frequently use their bikes for commuting, road cycling, or mountain biking, as a misaligned wheel can lead to poor handling, decreased efficiency, and increased risk of accidents.
There are several common reasons why a bike wheel may need truing, including:
- Regular Wear and Tear: Over time, the tension in the spokes can loosen, causing the wheel to go out of true.
- Impact or Crashes: Hitting a pothole, curb, or other obstacles can cause the wheel to become misaligned.
- Uneven Spoke Tension: Spokes that are not evenly tensioned can lead to an imbalanced wheel.
- Improper Wheel Assembly: Poorly built or poorly maintained wheelsets may require frequent truing.
By truing a bike wheel, you can improve the overall stability, performance, and longevity of your bicycle. It helps to ensure a smoother ride, better handling, and reduced stress on other components, such as the brakes and drivetrain. Truing a wheel is considered a basic maintenance skill that every cyclist should know, as it can save you money on costly repairs and enhance your riding experience.
Step 1: Gather the necessary tools

Before you start truing your bike wheel without a spoke wrench, make sure you have the following tools:
- Adjustable wrench: This will be your main tool for adjusting the spokes. Make sure it is wide enough to fit the spoke nipples.
- Screwdriver: You will need a Philips or flathead screwdriver to use as a lever for adjusting the spokes.
- Truing stand or improvised stand: While not necessary, having a truing stand will make the process easier and more accurate. If you don’t have a truing stand, you can improvise by using your bike’s frame or fork as a stand.
- Bike pump: You will need a bike pump to inflate the tire to the correct pressure once you have finished truing the wheel.
- Spoke nipple lubricant (optional): Using spoke nipple lubricant can help loosen tight spokes and make adjustment easier. If you have it, apply a small amount to each spoke nipple before starting.
Having these tools ready before you start will ensure that you can complete the process smoothly and efficiently.
Step 2: Identify the problem area
Before you start truing your bike wheel, you need to identify the problem area. This could be a section of the wheel that is wobbling, rubbing against the brake pads, or causing the bike to ride unevenly.
To identify the problem area, follow these steps:

- Spin the wheel and observe its rotation. Look for any noticeable wobbles or areas where the wheel seems to be out of balance.
- Check for any rubbing against the brake pads. This can indicate a section of the wheel that is out of alignment.
- Listen for any scraping or rubbing noises as the wheel rotates. This can also indicate an issue with the wheel trueness.
If you’re having trouble identifying the problem area, you can also try the “zip tie method.” Attach a zip tie to one of the fork legs or seat stay and position it so that it lightly touches the rim as the wheel rotates. As the wheel spins, the zip tie will move closer to or further away from the rim, signaling any deviations in trueness. This method can help you locate the problem area more easily.
Once you have identified the problem area, you can proceed to the next step of truing your bike wheel.
Step 3: Loosen the affected spoke
Once you have located the affected spoke that needs adjustment, you will need to loosen it. Loosening the spoke will allow you to make the necessary adjustments to true the wheel.
Here’s how you can loosen the affected spoke:

- Use a spoke wrench or any suitable tool that can fit the nipple of the spoke.
- Turn the spoke wrench counterclockwise to loosen the nipple. Be careful not to overdo it, as you don’t want to completely detach the spoke from the wheel.
- Loosen the affected spoke by a quarter to a half turn at a time. This gradual adjustment will help you make precise modifications to the wheel’s trueness.
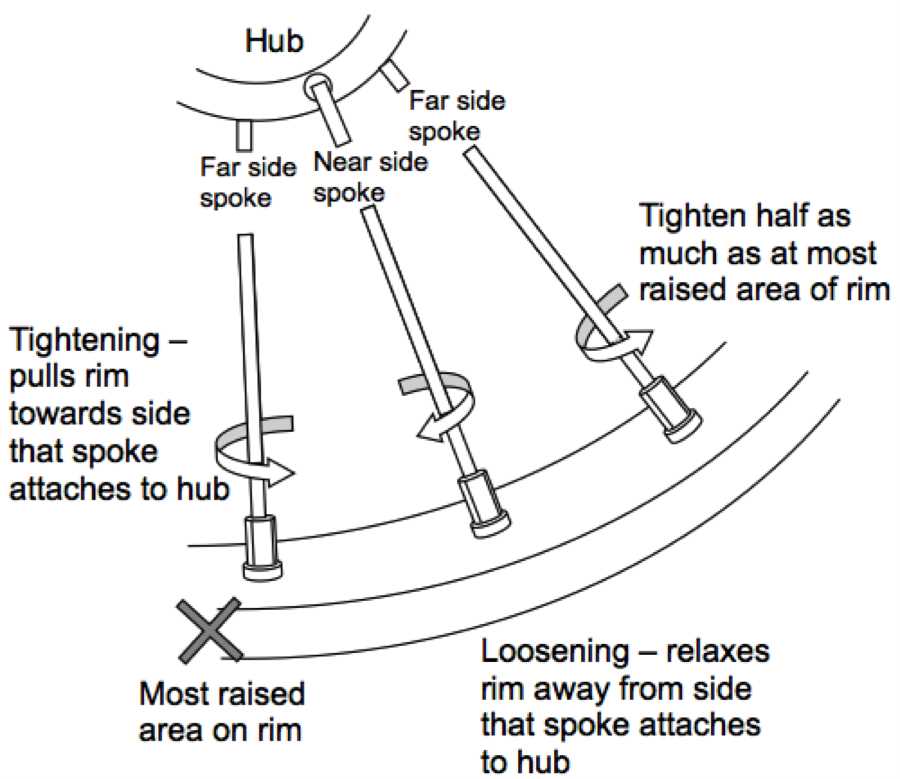
- If you are not sure which way to turn the spoke, keep in mind that turning it counterclockwise (when viewed from the rim side) will loosen it, while turning it clockwise will tighten it.
After you have loosened the affected spoke, move on to the next step to start adjusting the wheel’s trueness.
Step 4: Tighten the adjacent spokes
After loosening the tension on the bent spoke in the previous step, it’s important to tighten the adjacent spokes to bring the wheel back into alignment. This step helps to distribute the tension across the wheel and maintain its overall balance.
Here’s how you can tighten the adjacent spokes:
- Identify the two adjacent spokes on either side of the bent or damaged spoke. The damaged spoke will be the reference point for this step.
- Using the spoke wrench, turn the nipple of the first adjacent spoke clockwise to tighten it. This will increase the tension on that spoke.
- Continue tightening the first adjacent spoke until you feel resistance or until it has reached a similar tension as the surrounding spokes.
- Repeat the same process for the second adjacent spoke, turning its nipple clockwise to tighten it.
- Keep alternating between tightening the first and second adjacent spokes, making small adjustments to gradually restore the balance of the wheel.
Make sure to check the alignment of the wheel after tightening each spoke to ensure it is truing up properly. Use a truing stand or a frame fork as a reference point to gauge the alignment of the wheel.
Remember to take it slow and make small adjustments, as overtightening the spokes can put unnecessary stress on the wheel and lead to further damage.
Step 5: Recheck the wheel’s alignment
After truing the bike wheel using the DIY method, it’s important to recheck the alignment to ensure that the wheel is properly straightened. This step is crucial to guarantee the safety and efficiency of your bike.
To recheck the wheel’s alignment, follow these steps:
- Spin the wheel and observe it closely. Look for any remaining wobbles or unevenness.
- If you notice any issues, such as a slight wobble or unevenness, determine the area of the wheel causing the problem.
- Identify the spokes that are closest to the problem area.
- Using your hands, apply gentle pressure to the spokes on the opposite side of the problem area. This will help to adjust the tension and alignment of the wheel.
- Continue making small adjustments by gradually tightening or loosening the spokes on either side of the problem area until the wheel runs smoothly without any visible wobbles.
- Spin the wheel again to check if the adjustments have corrected the alignment. Repeat steps 1-5 as necessary until the wheel is properly straightened.
Remember, patience and attention to detail are key when rechecking the wheel’s alignment. It may take several attempts to get it perfectly straightened, so don’t rush the process.
Once you are satisfied with the alignment of the wheel, you can move on to other maintenance tasks or take your bike for a test ride.
Step 6: Repeat if necessary
If your bike wheel is still not true after completing step 5, you may need to repeat the process. Sometimes it takes a few adjustments to get the wheel properly aligned.
First, spin the wheel again to determine which areas are still out of true. Look for any wobbles or hops in the wheel as it rotates.
Once you’ve identified the problem areas, use the same technique as before to adjust the tension of the spokes. Remember to only make small adjustments at a time to avoid over-correcting.
Spin the wheel again after each adjustment to check if the truing is improving. Continue making adjustments until the wheel spins true with no wobbles or hops.
If you find that you’ve made too many adjustments and the wheel is now over-corrected, don’t worry. You can simply loosen some spokes to bring it back into alignment.
By repeating the process and making small adjustments, you’ll eventually be able to true your bike wheel to perfection.
Tips and precautions
- Before attempting to true a bike wheel without a spoke wrench, it is important to inspect the wheel for any damaged or broken spokes. If there are any, it is best to replace them before proceeding.
- Make sure to work in a well-lit area, as this will allow you to see any imperfections in the wheel more clearly.
- Use a straight edge, such as a ruler or a piece of wood, to check for any wobbles or dips in the rim. This will help you identify the areas that need to be adjusted.
- Start by making small adjustments to the spokes, rather than trying to fix the wheel all at once. This will help you avoid over-tightening or loosening the spokes, which can lead to further damage.
- Always make sure to tighten and loosen the spokes in small increments, rather than making sudden, large adjustments. This will help you maintain control over the truing process and prevent any sudden shifts in the wheel’s alignment.
- When tightening or loosening the spokes, it is important to make sure that the tension is distributed evenly across the wheel. Uneven tension can lead to a warped or unstable wheel.
- If you are unsure about any of the steps involved in truing a bike wheel without a spoke wrench, it is best to seek help from a professional. They will have the necessary tools and expertise to ensure that the task is carried out safely and effectively.
FAQ
Can I true a bike wheel without a spoke wrench?
Yes, you can true a bike wheel without a spoke wrench. There are alternative methods that you can use, such as using a screwdriver or an adjustable wrench.
What tools do I need to true a bike wheel without a spoke wrench?
If you don’t have a spoke wrench, you can use a screwdriver or an adjustable wrench as alternative tools. These tools can help you adjust the tension of the spokes and true the wheel.
Are there any risks or downsides to truing a bike wheel without a spoke wrench?
Truing a bike wheel without a spoke wrench can be more challenging and time-consuming compared to using a proper tool. Additionally, using improper tools may also damage the spoke nipples or the wheel itself if not used correctly. It’s always recommended to use the right tools for the job to avoid any potential risks or downsides.
Is it worth truing a bike wheel without a spoke wrench?
If you don’t have a spoke wrench and you’re in a situation where you need to true your bike wheel, then it can be worth trying to true it without the proper tool. However, if you have access to a spoke wrench or can easily obtain one, it’s generally recommended to use the correct tool for the job to ensure accurate and safe truing of the wheel.
Are there any tips or tricks for truing a bike wheel without a spoke wrench?
When truing a bike wheel without a spoke wrench, it’s important to be patient and make small adjustments at a time. Start by identifying the areas where the wheel needs to be trued and focus on those specific spokes. Use a screwdriver or adjustable wrench to turn the spokes slowly and evenly, and check the wheel’s progress frequently. It may take some time and practice to get the hang of it, but with patience and attention to detail, you can true the wheel effectively.
Video


Meet Harrison Clayton, a distinguished author and home remodeling enthusiast whose expertise in the realm of renovation is second to none. With a passion for transforming houses into inviting homes, Harrison's writing at https://thehuts-eastbourne.co.uk/ brings a breath of fresh inspiration to the world of home improvement. Whether you're looking to revamp a small corner of your abode or embark on a complete home transformation, Harrison's articles provide the essential expertise and creative flair to turn your visions into reality. So, dive into the captivating world of home remodeling with Harrison Clayton and unlock the full potential of your living space with every word he writes.