How to Remove an Oil Filter Without a Wrench | Easy DIY Guide

Changing the oil in your car is an important part of regular maintenance. One of the key steps in this process is removing the old oil filter. While it is common to use a wrench to accomplish this task, there may be situations where a wrench is not available or does not fit the filter properly. In this guide, we will show you how to remove an oil filter without a wrench, using easy DIY techniques that anyone can do.
Before we begin, it is important to note that removing an oil filter without a wrench should only be done if other methods fail or if you do not have access to a wrench. Using a wrench is the most reliable and efficient way to remove an oil filter. If possible, it is always recommended to have a wrench on hand when performing an oil change.
However, in some cases, a wrench may not be available or may not fit the filter properly. In these situations, you can try using alternative methods to remove the oil filter. One method is to use a strap wrench or a rubber strap. Simply wrap the strap around the filter, tighten it, and twist counterclockwise to remove the filter. This technique provides a good grip and allows you to apply enough force to turn the filter.
If you do not have a strap wrench or a rubber strap, you can also try using a screwdriver or a sharp object. Carefully insert the screwdriver into the side of the oil filter and use it as a lever to twist the filter counterclockwise. Be cautious not to puncture the filter or damage the engine while doing this, as it can cause oil leakage or other complications.
Remember, removing an oil filter without a wrench should only be done as a last resort. If you can, it is always best to use a wrench for a safe and efficient filter removal. However, if you find yourself in a situation where a wrench is not available, these DIY techniques can help you successfully remove the oil filter and complete your oil change.

Step-by-step Guide to Remove an Oil Filter Without a Wrench
Step 1: Gather the Necessary Tools
Before you begin, make sure you have all the necessary tools on hand:
- Rubber gloves
- Shop rags or old towels
- An oil filter removal tool or a thick rubber band
Step 2: Prepare the Area
Park your vehicle in a safe and level area. Put on your rubber gloves to protect your hands from getting dirty. Lay down some shop rags or old towels under the oil filter area to catch any oil that may spill.
Step 3: Loosen the Oil Filter
If you don’t have an oil filter removal tool, you can use a thick rubber band to grip the oil filter. Wrap the rubber band around the filter and twist counterclockwise to loosen it. Be careful not to apply too much pressure, as you don’t want to damage the filter or the surrounding parts.
Step 4: Remove the Oil Filter


Once the filter is loose, carefully unscrew it the rest of the way by hand. Keep in mind that it may still contain some oil, so be prepared to catch any drips or spills.
Step 5: Dispose of the Oil Filter
Place the old oil filter in a plastic bag to prevent any oil from leaking out and dispose of it properly at a recycling center or an automotive parts store that accepts used filters.
Step 6: Clean and Install the New Filter
Using a clean shop rag or towel, wipe off any dirt or debris from the filter housing. Apply a thin layer of fresh oil to the rubber gasket on the new oil filter. This will help create a good seal.
Step 7: Install the New Filter
Screw on the new oil filter by hand. Once it is hand-tight, use the oil filter removal tool or rubber band to give it a final twist, ensuring it is secure.
Step 8: Check for Leaks
Start the engine and let it run for a few minutes. Check for any signs of leaks around the filter area. If you notice any leaks, turn off the engine and tighten the filter a little more.

Step 9: Clean up
Dispose of the used shop rags or towels and wash your hands thoroughly to remove any oil residue.
Note: It is always recommended to consult your vehicle’s owner manual for specific instructions and to follow the manufacturer’s recommendations for oil filter removal.
Gather the necessary tools for the job

Before you begin removing an oil filter without a wrench, it is important to gather all the necessary tools to ensure a smooth and efficient process. While a wrench may be the most common tool used for this task, there are alternative tools you can use to remove the oil filter without one. Here is a list of tools you may need:
- Rubber gloves: Wearing rubber gloves will protect your hands from any oil or debris that may come into contact during the removal process.
- Oil filter wrench (optional): While you are attempting to remove the oil filter without a wrench, it is still a good idea to have one on hand in case you run into any difficulties.
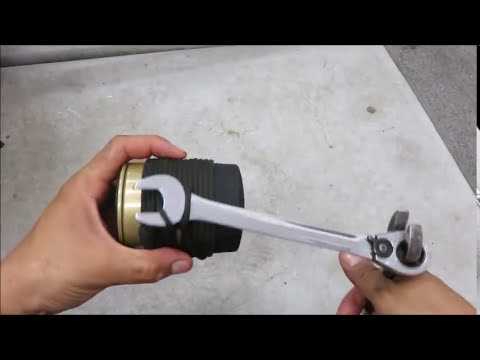
- Ratchet and socket set: This set can be used as an alternative to a wrench, especially if you have a socket that matches the size of your oil filter.
- Oil filter strap wrench: This tool is specifically designed to remove oil filters and can be used as an alternative to a traditional wrench.
- Pliers: Pliers can provide a good grip on the oil filter and can help you twist it off.
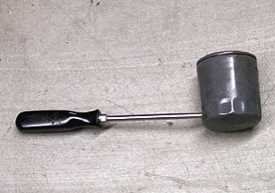
- Rubber mallet: A rubber mallet can be used to tap on the edge of the oil filter to loosen it if it is stuck.
Having these tools on hand will make the oil filter removal process much easier and allow you to complete the task without any unnecessary complications.
Prepare the vehicle for oil filter removal
Before you can remove the oil filter from your vehicle, you need to make sure that you have all the necessary tools and equipment ready, and that the vehicle is in a suitable position for easy access to the oil filter.
Gather your tools
Here are the tools you will need:
- Oil filter wrench or a strap wrench
- Drain pan or bucket
- Rags or paper towels
Position the vehicle
It is important to position your vehicle on a flat, level surface before you start working on the oil filter. This will ensure stability and prevent any accidents.
If you have a vehicle with a front-mounted oil filter, make sure the front of the vehicle is accessible. If you have a vehicle with a rear-mounted oil filter, you may need to lift the vehicle using jack stands to access the oil filter.
Warm up the engine
Before you remove the oil filter, it is recommended to warm up the engine a bit. This will help the oil flow more easily and will make the removal process easier.
Start the engine and let it run for a few minutes until it reaches its normal operating temperature. Be careful to not touch any hot parts of the engine.
Turn off the engine
Once the engine is warm, turn it off and let it cool down for a few minutes. This will allow the oil to settle down in the oil pan and make the removal of the oil filter easier and less messy.
Locate the oil filter
Before you can remove the oil filter, you need to locate it. The location of the oil filter can vary depending on the make and model of your vehicle.
Refer to your vehicle’s owner’s manual to find the exact location of the oil filter. Alternatively, you can search online for a diagram or video tutorial specific to your vehicle.
Prepare the drain pan
Place the drain pan or bucket underneath the oil filter to catch any oil that may spill out when you remove the filter. Make sure the drain pan is positioned securely to avoid any spills or accidents.
It is a good idea to also place some rags or paper towels around the oil filter to catch any additional oil that may drip out.
Check for any obstructions
Before you begin removing the oil filter, check for any obstructions that may prevent you from accessing the filter properly. Remove any parts or components that may be blocking the oil filter.
It is important to work in a clean and clutter-free environment to ensure a smooth and hassle-free oil filter removal process.
Now you are ready to remove the oil filter!
With all the necessary preparations done, you are now ready to remove the oil filter from your vehicle. Follow the appropriate steps to safely and efficiently remove the oil filter without a wrench.
Locate the oil filter
The oil filter is typically located near the engine block or underneath the vehicle. To find it, refer to the owner’s manual of your car or follow these steps:
- Make sure the engine is cold and turned off.
- Open the hood of your car and secure it in place.
- Look for a small metal canister or cylinder-shaped component attached to the engine block.
- Inspect the area near the engine block for any signs indicating the oil filter location, such as labels or arrows.
- If you are unable to locate the oil filter, consult the owner’s manual or a trusted mechanic for assistance.
Once you have located the oil filter, you can proceed with the next steps on how to remove it without a wrench.
Use a filter wrench alternative
If you don’t have a filter wrench on hand, don’t worry! There are several alternative methods you can use to remove an oil filter without a wrench.
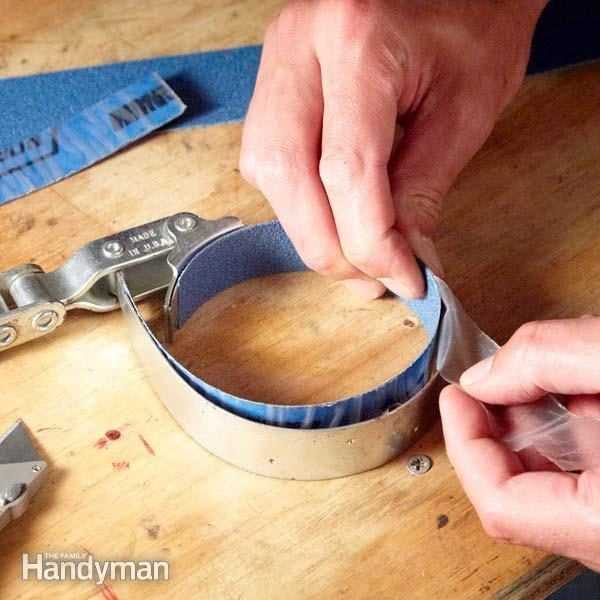
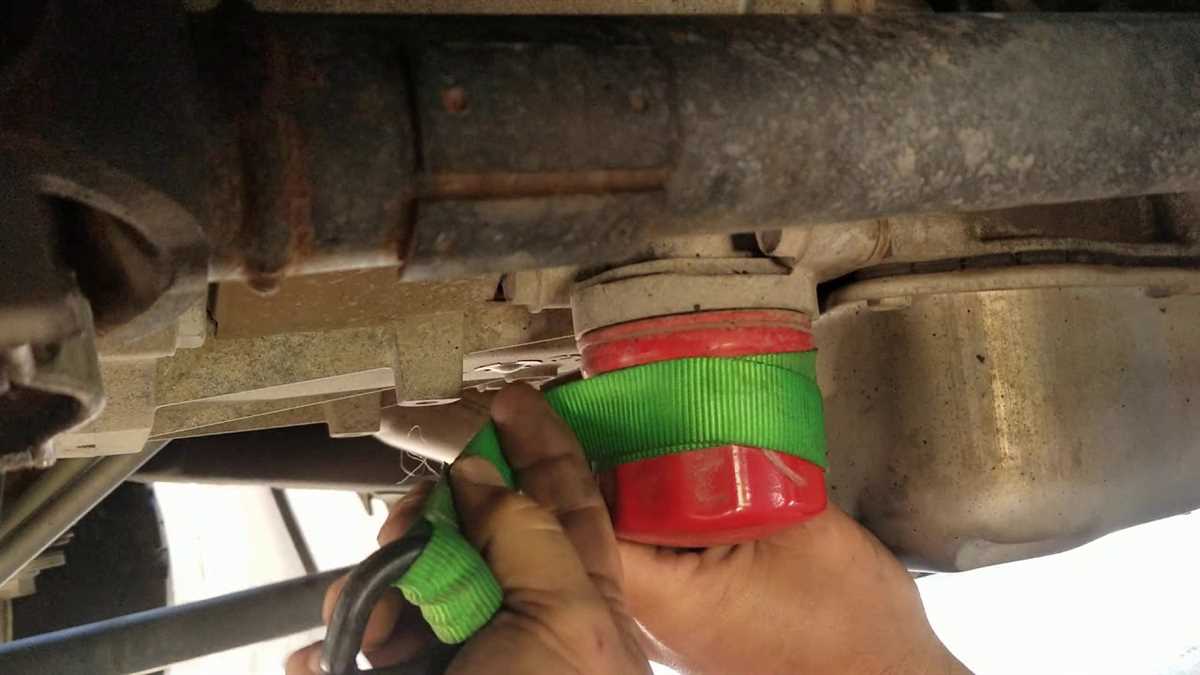
1. Oil filter removal strap
An oil filter removal strap is a flexible, metal strap that can be wrapped around the oil filter to provide grip and leverage for removal. To use this tool, follow these steps:
- Wrap the oil filter removal strap around the oil filter.
- Adjust the strap to ensure a tight fit.
- Use the handle of the strap to rotate the oil filter counterclockwise until it is loose enough to unscrew by hand.
2. Oil filter pliers
Oil filter pliers are specially designed to grip and remove oil filters. They have serrated jaws that provide a secure grip on the filter casing, allowing for easy removal. To use oil filter pliers, follow these steps:
- Position the pliers around the oil filter, ensuring a firm grip.
- Squeeze the handles of the pliers to lock them in place.
- Rotate the pliers counterclockwise to loosen and unscrew the oil filter.
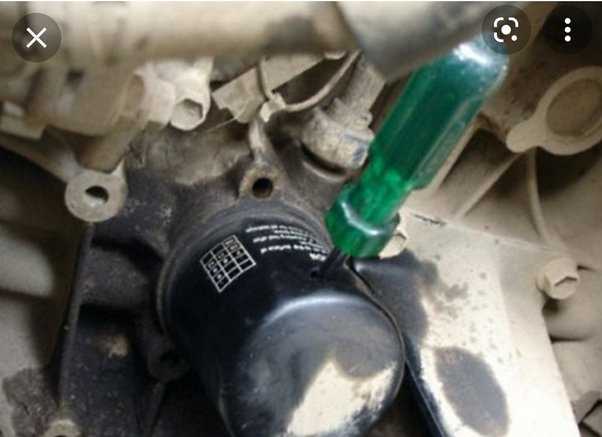
3. Screwdriver and hammer method
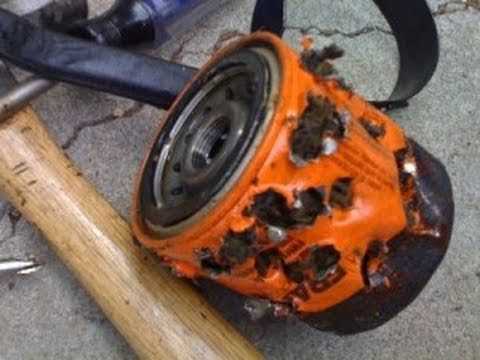
If you don’t have any specialized tools available, you can use a screwdriver and hammer to remove the oil filter. Here’s how:
- Place the tip of the screwdriver against the side of the oil filter.
- Using a hammer, tap the screwdriver firmly in a counterclockwise direction.
- The force from the hammer should create enough leverage to loosen and unscrew the oil filter.
Remember to exercise caution when using this method, as excessive force may damage the oil filter or surrounding components.
It’s important to note that these alternative methods may not be as effective or easy to use as a filter wrench. Therefore, it’s recommended to have a filter wrench on hand for future oil filter changes to ensure a smooth and hassle-free process.
Wrap a cloth around the filter for better grip
Removing an oil filter can sometimes be a challenge if it’s stuck or difficult to loosen. One easy way to get a better grip on the filter is to wrap a cloth around it. This will provide more traction and make it easier to turn and remove.
Here’s how you can wrap a cloth around the oil filter:
- Start by locating the oil filter under the hood of your vehicle.
- Take a clean cloth or rag and fold it into a strip.
- Place the folded cloth around the oil filter, ensuring it covers a substantial portion of the filter.
- Gently pull the ends of the cloth in opposite directions, creating tension and tightening the cloth around the filter.
- Hold onto the cloth tightly and try turning the filter counterclockwise to loosen it.
By wrapping a cloth around the oil filter, you provide yourself with a better grip, reducing the risk of slipping and potential injuries. Additionally, the cloth acts as a protective layer, preventing any scratches or dents on the filter or surrounding components.
If the oil filter is still difficult to remove, you can also try using an oil filter wrench or a rubber strap wrench. These tools can provide extra leverage and make the removal process easier.
Remember to always consult your vehicle’s manual and follow proper safety precautions when working on your car. If you’re unsure or uncomfortable with the process, it’s always best to seek professional assistance.
Apply force counterclockwise to loosen the filter
When removing an oil filter without a wrench, it is important to apply force counterclockwise to loosen the filter. Most oil filters are tightened using a clockwise motion, so turning it counterclockwise will help to loosen it and make it easier to remove.
To apply force counterclockwise, you can use a few different methods:
1. Hand grip
Using your hand grip is the simplest method to apply force counterclockwise. Make sure your hand is dry and firmly grasp the filter firmly to create enough torque to loosen it.
2. Rubber grip
If the filter is too tight or your hand is slipping, you can use a rubber grip tool to help increase your grip and make it easier to apply force. The rubber grip adds friction and prevents your hand from slipping, allowing you to generate more torque.
3. Oil filter wrench alternative
If you don’t have an oil filter wrench, you can use alternative tools such as a belt or strap wrench. These tools wrap around the oil filter and provide leverage to help you apply force counterclockwise. Adjust the tension of the belt or strap wrench to ensure a secure grip on the filter.
4. Large pliers/Channel locks
If you still cannot remove the filter using the methods above, you can try using large pliers or channel locks. These tools provide a strong grip and allow you to apply force counterclockwise. However, be cautious not to damage the filter or surrounding components when using pliers.
Remember to be careful and wear protective gloves when removing an oil filter. Some oil may spill during the process, so it’s best to have a drain pan ready to catch any excess oil. Once the filter is loosened, carefully unscrew it the rest of the way by hand, making sure not to spill any oil in the process. Dispose of the old filter properly and replace it with a new one.
Hand twist and remove the oil filter
If you don’t have a wrench on hand, don’t worry! You can still remove the oil filter using just your hands. While it may be a bit more challenging, with some extra effort, you’ll have the oil filter off in no time.
Step 1: Prep the area
- Ensure that your car is parked on a level surface and the engine is completely cool.
- Put on protective gloves to avoid any oil getting on your hands.
Step 2: Locate the oil filter
Depending on the make and model of your vehicle, the oil filter may be located on the top or on the bottom of the engine. Consult your owner’s manual if you’re having trouble finding it.
Step 3: Loosen the oil filter
- Using your hand, grip the oil filter firmly.
- Slowly turn the oil filter counterclockwise to loosen it.
- If the oil filter is too tight to turn by hand, you can try using a rubber jar opener or a rubber glove for extra grip.
Step 4: Remove the oil filter
- Continue twisting the oil filter counterclockwise until it comes off.
- Be careful as some oil may still be inside the filter, so make sure to keep a drain pan underneath to catch any spills.
Step 5: Clean the area
- Once the oil filter is removed, use a clean cloth or rag to wipe away any excess oil from the filter housing.
- Inspect the rubber gasket on the top of the oil filter. If it is cracked or damaged, replace it before installing the new filter.
Step 6: Install the new oil filter
- Apply a thin film of fresh oil to the rubber gasket of the new oil filter.
- Hand tighten the new oil filter by turning it clockwise until it is snug. Avoid over-tightening as it could cause a leak.
Step 7: Dispose of the old oil filter responsibly
- Place the old oil filter in a sealable bag to prevent any residual oil from leaking.
- Take the old oil filter to a local recycling center or an auto parts store that accepts used filters for proper disposal.
Following these steps will allow you to remove the oil filter without a wrench and complete your oil change successfully.
Clean the area and install a new filter
After removing the old oil filter, it’s important to clean the area where the filter was located to ensure a proper fit for the new filter. Use a clean rag or paper towels to wipe away any debris or oil residue. This will help prevent any contamination of the new filter or engine.
Once the area is clean, it’s time to install the new oil filter. Before installing, make sure to lubricate the rubber seal on the top of the filter with fresh engine oil. This will ensure a proper seal and make it easier to remove during the next oil change.
Position the new filter into place, taking care not to cross-thread it. Hand tighten the filter until it is snug. It is not necessary to use a wrench to tighten the filter, as overtightening can cause damage or make it difficult to remove in the future.
After installing the new filter, double-check that it is securely in place. This can be done by gently tugging on the filter to ensure it does not come loose. Once you are satisfied with the installation, you can proceed to the next step of adding fresh oil to the engine.
FAQ
Can I remove an oil filter without a wrench?
Yes, you can remove an oil filter without a wrench. There are a few alternative methods you can use, such as using a rubber strap wrench, a pair of oil filter pliers, or even a screwdriver and a hammer.
What is a rubber strap wrench?
A rubber strap wrench is a tool specifically designed to remove oil filters. It consists of a long handle with a flexible strap attached to it. The strap wraps around the oil filter and provides a strong grip while you turn the handle to loosen or tighten the filter.
Where can I buy a rubber strap wrench?
You can buy a rubber strap wrench at most auto parts stores, as well as online retailers such as Amazon or eBay. Make sure to choose a wrench that is suitable for the size of your oil filter.
How do I use oil filter pliers to remove an oil filter?
To use oil filter pliers, you simply need to open them wide enough to fit around the oil filter, then squeeze the handles together to create a tight grip. Once you have a good grip, you can turn the pliers counterclockwise to loosen the filter and remove it.
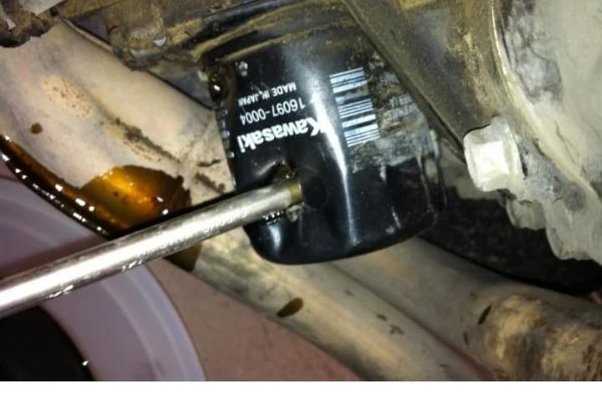
Is it possible to remove an oil filter with a screwdriver and hammer?
Yes, it is possible to remove an oil filter with a screwdriver and hammer, although it may not be the easiest method. To do this, you would need to drive the screwdriver into the side of the filter, then use the hammer to rotate the filter counterclockwise until it comes loose.
Are there any other tools or methods I can use to remove an oil filter?
Yes, there are a few other tools and methods you can try. Some people have had success using a strap wrench made from an old rubber belt, while others have used a pair of channel lock pliers or even a pry bar to loosen the filter. However, keep in mind that using tools not specifically designed for removing oil filters can be risky and may cause damage to the filter or engine.
Video


Meet Harrison Clayton, a distinguished author and home remodeling enthusiast whose expertise in the realm of renovation is second to none. With a passion for transforming houses into inviting homes, Harrison's writing at https://thehuts-eastbourne.co.uk/ brings a breath of fresh inspiration to the world of home improvement. Whether you're looking to revamp a small corner of your abode or embark on a complete home transformation, Harrison's articles provide the essential expertise and creative flair to turn your visions into reality. So, dive into the captivating world of home remodeling with Harrison Clayton and unlock the full potential of your living space with every word he writes.


