How to Properly Use a Crescent Wrench: Step-by-Step Guide

A crescent wrench is a versatile and essential tool that every DIY enthusiast and professional should have in their toolbox. This tool, also known as an adjustable wrench, is designed to grip and turn nuts, bolts, and other fasteners of various sizes. Due to its adjustable nature, it can adapt to different sizes of fasteners, making it a convenient tool to have for any project.
Using a crescent wrench may seem straightforward, but there are certain techniques and precautions that need to be followed to ensure safe and effective use. In this step-by-step guide, we will walk you through the proper use of a crescent wrench, from selecting the right size to the correct way to grip and turn fasteners.
First and foremost, it is crucial to select the correct size of the crescent wrench for the fastener you are working with. Using an incorrectly sized wrench can lead to slippage, causing damage to the fastener and potentially injuring yourself. To determine the correct size, match the jaw of the wrench to the size of the fastener. The jaw should fit snugly around the fastener without any play or movement.
Once you have selected the right size of the crescent wrench, it’s important to ensure a secure grip on both the wrench and the fastener. Hold the handle of the wrench firmly with one hand, using your fingers to wrap around the handle for stability. Place the jaw of the wrench around the fastener, making sure it is centered and aligned properly.
With a proper grip established, begin turning the wrench in the desired direction. It’s important to note that a crescent wrench is designed to turn fasteners in a clockwise (right) direction. Avoid applying excessive force, as this can lead to stripped threads or rounded corners on the fastener. Instead, use steady and controlled pressure to loosen or tighten the fastener.

By following this step-by-step guide, you can effectively and safely use a crescent wrench for your various DIY projects and repairs. Remember to always select the correct size, establish a secure grip, and use controlled pressure when turning the wrench. With practice, you’ll become proficient in using this versatile tool and be able to tackle a wide range of tasks with confidence.
What is a Crescent Wrench?
A crescent wrench, also known as an adjustable wrench or an adjustable spanner, is a versatile hand tool that is used for gripping and turning bolts, nuts, and other fasteners. It gets its name from the crescent-shaped jaw that can be adjusted to fit different sizes of fasteners.
The main advantage of a crescent wrench is its adjustability. Unlike a traditional fixed-size wrench, a crescent wrench can be adjusted to fit different sizes of fasteners, making it a versatile tool that can be used in a wide range of applications.
Crescent wrenches are commonly used in various industries, including automotive, plumbing, and construction. They are also popular among DIY enthusiasts and homeowners for everyday tasks and repairs.

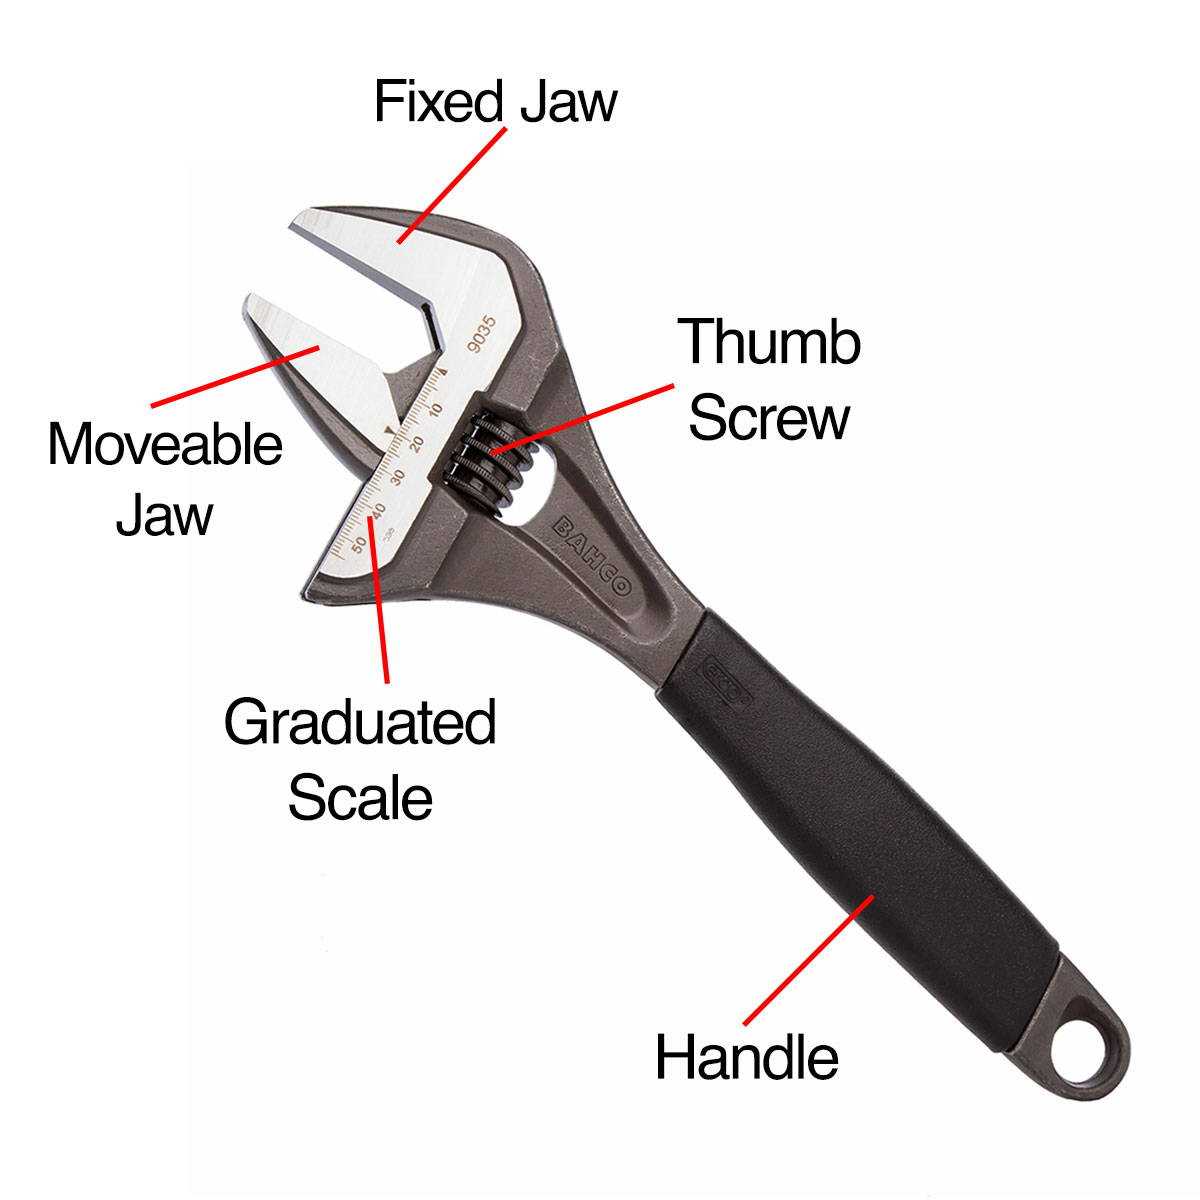
A typical crescent wrench consists of a handle and an adjustable jaw. The handle is usually made of steel or other durable materials and is designed to provide a comfortable grip. The adjustable jaw, which is the key feature of the wrench, can be moved along a track on the handle to adjust the width of the jaw opening.
The adjustable jaw is equipped with teeth that help grip the fastener securely. When the wrench is adjusted to the correct size, the teeth on the jaw dig into the fastener, providing a strong grip that allows for efficient turning and tightening.
Crescent wrenches come in different sizes, usually measured in inches or millimeters. The size of the wrench refers to the maximum jaw opening when fully adjusted. It is important to choose the right size wrench for the job at hand to ensure a proper fit and avoid damaging the fastener.
In addition to the adjustable jaw, some crescent wrenches may also feature a built-in scale to help measure the size of the fastener. This can be useful when you need to determine the size of a bolt or nut that is not labeled.
Overall, a crescent wrench is a handy tool to have in your toolbox. Its adjustability and versatility make it suitable for a wide range of applications, and its ease of use makes it a favorite among professionals and DIY enthusiasts alike.

Step 1: Adjusting the Wrench

Before using a crescent wrench, it’s important to make sure it is properly adjusted to fit the size of the nut or bolt you are working with. Follow these steps to adjust the wrench:
- Check the Size: Look at the nut or bolt you need to turn and determine the size. Crescent wrenches come in different sizes, so you’ll need to use one that matches the size of the nut or bolt.
- Locate the Adjusting Knob: The adjusting knob is usually found near the head of the wrench. It is a small wheel or dial that allows you to adjust the width of the jaws.
- Loosen the Adjusting Knob: Turn the adjusting knob counterclockwise to loosen it. This will allow you to adjust the width of the jaws.
- Adjust the Width: Hold the wrench with one hand and use your other hand to adjust the width of the jaws. Rotate the adjusting knob clockwise to make the jaws narrower or counterclockwise to make them wider.
- Fit the Wrench: Once the jaws are adjusted to the correct width, place the wrench over the nut or bolt so that the jaws fit snugly around it.
- Tighten the Adjusting Knob: Finally, turn the adjusting knob clockwise to tighten it and lock the jaws in place. The wrench should now be securely adjusted to the correct size.
Now that your crescent wrench is properly adjusted, you are ready to move on to the next step of using it.
Step 2: Choosing the Right Size
When working with a crescent wrench, it is important to choose the right size for the task at hand. Using the wrong size wrench can lead to damage or slippage, making the job more difficult or even dangerous.

1. Assess the nut or bolt: Before selecting a wrench, take a close look at the nut or bolt you need to tighten or loosen. Determine its size and shape to find the correct tool.
2. Match the wrench size: Look for the wrench markings or labels that indicate its size. Crescent wrenches typically have measurements stamped on the handle or head. Ensure the wrench size matches the nut or bolt size.
3. Consider adjustable wrenches: If you have a set of adjustable crescent wrenches, you can use the one that most closely matches the nut or bolt size. Adjust the wrench to fit snugly without any excess play.
4. Use a socket wrench for precise fits: For jobs that require more accuracy and less slippage, consider using a socket wrench with interchangeable sockets. This will provide a more secure grip on the nut or bolt.
5. Opt for a smaller wrench when in doubt: When unsure of the exact size, it is better to choose a slightly smaller wrench than a larger one. A smaller wrench can still grip the nut or bolt adequately, while a larger wrench may slip or cause damage.

By choosing the right size wrench, you can ensure a secure grip and avoid any unnecessary complications during your project.
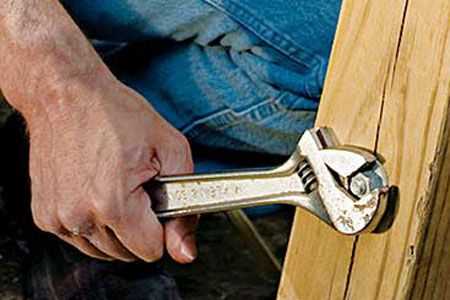
Step 3: Positioning the Wrench
Properly positioning the wrench is essential to ensure that you have a firm grip and can apply the necessary force to turn the fastener.
Follow the steps below to position the wrench correctly:
- Hold the handle of the wrench with your dominant hand. Make sure your grip is comfortable and secure.
- Position the opening of the wrench around the fastener, making sure it is fully engaged and securely fitted on the nut or bolt.
- Adjust the angle of the wrench so that you have the most leverage. This can be achieved by aligning the handle of the wrench at a 90-degree angle to the fastener.
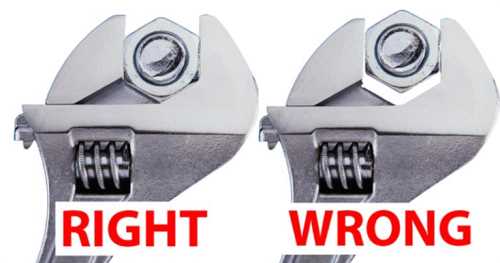
- Ensure that the jaws of the wrench are aligned parallel to the flat surfaces of the fastener to avoid slipping or rounding-off the edges.
Remember, the positioning of the wrench is crucial for proper use and to prevent accidents or damage to the fastener.
Step 4: Applying Torque

Once the crescent wrench is properly positioned on the nut or bolt, it’s time to apply torque. Torque refers to the rotational force that is applied to turn the nut or bolt. It is important to apply torque correctly in order to avoid damaging the fastener or the wrench.
To apply torque with a crescent wrench, you need to grip the handle firmly and use your wrist to turn the wrench in the direction you want to loosen or tighten. Remember to always turn the wrench in a clockwise direction to tighten and counterclockwise to loosen.
It’s important not to apply excessive force while using a crescent wrench. Applying too much force can lead to stripped or damaged fasteners, as well as potential injury. Instead, apply steady and even pressure, increasing it gradually if needed.
If you are having trouble turning the fastener, you can try using a longer handle or a cheater bar, which is a pipe or another type of extension that can be used to increase leverage. This will make it easier to apply torque and turn stubborn fasteners.
While applying torque, make sure that the wrench remains properly positioned on the fastener. If the wrench slips or loses its grip, stop immediately and reposition it before continuing. Using a wrench that is the correct size for the nut or bolt will help prevent slipping.

Once the fastener is tightened or loosened to the desired level, you can release the pressure on the wrench and remove it from the nut or bolt. Make sure to store the crescent wrench in a safe place after use.
Step 5: Loosening a Nut or Bolt
Loosening a nut or bolt is a common task that requires the use of a crescent wrench. Follow these steps to effectively loosen a nut or bolt:
- Position the crescent wrench around the nut or bolt you want to loosen. Make sure the jaws of the wrench fit securely on the flat sides of the nut or bolt.
- Hold the handle of the wrench with one hand and use your other hand to turn the knurled adjustment wheel counter-clockwise. This will open the jaws of the wrench.
- Once the jaws are open wide enough, place the wrench back on the nut or bolt and tighten the jaws by turning the knurled adjustment wheel clockwise.
- Ensure that the jaws of the wrench are securely tightened around the nut or bolt to prevent slipping.
- Hold the handle of the wrench firmly and apply force in the opposite direction of the tightening direction to loosen the nut or bolt.
- If the nut or bolt is difficult to loosen, try applying some penetrating oil or rust remover to make it easier to turn.
It’s important to note that when loosening a nut or bolt, it’s generally best to turn the wrench in short, controlled movements rather than applying excessive force all at once. This will help prevent damage to the nut or bolt and ensure a smoother loosening process.
Step 6: Tightening a Nut or Bolt
Once you have properly positioned the crescent wrench on the nut or bolt, it’s time to tighten it. Follow these steps to ensure a secure and tight connection:
- Hold the handle: Hold the handle of the crescent wrench firmly with one hand.
- Apply pressure: Use your other hand to apply pressure in the direction you want to turn the nut or bolt. Make sure to apply steady and controlled pressure.
- Turn clockwise: Rotate the handle of the wrench in a clockwise direction to tighten the nut or bolt. Depending on the size of the nut or bolt, you may need to use more force to achieve a tight connection.
- Check the tightness: After a few turns, stop and check the tightness of the nut or bolt by trying to move it with your fingers. If it still feels loose, continue tightening until it is secure.
Important: Avoid over-tightening the nut or bolt as it can lead to damage or breakage. Use your judgment or refer to the manufacturer’s instructions for the specific torque specifications.
When you have finished tightening the nut or bolt, remove the crescent wrench by reversing the steps outlined in the previous sections.
Note: Properly tightening a nut or bolt is essential for ensuring the stability and durability of the connection.
FAQ
Why is a crescent wrench an important tool to have?
A crescent wrench is an important tool to have because it is versatile and can be used for a variety of tasks, such as tightening or loosening bolts and nuts of different sizes.
What are the different parts of a crescent wrench?
A crescent wrench has a fixed jaw and an adjustable jaw, which can be moved to accommodate different sizes of bolts and nuts. It also has a handle for gripping and a worm gear for adjusting the jaws.
How do I adjust the jaws of a crescent wrench?
To adjust the jaws of a crescent wrench, you need to turn the worm gear clockwise or counterclockwise. Clockwise rotation will open the jaws, while counterclockwise rotation will close them.
What is the proper way to hold a crescent wrench?
The proper way to hold a crescent wrench is by gripping the handle firmly with one hand and using the other hand to turn the wrench in the desired direction.
How do I use a crescent wrench to tighten a bolt?
To use a crescent wrench to tighten a bolt, place the adjustable jaw of the wrench on the bolt head or nut, making sure it fits securely. Then, grip the handle firmly and turn the wrench clockwise until the bolt is tightened to the desired level.
Can I use a crescent wrench to loosen a stuck nut?
Yes, a crescent wrench can be used to loosen a stuck nut. Place the adjustable jaw of the wrench on the nut, making sure it fits securely. Then, grip the handle firmly and turn the wrench counterclockwise to loosen the nut. If the nut is very tight, applying some penetrating oil and tapping it gently with a hammer can help loosen it.
What should I do if the jaws of my crescent wrench are slipping?
If the jaws of your crescent wrench are slipping, it may be because they are worn or dirty. Try cleaning them with a wire brush or replacing them if necessary. It is also important to make sure that the jaws are properly adjusted to fit the size of the bolt or nut you are working with.
Video


Meet Harrison Clayton, a distinguished author and home remodeling enthusiast whose expertise in the realm of renovation is second to none. With a passion for transforming houses into inviting homes, Harrison's writing at https://thehuts-eastbourne.co.uk/ brings a breath of fresh inspiration to the world of home improvement. Whether you're looking to revamp a small corner of your abode or embark on a complete home transformation, Harrison's articles provide the essential expertise and creative flair to turn your visions into reality. So, dive into the captivating world of home remodeling with Harrison Clayton and unlock the full potential of your living space with every word he writes.


