Guide to Using a Gland Nut Wrench: Step-by-Step Instructions

When it comes to maintaining and repairing machinery, having the right tools is essential. One such tool that can make a job much easier is a gland nut wrench. A gland nut wrench is a specialized tool designed to tighten or loosen gland nuts, which are used to secure various components in a machine. Whether you are a professional mechanic or a DIY enthusiast, using a gland nut wrench can save you time and frustration.
The first step in using a gland nut wrench is to identify the gland nut that needs to be tightened or loosened. Gland nuts can be found in various machines, such as pumps, compressors, and engines. Once you have located the gland nut, it is important to ensure that the machine is turned off and disconnected from any power source. Safety should always be the top priority when working with any machinery.
Next, select the appropriate sized gland nut wrench for the job. Gland nut wrenches come in different sizes to accommodate the various sizes of gland nuts. It is important to choose the correct size wrench to avoid damaging the nut or the surrounding components. If you are unsure of the size, consult the manufacturer’s manual or seek professional advice.
Once you have the correct gland nut wrench, position it firmly onto the gland nut. Make sure that the wrench fits securely and snugly onto the nut to prevent slipping or rounding off the edges. If necessary, use a hammer to gently tap the wrench into place. Remember to always apply pressure in the direction that tightens or loosens the nut, as indicated by the arrow on the wrench.
Finally, using steady and controlled force, turn the wrench in the appropriate direction to either tighten or loosen the gland nut. It is important not to apply excessive force, as this can cause damage to the nut or the surrounding components. If the nut is particularly stubborn, you may need to apply a lubricant to help loosen it. Once the nut is tightened or loosened to the desired level, remove the wrench and ensure that the nut is secure.

In conclusion, a gland nut wrench is a valuable tool for anyone working with machinery. By following these step-by-step instructions, you can safely and effectively use a gland nut wrench to tighten or loosen gland nuts. Remember to always prioritize safety and consult professional advice if needed. With the right tools and knowledge, you can confidently maintain and repair machinery with ease.
What is a Gland Nut Wrench and How Does it Work?
Introduction
A gland nut wrench is a specialized tool used for tightening or loosening gland nuts on various types of machinery and equipment. It is commonly used in industrial settings, particularly in applications where fluid seals are used.
Function
The primary function of a gland nut wrench is to provide a secure grip on gland nuts, allowing users to apply the required torque without damaging the nut or the surrounding components. Gland nuts are typically used in conjunction with packing seals or gland packings to prevent fluid leakage from machines such as pumps, valves, and compressors.
Design
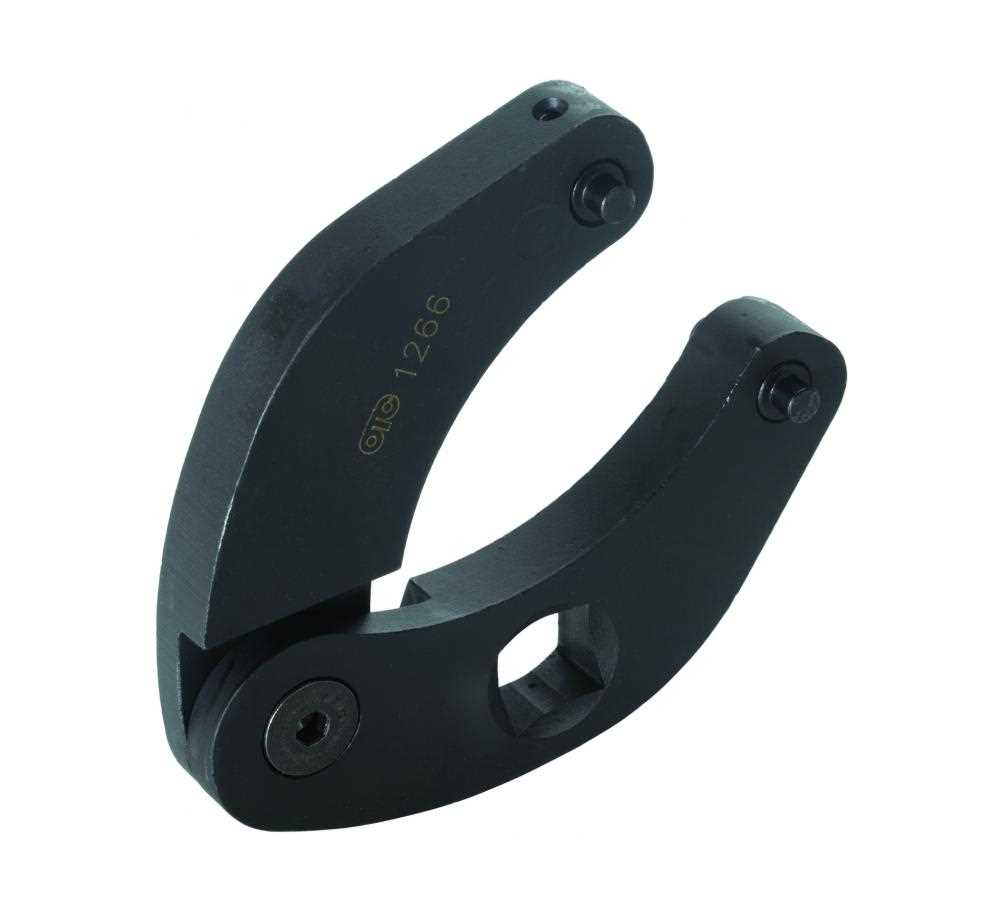
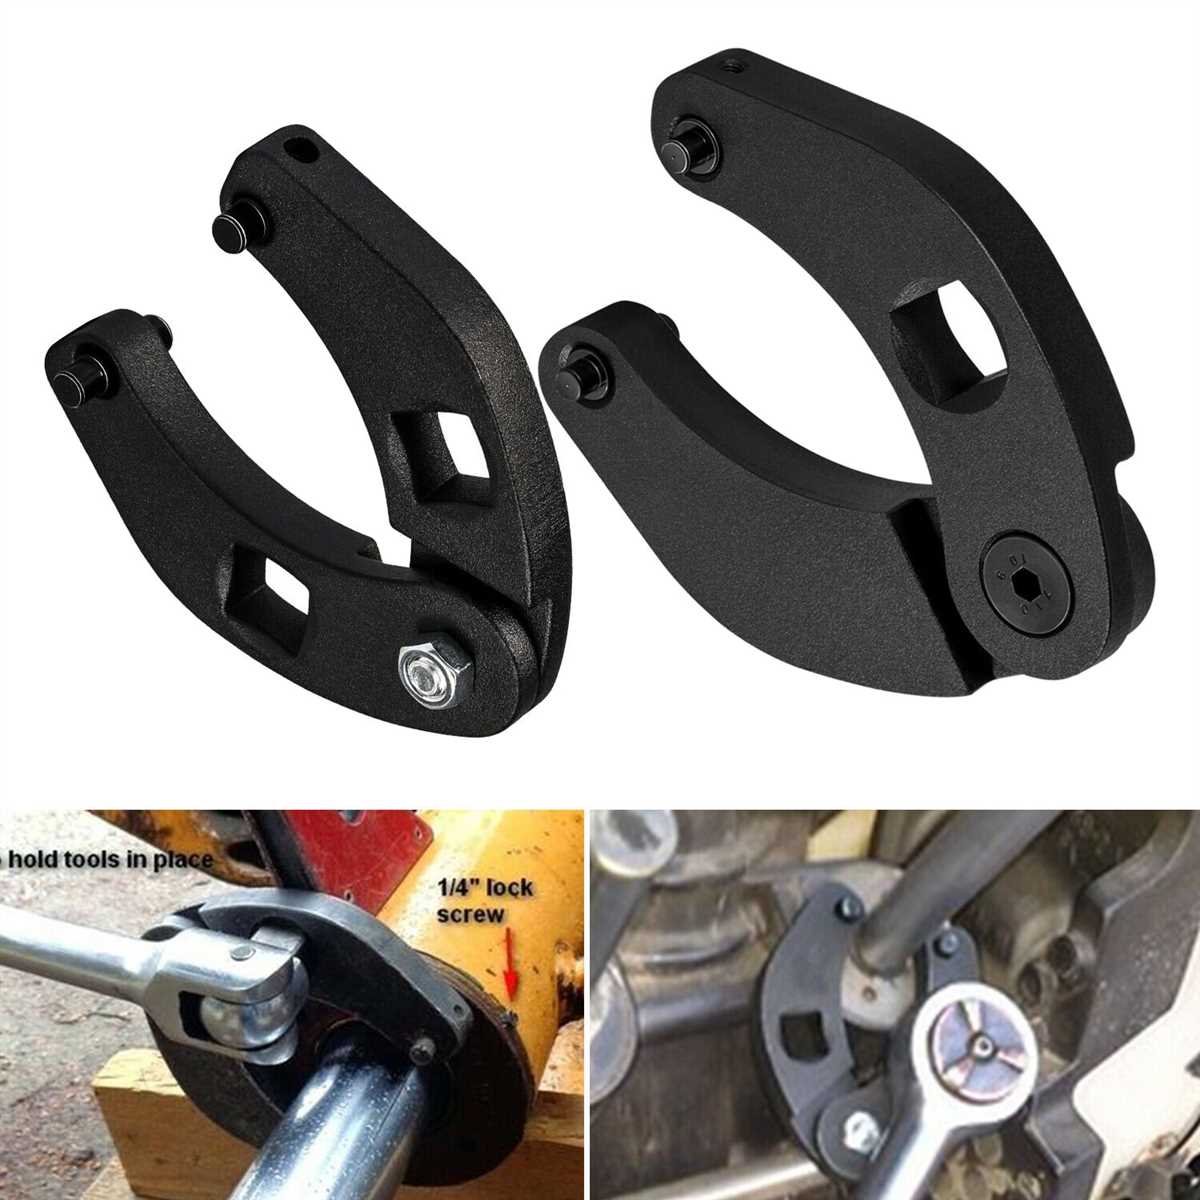
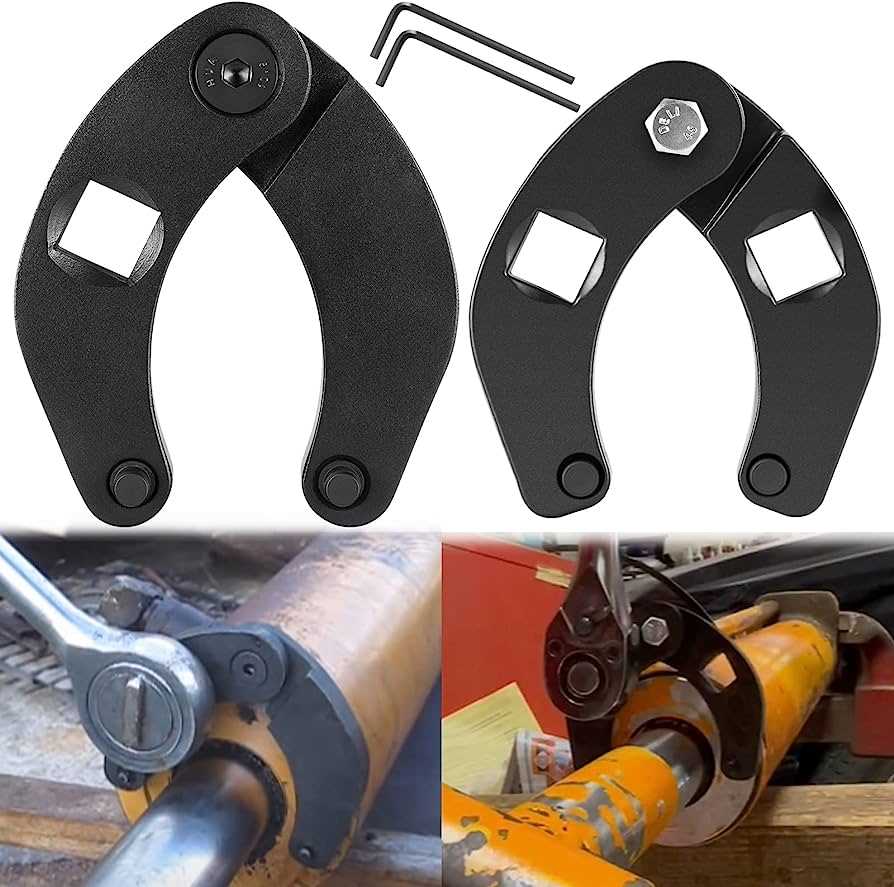
A gland nut wrench typically consists of a long handle with a specialized jaw or socket at one end. The jaw or socket is designed to fit the shape and size of the gland nut, providing a secure and precise grip. Some gland nut wrenches feature an adjustable jaw to accommodate different sizes of gland nuts.
The handle of the gland nut wrench is usually long to provide sufficient leverage for tightening or loosening the nut. This allows users to generate the required torque with minimal effort. The handle may be made of a durable material such as steel or aluminum to withstand the forces applied during operation.
Operation
To use a gland nut wrench, the user places the jaw or socket over the gland nut and ensures a secure fit. The user then applies force to the handle, either clockwise to tighten or counterclockwise to loosen the gland nut. The long handle provides the necessary leverage to generate the required torque.
It is important to use the appropriate size of gland nut wrench to ensure a proper fit on the nut. Using an incorrectly sized wrench may result in slippage or damage to the nut or surrounding components.
Gland nut wrenches are often used in conjunction with other tools, such as adjustable wrenches or pipe wrenches, to hold other parts of the machinery in place while tightening or loosening the gland nut.
Conclusion
A gland nut wrench is a valuable tool in industrial settings where gland nuts are used. It provides a secure grip and allows users to apply the necessary torque to tighten or loosen gland nuts without causing damage to the nut or surrounding components. By understanding how a gland nut wrench works and following proper operating procedures, users can safely and effectively maintain equipment that utilizes gland nuts and packing seals.
Step 1: Choose the Right Gland Nut Wrench
When using a gland nut wrench, it is important to choose the right one for the job. The wrench should be the appropriate size and type for the gland nut you are working with. Here are some factors to consider when selecting the right gland nut wrench:
- Size: Ensure that the wrench is the correct size for the gland nut. The wrench should fit snugly around the nut without any excess play. Use a measuring tool to determine the dimensions of the gland nut and choose a wrench accordingly.
- Type: There are different types of gland nut wrenches available, including adjustable wrenches, hook spanners, and pin spanners. Each type is designed for specific applications and has its own advantages. Research the different types and select one that is suitable for your specific needs.
- Material: Consider the material from which the wrench is made. Gland nut wrenches are often made from hardened steel or other durable materials. Ensure that the wrench is sturdy and able to withstand the force required to loosen or tighten the gland nut.
By choosing the right gland nut wrench, you will ensure that you have the proper tool for the job and increase your chances of success. Take the time to research and select the right wrench, as using the wrong tool can lead to damage or injury.
Step 2: Prepare the Gland Nut for Removal
Before you can remove the gland nut, you need to prepare it by following these steps:
- Turn off the machine or device that the gland nut is attached to. This will ensure your safety and prevent any accidents.
- Remove any surrounding components or covers that may be obstructing access to the gland nut. This will provide you with a clear view and easy access to the nut.
- Clean the area around the gland nut using a brush or cloth. This will remove any dirt or debris that might interfere with the removal process.
- Inspect the gland nut for any signs of damage or wear. Look for cracks, corrosion, or stripped threads. If you notice any issues, it is best to replace the nut before proceeding.
Once you have completed these preparation steps, you will be ready to proceed with the removal of the gland nut. Make sure you have all the necessary tools and equipment on hand before moving on to the next step.
Step 3: Securely Attach the Gland Nut Wrench
Once you have gathered all the necessary tools and materials, it’s time to securely attach the gland nut wrench to the gland nut. Follow these steps:
- Hold the gland nut wrench in your hand and orient it so that the prongs are facing towards the gland nut.
- Align the prongs of the wrench with the slots or holes on the gland nut. Make sure they fit snugly into the slots or holes.
- Tighten the adjustable collar on the wrench to secure the prongs in place. Use your hand to turn the collar clockwise until it is tightly locked.
- Double-check the tightness of the collar to ensure that the wrench is firmly attached to the gland nut.
It is important to ensure that the gland nut wrench is securely attached before attempting to loosen or tighten the gland nut. A loose wrench could slip or become dislodged, resulting in injury or damage to the gland nut.
Remember to always follow the manufacturer’s instructions when using a gland nut wrench. Different wrenches may have specific guidelines or requirements for attachment and use.
Step 4: Apply Force to Loosen the Gland Nut
Once the gland nut wrench is securely in place on the gland nut, you are ready to apply force to loosen the nut. This step requires physical strength and caution.
1. Begin by gripping the handle of the gland nut wrench firmly with both hands.
2. Stand in a stable position, ensuring your feet are firmly planted on the ground for balance.
3. Use your body weight to provide additional leverage. This can be done by leaning into the wrench or using your free hand to push down on the wrench handle.
4. Slowly and steadily apply force in a counterclockwise direction to loosen the gland nut. Be careful not to apply excessive force, as this could cause damage to the nut or surrounding components.
5. If the nut is particularly stubborn, you can try using a breaker bar or a length of pipe for added leverage. Simply fit the breaker bar or pipe onto the end of the gland nut wrench handle and use it as an extended lever to increase the force applied.
6. Continuously check the position of the wrench and adjust it if necessary to ensure it remains securely attached to the gland nut.
7. Keep applying force and checking the nut’s resistance until it starts to loosen. You may hear a slight click or feel resistance suddenly decrease when this occurs.
8. Once the nut starts to loosen, you can switch to using your hands to turn it the rest of the way off. Remove the gland nut wrench from the nut and continue unscrewing it until it is fully removed.
Caution: When applying force to loosen the gland nut, be mindful of your surroundings and the potential for the wrench to slip or the nut to suddenly break free. Take care to protect your hands and fingers from any sudden movement or pinch points.
Step 5: Remove the Gland Nut
Once you have successfully loosened the gland nut using the gland nut wrench, it’s time to remove it from the assembly. Follow these steps to safely remove the gland nut:
- Using your hands, carefully unscrew the gland nut from the threaded shaft.
- Be gentle and ensure that the shaft remains secure during this process to prevent any damage to the assembly.
- If the gland nut is difficult to remove by hand, you can use a wrench or pliers for added grip and leverage.
- Ensure that you turn the gland nut counterclockwise to loosen and remove it.
- Continue to unscrew the gland nut until it is completely removed from the assembly.
Once the gland nut has been removed, you can proceed with further maintenance or repair tasks if necessary.
Step 6: Inspect and Clean the Gland Nut
After removing the gland nut using the gland nut wrench, it is important to inspect it for any damage or wear. This step will ensure that the gland nut is still in good condition and suitable for use.
Inspection
Take a close look at the gland nut to check for any signs of damage, such as cracks, dents, or stripped threads. These issues can affect the performance of the gland nut and may indicate the need for replacement. If any major damage is found, it is recommended to replace the gland nut before reassembly.
Tip: Use a magnifying glass to get a detailed view of the gland nut and better identify any potential issues.
Cleaning
Before reinstalling the gland nut, it is important to clean it to remove any dirt, debris, or contaminants that may have accumulated. This will help ensure smooth operation and prevent any potential damage to the sealing surfaces.
- Start by wiping the gland nut with a clean cloth to remove any loose particles.
- Next, use a brush or another cloth dampened with a suitable cleaning solution to remove any stubborn dirt or grease.
- Ensure that all surfaces of the gland nut are thoroughly cleaned and free from any residue.
- Once cleaned, allow the gland nut to air dry or use a clean cloth to dry it off completely before reinstallation.
Note: It is important to use a cleaning solution that is compatible with the material of the gland nut to avoid any potential damage. Consult the manufacturer’s recommendations or use a mild solvent or soap solution if unsure.
Completing the inspection and cleaning process will help ensure that the gland nut is in optimal condition and ready for reassembly.
Step 7: Reassemble the Gland Nut
Once you have properly adjusted the packing and tightened the gland nut, it’s time to reassemble the gland nut and put everything back together.
To reassemble the gland nut, follow these steps:
- Take the gland nut with the packing already installed and position it over the shaft or stem of the valve.
- Slowly thread the gland nut onto the valve, making sure that it aligns properly with the threads.
- Use your gland nut wrench to tighten the gland nut securely, but be careful not to overtighten as this may cause damage to the valve.
- Check for any leaks around the gland nut area. If you notice any leaks, you may need to further tighten the gland nut.
- Once you are satisfied that the gland nut is properly tightened and there are no leaks, you can proceed to the next step of reassembling the valve.
Note: If you are replacing the packing material, make sure to remove the old packing and clean the gland nut and shaft before installing the new packing. Follow the manufacturer’s instructions for installing the new packing material.
Reassembling the gland nut is an important step in the process of using a gland nut wrench. By properly tightening the gland nut, you can ensure a leak-free seal and prevent any potential damage to the valve.
Step 8: Test the Gland Nut’s Tightness
Once you have tightened the gland nut using the gland nut wrench, it is important to test its tightness to ensure the proper functioning of the equipment. Follow these steps to test the gland nut’s tightness:
- Check for any leaks or drips around the gland nut. If there are any, it indicates that the gland nut is not tight enough and needs further adjustment.
- Using a clean cloth or paper towel, wipe away any dirt or debris around the gland nut to get a clear view.
- Inspect the gland nut for any visible signs of looseness or gaps between the nut and the gland surface. A loose gland nut may result in leakage and require further tightening.
- If the gland nut feels loose or shows signs of leakage, use the gland nut wrench to tighten it further. Be cautious not to overtighten, as it can cause damage.
- Repeat the steps to check for leaks, wipe away debris, and inspect for any signs of looseness until the gland nut is securely tightened.
Testing the gland nut’s tightness is a crucial step in the maintenance process to ensure that the equipment is functioning properly and to prevent any potential leaks or malfunctions. It is important to regularly check and adjust the gland nut as needed to ensure the optimal performance of the equipment.
FAQ
What is a gland nut wrench?
A gland nut wrench is a specialized tool designed to loosen or tighten gland nuts in certain types of machinery, such as pumps or valves. It has a unique shape that allows for a secure grip on the gland nut, making it easier to manipulate.
Why do I need to use a gland nut wrench?
You need to use a gland nut wrench because gland nuts are often tightly secured and can be difficult to loosen or tighten without the proper tool. A gland nut wrench provides the necessary leverage and grip to apply the required force without damaging the nut or the machinery.
How do I choose the right size of gland nut wrench?
To choose the right size of gland nut wrench, you need to measure the diameter of the gland nut. Most wrenches come in various sizes, so it is important to select the one that matches the diameter of your specific gland nut. Using the wrong size wrench can lead to a poor fit, causing potential damage to the nut or the tool itself.
Can I use other tools instead of a gland nut wrench?
While it is possible to use other tools to loosen or tighten gland nuts, it is not recommended. Using improper tools can lead to damage to the nut, the surrounding machinery, or even to personal injury. It is best to use a gland nut wrench specifically designed for this purpose to ensure safe and efficient operation.
Are there any safety precautions I should take when using a gland nut wrench?
Yes, there are several safety precautions you should take when using a gland nut wrench. First, make sure the machinery is properly shut off and any pressure is released before attempting to work on the gland nut. Always wear appropriate protective gear, such as gloves and safety glasses, to prevent injury. Finally, follow the manufacturer’s instructions and guidelines for using the wrench correctly to avoid accidents or damage.
Video


Meet Harrison Clayton, a distinguished author and home remodeling enthusiast whose expertise in the realm of renovation is second to none. With a passion for transforming houses into inviting homes, Harrison's writing at https://thehuts-eastbourne.co.uk/ brings a breath of fresh inspiration to the world of home improvement. Whether you're looking to revamp a small corner of your abode or embark on a complete home transformation, Harrison's articles provide the essential expertise and creative flair to turn your visions into reality. So, dive into the captivating world of home remodeling with Harrison Clayton and unlock the full potential of your living space with every word he writes.


