How to work a timer plug
If you’re like most people, you probably have multiple devices and appliances in your home that need to be turned on and off at specific times. Whether it’s your coffee machine, television, or even your lights, a timer plug can make managing these tasks much easier. With a timer plug, you can set a specific time for your devices to turn on or off automatically, saving you time and energy.
But how exactly does a timer plug work? It’s actually quite simple. A timer plug is a device that you plug into a power outlet, just like any other electrical appliance. What makes it different is that it has a built-in clock and timer, allowing you to set specific times for your devices to turn on and off. Once you’ve set the desired time, the timer plug will switch the power on or off automatically, according to your schedule.
Using a timer plug is incredibly convenient, especially if you have a busy schedule or if you frequently forget to turn off your appliances. For example, let’s say you want your coffee machine to start brewing every morning at 7 a.m. Instead of having to wake up early to prepare it yourself, you can simply set the timer plug to turn on at the desired time. By the time you get out of bed, your coffee will be ready and waiting for you!
Another advantage of timer plugs is that they can help save energy and reduce your electricity bill. By setting your devices to turn off automatically when not in use, you can avoid leaving them running unnecessarily and wasting electricity. Whether it’s your computer, television, or lamps, a timer plug can help ensure you never forget to turn them off, even when you’re not at home. So not only does it simplify your life, but it also helps you be more eco-friendly!
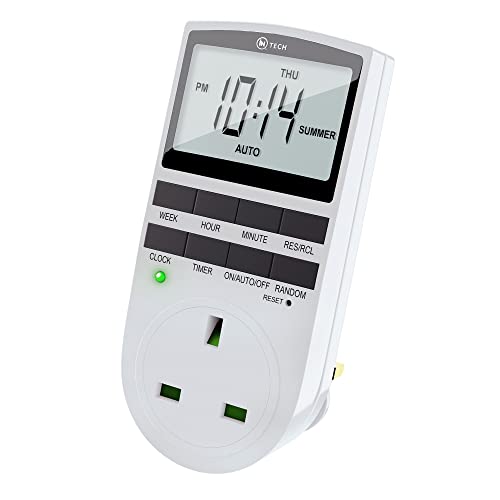
Understanding the timer plug
A timer plug, also known as a programmable plug or an electrical outlet timer, is a device that allows you to set a specific time for an electrical appliance to turn on or off automatically. It gives you control over when your devices are powered, making it a convenient tool for energy saving and home automation.

Timer plugs typically have a digital display and buttons for programming. They can be used with various appliances such as lamps, coffee machines, televisions, and heaters. By programming a timer plug, you can easily schedule when you want the appliance to start or stop working, without having to manually operate it.
When using a timer plug, it’s important to understand its features and functions:
1. Timer settings
You can set the specific time and duration for your devices to operate using the timer plug. This allows you to automate the operation of your appliances based on your daily routine or specific needs.
2. Repeat options
Some timer plugs offer repeat options, allowing you to schedule the same timing pattern daily, weekly, or on selected days of the week. This is useful for devices that need to be turned on and off consistently.
Using a timer plug is straightforward:

Step 1: Plug your timer plug into the electrical outlet.
Step 2: Connect your appliance to the timer plug.
Step 3: Set the desired time and duration using the programming buttons.
Step 4: Double-check the settings and make sure they are accurate.
Step 5: Activate the timer plug and let it do the job.

Using a timer plug not only helps save energy by reducing unnecessary power usage but also provides security by creating the illusion of an occupied home when you are away.
Make sure to follow the product’s instructions carefully and use the timer plug responsibly. Improve your energy efficiency and enjoy the convenience of automation with a timer plug.
Setting up the timer plug
Step 1: Before setting up the timer plug, plug it into an electrical outlet and make sure there is power.
Step 2: Press the “Mode” button on the timer plug. The display should show “SET” or “Off” mode.
Step 3: Use the arrow buttons to select the desired time interval for the timer plug. This will determine how long the device connected to it will be powered on.

Step 4: Once the desired time interval is selected, press the “Mode” button again and the display should show “On”.
Step 5: Connect the device you want to control with the timer plug to the plug’s outlet.
Step 6: Set the timer plug’s built-in timer switch to the “On” position. This will make sure that the device gets powered on during the selected time interval.
Step 7: Double-check all the settings and make sure they are correct. You can always refer to the product manual for further instructions.
Note: Make sure that the timer plug is within range of your Wi-Fi network for it to work properly.

Programming the timer plug
In order to properly use a timer plug, it is important to know how to program it correctly. Here are some steps to get started:
- Choose the desired schedule: Determine when you want the plug to turn on and off. This could be a specific time of day, or a duration that you want the plug to be active.
- Set the clock: Most timer plugs come with a built-in clock that you need to set. This ensures that the plug is operating according to the correct time.
- Enter the desired schedule: Using the control panel or interface, input the desired schedule for the plug. This may involve selecting specific days of the week or setting the duration for which the plug should be active.
- Activate the schedule: Once the schedule is programmed, activate it to begin the timer plug’s operation. This may involve pressing a button or confirming the desired settings.
Note: Make sure to double-check your programming to ensure that the timer plug is set to operate according to your desired schedule. It is also important to read the instruction manual provided by the manufacturer for any specific details or tips regarding programming your particular timer plug model.
Using the timer plug
To use a timer plug, follow these steps:
1. Plug in the timer plug
First, find a suitable power outlet and plug in the timer plug securely. Make sure the plug is inserted fully and there are no loose connections.
2. Set the current time
Once the plug is connected to the power source, set the current time on the timer plug. This can usually be done using the buttons or switches on the plug. Refer to the user manual for specific instructions on how to set the time.

3. Set the timer function
After setting the current time, determine the duration and timing of the device operation. Most timer plugs allow you to set the on and off times, as well as the days of the week for the timer function. Set the desired settings according to your preferences.
4. Plug in the device
Next, plug the device that you want to control with the timer plug into the receptacle on the timer plug. Ensure that the device is properly connected and securely plugged in.
5. Test the timer functionality
Before relying on the timer plug for automated operation, it’s important to test its functionality. Turn on the device and observe whether it turns off and on according to the timer settings. Make any necessary adjustments to the timer function if needed.
Additional Tips:
– Keep the timer plug away from water and moisture to avoid any electrical hazards.
– Read the user manual carefully to understand the specific features and functions of your timer plug.

| Button/Function | Description |
|---|---|
| On/Off switch | Turns the timer plug on or off |
| Time Set | Button to set the current time on the timer plug |
| Timer Set | Button to set the timer function (on/off times, days of the week) on the timer plug |
Troubleshooting the timer plug
If you are experiencing any issues with your timer plug, there are a few troubleshooting steps you can take to try and resolve the problem:
1. Check the power supply: Ensure that the timer plug is properly connected to a power source and that the outlet is functioning correctly. You can try plugging a different device into the outlet or using a different outlet to rule out any issues with the power supply.
2. Reset the timer plug: Sometimes a simple reset can fix any glitches or error messages. To reset the timer plug, unplug it from the power source for at least 30 seconds, then plug it back in and set it up again.
3. Verify the timer settings: Double-check that you have set the timer plug correctly. Ensure that the on/off times are programmed correctly and that the duration is set to your desired length.
4. Test with a different appliance/device: If the timer plug is not working with a particular appliance or device, try using it with a different one to see if the issue lies with the original device or the timer plug itself.
5. Update the firmware (if applicable): Some timer plugs can be updated with new firmware to fix any bugs or compatibility issues. Check the manufacturer’s website for any firmware updates and follow the instructions to update the device if necessary.
If you have tried all of the above steps and are still experiencing issues with your timer plug, it may be a problem with the device itself. In this case, contact the manufacturer or consult the user manual for further assistance or to inquire about warranty coverage.


Meet Harrison Clayton, a distinguished author and home remodeling enthusiast whose expertise in the realm of renovation is second to none. With a passion for transforming houses into inviting homes, Harrison's writing at https://thehuts-eastbourne.co.uk/ brings a breath of fresh inspiration to the world of home improvement. Whether you're looking to revamp a small corner of your abode or embark on a complete home transformation, Harrison's articles provide the essential expertise and creative flair to turn your visions into reality. So, dive into the captivating world of home remodeling with Harrison Clayton and unlock the full potential of your living space with every word he writes.


