How to work a bicycle pump

Riding a bicycle can be a wonderful way to stay in shape, enjoy the great outdoors and get from point A to point B with ease. However, to maintain optimal performance, it is important to keep your bicycle’s tires properly inflated. This is where a bicycle pump becomes an indispensable tool.
Learning how to use a bicycle pump may seem overwhelming at first, but with a little guidance, you will be able to inflate your tires effortlessly. In this article, we will walk you through the step-by-step process, so you can confidently pump up your bicycle tires whenever needed.
Step 1: Gather the necessary items
Before you begin pumping, make sure you have all the necessary items within reach. This includes a bicycle pump, a valve adapter (if necessary), and a pressure gauge (if your pump does not have one built-in). By having these items prepared, you can avoid interruptions during the pumping process and ensure that you achieve the correct tire pressure for a smooth ride.
Basic Steps for Working a Bicycle Pump
Working a bicycle pump may seem like a daunting task, but with a few simple steps, anyone can do it. Whether you’re a beginner or an experienced cyclist, it’s important to know how to pump up your bike tires to ensure a smooth and safe ride. Here are the basic steps for working a bicycle pump:

Step 1: Flip the bike upside down, so it rests on the handlebars and the seat. This will make it easier for you to access the valves and pump up the tires.
Step 2: Identify the valve type on your bike tires. There are typically two types of valves: Schrader valves and Presta valves. Schrader valves are the most common and look similar to the valves found on car tires, while Presta valves are longer and thinner.
Step 3: If you have Schrader valves, you can skip this step. If you have Presta valves, unscrew the tiny nut at the top of the valve by turning it counterclockwise.
Step 4: Attach the pump nozzle to the valve. Make sure it fits snugly and doesn’t wiggle, as this could result in air leakage.
Step 5: Start pumping. Push and pull the pump handle to fill the tires with air. Pay attention to the pressure gauge on the pump, and stop pumping once you’ve reached the desired pressure.

Step 6: If you have Presta valves, screw the tiny nut back on by turning it clockwise to secure the valve.
Step 7: Remove the pump nozzle from the valve. Again, make sure to do it carefully to prevent any air from escaping.
Step 8: Test the tire pressure by pressing on them with your fingers or using a tire pressure gauge. They should feel firm and not too soft or too hard.
Step 9: Repeat the process for the other tire if necessary.
Step 10: Flip the bike back upright, and you’re all set to go on your next ride!
Remember, it’s important to regularly check and maintain the air pressure in your bike tires to ensure optimal performance and prevent flats. With these simple steps, you can easily work a bicycle pump and enjoy a smooth and comfortable ride every time.
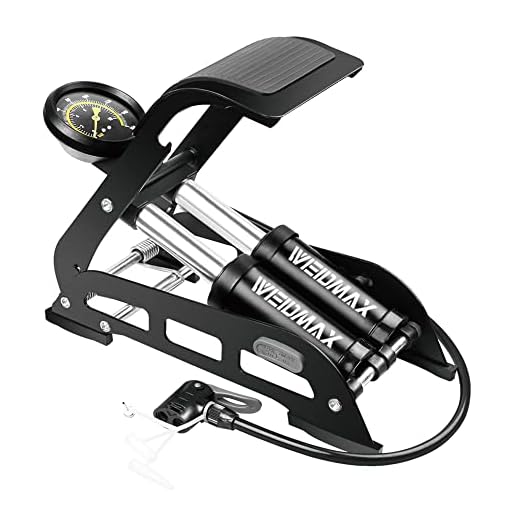
Familiarize Yourself with the Pump
Before using a bicycle pump, it’s important to familiarize yourself with the various parts of the pump. Understanding how the pump works will make it easier for you to use it effectively and efficiently.
Nozzle
The nozzle is the part of the pump that attaches to the valve on your bicycle tire. Different types of valves require different types of nozzles, so be sure to check your tire’s valve before attaching the nozzle. Some common types of valves include Presta valves and Schrader valves.
Pressure Gauge
Many bicycle pumps come equipped with a pressure gauge. This gauge allows you to monitor the air pressure as you fill your tire. Maintaining the correct tire pressure is important for optimal ride performance and safety.
Pro Tip: Keep an eye on the pressure gauge as you pump to avoid overinflating your tire.

Additionally, some pumps have a built-in pressure release valve that allows you to release excess air if needed, ensuring that you achieve the desired tire pressure.
Pro Tip: In case your pump doesn’t have a pressure gauge, it’s recommended to invest in a separate pressure gauge so you can accurately measure the pressure of your tires.
By familiarizing yourself with the different parts of the pump and their functions, you’ll be well-prepared to use it effectively and safely.
Attach the Pump to the Valve
To inflate your bicycle tire, you first need to attach the pump to the valve. The valve is a small, cylindrical component typically located on the inner tube of the tire. There are two main types of valves: Schrader valves and Presta valves. It is important to know which type your tire has before you begin attaching the pump.
If your bicycle tire has a Schrader valve, it will look similar to the valves on car tires. To attach the pump, simply remove the caps from the valve and place the nozzle of the pump onto the valve stem. Make sure it is a secure fit by pressing the nozzle down firmly. To prevent any air from escaping, you can also hold onto the nozzle with your hand.

If your bicycle tire has a Presta valve, it will look thinner and have a small nut at the top. To attach the pump, unscrew the small nut on top of the valve until it is loose. Next, remove the cap from the valve and place the nozzle of the pump onto the valve stem. Push the nozzle down onto the valve stem until it is securely attached. To ensure a tight seal, you can also tighten the nut at the top of the valve with your fingers.
Once the pump is attached to the valve, you are ready to start inflating the tire. Hold the pump with both hands and begin pumping up and down, using your body weight to apply pressure. Watch the pressure gauge on the pump to see the tire’s pressure rise. Continue pumping until you reach the desired pressure level for your bicycle tire.
Inflate the Tire
Once you have securely attached the pump nozzle to the valve, it’s time to start inflating the tire. Here’s how you do it:
- Step 1: Start by firmly pushing down on the pump handle to secure it.
- Step 2: Begin pumping the air into the tire by moving the handle up and down in a smooth motion.
- Step 3: Continue pumping until you reach your desired tire pressure. A typical road bike tire usually requires around 80-130 PSI, while a mountain bike tire requires around 30-50 PSI.
- Step 4: While pumping, keep an eye on the pressure gauge located on the pump to ensure you don’t overinflate the tire.
- Step 5: Occasionally check the tire’s firmness using your hand or a pressure gauge. If it feels too soft, continue pumping until you achieve the desired firmness.
- Step 6: Once you’ve completed inflating the tire, remove the pump nozzle from the valve by twisting it counterclockwise.
- Step 7: Make sure to close the valve cap tightly to prevent any air loss.
Remember, it’s important to regularly check and refill your bike tires with air to maintain optimal performance on the road.
Remove the Pump
Once you have finished inflating the tire, it’s time to remove the pump. Remove the pump nozzle by unscrewing it counterclockwise. Be careful not to pull on the pump too forcefully, as this could cause damage to both the pump and the valve.

After removing the pump nozzle, double-check that the valve is securely closed. You can do this by pressing down on the valve with your fingers to ensure that no air is escaping.
Then, release the lever on the pump handle if your pump has one. This will allow you to remove the pump easily without any resistance.
If you are using a floor pump, make sure to detach it from the tire by pulling it straight off. If necessary, you can use a twisting motion while pulling to help separate the pump from the valve.
Once the pump is removed, check the tire pressure one more time using a tire pressure gauge. This will ensure that the tire has been inflated to the correct pressure. If necessary, you can add or release air as needed.
| Tip: | Always remember to close the valve tightly after inflating the tire to prevent air from leaking out. |
|---|
Check the Tire Pressure
Before using a bicycle pump, it’s important to check the tire pressure. Proper tire pressure ensures smooth and safe rides, as well as optimal performance of the bicycle. Here’s how to check the tire pressure:

- Locate the valve on the inner tube of the tire. There are two types of valves commonly found on bicycles: Schrader valve and Presta valve.
- If your bicycle has a Schrader valve, you can use a regular pressure gauge to check the tire pressure. Simply press the gauge onto the valve to obtain the reading.
- If your bicycle has a Presta valve, you will need a special high-pressure gauge made for this type of valve. Unscrew the small nut on top of the valve, then press the gauge onto the valve to get the reading.
- Take note of the recommended tire pressure, which is usually indicated on the sidewall of the tire. It is important not to overinflate or underinflate the tire.
- If the tire pressure is too low, attach the pump to the valve and start pumping. Regularly check the tire pressure using the gauge until you reach the recommended level.
- If the tire pressure is too high, use a small tool or your finger to press the valve gently and release some air until the desired pressure is achieved.
Always remember to check the tire pressure before every ride to ensure a safe and comfortable biking experience.


Meet Harrison Clayton, a distinguished author and home remodeling enthusiast whose expertise in the realm of renovation is second to none. With a passion for transforming houses into inviting homes, Harrison's writing at https://thehuts-eastbourne.co.uk/ brings a breath of fresh inspiration to the world of home improvement. Whether you're looking to revamp a small corner of your abode or embark on a complete home transformation, Harrison's articles provide the essential expertise and creative flair to turn your visions into reality. So, dive into the captivating world of home remodeling with Harrison Clayton and unlock the full potential of your living space with every word he writes.


