How to make pillar candles
If you’re looking for a creative and unique way to add warmth and ambiance to your home, making your own pillar candles is a great option. Pillar candles are versatile and can be used for both decorative purposes and as a light source. Whether you’re a beginner or an experienced candle maker, this article will guide you through the process of making beautiful pillar candles.
Gather Your Supplies
To get started, you’ll need the following supplies:
– Candle wax: You can use paraffin wax, soy wax, or beeswax, depending on your preference. Make sure it is suitable for pillar candles.
– Wicks: Choose wicks that are specifically meant for pillar candles. They should be the appropriate size for the diameter of your candles.

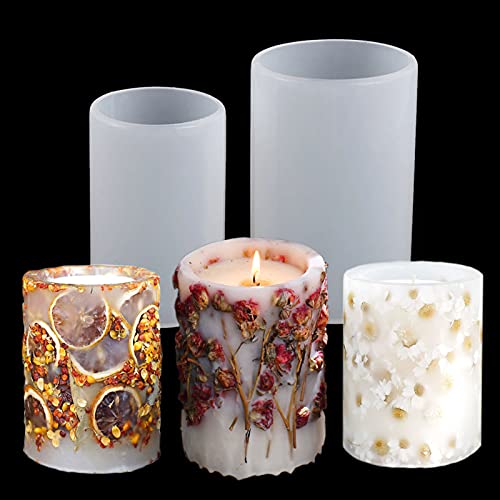
– Molds: You can use silicone molds, metal molds, or specially made plastic pillar candle molds.
Melt the Wax
To begin making your pillar candles, start by melting the wax. Place the wax in a double boiler or a pouring pitcher placed in a pot of hot water. Heat the wax slowly over medium heat until it is completely melted. Avoid overheating the wax, as this can lead to discoloration or uneven burning.
Prepare the Molds
While the wax is melting, prepare your molds by applying mold release spray or a thin layer of vegetable oil to the inside. This will make it easier to remove the candles once they are set.

Add the Wicks
When the wax has melted, dip the wick tab into the melted wax and then attach it to the bottom center of the mold. Straighten the wick so that it is centered and upright.
Pour the Wax
Slowly and carefully pour the melted wax into the prepared molds. Leave about 1/2 inch of space at the top to allow for expansion and settling of the wax. Make sure not to pour the wax too quickly, as this can cause air bubbles and may result in an uneven surface.
Let the Candles Set

Allow the candles to cool and harden completely. This can take several hours or overnight, depending on the type and size of your candles.
Remove the Candles from the Molds
Once the candles have fully set, gently remove them from the molds. Carefully push on the bottom of the mold or use a knife to loosen the edges if necessary. Your beautiful homemade pillar candles are now ready to be displayed and enjoyed!
Step-by-step guide for making pillar candles
Making pillar candles is a rewarding and creative hobby that allows you to produce beautiful and long-lasting candles. Follow this step-by-step guide to learn how to make your own unique pillar candles at home.
Materials You’ll Need:
- Paraffin wax or beeswax
- Candle wicks
- Candle molds
- Dye chips or liquid candle dye
- Fragrance oil (optional)
- Heat-resistant container
- Candle-making thermometer
- Wax adhesive or hot glue gun
- Double boiler system
- Metal spoon or stirring rod
Step 1: Prepare Your Workspace
Start by gathering all the necessary materials and setting up a clean and organized workspace. Protect the area with newspapers or a plastic mat to catch any potential spills or drips.

Step 2: Melt the Wax
- Place the wax in a heat-resistant container and melt it using a double boiler system.
- Monitor the temperature with a candle-making thermometer and heat the wax to the recommended melting point.
Step 3: Add Color and Fragrance
- If desired, add dye chips or liquid candle dye to the melted wax and stir well to distribute the color evenly.
- If you want scented candles, add a few drops of your preferred fragrance oil and mix thoroughly. Be careful not to overload the wax with the fragrance.
Step 4: Prepare the Candle Molds
Apply wax adhesive or use a hot glue gun to secure the wick to the bottom of each candle mold. Make sure the wick is centered and straight.
Step 5: Pour the Wax into Molds
- Carefully pour the melted wax into each prepared mold while holding the wick upright.
- Fill the molds to the desired height, leaving a small space at the top.
Step 6: Cool and Remove Candles
Allow the candles to cool and solidify completely. This process may take several hours or overnight.
Once the candles are completely hardened, gently remove them from the molds. If necessary, trim the excess wick to a desirable length.
Congratulations! You have successfully created your own handmade pillar candles. Now you can enjoy their beautiful glow and lovely scents.
The basics of making pillar candles
Making pillar candles can be a fun and rewarding hobby. Whether you’re a beginner or a seasoned candle maker, understanding the basics of pillar candle making is important for success. Here are a few fundamental steps to help you get started:

- Choose the right wax: Selecting the right type of wax is crucial for making pillar candles. Paraffin wax and soy wax are commonly used for this purpose, as they provide excellent burning and melting properties.
- Gather your equipment: To make pillar candles, you’ll need a few key tools such as a candle mold, wick, melting pot, thermometer, and a heat source. Make sure to have these items ready before you begin.
- Melt the wax: Place the wax in a melting pot and heat it until it completely liquifies. Keep an eye on the temperature using a thermometer to ensure that it doesn’t overheat.
- Prepare the mold and wick: Coat the inside of the candle mold with a release agent to prevent the wax from sticking. Insert the wick into the center of the mold, making sure it reaches the bottom and is held in place by a wick tab.
- Pour the wax: Carefully pour the melted wax into the prepared candle mold, avoiding any spills or splashes. Fill the mold to the desired level, leaving some space at the top for any shrinkage that may occur during cooling.
- Allow the wax to cool: Let the filled mold sit undisturbed until the wax cools and solidifies. This can take several hours, so be patient and avoid touching or moving the mold during this time.
- Unmold the candle: Once the wax has completely cooled and hardened, gently remove the candle from the mold. Trim the wick to a desired length and give your pillar candle a finishing touch, such as carving or decorating the surface.
Remember to always exercise caution when working with hot wax and open flames. Follow safety precautions and handle the materials with care. With practice and experience, you’ll be able to create beautiful pillar candles that can be enjoyed for their warm glow and delightful fragrance.
Gathering the necessary materials and equipment
Before you can start making pillar candles, you’ll need to gather the necessary materials and equipment. Here is a list of what you’ll need:
Candle Making Supplies:
- Pillar candle wax
- Candle wicks
- Metal wick holders
- Fragrance oil of your choice (optional)
- Candle dye (optional)
Tools:
- Double boiler or large heatproof container
- Thermometer
- Stirring utensil (metal or silicone)
- Scissors
- Ruler
- Heat source (such as a stove or hot plate)
- Heat-resistant work surface
It’s important to make sure that you have everything on hand before you start, as the candle-making process requires you to work quickly once the wax is melted. Double-check your supplies to ensure that you have all the necessary items. If you’re missing anything, make a note of it and purchase it before proceeding.
Once you have gathered all the materials and equipment, you’re ready to move on to the next steps in making your own pillar candles.
Preparing the Candle Molds
Before starting the process of making pillar candles, it is important to properly prepare the candle molds. This step ensures that the final candles have a smooth and professional finish.

Here are the steps to prepare the candle molds:
| 1. | Clean the molds: Make sure the molds are clean and free of any dust or debris. Use mild soap and water to wash the molds, and dry them thoroughly. |
| 2. | Wick placement: Place a wick in the center of each mold. Secure the wick in place using a wick centering device or by tying it around a pencil placed across the top of the mold. |
| 3. | Prepare the mold release agent: To ensure easy removal of the finished candles from the molds, prepare a mold release agent. This can be a thin layer of melted beeswax or a commercial mold release spray. |
| 4. | Apply the mold release agent: Using a soft cloth or brush, apply the mold release agent to the interior of each mold. Make sure to cover all surfaces, including the sides and bottom. |
| 5. | Let it dry: Allow the mold release agent to dry completely before proceeding with pouring the melted wax into the molds. This usually takes around 10-15 minutes. |
By following these steps, you will ensure that your candle molds are properly prepared and ready for pouring the melted wax. This will help in achieving candles with a smooth and professional appearance after they are removed from the molds.
Melting the wax and adding color and fragrance
Before you can create your beautiful pillar candles, you will need to melt the wax and add color and fragrance to infuse them with your desired scents and shades. Here is a step-by-step guide on how to do it:
- Start by choosing the type of wax you want to use. Popular options include paraffin wax, soy wax, and beeswax.
- Measure the amount of wax you will need based on the size and number of pillar candles you want to make. Ensure you have enough wax to fill each mold.
- Using a double boiler or a makeshift setup (such as a heatproof bowl placed over a saucepan filled with water), melt the wax over low heat. Be careful not to overheat the wax, as different types of wax have different melting points.
- Stir the wax gently and continuously as it melts, ensuring all the wax solids are fully liquefied.
- Once the wax is completely melted, remove it from the heat source.
- If desired, add candle dye to the melted wax to achieve your desired color. Start with a small amount and gradually add more until you reach the desired hue. Stir well to ensure the dye is evenly distributed.
- To add fragrance to your candles, carefully pour a few drops of candle fragrance oil into the melted wax. Start with a conservative amount and adjust to your preference. Stir well to ensure the fragrance is well blended.
- Prepare your candle molds by placing the wick in the center of each mold and securing it in place using a wick holder.
- Slowly and carefully pour the melted wax into each mold, ensuring the wick stays centered. Allow the wax to cool and solidify completely before continuing.
- Once the candles have solidified, trim the wick to the desired length and remove them from the molds. Make sure to follow proper safety protocols when handling hot wax and open flames.
Now that you have learned how to melt the wax and add color and fragrance, you are ready to move on to the next steps in making your pillar candles.
Pouring the melted wax into the molds
Once the wax has melted and reached the desired temperature, it is now time to pour it into the molds. Here is a step-by-step guide on how to properly pour the melted wax:

- Prepare the molds by coating them with a layer of mold release spray. This will help ensure that the finished candles easily release from the molds.
- If using multiple molds, line them up on a flat surface, making it easier to pour the melted wax simultaneously.
- Carefully lift the melting pitcher or container and pour the melted wax into the molds. It is essential to pour the wax slowly and steadily to prevent any spills or overflowing.
- Leave a small space at the top of each mold to allow for any potential shrinkage during the cooling process.
- If desired, this is also the time to add any additional elements to the candles, such as dried flowers, herbs, or essential oils. Simply place them in the molds before pouring the wax.
- Once all the molds are filled, set them aside in a cool, undisturbed area to allow the candles to solidify and cool down completely. This process typically takes a few hours.
- After the candles have fully cooled, gently pull the molds away from the edges of the candles, and then carefully pop the candles out of the molds. If they don’t come out easily, tapping the mold on a solid surface can help release them.
- Inspect the candles for any imperfections or air pockets, which can be fixed by re-melting and pouring additional wax into the affected areas.
- Trim the excess wick to a desirable length, usually around 1/4 inch, for optimal burning.
By following these simple steps, you can successfully pour the melted wax into the molds and create beautiful pillar candles that are ready to be enjoyed or given as thoughtful gifts. The pouring process requires patience and careful attention to detail, but the end result is worth the effort.
Finishing and decorating the pillar candles
Adding a finishing touch
Once your pillar candles have fully cooled and solidified, it’s time to add a finishing touch to make them truly unique and beautiful. Here are a few options to consider:
| Ribbons and bows | You can wrap a colorful ribbon around the base or middle of the pillar candle and tie it into a small bow. This adds a touch of elegance and can match the theme of the occasion or the room. |
| Pressed flowers | Another popular way to decorate your pillar candles is by placing small pressed flowers between the candle and the holder. This creates a delicate and nature-inspired look, perfect for spring or summer events. |
| Glitter and rhinestones | If you want to add some sparkle to your pillar candles, you can apply a thin layer of glue and sprinkle glitter on top. Alternatively, you can use adhesive rhinestones to create beautiful patterns or designs. |
Personalized labels
Another way to make your pillar candles special is by creating personalized labels. You can print your own labels with custom designs and messages, using adhesive paper or cardstock. Carefully apply the label to the side of the candle for a professional look.
Whether you choose to add a ribbon, pressed flowers, glitter, or personalize with labels, these finishing touches will make your homemade pillar candles stand out and add a special touch to any occasion or space.


Meet Harrison Clayton, a distinguished author and home remodeling enthusiast whose expertise in the realm of renovation is second to none. With a passion for transforming houses into inviting homes, Harrison's writing at https://thehuts-eastbourne.co.uk/ brings a breath of fresh inspiration to the world of home improvement. Whether you're looking to revamp a small corner of your abode or embark on a complete home transformation, Harrison's articles provide the essential expertise and creative flair to turn your visions into reality. So, dive into the captivating world of home remodeling with Harrison Clayton and unlock the full potential of your living space with every word he writes.


