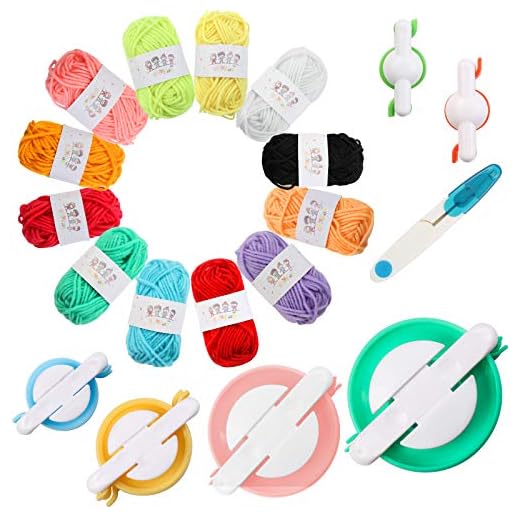
How to make a pom pom with pom pom maker

Pom poms are a fun and versatile craft supply that can be used to add a pop of color and texture to various types of projects. Whether you want to embellish a hat, decorate a sweater, or create cute accessories, making your own pom poms is a simple and enjoyable process. One of the easiest and most efficient tools to use for this is a pom pom maker.
A pom pom maker is a handy device that helps you create perfect pom poms in no time. It generally consists of two semi-circular arms with notches or slits in them, which allow you to wrap yarn around them in a specific way. By following a few easy steps, you can create fluffy and symmetrical pom poms every time!
To start, open up your pom pom maker and hold it so that the arms are facing upwards. Take your chosen yarn and place the end between the notches on one side of the maker. Make sure to leave a tail of yarn that is long enough to tie your pom pom together later on. Repeat this process on the other side of the maker, making sure that the yarn is stretched tightly across the arms.
Now, it’s time to start wrapping the yarn around the arms of the maker. Hold the loose end of the yarn with one hand to keep it in place, and use your other hand to wrap the yarn over and around one arm, then over and around the other arm. Continue wrapping the yarn in this manner until the arms of the maker are filled to your desired thickness.
Step-by-Step Guide: How to Make a Pom Pom with Pom Pom Maker
Are you looking to add some fun and fluffy decorations to your crafts? Making pom poms is a great way to add a pop of colour and texture to any project. With a pom pom maker, the process becomes even more simple and efficient. In this step-by-step guide, we will walk you through the process of making a pom pom using a pom pom maker. Let’s get started!

Materials You’ll Need:
- Pom pom maker
- Yarn in your desired colour
- Scissors
Step 1: Prepare Your Pom Pom Maker
Start by opening your pom pom maker. You should see two semi-circular arms with gaps in the middle. Align the arms together and make sure they are securely fastened.
Step 2: Wind the Yarn
Take one end of your yarn and start winding it around one half of the pom pom maker. Wind the yarn around the arms multiple times until they are nicely covered. You can use a single colour or mix different colours to create multi-coloured pom poms.
Step 3: Close the Pom Pom Maker
Once you are satisfied with the amount of yarn wrapped around, close the pom pom maker by bringing the open arms together. Make sure it snaps shut tightly to hold the yarn in place.
Step 4: Cut the Yarn
Using your scissors, cut along the groove between the two arms of the pom pom maker. Be careful not to cut the yarn too close to the closure as it may come undone. Repeat this process on the other side.
Step 5: Secure the Pom Pom
Take a piece of yarn and thread it through the groove between the two arms. Tie a tight double knot to secure the pom pom. You can leave the excess yarn for now or trim it later.

Step 6: Release the Pom Pom Maker
With the yarn securely tied, gently pull apart the two arms of the pom pom maker. Your pom pom should now be released and intact.
Step 7: Give Your Pom Pom a Trim
Examine your pom pom and trim any uneven or excess yarn to give it a nice and round shape. Fluff it up by gently pulling apart the yarn strands with your fingers and you’re done!
By following these steps, you can create beautiful pom poms using a pom pom maker. Let your creativity run wild and experiment with different colours and sizes to make your crafts stand out!
Gathering the Materials
Before you can start making your pom poms, you will need to gather a few materials. These are commonly found in craft stores or online:
1. Pom Pom Maker
A pom pom maker is a handy tool that will help you create perfectly shaped pom poms. It is typically made of plastic or metal and comes in different sizes. Choose a pom pom maker that matches the size you desire for your pom pom.
2. Yarn
You will also need yarn in your desired color or colors. The thickness of the yarn will determine the fluffiness of your pom poms. Thicker yarn will create a fuller pom pom, while thinner yarn will result in a more delicate pom pom.
Tip: Experiment with different types of yarn to create unique pom poms with various textures and colors.
3. Scissors
Scissors are essential for creating pom poms. You will use them to cut the yarn and trim any excess strands. Choose a sharp pair of scissors that are comfortable to hold.
Once you have all the necessary materials, you are ready to start making your pom poms!
Creating the Pom Pom
To start creating your pom pom, follow these simple steps:

- Open your pom pom maker and separate the two halves.
- Take your chosen yarn and begin wrapping it around one half of the pom pom maker. Make sure to wrap it tightly and evenly.
- Continue wrapping the yarn around the pom pom maker until it is completely full. The more yarn you use, the fuller your pom pom will be.
- Carefully close the pom pom maker and make sure it is securely snapped shut.
- Take your sharp scissors and insert them into the groove between the two halves of the pom pom maker.
- Begin cutting the yarn all the way around the perimeter of the pom pom maker. Make sure to cut through all the layers of yarn.
- Once you have cut all the way around, insert a length of yarn or string into the groove between the two halves of the pom pom maker.
- Tie a tight knot, making sure to firmly secure all the strands of yarn together.
- Gently pull the pom pom maker apart and remove your completed pom pom.
- Give your pom pom a few gentle shakes to fluff it up and shape it.
Congratulations! You have now created your own pom pom using a pom pom maker.
Finishing Touches and Display
Once you have finished making your pom pom using a pom pom maker, there are a few steps you can take to give it a polished look and display it in a stylish way.
Trimming
After removing your pom pom from the pom pom maker, you may notice that the strands are not all the same length. To give your pom pom a more uniform and tidy appearance, use sharp scissors to carefully trim the strands until they are all the desired length.
Fluffing
Pom poms tend to compact a bit during the trimming process. To make your pom pom look fuller and fluffier, gently fluff the strands with your fingers or gently shake it a few times.
Embellishments
If you want to add some extra flair to your pom pom, you can consider attaching ribbons, beads, or other decorative elements. Secure the embellishments with thread or glue, being careful not to add too much weight to the pom pom.

Display Ideas
There are numerous ways to showcase your finished pom pom. Here are a few ideas:
- Attach your pom poms to a piece of string or twine and create a colorful garland to hang on a wall or from a mantelpiece.
- Sew or glue the pom poms onto a plain pillow or cushion cover for a playful and stylish accent.
- Make pom pom keychains by attaching a small pom pom to a keychain ring.
- Create decorative pom pom curtains by attaching numerous pom poms to a string or rope and hanging it across a window or doorway.
- Fill a glass vase with an assortment of pom poms for a cheerful and whimsical centerpiece.
Feel free to get creative and come up with your own unique ways to display your pom poms. The possibilities are endless!


Meet Harrison Clayton, a distinguished author and home remodeling enthusiast whose expertise in the realm of renovation is second to none. With a passion for transforming houses into inviting homes, Harrison's writing at https://thehuts-eastbourne.co.uk/ brings a breath of fresh inspiration to the world of home improvement. Whether you're looking to revamp a small corner of your abode or embark on a complete home transformation, Harrison's articles provide the essential expertise and creative flair to turn your visions into reality. So, dive into the captivating world of home remodeling with Harrison Clayton and unlock the full potential of your living space with every word he writes.


