How to lay a base for a shed

When building a shed, it is essential to have a strong and sturdy base to ensure its stability and longevity. The base serves as the foundation for the shed, and without a solid base, the structure may shift, sink or even collapse over time. In this article, we will guide you through the process of laying a base for your shed, from preparing the ground to selecting the right materials and methods.
Step 1: Clear and level the ground
The first step in laying a base for a shed is to clear the area where the shed will be located. Remove any vegetation, rocks, or debris, and ensure that the ground is free from obstacles. Next, using a shovel and a level, create a level surface for the base. It is important to ensure that the ground is perfectly level to prevent any future problems with the shed’s stability and function.
Step 2: Choose the right materials
Deciding on the materials for your shed base is crucial for its longevity. There are various options available, including concrete, gravel, and paving slabs. Concrete offers a strong and durable base but may require more time and effort to construct. Gravel is cost-effective and relatively easy to install. Paving slabs are another popular choice, as they provide a solid and stable surface for the shed.
![SUBOOS Camping Lanterns Battery Operated [2 Pack] - 2X Brighter LED Camping Lights with Magnetic Base and Foldable Hook, Portable Camping Lamp for Hurricane, Emergency, Home, Shed and More](https://m.media-amazon.com/images/I/41QvynCTf1L._SS520_.jpg)
Step 3: Prepare the base
Before laying the chosen material, it is important to prepare the base properly. This includes removing any remaining debris, compacting the soil, and adding a layer of hardcore or gravel to ensure proper drainage. Additionally, using wooden formwork, create a framework to contain the material and provide stability.
By following these steps and using the right materials, you can lay a solid and stable base for your shed. Remember, a strong foundation is the first and most crucial step towards a durable and long-lasting shed.
Planning and Preparation
Before starting the process of laying a base for your shed, it is important to properly plan and prepare. This will ensure that you have a sturdy and durable foundation that will support your shed for years to come.
1. Determine the Location
The first step in planning is to determine the location where you want to place your shed. Consider factors such as the size of your shed, accessibility, and the surrounding landscape. Make sure that the area is level and provides enough space for your shed and any additional features you may want.

Note: Check with your local building codes and regulations to ensure that you are allowed to build a shed in your chosen location. You may need to obtain permits or adhere to specific guidelines.
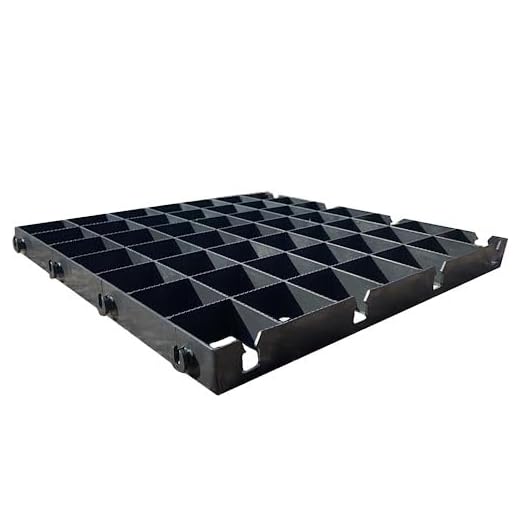
2. Choose the Type of Base
Next, you will need to decide on the type of base that best suits your needs. The four most common types of shed bases are concrete slabs, timber frame bases, plastic shed bases, and paving slab bases. Each type has its own advantages and disadvantages, so consider factors such as cost, construction difficulty, and durability when making your choice.
Concrete slabs provide a solid and stable foundation but require more time and effort to construct. Timber frame bases are easy to build and can be adjusted if needed, but they may not be as sturdy as concrete slabs. Plastic shed bases are lightweight and environmentally friendly, but they may not be as durable as other options. Paving slab bases are quick and easy to install, but they may not provide as solid of a foundation.
3. Prepare the Ground
Once you have chosen the type of base, you will need to prepare the ground. Start by removing any existing vegetation, rocks, or debris from the area. Use a shovel, rake, or a power tool such as a tiller to level the ground. Remove any bumps or high spots, and fill in any low areas with soil or gravel to create a level surface.
Note: Make sure to check the ground for drainage and moisture issues. If the area tends to hold water or becomes too muddy, you may need to consider drainage solutions or install a layer of gravel or sand to improve stability.

Finally, use a string or marking paint to outline the exact dimensions of the shed base on the ground. This will help you visualize the space and make any necessary adjustments before you start building.
Site Selection:
Choosing the right location for your shed is a crucial step in the building process. The site selection will determine the stability and longevity of your shed, so it’s important to take some time to consider a few key factors before you start. Here are some tips to help you choose the perfect site for your shed:
|
Type of Shed: |
Consider the type of shed you will be constructing. Are you building a garden shed or a larger storage shed? The size and purpose will affect where you can place it. A garden shed may be best placed near a water source, while a storage shed can be placed in a corner of your property. |
|
Ground Slope: |
Ensure the chosen site is level and has a minimal slope. A large slope can cause issues during construction and make your shed unstable. If the ground is not level, you may need to consider leveling it before building the shed. |
|
Accessibility: |
Consider the accessibility of your shed. You will want it to be easily accessible for both construction purposes and future use. Ensure there is enough space around the shed for easy maneuvering and maintenance. |
|
Sun Exposure: |
Determine the amount of sun exposure the shed will receive throughout the day. Some items may be affected by excessive sun exposure or require certain conditions. Take this into account when selecting your shed’s location. |
|
Drainage: |
Good drainage is essential for the longevity of your shed. Ensure the site is properly drained to avoid water accumulation, which can cause damage to your shed’s foundation. Avoid placing your shed in low-lying areas that are prone to flooding. |


By considering these factors and selecting the right site for your shed, you can ensure its stability and longevity. Take your time to assess your options and choose a location that meets all your needs.
Clearing and Leveling:
Before you start laying the base for your shed, it is essential to clear and level the area where it will be placed. Failure to do so may result in your shed not being level or stable.
Clearing the Area:
Begin by clearing any debris, rocks, or vegetation from the area where you plan to place your shed. This will provide a clean and even surface for your base. Using a rake or shovel, remove any grass or roots that may be present. It is important to ensure that the entire area is free from any obstructions.
Leveling the Area:
Once the area is clear, use a long straightedge, such as a 2×4 board, to check for any unevenness or slopes. Place the straightedge in different areas of the cleared space and examine if there are any gaps or low spots. If you notice any inconsistencies, you will need to level the area.
| Steps to Level the Area: |
|---|
| 1. Once you have identified the low spots, use a shovel to fill them with soil or gravel to bring them up to the desired level. |
| 2. After filling in the low spots, use a tamper or compactor to firmly pack the soil or gravel to ensure a stable and level surface. Repeat this process until the entire area is level. |
| 3. Check the levelness of the area using your straightedge, making sure that there are no gaps or slopes remaining. |
| 4. If necessary, make any additional adjustments to ensure a completely level surface. This is crucial as it will provide a solid foundation for your shed. |
By properly clearing and leveling the area, you can ensure that your shed has a stable and flat base, allowing for easier installation and a longer lifespan.
Base Construction
Constructing a solid and level base is essential for the stability and longevity of your shed. Follow these steps to ensure a sturdy foundation for your shed:
1. Site Preparation
Choose a flat and well-drained location for your shed base. Clear the area of any debris, including rocks, roots, and vegetation.
2. Marking the Perimeter
Using stakes and a string, mark the perimeter of your shed base. Make sure the corners form right angles and the dimensions match the size of your shed.

Check that the perimeter is square by measuring diagonally from each corner. The measurements should be equal.
3. Excavation
Dig a hole within the marked perimeter to a depth of about 4-6 inches. Ensure the bottom of the hole is level and free from any bumps or inconsistencies.
Remove any excess dirt from the hole and tamp down the soil using a tamper. This will help to compact the soil and provide stability.
4. Installing Gravel
Add a layer of gravel to the excavated hole, approximately 2-3 inches thick. Spread the gravel evenly, making sure it covers the entire base.
Use a rake or shovel to level the gravel and ensure there are no high or low spots. Tamp down the gravel layer to compact it and create a firm base.
5. Adding a Weed Barrier
Place a weed barrier fabric over the compacted gravel. This will help to prevent weeds from growing through the base and ensure proper drainage.
Cut the weed barrier to fit the dimensions of your shed base and secure it in place using landscaping staples or nails.
6. Adding a Layer of Sand
Add a layer of sand over the weed barrier fabric. Aim for a depth of 1-2 inches and spread the sand evenly across the base.
Use a rake or shovel to level the sand, ensuring it is smooth and even. This will provide a stable surface for your shed.
Your shed base is now ready for the construction of your shed. Follow the manufacturer’s instructions to assemble and anchor your shed to the base.


Meet Harrison Clayton, a distinguished author and home remodeling enthusiast whose expertise in the realm of renovation is second to none. With a passion for transforming houses into inviting homes, Harrison's writing at https://thehuts-eastbourne.co.uk/ brings a breath of fresh inspiration to the world of home improvement. Whether you're looking to revamp a small corner of your abode or embark on a complete home transformation, Harrison's articles provide the essential expertise and creative flair to turn your visions into reality. So, dive into the captivating world of home remodeling with Harrison Clayton and unlock the full potential of your living space with every word he writes.


