How to join sleepers together

If you are planning to use railway sleepers for a landscaping project or to build a garden feature, you may need to join them together to create a longer or wider structure. Joining sleepers together can be done in various ways, depending on your needs and the materials you have available. Whether you want a simple join or a more robust connection, it’s important to choose a method that will provide stability and durability for your project.
One common method of joining sleepers is using metal brackets. Metal brackets are often used for creating straight lines or right angles. They are typically screwed or bolted into the ends of each sleeper to hold them together securely. This method is relatively simple and provides a strong connection, but you will need additional materials and tools to complete the job.
If you prefer a more traditional and rustic look for your joining method, you can use wooden dowels. Wooden dowels can be inserted into drilled holes in the ends of the sleepers to connect them together. This method requires precision and care to ensure the dowels are aligned properly. Using dowels can give your project a charming and natural appearance that blends well with outdoor surroundings.
Another option for joining sleepers is using timberlok screws or decking screws. These screws are specifically designed for fastening wood together. They have a coarse thread that bites into the sleeper, creating a secure connection. Timberlok screws are especially useful for connecting large sleeper sections or when building raised beds. Make sure to check the specifications of the screws you choose and follow the manufacturer’s instructions for proper installation.
What You Need to Join Sleepers Together
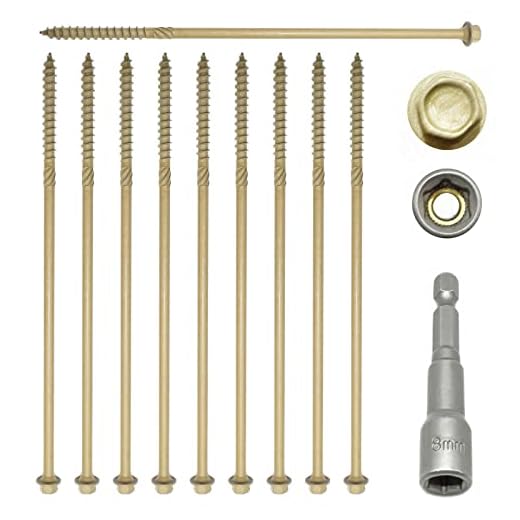
If you are looking to join sleepers together to build a sturdy structure, there are a few essential items you will need. These tools and materials will help you create a solid and secure connection between the sleepers:

- An electric drill or screwdriver
- Galvanised coach screws
- Washers
- A spirit level
- A tape measure
- A pencil or marker
- Safety goggles
- Protective gloves
The electric drill or screwdriver will be used to make the necessary holes in the sleepers for the coach screws. Galvanised coach screws are highly recommended as they are durable and resistant to corrosion, which is essential for outdoor projects.
Using washers is important to ensure a secure connection and prevent the screws from loosening over time. The washers will distribute the load evenly and provide extra stability.
A spirit level will help you ensure that the sleepers are aligned correctly and that the structure is level. This is essential for safety and the overall appearance of the project.
A tape measure should be used to measure the distance between the sleepers and ensure accurate and even spacing. This will help create a well-balanced structure.
Using a pencil or marker to mark the positions for drilling and screwing is important for precision and consistency.

Wearing safety goggles and protective gloves is crucial to protect your eyes and hands from any potential injuries while handling the tools and materials.
By having these tools and materials on hand, you will be well-equipped to join sleepers together and create a strong and durable structure for your project.
Preparation for Joining Sleepers
Before joining sleepers together, it is important to properly prepare the area and the sleepers themselves. Follow these steps to ensure a successful and sturdy joint:
- Clear the area: Remove any debris, dirt, or vegetation from the area where the sleepers will be joined. This will help to create a clean surface for the joint.
- Inspect the sleepers: Check each sleeper for any cracks, warping, or damage. It is essential to use sleepers that are in good condition to ensure a strong connection.
- Measure and mark: Determine the desired length and position of the joint. Use a measuring tape to mark the exact spot where the sleepers will be cut. This will ensure a precise and straight joint.
- Gather the necessary tools: Before beginning the joining process, make sure you have all the necessary tools on hand. This may include a circular saw, measuring tape, clamps, drill, screws, and sandpaper.
- Cut the sleepers: Using a circular saw, carefully cut the sleepers along the marked lines. Take your time to ensure that the cuts are straight and accurate.
- Sand the cut edges: After cutting the sleepers, use sandpaper to smooth out any rough edges or splinters. This will help create a seamless and safe joint.
- Fit the sleepers together: Once the sleepers are cut and sanded, fit them together to check the accuracy of the joint. Make any adjustments if needed to ensure a tight fit.
By following these preparation steps, you will be ready to successfully join sleepers together for your project.
Measuring and Cutting the Sleepers
To join sleepers together, it is essential to measure and cut them accurately. Before starting, gather all the necessary tools, such as a tape measure, marker, and a saw. Here is a step-by-step guide on how to measure and cut the sleepers:

- Measurements: Measure the length of the area where you want to join the sleepers. Write down the measurements and double-check their accuracy.
- Marking: Use a marker to mark the measured dimensions directly on the sleepers. Make sure to use a straight edge, like a ruler or a long piece of wood, to ensure accurate markings.
- Cutting: Carefully cut the sleepers along the marked lines using a saw. Follow the manufacturer’s instructions for the specific type of saw you are using to ensure a clean and precise cut.
- Sanding: After cutting the sleepers, use sandpaper or a power sander to smoothen any rough edges. This will prevent any injury during the joining process.
- Applying a Bevel: If you are joining sleepers at an angle, apply a bevel cut to the ends of the pieces before joining them. This will allow a secure fit and better structural stability.
- Checking Fit: Once the sleepers are cut and sanded, check the fit by placing them next to each other or in their intended position. Ensure they align properly and adjust as necessary.
Remember, precise measurements and accurate cuts are crucial for a successful join. Take your time during this step to ensure the best possible outcome for your project.
Choosing the Right Joining Method
There are several factors to consider when choosing the right joining method for sleepers:
1. Wood type: Depending on the type of wood used for the sleepers, certain joining methods may be more suitable. For instance, if you are working with hardwood sleepers, traditional joinery methods like mortise and tenon or dovetail joints can provide a strong and durable connection. On the other hand, if the sleepers are made of softwood, simpler methods like screws or nails may be sufficient.
2. Aesthetic preference: Another crucial factor to consider is the desired appearance of the connection. Some joining methods, like hidden fasteners or adhesives, can create seamless and clean-looking joints. Others, such as visible screws or decorative joinery, can add a touch of character and interest to the overall design.
3. Level of expertise: It is important to consider your own level of experience and skill when selecting a joining method. Sophisticated joinery techniques may require advanced woodworking knowledge, while simpler methods like brackets or connectors can be more beginner-friendly.

4. Durability: If you are planning to build a structure that will be subject to heavy loads or frequent use, it is crucial to choose a joining method that can withstand the anticipated stress. Reinforced methods like dowels or steel plates can provide extra strength in such cases.
5. Flexibility: Lastly, consider the potential need for disassembly or modification in the future. Joining methods like screws or metal connectors offer easier disassembly if you plan on reconfiguring or relocating the sleepers later on.
By taking into account these factors and determining your specific needs, you can choose the most appropriate joining method for your sleeper project. Remember to always prioritize safety and consult professional advice if needed.
Step-by-Step Guide to Join Sleepers with Screws
Joining sleepers together using screws is a reliable method that ensures they stay secure and in place. By following these simple steps, you can easily join sleepers together and create a sturdy structure.
- Measure and mark: Start by measuring the length at which you want to join the sleepers. Use a measuring tape to mark the spots on both sleepers where the screws will go.
- Drill pilot holes: Using a drill with an appropriate bit size, drill pilot holes into the marked spots on both sleepers. Pilot holes prevent the wood from splitting when the screws are driven in.
- Add wood glue(optional): For extra strength, you can also add wood glue before joining the sleepers together. Apply a thin layer of wood glue along the edges where the sleepers will be joined.
- Align the sleepers: Place the sleepers in the desired position and align them carefully. Make sure that the pilot holes on both sleepers match up perfectly.
- Insert screws: Take screws of appropriate length and insert them into the pilot holes. Use a screwdriver or a drill to turn the screws clockwise and drive them into the sleepers. Make sure to drive the screws all the way to the end.
- Repeat the process: If you are joining more than two sleepers together, repeat steps 1-5 for each additional sleeper. Ensure that all the pilot holes match up correctly.
- Inspect and finish: Once all the screws are in place, inspect the joined sleepers for any gaps or misalignments. If necessary, use a rubber mallet or a hammer with a piece of scrap wood to gently tap the sleepers into place. Sand any rough edges and apply a protective finish if desired.
Following these steps will allow you to securely join sleepers together with screws. Remember to always take proper safety precautions and use the appropriate equipment when working with power tools. Happy building!

Step-by-Step Guide to Join Sleepers with Dowels
The process of joining sleepers with dowels involves securely attaching two or more sleepers together to create a solid and sturdy structure. This guide will provide you with step-by-step instructions on how to complete this project effectively.
Materials You Will Need:
- Sleepers of suitable length for your project
- Dowels of appropriate size and quantity
- Measuring tape or ruler
- Pencil or marker
- Drill with a suitable bit
- Clamps
- Saw (optional)
- Sandpaper (optional)
Step 1: Measure and Mark
Start by measuring and marking the positions where the sleepers will be joined. Use a measuring tape or ruler to ensure precise and uniform spacing. Make sure to mark both ends of each sleeper.
Step 2: Drill Holes
Using a drill with a suitable bit, create holes at the marked positions on the sleepers. The diameter of the holes should match the size of the dowels you will be using. Make sure the holes are straight and centered.
Step 3: Insert Dowels
Apply some wood glue to the dowels and insert them into one sleeper at a time. Use a mallet or hammer to gently tap the dowels into place. Make sure the dowels are fully inserted and aligned with the drilled holes.
Step 4: Join Sleepers
Once all the dowels are inserted, align the second sleeper with the dowels and slide it into place. Ensure that the dowels are inserted into the holes of the second sleeper. Use clamps to hold the sleepers in place and to provide extra pressure for a secure fit.
Step 5: Secure Sleepers
If desired, you can further secure the sleepers by adding screws or nails through the joined area. This will provide additional strength and stability to the structure. Use a saw to trim the excess length of the dowels if necessary.
Repeat these steps for any additional sleepers that need to be joined together. Once the construction is complete, allow sufficient time for the wood glue to dry and set before removing the clamps and using the assembled structure.
By following these step-by-step instructions, you can successfully join sleepers together with dowels, creating a solid and durable structure for your project.

Tips on Maintaining Joined Sleepers
When joining sleepers together to create a larger structure, it is important to ensure that they are properly maintained to ensure their longevity and stability. Here are some tips on maintaining joined sleepers:
1. Regularly inspect the joined sleepers
Inspecting the joined sleepers regularly will help you identify any signs of damage or wear and tear. Look for any cracks, loose connections, or signs of rot. If you notice any issues, address them promptly to prevent further damage.
2. Clean the joined sleepers
Keeping the joined sleepers clean will help prevent the buildup of dirt, grime, and algae, which can accelerate deterioration. Regularly scrub the sleepers with a broom or stiff brush to remove any debris. You can also use a mild detergent and water solution for tougher stains.
3. Treat the joined sleepers
Applying a suitable treatment to the joined sleepers can help protect them from moisture, sunlight, and other environmental factors that can cause damage. Use a wood preservative or a suitable sealant to provide a protective layer. Follow the manufacturer’s instructions for application and reapplication.
4. Maintain proper drainage
Poor drainage can lead to water pooling around the joined sleepers, which can cause them to deteriorate more quickly. Make sure that the area around the sleepers has proper drainage. Clear any leaves, debris, or other materials that might obstruct water flow to prevent water from accumulating.
5. Avoid placing heavy loads
Excessive weight or pressure on the joined sleepers can cause them to shift or break. Avoid placing heavy loads, such as large furniture or machinery, directly on the sleepers. If you need to place something heavy on them, consider using supports or additional reinforcements to distribute the weight evenly.
- Inspect the joined sleepers regularly
- Clean the joined sleepers
- Treat the joined sleepers
- Maintain proper drainage
- Avoid placing heavy loads
By following these tips, you can maintain the joined sleepers in good condition, ensuring their strength and durability over time.

How to set ooo in outlook app

Meet Harrison Clayton, a distinguished author and home remodeling enthusiast whose expertise in the realm of renovation is second to none. With a passion for transforming houses into inviting homes, Harrison's writing at https://thehuts-eastbourne.co.uk/ brings a breath of fresh inspiration to the world of home improvement. Whether you're looking to revamp a small corner of your abode or embark on a complete home transformation, Harrison's articles provide the essential expertise and creative flair to turn your visions into reality. So, dive into the captivating world of home remodeling with Harrison Clayton and unlock the full potential of your living space with every word he writes.


