How to fit washing machine waste pipe

The waste pipe is a crucial component in any washing machine installation. It is responsible for draining the dirty water from the washing machine into the sewer or a drain. If not properly installed, it can lead to leaks, blockages, and potential water damage to your home.
In this article, we will guide you step by step on how to fit a washing machine waste pipe, ensuring that it is securely connected and functioning correctly. We will cover the necessary tools and materials, common installation mistakes to avoid, and provide useful tips along the way.
Before starting the installation process, it is important to note that local building codes and regulations may vary. Therefore, it is always recommended to consult with a professional plumber or adhere to your local plumbing guidelines to ensure compliance.
How to Install Washing Machine Waste Pipe
Installing a washing machine waste pipe is an essential task when connecting your washing machine to the plumbing system. It allows wastewater to flow out of the machine and into the sewer or septic system. Follow the step-by-step guide below to properly install the waste pipe for your washing machine.
Materials Needed:
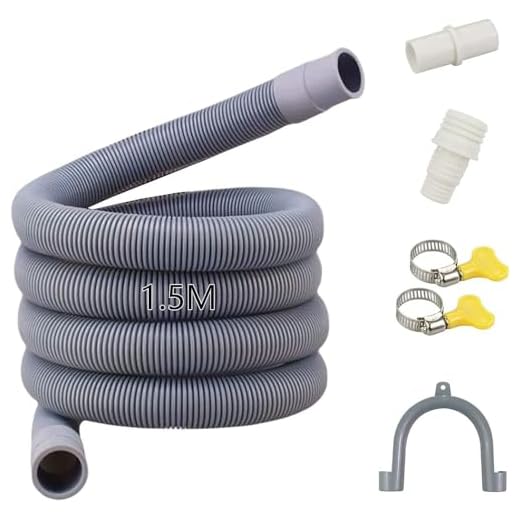
- Waste pipe
- Compression fittings (if needed)
- Measuring tape
- Hacksaw
- PVC primer and cement
- Tape measure
- Pipe brackets or clips
- Screwdriver
- Adjustable wrench
Step 1: Measure and Cut the Waste Pipe
Begin by determining the length of the waste pipe needed to connect the washing machine to the drain. Measure the distance from the back of the machine to the drain outlet. Use a hacksaw to cut the waste pipe to the desired length, ensuring a precise and snug fit.

Step 2: Connect the Waste Pipe to the Washing Machine
Next, attach one end of the waste pipe to the outlet on the back of the washing machine. If the machine has a threaded outlet, use compression fittings to securely fasten the pipe. If the outlet is smooth, you can use a hose clamp or cable tie to hold the pipe in place.
Step 3: Connect the Waste Pipe to the Drain
Now, connect the other end of the waste pipe to the drain. Use PVC primer and cement to join the pipe securely to the drain. Apply the primer to the pipe and drain, then apply the cement to both surfaces. Insert the pipe into the drain, twisting slightly to create a watertight seal.
Step 4: Secure the Waste Pipe
To ensure stability and prevent any movement, use pipe brackets or clips to secure the waste pipe to the wall or floor. This will prevent any strain on the pipe, ensuring longevity and preventing leaks.
With these simple steps, you can successfully install a waste pipe for your washing machine. Remember to double-check all connections for leaks and test the machine after installation to ensure proper drainage. If you are unsure about any step or encounter difficulties, it is always wise to consult a professional plumber.
Necessary Tools
Before you begin fitting a washing machine waste pipe, you will need to gather a few tools to ensure the process goes smoothly. Having the right tools on hand will help you complete the task quickly and efficiently.

1. Pipe cutters
Pipe cutters are essential when fitting a washing machine waste pipe as they allow you to cut the pipe to the required length. It’s important to use a professional pipe cutter to ensure clean and accurate cuts.
2. Pipe wrench
A pipe wrench is needed to tighten and secure the fittings. Make sure to use an adjustable pipe wrench so that it can accommodate different pipe sizes.
| Additional Tools |
|---|
| Teflon tape |
| Hacksaw |
| Measuring tape |
| Pipe fittings |
| Screwdriver |
| Pipe adhesive (if needed) |
| Bucket |
| Cleaning materials |
These additional tools will come in handy during the installation process. Teflon tape is used to create leak-proof connections, while a hacksaw is necessary for cutting pipes in tight spaces. A measuring tape helps ensure accurate measurements, and various pipe fittings may be required to connect the waste pipe securely. A screwdriver may be needed to tighten screws or remove parts, and pipe adhesive may be necessary to attach pipes together. Finally, a bucket and cleaning materials are necessary to clean up any water or spills during the installation. With these tools, you’ll be well-equipped to fit a washing machine waste pipe.
Preparing the Area
Before fitting the washing machine waste pipe, it is important to prepare the area where the pipe will be installed. Proper preparation will ensure a secure and leak-proof connection.
1. Clear the area: Begin by removing any obstacles or debris from the area where the washing machine will be placed. This includes moving any furniture or appliances that may be in the way.

2. Measure and mark: Measure the distance from the washing machine to the drain pipe, and mark this measurement on the wall. This will help ensure that the waste pipe is cut to the correct length.
3. Shut off the water: Before proceeding with any installation work, it is important to shut off the water supply to the washing machine. This can usually be done by locating the shut-off valve on the water supply line and turning it clockwise until it is fully closed.
4. Gather the necessary tools: Before continuing, gather all the tools and materials you will need for the installation. This may include a wrench, pipe cutter, pipe fittings, plumber’s tape, and a bucket to catch any water that may leak during the installation process.
5. Protect the floor: To protect the floor from any potential water damage, place a plastic sheet or towel underneath the washing machine and the area where the waste pipe will be installed.
6. Read the manufacturer’s instructions: It is always important to carefully read and follow the manufacturer’s instructions for fitting the washing machine waste pipe. This will ensure that you install the pipe correctly and avoid any potential issues or damage.
By properly preparing the area before fitting the washing machine waste pipe, you can ensure a smooth and successful installation process.
Connecting the Pipe
Once you have positioned your washing machine and located the waste pipe opening, it’s time to connect the waste pipe.
Step 1: Measure and Cut
First, measure the distance between the waste pipe opening and the washing machine outlet. Use a hacksaw to cut the waste pipe to the appropriate length. Make sure to remove any burrs or rough edges from the cut end of the pipe.
Step 2: Attach a Straight Connector
Slide a straight connector onto the cut end of the waste pipe. Ensure that it is pushed all the way up to the end of the pipe.
In some cases, you may need to use a rubber sleeve or seal to ensure a watertight connection between the waste pipe and connector. If this is required, slide the rubber sleeve onto the waste pipe before attaching the straight connector.

Step 3: Connect to the Washing Machine Outlet
Attach the other end of the straight connector to the washing machine outlet. Ensure that it is pushed firmly onto the outlet.
If necessary, use a screwdriver or clamp to tighten the connector and secure it in place.
Verify that the connection between the waste pipe and washing machine outlet is tight and secure to prevent any leaks or water damage.
Once the pipe is connected, make sure it is well-supported and secured to prevent any strain or potential damage to the connection during regular use.
Testing and Finishing
Once you have connected the waste pipe to the main drainage system and attached the drainage adapter to the washing machine, it is important to test the installation to ensure that it is functioning properly. To do this, follow these steps:

- Check for leaks: Turn on the tap and let the machine start a cycle. Inspect the connections and joints for any signs of dripping or leakage. If you notice any leaks, tighten the connections or replace any damaged parts before proceeding.
- Test the drainage: Once the machine has finished a cycle, open the door and examine if the water drains out completely. If you notice any blockages or slow drainage, there may be an issue with the installation. Check the waste pipe for any obstructions and remove them if necessary.
- Secure the pipe: Make sure that the waste pipe is securely attached to the wall or floor. Use appropriate pipe clips or brackets to fasten it in place. This will prevent any unnecessary movement or accidental disconnection during use.
After performing these tests and ensuring that everything is working correctly, you can finish the installation by tidying up the area around the washing machine. Use cable ties or tape to neatly secure any loose wires or hoses and place a drain cover over the waste pipe to prevent any debris from entering the drainage system.
Remember, it is always a good idea to refer to the manufacturer’s instructions for specific guidelines on fitting your washing machine waste pipe.

Meet Harrison Clayton, a distinguished author and home remodeling enthusiast whose expertise in the realm of renovation is second to none. With a passion for transforming houses into inviting homes, Harrison's writing at https://thehuts-eastbourne.co.uk/ brings a breath of fresh inspiration to the world of home improvement. Whether you're looking to revamp a small corner of your abode or embark on a complete home transformation, Harrison's articles provide the essential expertise and creative flair to turn your visions into reality. So, dive into the captivating world of home remodeling with Harrison Clayton and unlock the full potential of your living space with every word he writes.


