How to fit lino in a bathroom

Renovating a bathroom can be an exciting but daunting task. One important aspect of bathroom renovation is choosing the right flooring material. Linoleum, commonly known as lino, is a popular choice due to its durability, water resistance, and affordability. If you’re looking to install lino in your bathroom, this guide will provide you with step-by-step instructions to ensure a successful installation.
Step 1: Prepare the Subfloor
Before installing lino, it is crucial to prepare the subfloor properly. Remove any existing flooring and thoroughly clean the surface. Repair any damage, such as cracks or holes, and make sure the subfloor is level and dry. An uneven or moist subfloor can lead to bumpy or loose lino.
Note: If the subfloor is made of wood, consider applying a layer of underlayment or plywood to create a smoother surface.
Step 2: Measure and Cut the Lino

Next, carefully measure the dimensions of your bathroom to determine the amount of lino needed. Add a few extra inches to account for any mistakes or adjustments during the installation process. Once you have your measurements, mark the lino accordingly and use a sharp utility knife to cut it to size. Make sure to wear protective gloves and exercise caution while cutting.
Step 3: Apply Adhesive
Now it’s time to apply adhesive to the subfloor. Follow the manufacturer’s instructions and use a trowel to spread an even layer of adhesive. Work in smaller sections to ensure the adhesive doesn’t dry before installing the lino. Ensure that the adhesive is laid uniformly and avoid applying too much, as it can seep through the seams and create an uneven surface.
Step 4: Install the Lino
After applying the adhesive, carefully place the cut pieces of lino onto the subfloor, aligning them with the walls. Smooth out any air bubbles or wrinkles using a rolling pin or a flooring roller. Additionally, make precise cuts for objects like toilets and sinks, allowing the lino to slightly slide underneath for a neat finish.

Step 5: Seal the Edges
Lastly, seal the edges of the lino using a matching seam sealer. Apply a small amount of the sealer and use a brush or a damp cloth to blend it seamlessly with the flooring. This will prevent any moisture or dirt from seeping underneath and also provide an aesthetically pleasing look to your new bathroom floor.
By following these steps, you can confidently install lino in your bathroom and create a beautiful and functional flooring solution. Remember to take your time, measure meticulously, and seek professional assistance if needed. Enjoy the process and enjoy your newly transformed bathroom.
Why You Should Choose Lino for Your Bathroom
Lino flooring is a great option for your bathroom, and here’s why:
- Durability: Lino is known for its durability and can withstand high levels of foot traffic. This makes it an ideal choice for bathrooms, where moisture and frequent use can often lead to wear and tear.
- Water resistance: Lino is water-resistant, making it perfect for environments like bathrooms where water spills and high humidity levels are common. It is easy to clean and maintain, and you won’t have to worry about water damage or mold growth.
- Comfort: The cushioned texture of lino adds extra comfort underfoot, making it a pleasant experience to walk on in your bathroom. This feature is especially beneficial if you spend a lot of time in your bathroom.
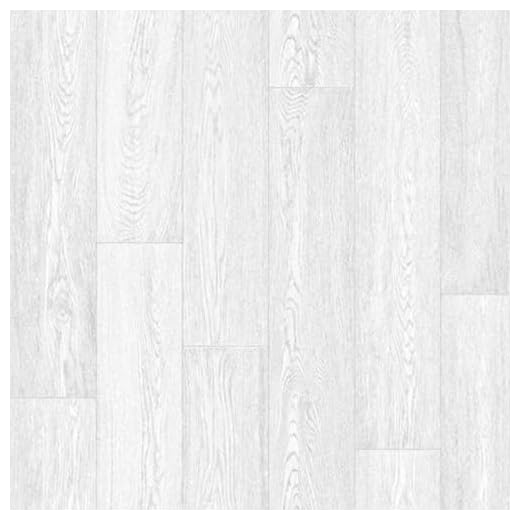
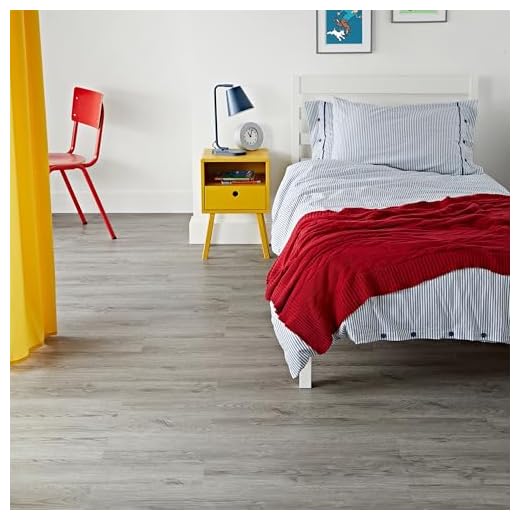
- Design options: Lino comes in a wide range of designs, colors, and patterns, allowing you to choose the perfect style that matches your bathroom decor. Whether you prefer a classic or modern aesthetic, there’s a lino design to suit your taste.
- Affordability: Lino is a cost-effective flooring option compared to other materials like tiles or hardwood. You can achieve a stylish and practical bathroom floor without breaking the bank.
- Easy installation: Installing lino in your bathroom is a straightforward process that can be completed by most DIY enthusiasts. Its flexibility and easy-to-cut sheets make fitting lino a hassle-free task.
With its durability, water resistance, comfort, design options, affordability, and easy installation, lino is a practical and attractive choice for your bathroom. Consider lino flooring for your bathroom renovation or when looking to upgrade your bathroom’s aesthetics and functionality.
Advantages of Lino Flooring
Lino flooring, also known as linoleum, offers several advantages that make it a popular choice for bathroom flooring:
- Durability: Lino flooring is highly durable and can withstand heavy foot traffic. It is resistant to scratches and wear, making it a durable flooring option for bathrooms.
- Water resistance: Lino flooring is water-resistant, which makes it a great choice for bathrooms. It can withstand moisture and water spills without getting damaged or warped.
- Easy maintenance: Lino flooring is easy to clean and maintain. It only requires regular sweeping and occasional mopping with a mild detergent solution to keep it looking new and fresh.
- Wide variety of design options: Lino flooring comes in a wide range of colors, patterns, and designs. Whether you prefer a classic, modern, or vintage look, you can find a lino flooring design that fits your bathroom’s style.
- Warm and comfortable underfoot: Lino flooring is known for its soft and cushioned texture. It provides a warm and comfortable surface underfoot, making it ideal for barefoot use in bathrooms.
- Environmentally friendly: Lino flooring is a sustainable and eco-friendly choice for bathroom flooring. It is made from natural materials, such as linseed oil, cork dust, and wood flour, making it a renewable and biodegradable flooring option.
With its durability, water resistance, ease of maintenance, variety of design options, comfort, and eco-friendly nature, lino flooring is a practical and stylish choice for any bathroom.
Preparing the Bathroom for Lino Installation
Before you begin installing lino in your bathroom, it’s important to properly prepare the space. Follow these steps to ensure a successful installation:
Step 1: Clear the Area
Remove any furniture, fixtures, or personal items from the bathroom. This will create a clear and open space to work in. Store these items in a safe location until the installation is complete.
Step 2: Clean the Surface
Thoroughly clean the bathroom floor to ensure a smooth and even surface for your lino. Remove any dirt, dust, or debris using a broom or vacuum cleaner. Then, mop the floor using a mild detergent to remove any stains or residue.

Step 3: Inspect the Floor
Check the bathroom floor for any damages or imperfections. Look for uneven areas, cracks, or loose tiles. Repair or replace any damaged sections to create a solid foundation for your lino installation.
Step 4: Dry the Floor
Allow the bathroom floor to completely dry before installing the lino. Moisture can affect the adhesion and longevity of your lino, so it’s important to ensure the floor is dry and free from any moisture.
Step 5: Measure the Area
Measure the bathroom floor accurately to determine the amount of lino you will need. Remember to account for any corners and edges. It’s also a good idea to purchase extra lino to have on hand in case of any mishaps during the installation process.
By properly preparing your bathroom for lino installation, you can ensure a smooth and successful project. Follow these steps carefully to create a beautiful and functional space.
Tools and Materials Needed for Lino Installation
Installing lino in a bathroom requires a few specific tools and materials. To ensure a successful installation, make sure you have the following items on hand:

| Tools | Materials |
| Tape measure | Lino flooring |
| Straight edge | Adhesive |
| Utility knife | Lino adhesive applicator |
| Trowel | Seam roller |
| Notched trowel | Transition strips (if needed) |
| Rubber mallet | Safety glasses |
| Vinyl floor roller | Dust mask |
Having these tools and materials readily available will make the installation process much easier and efficient. Make sure to wear appropriate safety gear, such as safety glasses and a dust mask, during the installation. Additionally, if you are installing lino over an existing floor, ensure that it is clean, dry, and free of any debris before starting the installation.
Step-by-Step Guide to Installing Lino in a Bathroom
Installing lino in a bathroom is a great way to add a waterproof and durable flooring option. Follow these step-by-step instructions to successfully install lino in your bathroom:
Step 1: Prepare the Subfloor
Start by preparing the subfloor. Remove the existing flooring and ensure that the subfloor is clean, dry, and level. If necessary, repair any damaged areas and sand down any uneven spots.
Step 2: Measure and Cut the Lino
Measure the dimensions of your bathroom and use those measurements to cut the lino to the correct size. It’s important to leave a small gap around the edges of the room to allow for expansion.
Step 3: Apply Adhesive
Apply a thin layer of adhesive to the subfloor using a trowel. Spread the adhesive evenly across the surface, ensuring full coverage.
Step 4: Lay the Lino
Carefully lay the lino onto the adhesive, starting from one corner of the room. Smooth out any bubbles or wrinkles using a flooring roller, ensuring the lino is flat and secure.
Step 5: Trim and Seal
Trim any excess lino using a straight edge and a sharp utility knife. Be careful not to cut too close to walls or fixtures. Then, seal the edges of the lino using silicone caulk to prevent moisture from seeping underneath.
Step 6: Allow to Set
Allow the adhesive to set for the recommended amount of time, usually around 24 hours. During this time, keep the bathroom well-ventilated to assist with the drying process.
- Start with preparing the subfloor.
- Measure the dimensions of your bathroom and cut the lino accordingly.
- Apply adhesive evenly on the subfloor using a trowel.
- Lay the lino onto the adhesive, smoothing it out with a flooring roller.
- Trim any excess lino and seal the edges with silicone caulk.
- Allow the installation to set for 24 hours before using the bathroom.
By following these simple steps, you can successfully install lino in your bathroom and enjoy the benefits of a waterproof and durable flooring option.
Tips for Maintaining Lino Flooring in the Bathroom
Maintaining lino flooring in the bathroom can help prolong its lifespan and keep it looking pristine. Here are some useful tips to keep your lino flooring in top condition:

- Regular Cleaning: Regularly sweeping or vacuuming the floor can help remove loose dirt and debris. For more thorough cleaning, damp mop the floor using a mild detergent solution. Avoid using harsh chemicals or abrasive cleaners as they can damage the lino.
- Preventing Scratches: Use felt pads or furniture coasters under the legs of the bathroom furniture to prevent scratches or dents on the lino flooring. Also, avoid dragging heavy objects across the floor.
- Immediate Spill Cleanup: Wipe up any spills promptly to prevent stains or damage to the lino. Avoid using bleach or harsh chemicals on the flooring as they can cause discoloration.
- Protecting from Moisture: Although lino flooring is water-resistant, excessive moisture can still cause damage. Use bath mats or rugs near the shower or sink area to minimize water exposure. Also, ensure proper ventilation in the bathroom to prevent excess moisture buildup.
- Avoiding Sharp Objects: Sharp objects like high heels, exposed nails, or pet claws can potentially puncture or scratch the lino flooring. Take precautions to avoid such incidents and trim your pet’s nails regularly, if required.
- Avoid Rubber Mats: Rubber mats or rugs can sometimes cause discolouration on lino flooring. If you need to use a mat, consider using one with a non-staining or non-rubber backing.
- Maintenance Check: Regularly check the lino flooring for any signs of wear and tear, such as cracks, peeling edges, or loose seams. Addressing them promptly can prevent additional damage and ensure the longevity of your lino flooring.
By following these maintenance tips, you can keep your lino flooring in the bathroom in great condition for years to come.
Finding the Best Lino Flooring for Your Bathroom
Choosing the right flooring for your bathroom is important, and lino is a popular choice for its durability, water resistance, and affordability. When selecting lino flooring for your bathroom, consider the following factors to find the best option for your needs:
1. Water Resistance
One of the key requirements for bathroom flooring is water resistance. Look for lino that has a waterproof design, as this will ensure that the material doesn’t absorb moisture and will prevent mold and mildew from growing.
2. Slip Resistance
Bathrooms are prone to slippery surfaces, so it’s crucial to choose lino with good slip resistance. Look for a textured or embossed design that provides grip and reduces the chances of accidents caused by slipping.
Additionally, consider adding a slip-resistant treatment or using an anti-slip mat in areas that are in constant contact with water, such as near the bathtub or shower.
3. Durability
Bathrooms can be high-traffic areas, so your lino flooring needs to be able to withstand daily wear and tear. Choose a thick and durable lino material that is resistant to scratches, stains, and fading to ensure it will maintain its quality over the long term.
You may also want to consider lino flooring with a protective layer or coating to enhance its durability and make it easier to clean.
4. Style and Design
Your bathroom is a space where you can showcase your personal style. Choose lino flooring that complements the overall design of your bathroom, whether you prefer a modern, traditional, or eclectic look.
Consider the color, pattern, and texture of the lino to ensure it harmonizes with your bathroom decor and creates the desired atmosphere. From sleek and minimalist to vibrant and playful, there are countless options to enhance the visual appeal of your bathroom.
In conclusion, when looking for the best lino flooring for your bathroom, prioritize water resistance, slip resistance, durability, and style. Taking these factors into account will ensure that you choose a reliable and visually appealing flooring option that will withstand the demands of your bathroom for years to come.


Meet Harrison Clayton, a distinguished author and home remodeling enthusiast whose expertise in the realm of renovation is second to none. With a passion for transforming houses into inviting homes, Harrison's writing at https://thehuts-eastbourne.co.uk/ brings a breath of fresh inspiration to the world of home improvement. Whether you're looking to revamp a small corner of your abode or embark on a complete home transformation, Harrison's articles provide the essential expertise and creative flair to turn your visions into reality. So, dive into the captivating world of home remodeling with Harrison Clayton and unlock the full potential of your living space with every word he writes.


