How to fit a cat flap in a upvc door

If you have a cat and a UPVC door, installing a cat flap can provide your furry friend with the freedom they need to come and go as they please. While fitting a cat flap into a solid wooden door is relatively straightforward, UPVC doors present a unique challenge. However, with the right tools and a bit of patience, you can successfully fit a cat flap in your UPVC door and make life easier for both you and your feline companion.
Step 1: Choose the right cat flap
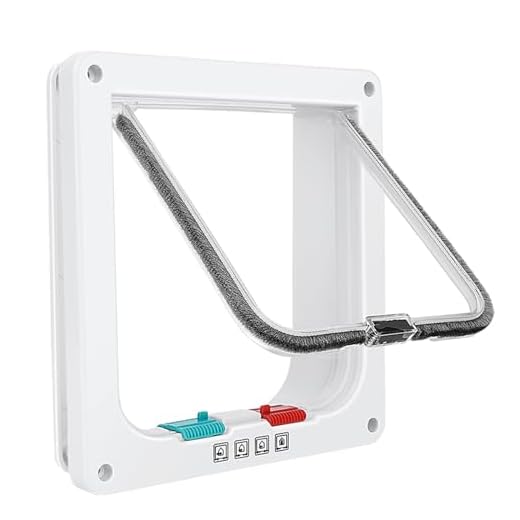
Before getting started, it’s essential to select a cat flap that is suitable for installation in a UPVC door. Look for a cat flap specifically designed for UPVC doors, as these are typically designed to fit into the existing panel without compromising the door’s integrity. Additionally, make sure the cat flap is the right size for your cat, allowing them to comfortably pass through.
Step 2: Measure and mark the door
Measure the height and width of your cat flap, and use these measurements to determine the ideal position for installation on your UPVC door. Take into account the cat’s height and any obstructions, such as furniture or railings. Use a tape measure and a pencil to mark the area where you will cut out the panel for the cat flap.

Step 3: Cut out the panel
Using a jigsaw or a hole cutter, carefully cut along the marked area to remove the panel for the cat flap. Take your time and follow the manufacturer’s instructions to ensure a clean and accurate cut. Be sure to wear protective gloves and eyewear during this step to prevent any injuries.
Step 4: Attach the cat flap
Once the panel has been removed, insert the cat flap into the opening from the interior side of the door. Follow the manufacturer’s instructions to securely attach it in place, making sure it is level and straight. Tighten any screws or fixings provided to ensure the cat flap is firmly attached and secure.
Step 5: Test the cat flap
After the cat flap is installed, carefully test it to ensure it opens and closes smoothly. Encourage your cat to pass through it by luring them with a treat or their favorite toy. If necessary, adjust the hinges or fixings to allow for easier operation.
By following these steps, you can easily fit a cat flap in your UPVC door and give your cat the freedom they desire. Remember to double-check the manufacturer’s instructions and seek professional help if you feel unsure at any point during the installation process.
Step-by-Step Guide: Installing a Cat Flap in a uPVC Door
If you have a uPVC door and a curious feline friend, installing a cat flap can provide your pet with the freedom to come and go as they please. Follow this step-by-step guide to easily install a cat flap in your uPVC door.
- Start by choosing a suitable location for the cat flap on your uPVC door. Ensure the chosen spot is at a comfortable height for your cat to easily access.
- Next, remove your door handle and measure the backset size, which is the distance from the edge of the door to the keyhole or latch. This measurement will determine the position of the cat flap.
- Using the provided template, mark the position of the cat flap on your door, making sure it aligns with the backset size you measured previously.
- Use a hole saw or jigsaw to carefully cut out the marked area on your uPVC door. Take your time and use steady, controlled movements to prevent any damage to the door surface.
- Once the hole is cut, gently file away any rough edges. Be careful not to create any sharp edges that could potentially harm your cat.
- Firmly attach the outer frame of the cat flap to the hole using the provided screws. Ensure the frame is seated securely and flush against the door surface.
- Insert the inner frame into the outer frame from the inside of your home. Make sure it fits snugly and aligns properly with the markings on the door.
- Tighten the screws on the inner frame to secure it in place. Double-check that it is properly aligned and doesn’t restrict the movement of the cat flap.
- Finally, test the cat flap by encouraging your cat to use it. Help your pet get accustomed to the cat flap by gently guiding them through it.
- Monitor your cat’s usage of the cat flap during the initial days and provide positive reinforcement to help them feel comfortable using it.
By following these steps, you can successfully install a cat flap in your uPVC door and grant your cat the freedom they desire while keeping your home secure.
Gather the Tools and Materials
Before you begin installing a cat flap in a UPVC door, gather all the necessary tools and materials to ensure a smooth and efficient installation process.

Here are the tools and materials you will need:
- Chalk or pencil
- Measuring tape
- Hacksaw or jigsaw
- Sharp scissors
- Drill and drill bits
- Screwdriver
- Pliers
- Silicone sealant
- Screws or bolts (depending on the cat flap model)
- Cat flap
Make sure you have everything ready before starting the installation process. This will help you work efficiently and avoid any delays or complications.
Additionally, ensure that you have read and understood the manufacturer’s instructions that come with the cat flap. Each model may have slightly different installation requirements, and it is important to follow the guidelines provided for optimal results.

Meet Harrison Clayton, a distinguished author and home remodeling enthusiast whose expertise in the realm of renovation is second to none. With a passion for transforming houses into inviting homes, Harrison's writing at https://thehuts-eastbourne.co.uk/ brings a breath of fresh inspiration to the world of home improvement. Whether you're looking to revamp a small corner of your abode or embark on a complete home transformation, Harrison's articles provide the essential expertise and creative flair to turn your visions into reality. So, dive into the captivating world of home remodeling with Harrison Clayton and unlock the full potential of your living space with every word he writes.


