How to change a toilet cistern
If you have a leaky or broken toilet cistern, it may be time to replace it. While this task may sound daunting, with the right tools and guidance, you can easily change your toilet cistern by yourself. This step-by-step guide will walk you through the process, ensuring that your toilet is up and running smoothly again in no time.
Step 1: Preparation and Safety
Before you begin, gather all the necessary tools and materials. You will need a new cistern, an adjustable wrench, a screwdriver, plumber’s tape, and a sponge. Additionally, ensure that you have turned off the water supply to your toilet and have towels or rags handy to catch any water that may spill during the process.
Step 2: Emptying the Cistern
To start, flush the toilet to empty as much water as possible from the cistern. Use a sponge to soak up any remaining water. Once the cistern is empty, disconnect the water supply line located at the bottom of the cistern. Use a wrench to loosen the nut connecting the supply line and carefully remove the line.

Step 3: Removing the Old Cistern
To remove the old cistern, locate the mounting bolts on the bottom and loosen them with a wrench. Once the bolts are loose, carefully lift the cistern away from the toilet bowl. Be cautious, as the cistern can be heavy. Place the old cistern aside.
Step 4: Installing the New Cistern
Begin by applying plumber’s tape to the threaded holes in the toilet bowl. This will help prevent leaks. Carefully position the new cistern over the threaded holes and lower it onto the toilet. Align the cistern evenly and ensure that it is centered. Secure the cistern in place by tightening the mounting bolts with a wrench.
Step 5: Reconnecting the Water Supply Line

Reattach the water supply line to the bottom of the new cistern. Fit the nut onto the threaded end of the supply line and tighten it by hand. Use a wrench to ensure it is securely tightened. Open the shut-off valve to restore the water supply.
Step 6: Testing
Once the water supply is turned on, flush the toilet to check if everything is working properly. Inspect for any leaks and make necessary adjustments if needed. If everything looks good, congratulate yourself on successfully changing your toilet cistern!
By following these steps, you can easily replace a toilet cistern and avoid the hassle and expense of hiring a professional plumber. Remember to always exercise caution and if you encounter any difficulties or uncertainties, it is best to consult a plumbing expert.
Tackling the Task of Changing a Toilet Cistern
Changing a toilet cistern may seem like a daunting task, but with the right tools and information, it can be a straightforward process. Follow these steps to replace your old or faulty toilet cistern and have your bathroom functioning properly again:

- First, turn off the water supply to the toilet by locating the shut-off valve, usually located behind the toilet near the floor. Turn the handle clockwise to shut off the water.
- Flush the toilet to drain the water from the cistern. Use a sponge or towel to remove any remaining water. This will prevent any water spills during the cistern replacement process.
- Next, disconnect the water supply line from the bottom of the c
Safety Precautions for Changing a Toilet Cistern
When changing a toilet cistern, it is important to prioritize safety to avoid any accidents or injuries. Here are some safety precautions to keep in mind:
1. Turn off the water supply: Before starting any work, make sure to turn off the water supply to the toilet. This can usually be done by locating the shut-off valve, which is usually found near the base of the toilet. Turning off the water supply will prevent any leaks or flooding while working on the cistern.
2. Empty the toilet bowl: Before removing the old cistern, ensure that the toilet bowl is emptied completely. Flush the toilet and use a small container to scoop out any remaining water. This will prevent any spills or messes during the replacement process.
3. Gather the necessary tools: Make sure to have all the required tools for the job before starting the process. This might include an adjustable wrench, screwdriver, plumber’s tape, and a bucket for water drainage. Having the necessary tools within reach will help you work efficiently and safely.
4. Wear protective gear: To protect yourself from any potential harm or injuries, it is recommended to wear gloves and safety goggles while working on the cistern. Gloves will prevent any cuts or scrapes, while goggles will protect your eyes from accidental splashes or drips.
5. Follow manufacturer’s instructions: Consult the manufacturer’s instructions or user manual for the specific model of the toilet cistern you are replacing. Following the recommended procedures will ensure that you are completing the task safely and correctly.
6. Ask for assistance if needed: If you are unsure or uncomfortable working alone, it is always better to ask for assistance from a professional or someone experienced in plumbing. They can help guide you through the process and ensure that everything is done correctly.
By following these safety precautions, you can minimize the risk of accidents and complete the task of changing a toilet cistern with confidence.
Gathering the Necessary Tools and Materials
Before you begin the process of changing a toilet cistern, it’s important to gather all the necessary tools and materials. Here is a list of everything you will need:
Tools:
- Adjustable wrench – This will be used to disconnect the water supply line.
- Screwdriver – You will need both a Phillips and a flat-head screwdriver for various parts of the process.
- Pliers – These will be useful for loosening and tightening nuts and bolts.
- Toilet auger – In case there are any blockages in the toilet trap, you may need to use an auger to clear them.
Materials:
- New toilet cistern – Make sure to select a cistern that is compatible with your toilet bowl and system.
- Replacement parts – Depending on the condition of your existing cistern, you may need to replace components such as the flush valve or fill valve.
- Thread seal tape – This will be used to prevent any leaks when reconnecting the water supply line.
- Silicone sealant – Applying a thin layer of sealant around the base of the cistern will help to create a watertight seal.
- Cloths or rags – These will be handy for wiping up any water or spills during the process.
By ensuring you have these tools and materials on hand before you begin, you will be prepared to tackle the task of changing your toilet cistern efficiently and effectively.
Steps to Remove the Old Cistern
Removing the old cistern is an important step when replacing your toilet system. Follow these steps to ensure a smooth and successful removal process:
1. Turn off the water supply
Before you begin to remove the old cistern, turn off the water supply. Locate the shut-off valve near the bottom of the toilet on the wall or floor. Rotate the valve handle clockwise to shut off the water flow. Once the supply is completely shut off, flush the toilet to empty the cistern.
2. Disconnect the water supply line
Next, disconnect the water supply line from the bottom of the old cistern. You can use adjustable pliers or a wrench to loosen and remove the connecting nut. Be sure to place a towel or bucket beneath the connection to catch any remaining water that may leak out.
3. Unscrew or disconnect the inlet valve
Depending on the type of cistern you have, you may need to unscrew or disconnect the inlet valve. This valve controls the incoming water supply. Use a wrench to loosen the nut attaching the inlet valve to the cistern. Once it is loose, carefully remove the valve from the cistern.
4. Remove the mounting screws
Look for the mounting screws that attach the cistern to the wall. Typically, there will be two screws located near the top of the cistern. Use a screwdriver or drill to loosen and remove these screws. Once the screws are removed, gently lift the cistern away from the wall.
Remember to take caution when removing the old cistern as it can be heavy and fragile. Use proper lifting techniques or ask for assistance if needed. Additionally, avoid putting excessive pressure or force on any part of the cistern to prevent damage.
By following these steps, you will be able to successfully remove the old cistern and proceed to the next steps in installing your new toilet cistern.
Installing the New Cistern
Once you have removed the old cistern, it is time to install the new one. Follow these steps to ensure a successful installation:
Gather the Necessary Tools and Materials
Before installing the new cistern, make sure you have all the required tools and materials. You will typically need an adjustable spanner, a screwdriver, a wrench, a hacksaw, a sponge, a bucket, and the new cistern with all its components.
Read the Instructions
Read the manufacturer’s instructions that come with the new cistern carefully. Each cistern model may have specific installation requirements, so it is important to know and follow them properly.
Here is a general outline of the installation process:
- Position the Cistern
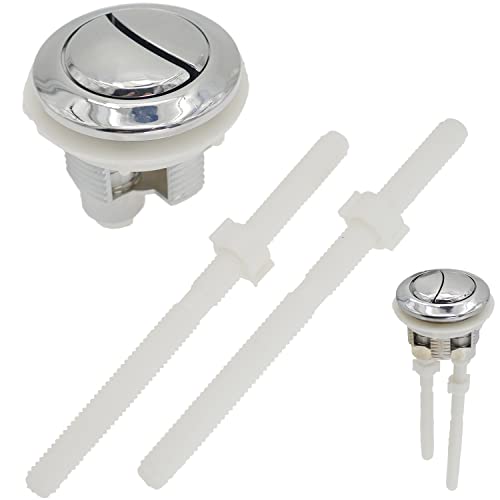
- Attach the Flush Valve
- Connect the Inlet Valve
- Attach the Flush Mechanism
- Connect the Water Supply
- Adjust the Water Level
- Test the Flushing
Place the cistern in the correct position on top of the toilet bowl. Make sure it aligns properly with the existing holes for the flush valve and inlet valve. You may need to adjust the position to ensure a proper fit.
Fit the flush valve into the cistern according to the manufacturer’s instructions. Use the provided rubber gasket or sealing washer to create a watertight connection.
Attach the inlet valve to the bottom of the cistern. Make sure it is securely fastened and aligned with the inlet water supply pipe.
Install the flush mechanism according to the manufacturer’s instructions. This may involve attaching a chain, lever, or button to the flush valve.
Use a wrench to connect the water supply pipe to the inlet valve. Ensure the connection is watertight to avoid any leaks.
Follow the instructions to adjust the water level inside the cistern. This will ensure proper flushing and prevent any overflow issues.
Once everything is installed, turn on the water supply and test the flushing mechanism. Check for any leaks and make sure the toilet flushes properly.
Following these steps will help you successfully install the new cistern and restore the functionality of your toilet.
Testing and Troubleshooting the New Cistern
Once the new cistern has been installed, it is important to test it to ensure that everything is working correctly. This step will help to avoid any future issues and ensure proper functionality of the toilet.
Here are some steps to effectively test and troubleshoot the new cistern:
1. Check for Leaks:
After installing the new cistern, it is crucial to check for any visible leaks. Carefully inspect all the connections and joints where leaks might occur. Make sure all the nuts and bolts are properly tightened to avoid any leaks.
2. Fill the Cistern:
You can now proceed to fill the cistern with water by turning on the water supply valve. Allow the cistern to fill completely and observe whether there are any leaks during the filling process.
3. Test the Flush:
Once the cistern is full, you can now test the flush mechanism. Push the flush button or lever and check if the cistern empties smoothly and that all the water is released into the toilet bowl without any issues.
4. Adjust Water Level:
If you notice that the water level in the cistern is too low or too high after testing the flush, you may need to adjust it. Refer to the manufacturer’s instructions on how to adjust the water level or consult a professional plumber if required.
5. Test Multiple Flushes:
Perform multiple test flushes to ensure consistent flushing and proper refilling of the cistern. Observe if there are any malfunctions or irregularities in the flushing process.
6. Final Check-in the Cistern:
Thoroughly inspect the internal components of the cistern, such as the fill valve and flush valve, to ensure that they are working correctly. The fill valve should stop filling the cistern once it reaches the desired water level, and the flush valve should completely seal off the outlet after flushing.
By following these steps, you can effectively test and troubleshoot the new cistern, ensuring optimal performance and preventing any future issues that may arise with your toilet.
Harrison ClaytonMeet Harrison Clayton, a distinguished author and home remodeling enthusiast whose expertise in the realm of renovation is second to none. With a passion for transforming houses into inviting homes, Harrison's writing at https://thehuts-eastbourne.co.uk/ brings a breath of fresh inspiration to the world of home improvement. Whether you're looking to revamp a small corner of your abode or embark on a complete home transformation, Harrison's articles provide the essential expertise and creative flair to turn your visions into reality. So, dive into the captivating world of home remodeling with Harrison Clayton and unlock the full potential of your living space with every word he writes.


