How to build a mud kitchen

Children love to get their hands dirty, and what better way to encourage their creativity and imagination than by building a mud kitchen? A mud kitchen provides endless opportunities for outdoor play and learning. It allows children to engage in sensory experiences, discover new textures, and develop important motor skills.
Building your own mud kitchen is a fun and rewarding project that can be accomplished with just a few simple materials. By creating a dedicated space for mud play, you’ll be providing your child with hours of entertainment and valuable learning experiences.
To start, you’ll need a sturdy base, such as an old table or workbench. This will serve as the foundation for your mud kitchen. Choose a location in your yard that is easily accessible and allows for water play without causing a mess. Once you have your base, gather materials such as pots, pans, bowls, and utensils that can withstand outdoor use.
Next, it’s time to get creative! Set up your mud kitchen by arranging the pots and pans on the table, adding hooks or hangers for utensils, and creating a space for water play. You can also incorporate natural materials, such as rocks or sticks, to enhance the sensory experience. Encourage your child to gather leaves, flowers, or other natural elements to use in their mud creations.
A mud kitchen is a fantastic way for children to connect with nature, explore their senses, and learn through play. By providing them with the tools and space to engage in messy play, you are fostering their imagination, creativity, and problem-solving skills. So roll up your sleeves, gather your materials, and get ready to build a mud kitchen that will provide endless fun for your little ones!

Welcome to the world of mud kitchens
Welcome to the wonderful world of mud kitchens! If you’re looking for a fun and educational outdoor activity for your children, then you’ve come to the right place. A mud kitchen is a fantastic way to promote creativity, sensory play, and imagination. It allows children to explore and experiment with nature while having loads of fun!
What exactly is a mud kitchen? Well, think of it as a mini outdoor kitchen where children can get their hands dirty and let their imaginations run wild. It typically consists of a countertop, shelves, and various kitchen utensils, all set up in a dedicated outdoor space. The most important component, of course, is the mud! By mixing water, soil, and various natural materials, children can unleash their inner chefs and create endless culinary masterpieces.
There are so many benefits to incorporating a mud kitchen into your child’s playtime routine. Not only does it encourage sensory play and stimulate their creativity, but it also promotes fine motor skills, problem-solving, and social interaction. It’s a truly holistic learning experience that can be enjoyed by children of all ages.
So, why wait any longer? Dive in and explore the wonders of mud kitchens. In the next sections, we will guide you through the process of building your very own mud kitchen step by step. From selecting the perfect spot to gathering materials and tools, we’ve got you covered. Get ready to create memories and have a blast with your little ones!
Why build a mud kitchen yourself?
Building a mud kitchen from scratch can be a rewarding experience that brings many benefits for both you and your children. Here are some reasons why you should consider building a mud kitchen yourself:

1. Cost-effective
Building a mud kitchen yourself can be a cost-effective alternative to purchasing a pre-made one. You can repurpose old materials such as pallets, wooden crates, or even recycled kitchen utensils to create an engaging and functional mud kitchen.
2. Customization
When you build a mud kitchen yourself, you have the freedom to customize it according to your preferences and needs. You can choose the size, design, and layout that best fits your outdoor space. You can also add extra features and personal touches to make it truly unique.
Furthermore, involving your children in the building process allows them to contribute their ideas and creativity, making the mud kitchen even more special to them.
3. Learning opportunity
Building a mud kitchen together with your children is a valuable learning opportunity. It teaches them about basic DIY skills, problem-solving, and creative thinking. They can also learn about the importance of reusing and repurposing materials, promoting sustainable practices from a young age.
As they play and interact with the mud kitchen they built, children develop important social, cognitive, and physical skills. They learn about cooperation, communication, and imaginative play, while also improving their fine motor skills and sensory development.
In conclusion, building a mud kitchen yourself is a cost-effective, customizable, and educational project that benefits both you and your children. So roll up your sleeves and get ready to create a fun-filled outdoor play experience!
Choosing the right location for a mud kitchen
Choosing the right location for your mud kitchen is crucial for creating an enjoyable and safe play area for your children. Here are a few factors to consider when picking the perfect spot:
Safety First
- Look for a flat and stable surface that won’t pose any tripping hazards.
- Avoid placing the mud kitchen near any potentially dangerous objects or areas, such as sharp tools or busy areas of the garden.
- Ensure the location offers good visibility, allowing you to keep an eye on your children easily.
Environmental Considerations
- Choose a spot that has easy access to water, as this is a crucial element for playing in the mud kitchen.
- Consider how much sunlight the location gets throughout the day. A balance of shade and sunlight is ideal, allowing the children to play comfortably without getting too hot.
- Take wind direction into consideration. Placing the mud kitchen in a sheltered area will help prevent debris from being blown into the play area.
Convenience
- Think about proximity to the house. Placing the mud kitchen near the kitchen door or a window makes it more convenient for you to supervise and interact with your children while they play.
- Consider the overall flow and accessibility of your outdoor space. The mud kitchen should be easy to access and not obstruct any paths or walkways.
By considering these factors and finding the right location for your mud kitchen, you can ensure that your children will have a fantastic playing experience while staying safe and engaged in imaginative outdoor play.
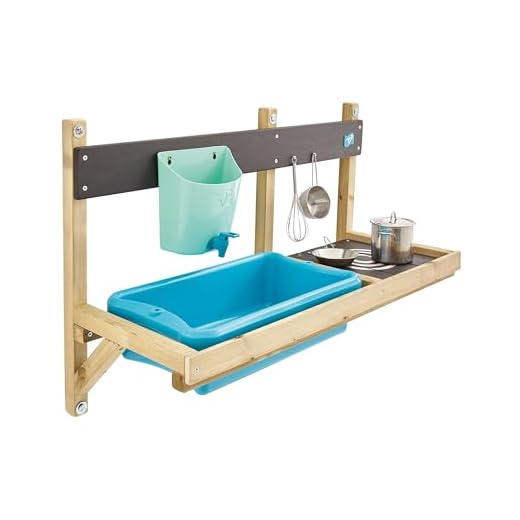
Materials needed for building a mud kitchen
To build a mud kitchen, you will need the following materials:
| Materials | Quantity |
|---|---|
| Wooden pallets | 2 |
| Planks | 4 |
| Wood screws | 16 |
| Garden spade | 1 |
| Stainless steel bowls | 2 |
| Stainless steel pots | 2 |
| Plastic spoons | 4 |
| Plastic cups | 4 |
| Waterproof outdoor paint | 1 can |
| Paintbrush | 1 |
These materials will provide you with the basic structure for your mud kitchen, as well as the necessary utensils and containers for mixing and playing with mud. Make sure to gather all the materials before starting the construction process.

Additional materials
In addition to the materials listed above, you might also need:
- Outdoor varnish to protect the wood (optional)
- Hooks for hanging utensils
- Decorative items like chalkboard paint or stickers
- Sand and gravel for added texture
- Accessories like toy pots, pans, and utensils
These additional materials can enhance the functionality and aesthetics of your mud kitchen. Consider your preferences and budget when deciding on whether to include them in your project.
Step-by-Step Guide to Building Your Own Mud Kitchen
Mud kitchens are a wonderful addition to any backyard or outdoor play area. They provide children with an opportunity to explore nature, develop their creativity, and engage in sensory play. Building your own mud kitchen is an enjoyable project that can be done with just a few basic materials. Follow these clear steps to create a mud kitchen that will inspire hours of imaginative play.
Step 1: Choose a Suitable Location
Start by selecting a suitable location in your yard or outdoor space for the mud kitchen. Consider an area that is easily accessible and with enough room for children to move around comfortably. It should also have access to water and be close to a flat surface or table where the mud kitchen can be built.
Step 2: Gather Materials
Next, gather the necessary materials to build the mud kitchen. You will need:

- Wooden pallets or old wooden furniture
- Various sized pots, pans, or mixing bowls
- Plastic spoons, ladles, and utensils
- Paint and brushes (optional for decoration)
- Mist sprayer or water hose
- Durable hooks or hangers
- Waterproof measuring cups and jugs
- Gardening trowel for digging
- Securing materials (screws, nails, or strong adhesive)
Step 3: Prepare the Mud Kitchen Structure
If you are using wooden pallets, arrange them to create a basic structure for your mud kitchen. Secure them together using screws, nails, or a strong adhesive. If you prefer using old furniture, modify and combine pieces to form a countertop, shelves, and a backboard for the mud kitchen.
Step 4: Add Shelves and Hooks
Add shelves or surfaces to your mud kitchen using pieces of wood that can be attached to the structure. Install hooks or hangers to hang the pots, pans, and utensils. This will make it easier for children to see and access the items they need when playing in the mud kitchen.
Step 5: Create a Water Supply
Place a small table or flat surface near the mud kitchen structure where you can set up the water supply. Connect a mist sprayer or water hose to the nearest outdoor water source and adjust the water pressure according to your liking. Make sure the water supply is easily accessible for children and safe to use.
Step 6: Organize and Decorate
Arrange the pots, pans, mixing bowls, and utensils on the shelves or hooks in an organized and inviting manner. Consider painting the mud kitchen in bright, child-friendly colors to make it more visually appealing. Let children join in the fun by encouraging them to decorate the mud kitchen with their own artwork.
Step 7: Dig a Mud Area
Next, dig a designated area near the mud kitchen where children can access mud for their play. Use a gardening trowel to loosen the soil and create a muddy patch. Ensure that the mud area is easily accessible and large enough for multiple children to play and explore.

Step 8: Ready to Play!
Congratulations! Your mud kitchen is now complete and ready for endless hours of enjoyment. Encourage children to let their imaginations soar as they whip up delicious mud pies, create mysterious concoctions, and engage in muddy adventures. Remember to supervise and stay nearby for safety reasons while they indulge in sensory-rich play.
Building a mud kitchen provides a fantastic opportunity for children to connect with nature, engage in imaginative play, and develop essential skills. Enjoy this fantastic project with your child and watch as their creativity blooms!
Tips for maintaining and caring for your mud kitchen
Once you have built your mud kitchen, it’s important to properly maintain and care for it to ensure its longevity. Follow these tips to keep your mud kitchen looking great and ready for play:
1. Regular cleaning
Regularly clean your mud kitchen to remove dirt, mud, and other debris. Use a mild soap and warm water to scrub the surfaces and rinse well. Avoid using harsh chemicals or abrasive cleaners that can damage the materials.
2. Seal or treat wooden surfaces
If your mud kitchen has wooden surfaces, consider sealing or treating them with a weather-resistant sealant or stain. This will help protect the wood from moisture, mold, and other damage caused by being exposed to the elements. Be sure to follow the manufacturer’s instructions for the sealant or stain.

3. Protect against the elements
If possible, store your mud kitchen indoors or in a covered area when not in use. This will help protect it from rain, snow, and other harsh weather conditions that can cause damage. If storing indoors is not an option, use a waterproof cover to protect the mud kitchen.
4. Avoid sun fading
Direct sunlight can fade and damage the colors of your mud kitchen. If your mud kitchen is permanently located outside, consider placing it in a shaded area or under a canopy to minimize sun exposure. If the mud kitchen is portable, move it to a shaded area when not in use.
5. Inspect for wear and tear
Regularly inspect your mud kitchen for any signs of wear and tear. Check that all screws, bolts, and fittings are secure and tighten them if necessary. Replace any damaged or broken parts promptly to prevent further damage or potential injury.
By following these tips, you can ensure that your mud kitchen remains in great condition for years of messy play and outdoor fun! Happy cooking!
Enjoying the benefits of a homemade mud kitchen
Playing in the mud is not only a fun and engaging activity for children, but it also comes with several valuable benefits. By building a homemade mud kitchen, you can enhance your child’s creativity, sensory development, and cognitive skills.
A mud kitchen provides a unique sensory experience as children can touch, feel, and smell the natural elements. Playing with mud stimulates their sense of touch, helps them understand textures, and encourages them to explore the natural environment.
The process of building and designing their own mud kitchen involves problem-solving skills, critical thinking, and decision-making. Children can gather natural materials such as sticks, stones, and leaves, and use their imagination to create their ideal mud kitchen setup.
With a mud kitchen, children can engage in open-ended play, which promotes creativity and imaginative thinking. They can invent and act out stories, take on different roles, and experiment with various ingredients and tools in their mud kitchen laboratory.
Playing in a mud kitchen also provides opportunities for cooperative play and social interactions. Children can collaborate, share their ideas, and work together to create mud pies, soups, and other imaginary dishes. This type of play fosters teamwork, communication skills, and empathy.
Furthermore, a mud kitchen teaches children about the natural world and encourages them to understand and appreciate their environment. They can learn about plant growth, different types of soil, and the importance of cleanliness and hygiene.
To maximize the benefits of a homemade mud kitchen, ensure that your child has appropriate clothing and access to water for handwashing. Set up the mud kitchen in a safe and suitable location, where children can freely engage in messy play without causing any harm.
In conclusion, by building and allowing your child to play in a homemade mud kitchen, you are providing them with an invaluable learning and sensory experience. Embrace the messiness, encourage imagination, and watch your child enjoy the many benefits of playing in the mud.


Meet Harrison Clayton, a distinguished author and home remodeling enthusiast whose expertise in the realm of renovation is second to none. With a passion for transforming houses into inviting homes, Harrison's writing at https://thehuts-eastbourne.co.uk/ brings a breath of fresh inspiration to the world of home improvement. Whether you're looking to revamp a small corner of your abode or embark on a complete home transformation, Harrison's articles provide the essential expertise and creative flair to turn your visions into reality. So, dive into the captivating world of home remodeling with Harrison Clayton and unlock the full potential of your living space with every word he writes.


