Can You Etch Wood With A Soldering Iron
Wood etching is a popular technique used by artists and craftsmen to create intricate designs and patterns on wooden surfaces. While there are various tools and methods available for this purpose, one question often arises: can you etch wood with a soldering iron?
A soldering iron, which is primarily used for soldering electronic components, may seem like an unconventional choice for wood etching. However, it is indeed possible to use a soldering iron for this purpose, and it can yield impressive results.
The process of etching wood with a soldering iron involves using the heated tip to burn away the surface of the wood, creating permanent markings. The high temperature of the soldering iron allows for precise control and intricate detailing, making it a suitable tool for creating intricate designs.
However, it is important to note that wood etching with a soldering iron requires practice and caution. The heat of the soldering iron can easily scorch the wood or create unwanted burn marks if not used properly. It is essential to have a steady hand and to work slowly and carefully to achieve the desired results.
In conclusion, while unconventional, using a soldering iron for wood etching can be a creative and effective technique. With proper practice and attention to detail, it is possible to create beautiful and intricate designs on wooden surfaces using this tool.

Benefits of Wood Etching
Wood etching using a soldering iron is a unique and creative way to decorate and personalize wooden objects. Here are some of the benefits of wood etching:
- Customization: Wood etching allows for the customization of any wooden item. Whether it’s a cutting board, picture frame, or even furniture, you can easily add your own designs, patterns, or text to make it truly one-of-a-kind.
- Personalization: By etching wood, you can add personal touches and create meaningful gifts. Whether you’re etching initials, dates, or personal messages, it adds a special and sentimental value to the item.
- Creativity: Wood etching allows you to express your creativity. You can create intricate designs or experiment with different techniques and patterns. It’s a great way to explore your artistic side.
- Long-lasting: Unlike other forms of wood decoration like painting or stickers, etched designs are more durable and long-lasting. The burned-in patterns will stay intact even after years of use and can withstand wear and tear.
- Natural look: Wood etching enhances the natural beauty of wood. The burned-in designs have an organic and rustic feel that blends seamlessly with the natural grain and color of the wood.
- Low cost: Etching wood with a soldering iron requires minimal materials and tools, making it a cost-effective way to decorate wooden items. All you need is a soldering iron, wood, and some creativity.
In conclusion, wood etching is a versatile and rewarding craft that offers numerous benefits. It allows for customization, personalization, and creativity while providing a long-lasting and natural look to your wooden objects. Give it a try and let your imagination run wild!
Enhancing Wood Artwork
Wood artwork can be enhanced using various techniques and tools, and one such tool is a soldering iron. While commonly used for soldering electronic components, a soldering iron can also be used to etch intricate designs onto wood surfaces. This adds a unique and personalized touch to the artwork, making it stand out from the rest.
Choosing the Right Soldering Iron
When it comes to etching wood with a soldering iron, it’s important to choose the right tool for the job. Look for a soldering iron with a fine tip that can provide precision and control. Additionally, consider the wattage of the soldering iron, as higher wattage models tend to heat up faster and can make the etching process more efficient.
Etching Techniques
There are several techniques that can be used to etch wood with a soldering iron. Here are a few popular ones:

| Technique | Description |
|---|---|
| Hatching | This technique involves creating parallel lines to form shading and texture. By adjusting the pressure and speed of the soldering iron, different effects can be achieved. |
| Stippling | Stippling involves creating patterns or textures by repeatedly dotting the wood with the soldering iron. Varying the spacing and pressure of the dots can create different effects. |
| Outlining | This technique involves using a soldering iron to trace the outlines of a design or drawing. This adds definition and detail to the artwork. |
Experimenting with different techniques and combinations of these techniques can result in stunning and unique wood artwork. However, it’s important to practice on scrap wood before working on the final piece to ensure the desired effect is achieved.
To keep the wood artwork looking its best, it’s recommended to seal it with a clear coat or varnish after etching. This will protect the wood and preserve the details of the design for years to come.
In conclusion, a soldering iron can be a versatile tool for enhancing wood artwork. By using different etching techniques and practicing on scrap wood, artists can create intricate and personalized designs that add a unique touch to their creations. So why not give it a try and take your wood artwork to the next level?
Tools and Materials for Wood Etching
Wood etching can be a fun and creative way to add intricate designs and patterns to your woodworking projects. While using a soldering iron is one method of etching wood, there are other tools and materials that you can use to achieve different effects. Here are some commonly used tools and materials:
| Tool/Material | Description |
|---|---|
| Soldering Iron | A soldering iron with a fine tip can be used to burn designs into the wood. It is important to use a low heat setting and work slowly to prevent scorching or burning the wood. |
| Wood Burning Pen | A wood burning pen, also known as a pyrography pen, is specifically designed for etching wood. It usually comes with different interchangeable tips to create various patterns and designs. |
| Wood Carving Tools | Wood carving tools, such as chisels, gouges, and knives, can be used to remove layers of wood to create designs. These tools allow for more depth and texture in the etched designs. |
| Sanding Paper | After etching the wood, sanding paper of varying grits can be used to smooth out any rough areas and create a more polished finish. It is important to sand gently to avoid damaging the etched design. |
| Stencil | Using a pre-made stencil or creating your own stencil can help you achieve more precise and detailed designs. Stencils can be made from various materials, such as plastic or cardboard. |
| Protective Gear | When using any tools for wood etching, it is important to wear protective gear, such as safety glasses and a dust mask. This will help protect your eyes from flying wood particles and prevent you from inhaling harmful dust. |
Experimenting with different tools and materials can help you discover your preferred method of wood etching. Remember to always practice safety precautions and take your time to achieve the desired results. Happy etching!

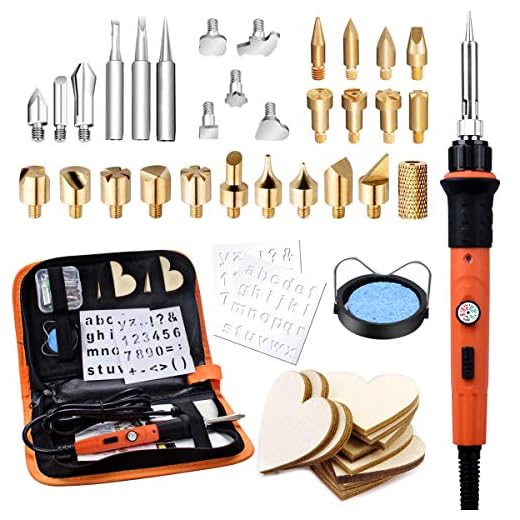
Soldering Iron
A soldering iron is a handheld tool that is used for melting solder to join or repair metal components. It consists of a heated metal tip, typically made of copper or iron, which is heated using an electrical current. Soldering irons come in various sizes and wattages, depending on the desired application.
The tip of a soldering iron can reach high temperatures, ranging from 300 to 900 degrees Fahrenheit. It is important to select the appropriate temperature for the specific soldering task, as using too much heat can damage the components or create weak solder joints.
Soldering irons are commonly used in electronics and electrical work, as well as for hobbies such as jewelry making and model building. They are versatile tools that can be used for soldering, desoldering, and heat shrink tubing applications.
When using a soldering iron, it is essential to follow safety precautions to prevent burns or injuries. These include wearing heat-resistant gloves, using a stand or holder to prevent accidental contact with the hot tip, and working in a well-ventilated area to avoid inhaling fumes from the solder.
It is also crucial to keep the soldering iron tip clean and properly tinned. Tinning refers to coating the tip with a thin layer of solder, which helps improve heat transfer and prevents oxidation. Regularly cleaning and tinning the tip will ensure efficient soldering and extend the life of the soldering iron.

Overall, a soldering iron is a valuable tool for anyone involved in electronics, repairs, or DIY projects. With proper care and usage, it can help create strong and reliable connections between metal components.
Techniques for Wood Etching
Etching wood with a soldering iron can be a creative and rewarding process. By using the right techniques, you can achieve intricate designs and create beautiful pieces of art. Here are some tips to help you get started:
1. Preparation
Before you begin etching, it’s important to properly prepare the wood surface. Sanding the wood with fine-grit sandpaper will smooth out any rough areas and provide a clean canvas for your design. Make sure to remove any dust or debris with a cloth before starting.
2. Design Planning
Planning your design in advance will help you create a more polished and cohesive piece. Start by sketching your design on paper and transferring it onto the wood surface using a pencil or stencil. This will serve as a guide as you etch your design.
3. Heat Control
One of the key factors in wood etching with a soldering iron is controlling the heat. Different types of wood require different levels of heat to achieve the desired effect. Test the soldering iron on a scrap piece of wood to find the right temperature before starting your project.

4. Etching Techniques
There are various techniques you can use to etch wood with a soldering iron. The most common technique is to use the soldering iron tip to draw lines or shapes onto the wood surface. You can also experiment with shading and texture by varying the pressure and angle of the soldering iron.
5. Practice and Patience
Wood etching with a soldering iron can be a skill that takes time to master. It’s important to practice on scrap wood pieces before attempting more intricate designs. Remember to take breaks when needed and have patience with the process.
Conclusion
Etching wood with a soldering iron can be a unique and enjoyable way to create art. By following these techniques, you can unleash your creativity and produce beautiful etched wood pieces. Remember to always prioritize safety and enjoy the journey of creating your own masterpiece.
Burning Designs with a Soldering Iron
A soldering iron is a versatile tool typically used for joining electrical components, but it can also be used for other creative purposes. One of these creative uses is burning designs onto wood surfaces. With the right technique and a steady hand, you can create unique and intricate designs that give a rustic and artistic touch to your wooden projects.

Materials You’ll Need
- A soldering iron with a fine tip
- Wooden surface, such as a plaque or a piece of furniture
- Pencil and paper to sketch your design
- Masking tape or stencils (optional)
- Sandpaper for preparing the wood surface
- Protective gear, such as safety glasses and gloves
Step-by-Step Guide
-
Prepare the wood surface by sanding it lightly to remove any rough spots or imperfections. This will ensure a smooth and even burn when you start etching.
-
Use a pencil and paper to sketch your design. You can also find stencils or use masking tape to create a pattern on the wood surface if you prefer a more structured design.
-
Plug in your soldering iron and let it heat up according to the manufacturer’s instructions. Make sure to work in a well-ventilated area or wear a mask to avoid inhaling any fumes.
-
Start by testing the soldering iron on a scrap piece of wood or an inconspicuous area of your project. This will help you get familiar with its temperature and how it interacts with the wood.
-
Once you feel comfortable, begin tracing your design on the wood surface with the soldering iron. Apply a gentle, steady pressure as you move along the lines of your design. Take your time and work slowly to avoid any mistakes.
-
If you’re using masking tape or stencils, remove them carefully after you’ve burned the design. This will reveal clean and sharp edges.
-
Allow the wood to cool down completely before handling it. You can apply a coat of varnish or sealant to protect the burned design and give it a finished look.
Tips and Tricks
- Practice on scrap wood before working on your final project to improve your technique and get a feel for the soldering iron.
- Experiment with different tip shapes and sizes to achieve different effects and line thicknesses.
- Consider incorporating shading techniques by varying the pressure and speed of your strokes.
- Always prioritize safety by wearing protective gear and working in a well-ventilated area.
- Use a damp cloth to clean the soldering iron tip between burns to prevent any residue from interfering with your design.
Burning designs with a soldering iron can be a rewarding and artistic way to personalize your wooden projects. Whether you’re creating a decorative plaque, customizing furniture, or making unique gifts, this technique adds a special touch that showcases your creativity and craftsmanship.
Tips for Successful Wood Etching
Etching wood with a soldering iron can be a fun and creative way to add unique designs and patterns to your woodworking projects. However, achieving successful etching requires proper technique and preparation. Here are some tips to help you achieve great results.
|
Choose the Right Wood Not all types of wood are suitable for etching with a soldering iron. Softwoods like pine and fir are excellent choices as they have a lower density and are easier to etch. Hardwoods like oak and mahogany can also be etched, but they will require more heat and pressure. |
Use a High-quality Soldering Iron Investing in a good-quality soldering iron is crucial for successful wood etching. Look for a soldering iron with adjustable temperature settings and a fine tip. This will give you more control over the etching process and allow for greater precision. |
|
Prepare the Wood Surface Before you start etching, make sure the wood surface is clean and smooth. Sand down any rough areas and remove any dust or debris. This will help the soldering iron glide smoothly and prevent any unwanted marks or scratches. |
Practice on Scrap Wood If you’re new to wood etching, it’s a good idea to practice on a scrap piece of wood before working on your final project. This will allow you to get a feel for the soldering iron and experiment with different techniques and designs. |
|
Create a Template If you have a specific design in mind, it can be helpful to create a template to guide your etching. You can sketch the design on a piece of paper, trace it onto a transparency, and then transfer it onto the wood using carbon paper or a pencil rubbing technique. |
Etch Slowly and Gently When etching with a soldering iron, it’s important to work slowly and apply even pressure. Move the soldering iron in a smooth, fluid motion, gradually etching the design into the wood. Avoid rushing or applying too much pressure, as this can lead to uneven lines or burning the wood. |
|
Take Breaks Wood etching can be a time-consuming process, especially for intricate designs. It’s important to take breaks to rest your hand and prevent fatigue. This will help maintain a steady hand and ensure consistent etching throughout the project. |
Finish and Protect Your Etched Wood Once you’ve finished etching, you can enhance the design by applying a wood finish or sealant. This will protect the wood and give it a polished look. Be sure to follow the manufacturer’s instructions for the specific finish or sealant you choose. |
By following these tips, you can achieve beautiful and professional-looking etched designs on wood using a soldering iron. Remember to practice, be patient, and have fun exploring different techniques and designs!
Questions and answers
What is etching?
Etching is a process of creating designs or patterns on a material’s surface using an acidic or corrosive substance.
Can you use a soldering iron to etch wood?
Yes, it is possible to etch wood using a soldering iron. The heated tip of the soldering iron can be used to burn designs or patterns onto the wood’s surface.


Meet Harrison Clayton, a distinguished author and home remodeling enthusiast whose expertise in the realm of renovation is second to none. With a passion for transforming houses into inviting homes, Harrison's writing at https://thehuts-eastbourne.co.uk/ brings a breath of fresh inspiration to the world of home improvement. Whether you're looking to revamp a small corner of your abode or embark on a complete home transformation, Harrison's articles provide the essential expertise and creative flair to turn your visions into reality. So, dive into the captivating world of home remodeling with Harrison Clayton and unlock the full potential of your living space with every word he writes.


