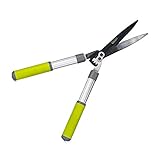
How To Clean Garden Shears After Use

Garden shears are an essential tool for any gardener, but they can quickly become dirty and dull after use. Properly cleaning and maintaining your garden shears is crucial to ensure they remain sharp and in good working condition. In this article, we will discuss some easy steps you can take to clean your garden shears effectively.
First and foremost, it is important to remove any excess dirt or debris from the blades of your garden shears. You can do this by using a stiff brush or an old toothbrush to scrub away the dirt. Make sure to pay extra attention to the area where the blades meet, as this tends to gather the most debris.
Once you have removed the dirt, it is time to give your garden shears a thorough cleaning. Fill a bucket or sink with warm water and add a mild detergent or dish soap. Submerge the blades of your shears in the soapy water and let them soak for a few minutes. This will help to break up any remaining dirt or sap.
After soaking, use a sponge or a cloth to scrub the blades and remove any stubborn dirt or sap. Be sure to pay attention to the edges of the blades, as these are the areas that need to be the sharpest. Rinse the shears with clean water to remove any soap residue.
Once your garden shears are clean, it is important to dry them thoroughly to prevent rust. You can use a clean towel to wipe them dry, or you can let them air dry. If you choose to let them air dry, make sure to store them in a dry place to avoid any moisture buildup.

Finally, after your garden shears are dry, it is a good idea to apply a thin coat of oil to prevent rust and keep the blades sharp. You can use a sewing machine oil or even a vegetable oil for this. Simply apply a few drops of oil to a cloth and rub it onto the blades. This will help to protect them and keep them in optimal condition.
By following these simple steps, you can ensure that your garden shears stay clean, sharp, and ready for use. Regular maintenance and cleaning will not only extend the life of your shears but also improve their performance. So, take the time to clean your garden shears after each use, and you will enjoy gardening with a well-maintained tool that makes your tasks easier and more enjoyable.
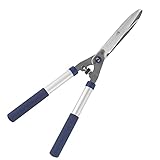
Maintaining the Efficiency: How to Clean Garden Shears After Use
Garden shears are an essential tool for any gardener, but like any tool, they require regular cleaning to maintain their efficiency and prolong their lifespan. Properly cleaning your garden shears after each use will help prevent the spread of disease, remove any sap or debris buildup, and ensure smooth cutting action for future use. Here are some steps to follow when cleaning your garden shears:
Step 1: Disassemble the Shears
Start by disassembling your garden shears, if possible. This will allow you to clean each individual part more thoroughly. Remove any screws or nuts that hold the shears together and separate the blades from the handles.
Step 2: Remove Debris
Next, use a brush or a cloth to remove any dirt, leaves, or other debris from the blades and handles. Pay special attention to the area near the pivot point where dirt and sap tend to accumulate. You can also use a toothpick or small brush to remove any debris from hard-to-reach areas.

Step 3: Clean with Soapy Water
Fill a bucket or basin with warm water and add a small amount of mild dish soap. Place the blades and handles into the soapy water and let them soak for a few minutes to loosen any remaining dirt or sap. Then, use a soft brush or cloth to scrub the blades and handles, making sure to remove any stubborn dirt or sap.
Step 4: Rinse and Dry
After scrubbing, rinse the shears thoroughly with clean water to remove any soap residue. Dry the blades and handles with a clean towel or let them air dry completely. This will help prevent rust and corrosion.
Step 5: Oil the Shears
Once the shears are dry, apply a thin layer of oil or lubricant to the blades and pivot point. This will help prevent rust and keep the shears in good working condition. Be sure to wipe off any excess oil to prevent it from attracting dirt or debris.
By following these simple steps, you can effectively clean and maintain your garden shears after each use. Regular cleaning will not only keep your shears in top condition but also help you achieve clean and precise cuts in your garden.
Gather the Essential Tools
Before you start cleaning your garden shears, it’s important to gather all the necessary tools. Having these items ready will make the cleaning process much easier and more efficient. Here are the essential tools you’ll need:
- Bucket of warm soapy water
- Sponge or brush
- Steel wool or sandpaper
- Rubbing alcohol or vinegar
- Cotton pads or rags
- Disposable gloves
- Sharpening stone or hone
- Protective oil or lubricant
Make sure to have these tools handy before you start cleaning your garden shears. This will ensure that you have everything you need to thoroughly clean and maintain your shears, keeping them sharp and ready for use.
Removing Dirt and Debris
Before cleaning your garden shears, it is important to remove any dirt and debris that may have accumulated on the blades. This can help prevent the buildup of rust and ensure that the shears are able to cut effectively.
Start by using a soft brush or cloth to gently brush away any loose dirt or debris. Be sure to brush both the blades and the handles, as dirt can often accumulate in the crevices. If the dirt is stubborn and difficult to remove, you can use a toothbrush or a small brush with stiff bristles to scrub away the debris.
If the shears are particularly dirty, you can fill a bucket or sink with warm soapy water. Use a mild detergent or dish soap and agitate the water to create suds. Place the shears in the soapy water and let them soak for a few minutes to help loosen any stubborn dirt.
After soaking, use a brush or cloth to scrub the blades and handles, making sure to remove all dirt and grime. Rinse the shears with clean water to remove any soap residue.

Once you have removed the dirt and debris, it is important to dry the shears thoroughly. Wipe them down with a clean towel or cloth and allow them to air dry completely before storing or using them again.
By regularly cleaning your garden shears and removing dirt and debris, you can help extend their lifespan and ensure that they continue to perform at their best.
Disinfecting the Shears
Once you have finished cleaning the garden shears, it’s important to take an extra step of disinfecting them to ensure the removal of any potentially harmful pathogens. Disinfecting your garden shears will help prevent the spread of plant diseases from one plant to another.
Here are some steps to follow when disinfecting your garden shears:
- Prepare a solution of water and bleach. Mix one part bleach with nine parts water in a bucket or basin.
- Submerge the blades of the shears in the bleach solution. Make sure the entire cutting edge and any other metal parts are completely covered with the solution.
- Let the shears soak in the bleach solution for at least 10 minutes. This will give enough time for the disinfectant properties of the bleach to work effectively.
- Take out the shears from the bleach solution and rinse them thoroughly with clean water to remove any residual bleach.
- Dry the shears with a clean towel or allow them to air dry completely.
- If desired, you can also use rubbing alcohol or a commercial disinfectant spray formulated for garden tools to disinfect the shears. Follow the instructions provided with the product for proper usage.
Disinfecting your garden shears after each use will help maintain their sharpness and prevent the spread of diseases among your plants. Make sure to store the shears in a clean and dry place until their next use.
Removing Rust and Residue
Rust and residue can accumulate on garden shears over time, making them less effective and more difficult to use. Luckily, there are a few simple steps you can take to remove rust and residue and restore your garden shears to their original condition.
Cleaning the Blades
Start by wiping off any loose debris from the blades using a clean, dry cloth. This will help prevent scratching the blades during the cleaning process.
Next, mix a solution of equal parts white vinegar and water in a container. Dip a sponge or cloth into the solution and use it to gently scrub the blades, paying special attention to any rust spots or residue. The acidity of the vinegar will help dissolve the rust and break down any buildup.
For tougher rust spots, you can also use a paste made from baking soda and water. Apply the paste to the affected areas and let it sit for a few minutes before scrubbing with a sponge or brush.
Once you have thoroughly cleaned the blades, rinse them with water to remove any leftover residue or cleaning solution. Dry the blades completely with a clean cloth to prevent new rust from forming.

Oiling the Blades
After cleaning, it’s important to oil the blades to prevent rust in the future and keep them running smoothly. Apply a few drops of lubricating oil to the pivot point and along the length of the blades. Open and close the shears a few times to work the oil into the joints.
Finally, wipe off any excess oil with a clean cloth to ensure that the shears are not overly greasy when you next use them.
By regularly cleaning your garden shears and removing rust and residue, you can keep them in great condition and ensure they last for years to come. Remember to clean and oil them after each use to maintain optimal performance and prolong their lifespan.
Lubricating the Shears
After cleaning and drying your garden shears, it’s important to lubricate them to keep them in good working condition. Lubricating the shears helps to prevent rust and keeps the blades operating smoothly.
First, make sure the shears are completely dry before applying any lubricant. This will help ensure that the lubricant sticks to the metal and doesn’t get diluted or washed away.
There are several types of lubricants you can use for garden shears. One popular option is a lightweight oil such as mineral oil or sewing machine oil. These oils are readily available and work well to prevent rust and ease blade movement. Another option is a silicone spray, which also provides excellent lubrication and prevents rust.
Applying the lubricant
To lubricate the shears, start by applying a small amount of oil or spray onto a clean cloth or rag. Gently wipe the blades and pivot point with the cloth, making sure to cover all metal surfaces. Take care not to apply too much lubricant as it can attract dirt and debris, which can clog the shears.
Next, open and close the shears several times to distribute the lubricant evenly along the blades and pivot point. This will help ensure that all moving parts are well coated and operating smoothly.
Maintenance tips
Regular maintenance is key to keeping your garden shears functioning properly. After each use, wipe the blades with a clean cloth to remove any dirt or debris. This will help prevent buildup and keep the shears working efficiently.
When storing your shears, it’s a good idea to lightly coat the blades with a thin layer of oil or silicone spray. This will provide extra protection against rust during storage and help maintain the shears’ performance when you’re ready to use them again.
By taking the time to lubricate your garden shears, you can extend their lifespan and ensure they are always ready for use. With regular cleaning and maintenance, your shears will continue to be effective tools for all your gardening needs.
Storing the Shears Properly
Proper storage of garden shears is essential to keep them in good condition and extend their lifespan. Here are some tips for storing your shears:
Clean and Dry
Before storing your garden shears, make sure they are clean and dry. Remove any dirt, debris, or plant residue that may have accumulated on the blades. Use a wire brush or a soft cloth to gently scrub the blades and remove any rust or sap. After cleaning, make sure the shears are completely dry to prevent corrosion.
Oil the Blades
Applying a thin coat of oil to the blades is an effective way to prevent rust and keep them in good working condition. Use a lubricating oil or a silicone-based spray and apply it to the blades, pivot point, and any other movable parts. Wipe off any excess oil before storing the shears to prevent it from attracting dirt and dust.
Store in a Dry Place
Choose a dry and well-ventilated area to store your garden shears. Avoid storing them in damp or humid places, as this can promote rust and deterioration. Consider using a tool rack, a pegboard, or a dedicated storage box to keep your shears organized and protected from moisture and physical damage.
Protect the Blades
To protect the sharpness of the blades and prevent accidental cuts, consider using blade covers or blade guards. These can be made of plastic, rubber, or other protective materials. Alternatively, you can wrap the blades in a piece of cloth or tape to prevent them from coming into contact with other tools or surfaces.
By following these storage tips, you can ensure that your garden shears will be ready for use whenever you need them, and they will last for years to come.
Questions and answers
What are garden shears?
Garden shears are cutting tools used for trimming and shaping plants in a garden.
Why is it important to clean garden shears after use?
It is important to clean garden shears after use to prevent the spread of diseases and ensure their longevity.
What are some common methods to clean garden shears?
Some common methods to clean garden shears include wiping them with a cloth soaked in rubbing alcohol, using a mixture of water and dish soap, or soaking them in a bucket of soapy water.


Harrison Clayton
Meet Harrison Clayton, a distinguished author and home remodeling enthusiast whose expertise in the realm of renovation is second to none. With a passion for transforming houses into inviting homes, Harrison's writing at https://thehuts-eastbourne.co.uk/ brings a breath of fresh inspiration to the world of home improvement. Whether you're looking to revamp a small corner of your abode or embark on a complete home transformation, Harrison's articles provide the essential expertise and creative flair to turn your visions into reality. So, dive into the captivating world of home remodeling with Harrison Clayton and unlock the full potential of your living space with every word he writes.

