How To Attach Circular Saw Buur
Attaching the circular saw blade correctly is crucial for both safety and optimal cutting performance. Whether you’re a DIY enthusiast or a professional, learning how to attach a circular saw blade is an essential skill that can save you time and frustration. In this article, we will guide you through the step-by-step process of attaching a circular saw blade.
Before we begin, it’s important to ensure that you have the right blade for the job. Circular saw blades come in different sizes and have various teeth configurations, each designed for specific cutting tasks. Make sure to choose a blade that matches the material you’ll be cutting, whether it’s wood, metal, or composite materials.
The first step in attaching a circular saw blade is to disconnect the saw from the power source. This is crucial to prevent any accidental start-up while working with the blade. Once the saw is unplugged or the battery is removed, you can proceed to the next step.
Next, locate the arbor nut or bolt on the saw. This is usually located at the center of the blade area. Depending on the model, you might need to use a wrench or a specialized tool to loosen the arbor nut. Once the arbor nut is loosened, you can remove the old blade by sliding it off the arbor.
Choosing the Right Circular Saw Blade
When it comes to using a circular saw, one of the most important factors to consider is the type of blade you are using. Choosing the right blade can make a significant difference in the quality of your cuts and the overall performance of your saw. Here are some key factors to consider when selecting a circular saw blade.

- Blade Diameter: One of the first things to consider is the blade diameter. Circular saw blades come in various sizes, typically ranging from 6 1/2 inches to 10 1/4 inches. The size you choose will depend on the depth of cut you need and the size of your saw.
- Number of Teeth: The number of teeth on a circular saw blade will affect the speed and smoothness of your cuts. Blades with more teeth provide finer cuts, while blades with fewer teeth are better for faster cuts in softer materials. Consider the specific materials you will be cutting and choose a blade with an appropriate tooth count.
- Tooth Configuration: Circular saw blades have different tooth configurations, such as rip, crosscut, or combination. Rip blades have fewer teeth and are designed for cutting with the grain, while crosscut blades have more teeth and are suited for cutting across the grain. Combination blades offer a mix of rip and crosscut teeth and can handle both types of cuts.
- Blade Material: Circular saw blades can be made from various materials, including carbon steel, high-speed steel, and carbide-tipped. Carbide-tipped blades are generally considered the best choice for most applications due to their durability and ability to maintain sharpness for a longer period of time.
- Specialty Blades: Depending on your specific needs, you may also consider specialty blades for certain materials or applications. For example, there are blades designed specifically for cutting plywood, laminate flooring, or metal. These blades often have unique tooth designs or coatings that enhance their cutting performance.
Remember, choosing the right circular saw blade is essential for achieving precise and clean cuts while ensuring optimal saw performance. Take the time to consider the factors mentioned above and select a blade that is suitable for your specific cutting needs.
Understanding Blade Teeth Types
When it comes to choosing a circular saw blade, one important factor to consider is the type of teeth it has. The type of teeth on a blade will determine the type of cuts it can make and the materials it can work with efficiently. Here are some common blade teeth types:
- Rip Teeth – Rip teeth are designed for making cuts along the grain of the wood. These teeth have a straight shape and are spaced further apart to remove more material quickly. Rip teeth are ideal for making long, smooth cuts.
- Crosscut Teeth – Crosscut teeth are designed for making cuts across the grain of the wood. These teeth have a V-shape and are spaced closer together to create a cleaner cut. Crosscut teeth are ideal for making precise and smooth cuts.
- Combo Teeth – Combo teeth are a combination of rip and crosscut teeth. These teeth have a combination of straight and V-shaped teeth, allowing the blade to make both ripping and crosscutting cuts effectively. Combo teeth are versatile and can be used for various types of cuts.
- Crosscutting/Trimming Teeth – These teeth are specifically designed for making clean and precise crosscuts or trimming cuts in materials like plywood or laminate. They have an alternating top bevel (ATB) configuration, which helps reduce chipping and tearing of the material.
- Ripping Teeth – Ripping teeth are designed to quickly remove material when making long rip cuts in materials like lumber. They have a flat top grind (FTG) configuration, which offers efficient, fast cutting.
- Dado Teeth – Dado teeth are specially designed for creating dado cuts, which are wide and shallow cuts used for joinery. These blades have multiple flat-top teeth with chippers in between, allowing them to remove wide sections of material efficiently.
- Specialty Teeth – There are various specialty teeth configurations available for specific cutting needs. These can include non-ferrous teeth for cutting metals, grind saw teeth for cutting solid surface materials, and specialty coating teeth for reducing friction and heat build-up.
Understanding the different types of blade teeth can help you choose the right blade for your specific cutting needs. Consider the material you will be working with and the type of cuts you will be making to determine the most suitable blade teeth configuration.
Preparing Your Circular Saw
Before attaching a circular saw blade, it’s important to properly prepare your saw. Taking these steps will ensure the safety and optimal performance of your tool:
1. Check the Power Source
Make sure your circular saw is properly plugged in or the battery is fully charged, depending on the type of saw you have. Check the power source to avoid any disruptions while using the tool.

2. Inspect the Blade
Before attaching a new blade, inspect the old one and look for any signs of damage or wear. If the blade is dull or damaged, replace it with a new one to ensure clean and efficient cuts.
3. Select the Proper Blade
Choosing the right blade for your cutting task is crucial. Consider the material you will be cutting and select a blade with the appropriate tooth count and design for optimal performance and safety.
4. Disconnect the Power
Prior to attaching or removing the blade, always disconnect the power source to prevent accidental activation of the saw and potential injuries.
5. Adjust the Cutting Depth
Ensure that the cutting depth of your circular saw is properly set for the material you will be cutting. Adjust the depth according to the thickness of the material to avoid any issues during the cutting process.
6. Secure the Blade Guard and Shoe
Check that the blade guard and shoe are securely in place before attaching the blade. This adds an extra layer of safety and helps prevent any accidental contact with the blade during operation.

7. Wear Safety Gear
Always wear appropriate safety gear, such as safety glasses, ear protection, and gloves, when operating a circular saw. This will protect you from potential hazards and ensure a safe working environment.
Installing the Blade
Before you can start using your circular saw, you need to install the blade properly. Follow these steps to ensure a safe and secure installation:
-
Prepare the Saw
Make sure the saw is turned off and unplugged before you begin. This will prevent any accidental starts during the installation process.
-
Choose the Right Blade
Select a circular saw blade that is suitable for the material you will be cutting. Different blades are designed for different purposes, such as cutting wood, metal, or plastic. Check the blade’s packaging or markings to ensure it is appropriate for your project.
-
Remove the Old Blade (if applicable)
If there is already a blade installed in your circular saw, you will need to remove it. Use the wrench provided with your saw to loosen the arbor nut that holds the blade in place. Turn the nut counterclockwise to loosen it, then remove the nut and the old blade.
-
Install the New Blade
Place the new blade onto the arbor, making sure the teeth are facing in the direction of the rotation (usually marked on the blade). Then, place the arbor nut back onto the spindle and tighten it with the wrench. Be sure to tighten it securely, but do not overtighten.
-
Double-Check the Installation
Once the blade is installed, check that it is aligned correctly and securely attached. Gently shake the blade to ensure there is no movement or wobbling. If the blade feels loose, double-check the tightness of the arbor nut.
With the blade installed properly, you are now ready to use your circular saw for your cutting tasks. Always remember to wear appropriate safety equipment, such as goggles and gloves, and follow all safety precautions provided by the manufacturer.
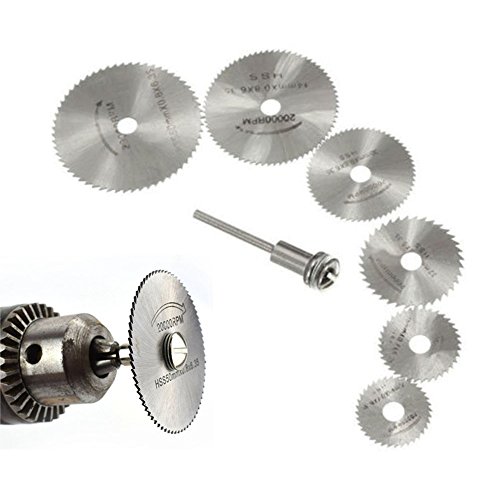
Attaching the Circular Saw to the Burr
Attaching the circular saw to the burr is a crucial step in ensuring its proper functioning and safety. Here is a step-by-step guide on how to attach the circular saw to the burr:
Step 1: Prepare the Tools and Materials
Gather all the necessary tools and materials before starting the attachment process. This may include the circular saw, burr, screws, screwdriver, and any other relevant equipment.

Step 2: Align the Circular Saw and Burr
Align the mounting holes of the circular saw with the corresponding holes on the burr. This ensures that the saw is properly positioned and will fit securely onto the burr.
Step 3: Insert and Tighten the Screws
Insert the screws through the mounting holes and into the corresponding holes on the burr. Use a screwdriver to tighten the screws securely. Ensure that the saw is firmly attached to the burr to prevent any movement during operation.
Step 4: Check the Attachment
After tightening the screws, double-check the attachment to ensure that the circular saw is properly secured to the burr. Make sure there is no wobbling or loosening of the saw when pressure is applied.
Step 5: Test and Adjust if Necessary
Before using the circular saw in any cutting operations, test its functionality. Check for any misalignment or issues with the attachment. If necessary, make any adjustments to ensure optimal performance and safety.
Following these steps will help you attach the circular saw to the burr correctly, providing you with a reliable and efficient tool for your cutting needs.

| Tools and Materials | Steps |
|---|---|
| Circular saw | Step 1 |
| Burr | Step 1 |
| Screws | Step 1, Step 3 |
| Screwdriver | Step 1, Step 3 |
| Other relevant equipment | Step 1 |
Securing the Circular Saw
Properly securing the circular saw before use is crucial for safety and accuracy. Here are the steps to securely attach the circular saw:
- Make sure the circular saw is powered off and unplugged.
- Set the base plate of the saw flat on a stable surface, such as a workbench.
- Locate the blade wrench that came with the circular saw. This is typically a small T-shaped tool that fits into the arbor nut.
- Insert the blade wrench into the arbor nut, which is located in the center of the blade.
- Hold the blade wrench in place and turn it counterclockwise to loosen the nut.
- Carefully remove the nut and the blade from the saw.
- Inspect the blade for any damage or wear and replace it if necessary.
- Select the appropriate replacement blade for the specific application.
- Insert the new blade onto the arbor shaft, making sure it aligns with the teeth facing forward.
- Tighten the arbor nut by turning the blade wrench clockwise, ensuring that it is fully tightened.
- Double-check that the blade is securely attached by gently trying to move it. It should not wobble or come loose.
Once the circular saw blade is securely attached, you can proceed with your cutting tasks. Remember to always wear appropriate safety gear, including safety goggles and ear protection, and follow proper cutting techniques for best results and safety.
Questions and answers
What is a circular saw burr?
A circular saw burr is a small blade or attachment that is used with a circular saw to cut through materials such as metal or wood.
How do I attach a circular saw burr to my circular saw?
Attaching a circular saw burr to your circular saw is a simple process. First, ensure that the saw is turned off and unplugged. Then, locate the arbor nut, which is situated in the center of the circular saw blade. Use a wrench to loosen and remove the arbor nut. Once the nut is removed, carefully slide the circular saw burr onto the arbor shaft, ensuring that it is positioned securely. Finally, reattach the arbor nut and tighten it with the wrench.
What are some safety precautions I should take when using a circular saw burr?
When using a circular saw burr, it is important to prioritize safety. Always wear protective eyewear and gloves to prevent any debris from causing harm. Keep your fingers and hands away from the blade or burr attachment at all times, and ensure that the saw is unplugged when attaching or detaching the burr. Additionally, follow all manufacturer instructions and guidelines for your specific circular saw and burr attachment.

What are some common uses for a circular saw burr?
A circular saw burr can be used for a variety of tasks. It is commonly used to cut through metal pipes, sheet metal, or other metal materials. Additionally, it can be used for woodworking tasks such as shaping and carving wood. The circular saw burr allows for precise and controlled cutting, making it a versatile tool for different applications.


Meet Harrison Clayton, a distinguished author and home remodeling enthusiast whose expertise in the realm of renovation is second to none. With a passion for transforming houses into inviting homes, Harrison's writing at https://thehuts-eastbourne.co.uk/ brings a breath of fresh inspiration to the world of home improvement. Whether you're looking to revamp a small corner of your abode or embark on a complete home transformation, Harrison's articles provide the essential expertise and creative flair to turn your visions into reality. So, dive into the captivating world of home remodeling with Harrison Clayton and unlock the full potential of your living space with every word he writes.


