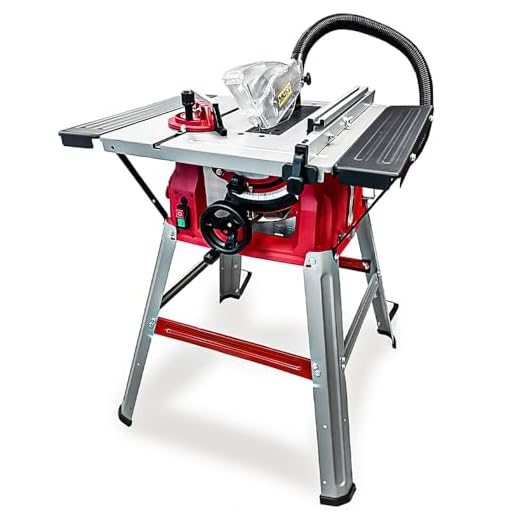
How To Adjust Table Saw Arbour

Table saws are an essential tool for any woodworking enthusiast. The arbour, or the shaft that holds the saw blade in place, plays a crucial role in ensuring accurate and clean cuts. Over time, the arbour may become misaligned or loose, which can affect the quality of your cuts and pose a safety risk. Fortunately, adjusting the table saw arbour is a straightforward process that can be done by following a few simple steps.
Step 1: Safety first
Before you begin adjusting the table saw arbour, it is important to ensure your safety. Make sure the power is turned off and the saw is unplugged. Wearing safety goggles and gloves is also recommended to protect yourself from any potential harm.
Step 2: Check for looseness
The first thing you need to do is check if the arbour is loose. You can do this by turning the arbour by hand. If you notice any wobbling or excessive play, it means that the arbour needs adjustment.

Step 3: Adjust the arbour
To adjust the arbour, you will typically need an arbour wrench or a wrench that fits the arbour nut. Insert the wrench into the arbour nut and turn it clockwise to tighten the arbour. Be careful not to over-tighten the arbour, as it can lead to excessive friction and strain on the motor.
Step 4: Align the arbour
After tightening the arbour, you need to check if it is aligned properly. You can do this by placing a square against the blade and the table. If the arbour is properly aligned, the square should touch both the blade and the table at the same time. If not, you may need to adjust the arbour by slightly loosening the nut and tapping it with a wooden mallet until it is aligned.
Step 5: Test the adjustments

Once you have tightened and aligned the arbour, it is time to test the adjustments. Plug in the saw and make a few test cuts to ensure that the blade is running smoothly and making accurate cuts. If you notice any issues, repeat the adjustment process until you achieve the desired results.
By following these simple steps, you can easily adjust the table saw arbour and ensure that your cuts are precise and safe. Regularly checking and adjusting the arbour will not only improve the quality of your woodworking projects but also prolong the life of your table saw.
Understanding the Table Saw Arbour
The table saw arbour is a crucial part of the table saw that holds and rotates the saw blade. It is responsible for the proper alignment and positioning of the blade, which ultimately affects the accuracy and quality of the cuts made on the table saw.
The arbour consists of several components, including the arbour shaft, arbour flange, arbour nut, and arbour bearings. The arbour shaft is a cylindrical metal rod that extends from the motor of the table saw and holds the saw blade. The arbour flange is a flat disc-shaped component that is attached to the arbour shaft and helps to secure the blade in place. The arbour nut is used to tighten the blade onto the arbour shaft, ensuring that it remains securely in place during operation. Lastly, the arbour bearings are small, ball-bearing-like components that allow the arbour shaft to rotate smoothly.
When adjusting the table saw arbour, it is important to ensure that all the components are properly aligned and tightened. This helps to prevent any wobbling of the saw blade, which can result in inaccurate cuts and potential safety hazards.

To adjust the table saw arbour, follow these steps:
- Disconnect the table saw from the power source.
- Use a wrench to loosen the arbour nut and remove the blade from the arbour shaft.
- Inspect the arbour shaft for any debris or damage. Clean or replace the arbour shaft if necessary.
- Inspect the arbour flange and arbour nut for any wear or damage. Replace them if needed.
- Tighten the arbour nut onto the arbour shaft, ensuring that it is securely in place.
- Reattach the blade onto the arbour shaft, making sure it is correctly aligned with the arbour flange.
- Tighten the arbour nut using a wrench, ensuring that it is tightened securely.
- Check the blade for any wobbling or misalignment. If necessary, repeat the adjustments until the blade is properly aligned.
By understanding the table saw arbour and following the proper steps to adjust it, you can ensure that your table saw operates smoothly and produces accurate cuts.
Safety Precautions
When adjusting the table saw arbor, it is important to take the following safety precautions to protect yourself and others from potential hazards and accidents:
1. Disconnect the power: Before beginning any adjustments, make sure the table saw is completely turned off and unplugged from the power source. This will prevent any accidental start-ups while working on the arbor.
2. Wear protective gear: Always wear appropriate personal protective equipment (PPE) such as safety goggles, ear protection, and a dust mask to protect yourself from flying debris, loud noises, and harmful dust particles.
3. Clear the workspace: Remove any unnecessary items, tools, or debris from the work area. This will help prevent accidents and ensure a clear workspace for a smooth adjustment process.
4. Secure the workpiece: Use clamps or other appropriate methods to secure the workpiece firmly in place on the table saw. This will minimize the risk of the workpiece shifting or binding during the arbor adjustment.
5. Read the manual: Familiarize yourself with the manufacturer’s instructions and guidelines for adjusting the table saw arbor. Follow the recommended procedures and safety precautions provided by the manufacturer.
6. Check for damage: Inspect the arbor, saw blade, and related components for any signs of damage or wear. Ensure that all parts are in good working condition before proceeding with the adjustment.
7. Use the right tools: Only use appropriate tools and equipment for the adjustment process. Using improper tools can lead to damage to the arbor or other parts of the table saw, as well as increase the risk of accidents.
8. Pay attention to the blade position: Ensure that the saw blade is fully lowered and not in contact with any objects before making any adjustments to the arbor. This will prevent accidental contact and possible injuries.
9. Go slow and be cautious: Take your time when adjusting the table saw arbor. Make small incremental adjustments and check the results before making further changes. Always be mindful of your surroundings and potential risks.
Following these safety precautions will help ensure a safer and more efficient process when adjusting the table saw arbor. Always prioritize safety and use caution when working with power tools.
Gather the Necessary Tools
Before adjusting the table saw arbor, it’s important to gather the necessary tools. Here is a list of tools that you will need:
- Adjustable wrench
- Allen wrench or hex key set
- Safety glasses
- Dial indicator gauge
- Table saw owner’s manual
An adjustable wrench will be needed to loosen or tighten the arbor nut. An Allen wrench or hex key set is necessary to adjust any set screws that hold the arbor assembly in place.

Safety glasses are essential to protect your eyes from any potential flying debris or sawdust while working on the table saw. A dial indicator gauge is helpful for accurately measuring the alignment of the arbor blade in relation to the miter slot or fence.
Lastly, it’s always a good idea to have the table saw owner’s manual on hand. It provides specific instructions and guidelines for your particular make and model of table saw, which can be helpful when adjusting the arbor.
Removing the Blade
Before adjusting the arbour on your table saw, you will need to remove the saw blade. This ensures your safety and allows for easier access to the arbour area.
Step 1: Power Off and Unplug
Before beginning any work on the table saw, make sure it is turned off and unplugged from the power source. This will prevent any accidental start-ups or electrical shocks.
Step 2: Locate the Arbor Lock
The arbour lock is typically located on the side of the table saw, near the blade. It is used to secure the arbour in place during blade removal or installation.

Step 3: Engage the Arbor Lock
Use your hand or a wrench to engage the arbour lock, holding the blade in place. This will prevent the blade from spinning while you loosen the arbour nut.
Step 4: Loosen the Arbor Nut
Using a wrench, turn the arbour nut counterclockwise to loosen it. Be sure to hold the blade in place with one hand while loosening the nut to keep it from spinning freely.
Step 5: Remove the Blade
Once the arbour nut is sufficiently loosened, remove it completely from the arbour shaft. Carefully lift the blade off the arbour shaft, making sure not to touch the sharp edges.
Now that the blade has been removed, you have access to the arbour area and can proceed with adjusting the arbour on your table saw.
Adjusting the Table Saw Arbour
The arbour of a table saw is an essential component that holds the saw blade in place. Over time, the arbour may become misaligned or loose, affecting the accuracy and stability of the cuts. It is crucial to regularly adjust the table saw arbour to ensure optimal performance. Here are the steps to adjust the arbour:
1. Power off and disconnect
Before starting any adjustments, ensure that the table saw is powered off and unplugged from the electrical outlet for safety reasons.
2. Remove the blade
To access the arbour, the blade needs to be removed. Raise the saw blade to its highest position using the elevation wheel. Then, loosen the arbour nut using a wrench and carefully lift the blade off the arbour.
3. Check for misalignment
Inspect the arbour for any signs of misalignment. Look for excessive play or wobbling of the arbour when manually moving it. If there is noticeable misalignment, further adjustments are required.
4. Adjust the arbour position
Use an arbour adjustment wrench to loosen the arbour bracket screws. Gently move the arbour from side to side while observing the alignment. Once the arbour is in the desired position, tighten the screws to secure it.
5. Reinstall the blade
Place the blade back onto the arbour with the teeth facing the correct direction (usually clockwise rotation). Tighten the arbour nut securely using a wrench.
6. Test the arbour alignment
Power on the table saw and make a test cut on a scrap piece of wood. Inspect the cut for accuracy and stability. If there are still issues with the arbour alignment, repeat the adjustment process until satisfactory results are achieved.
Regularly inspect and maintain the table saw arbour to ensure it is properly adjusted. This will help to extend the lifespan of the saw and ensure accurate and safe operation. Consult the manufacturer’s manual for any specific instructions related to your table saw model.
Reinstalling the Blade
Once you have made any necessary adjustments to the table saw arbour, it is time to reinstall the blade. Follow these steps to ensure a safe and accurate installation:
- Start by checking the blade for any signs of damage or wear. Look for any cracked or chipped teeth, as well as any warping or bending.
- Ensure that the blade is clean and free from any debris or rust. Use a wire brush to remove any buildup or residue.
- Carefully slide the blade back onto the arbour, making sure that it is aligned properly with the arbour flange.
- Turn the blade to ensure that it spins freely and does not wobble or make any unusual noises.
- Attach the blade washer and the arbour nut onto the arbour. Tighten the nut securely, but be sure not to overtighten.
- Use a wrench to hold the arbour in place while tightening the nut with another wrench. Follow the manufacturer’s specifications for the proper amount of torque.
- Double-check that the blade is secure by giving it a gentle tug. It should not move or come loose.
Once the blade is reinstalled, you can proceed with using your table saw. Remember to always wear appropriate safety gear and follow the manufacturer’s instructions for your specific model.
Questions and answers
How do I adjust the arbour on my table saw?
To adjust the arbour on your table saw, first, make sure the saw is turned off and unplugged. Then, locate the arbour adjustment mechanism, which is usually located on the side or back of the saw. Use a wrench to loosen the arbour nut and adjust the arbour up or down as needed. Once the arbour is adjusted to the desired height, tighten the arbour nut securely. Be sure to check the arbour for any wobbling or unevenness and make further adjustments if necessary.
What tools do I need to adjust the arbour on my table saw?
To adjust the arbour on your table saw, you will need a wrench to loosen and tighten the arbour nut. Make sure to use the correct size of wrench to avoid damaging the nut or arbour. Additionally, you may need a measuring tool, such as a ruler or a caliper, to accurately adjust the arbour to the desired height.
Why would I need to adjust the arbour on my table saw?
You may need to adjust the arbour on your table saw for several reasons. First, if you are experiencing a wobbling or vibration during cutting, adjusting the arbour can help improve the stability of the blade. Second, if the blade is not cutting straight or is binding in the material, adjusting the arbour can help align the blade properly. Lastly, when changing blades or using different types of blades, adjusting the arbour can ensure that the blade is at the correct height for optimal cutting performance.
What precautions should I take when adjusting the arbour on my table saw?
When adjusting the arbour on your table saw, it is important to take certain precautions to ensure your safety. First, make sure the saw is turned off and unplugged before making any adjustments. This will prevent any accidental starts or injuries. Second, wear safety goggles or glasses to protect your eyes from flying debris. Third, make sure to use the correct tools and follow the manufacturer’s instructions for adjusting the arbour. Lastly, double-check that the arbour nut is securely tightened before using the saw.
Can I adjust the arbour on a portable table saw?
Yes, you can adjust the arbour on a portable table saw just like any other table saw. However, the specific method of adjustment may vary slightly depending on the make and model of your saw. Refer to the manufacturer’s instructions or user manual for detailed guidance on how to adjust the arbour on your specific portable table saw.


Meet Harrison Clayton, a distinguished author and home remodeling enthusiast whose expertise in the realm of renovation is second to none. With a passion for transforming houses into inviting homes, Harrison's writing at https://thehuts-eastbourne.co.uk/ brings a breath of fresh inspiration to the world of home improvement. Whether you're looking to revamp a small corner of your abode or embark on a complete home transformation, Harrison's articles provide the essential expertise and creative flair to turn your visions into reality. So, dive into the captivating world of home remodeling with Harrison Clayton and unlock the full potential of your living space with every word he writes.


