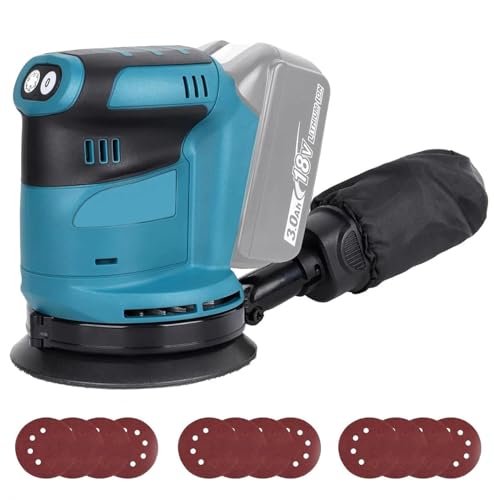
How To Use Power Devil Orbital Sander
The Power Devil Orbital Sander is a versatile tool that can be used for a variety of sanding tasks. Whether you are a professional tradesperson or a DIY enthusiast, this sander can help you achieve smooth and even surfaces with ease.
Before you start using the Power Devil Orbital Sander, it is important to familiarize yourself with its features and safety precautions. The sander is equipped with a powerful motor that delivers high speed and efficient sanding action. It is also lightweight and ergonomically designed for comfortable and controlled operation.
To start using the Power Devil Orbital Sander, ensure that the work area is clear of any obstacles and debris. Securely attach the appropriate sanding paper to the sander’s base plate, making sure it is aligned properly and tightly fastened. The sander accepts hook-and-loop sanding pads for quick and easy changes.
Once the sanding paper is properly attached, plug in the sander and switch it on. Start sanding the surface by holding the sander firmly with both hands and moving it in a back-and-forth or circular motion, depending on the desired finish. Remember to apply even pressure and avoid pressing too hard, as this can damage the surface.
As you sand, keep the sander moving constantly to avoid uneven sanding. Take frequent breaks to check your progress and ensure that the desired result is being achieved. If necessary, switch to a finer grit sandpaper to achieve a smoother finish.

When you have finished sanding, switch off the sander and unplug it from the power source. Remove the sanding paper from the base plate and clean any dust or debris from the sander. Store the sander in a safe and dry place, away from children and pets.
In conclusion, the Power Devil Orbital Sander is a reliable and user-friendly tool that can help you achieve professional sanding results. By following the proper instructions and safety precautions, you can effectively use this sander for a wide range of projects.
What is Power Devil Orbital Sander
Power Devil Orbital Sander is a versatile and powerful tool used for sanding various surfaces. It is a handheld power tool that operates by spinning a sanding disc in an orbital motion. This type of sander is commonly used in woodworking, furniture refinishing, and DIY projects.
Power Devil Orbital Sander can be used for sanding wood, metal, plastic, and other materials. It is particularly useful for removing paint, varnish, and rust, as well as preparing surfaces for painting or staining. The orbital motion of the sander ensures a smooth and even finish, reducing the risk of surface damage.
This sander is designed for ease of use and user comfort. It features a lightweight and compact design, allowing for greater maneuverability and control. The ergonomic handle provides a comfortable grip, reducing fatigue during extended sanding tasks.

Key features of Power Devil Orbital Sander:
- Variable Speed: The sander has a variable speed control, allowing the user to adjust the sanding speed to suit the task at hand.
- Dust Collection System: A built-in dust collection system helps to keep the work area clean and free from dust particles, providing better visibility and improving air quality.
Power Devil Orbital Sander is equipped with a sanding pad that can be easily replaced when worn out. The sander uses hook and loop (Velcro) fastening system, making it quick and hassle-free to change the sandpaper.
It is important to wear appropriate safety gear, such as safety goggles and a dust mask, when using Power Devil Orbital Sander to protect against flying debris and dust inhalation. Additionally, the tool should be used with caution and following the manufacturer’s instructions to ensure safe operation.
Overall, Power Devil Orbital Sander is a reliable and efficient tool that simplifies the sanding process. Whether you are a professional or a DIY enthusiast, this sander can help you achieve smooth and professional-looking results on your projects.
Advantages of Power Devil Orbital Sander
The Power Devil Orbital Sander is a versatile and powerful tool that offers a range of advantages for both professionals and DIY enthusiasts. Here are some of the main advantages of using a Power Devil Orbital Sander:
1. Efficient Sanding: The Power Devil Orbital Sander is designed to deliver efficient sanding performance. It features a high-speed motor and a random orbital motion that ensures smooth and even sanding results. This allows you to achieve a professional finish in less time and with less effort.

2. Versatility: This orbital sander is suitable for a wide range of sanding tasks. Whether you need to sand large surfaces or small corners and edges, the Power Devil Orbital Sander can handle it all. It is compatible with various sanding pads and discs, allowing you to customize the tool based on your specific needs.
3. Dust Collection: One of the standout features of the Power Devil Orbital Sander is its excellent dust collection system. It is equipped with a built-in dust bag that efficiently captures dust and debris generated during sanding. This not only keeps your working area clean but also promotes better air quality, minimizing the risk of respiratory issues.
4. Comfort and Control: The Power Devil Orbital Sander is designed with user comfort in mind. It features an ergonomic grip that provides a secure and comfortable hold, allowing you to work for extended periods without experiencing discomfort or fatigue. Additionally, the sander has a variable speed control feature, giving you greater control over the sanding process.
5. Durability: Built to last, the Power Devil Orbital Sander is constructed using high-quality materials that can withstand heavy-duty use. This means you can rely on this tool to handle tough sanding projects without worrying about premature wear or damage. With proper maintenance, the Power Devil Orbital Sander can serve you for years to come.
In conclusion, the Power Devil Orbital Sander offers numerous advantages that make it a valuable tool in any sanding project. Its efficient sanding performance, versatility, excellent dust collection, comfort, and durability make it a trusted choice for professionals and DIY enthusiasts alike.
![The Devil's Rejects [DVD] [2005]](https://m.media-amazon.com/images/I/51gQi8IshZL._SS520_.jpg)
Getting Started
Before using the Power Devil Orbital Sander, it’s important to familiarize yourself with its features and components.
Step 1: Check that the sander is unplugged and the power switch is in the “off” position.
Step 2: Ensure that the sandpaper attached to the sanding pad is suitable for the task at hand. Different grits are available for various sanding requirements.
Step 3: If the sandpaper needs to be replaced, follow the instructions provided by the manufacturer. Make sure to use the appropriate size and type of sandpaper.
Step 4: Attach the dust bag to the sander, if available. This will help to minimize dust and debris while sanding.

Step 5: Plug the sander into a power outlet that is compatible with its voltage and power requirements.
Step 6: Make sure you have a firm grip on the sander, and position yourself in a comfortable and stable stance.
Step 7: Before turning on the sander, check that there are no obstructions or loose objects in the surrounding area that could interfere with the sanding process.
Step 8: Turn on the sander and gradually apply it to the surface to be sanded. Start with a lighter pressure, and gradually increase it as needed.
Note: It’s important to maintain a steady and even motion while sanding to achieve the desired results.

Step 9: As you sand, periodically check the progress and adjust the sandpaper or sanding technique as necessary.
Step 10: Once you have completed the sanding task, turn off the sander and unplug it from the power outlet.
Step 11: Clean the sander and remove any dust or debris that may have accumulated during the sanding process. Proper maintenance will help prolong the life of your Power Devil Orbital Sander.
Setting up the Power Devil Orbital Sander
Step 1: Before starting any project, ensure that you have the necessary materials and a clean workspace. Gather the Power Devil Orbital Sander, sandpaper, and safety equipment such as goggles and a mask.
Step 2: Check the Power Devil Orbital Sander for any visible damage or defects. If you notice any issues, contact the manufacturer for assistance or consider replacing the sander.

Step 3: Attach the appropriate sandpaper to the base plate of the Power Devil Orbital Sander. Ensure that the sandpaper is securely fastened to avoid it slipping during operation.
Step 4: Plug the power cord into a suitable electrical outlet. Make sure the outlet is grounded to prevent any electrical hazards.
Step 5: Turn on the Power Devil Orbital Sander using the power switch located on the handle. Familiarize yourself with the different speed settings if your sander has this feature.
Step 6: Hold the Power Devil Orbital Sander firmly with both hands. Place one hand on the handle and the other on the front grip. This will help you maintain control and stability while sanding.
Step 7: Adjust the speed and pressure according to your project requirements. Start with a lower speed setting and gradually increase if needed. Apply even pressure to avoid uneven sanding.
Step 8: Move the Power Devil Orbital Sander back and forth, following the natural grain of the material you are sanding. Avoid applying excessive pressure as this may cause damage to the surface.
Step 9: Periodically check the sandpaper during sanding. If it becomes worn or clogged with dust, replace it with a new piece.
Step 10: After completing your sanding task, turn off the Power Devil Orbital Sander and unplug it from the electrical outlet. Clean the sander and store it in a safe place for future use.
Note: Always refer to the manufacturer’s instructions and guidelines for specific details on operating the Power Devil Orbital Sander safely and effectively.
Choosing the Right Sandpaper Grit
When using the Power Devil Orbital Sander, it is important to choose the right sandpaper grit for your specific project. The grit of the sandpaper refers to the size of the abrasive particles embedded in the paper. Different grit sizes are suitable for different tasks, so it’s crucial to select the appropriate one for the best results.
Here are some guidelines to help you choose the right sandpaper grit:
1. Coarse Grits (40-60)
- Coarse grit sandpaper is ideal for removing paint, varnish, or other finish from surfaces.
- It efficiently removes material and smooths rough surfaces.
- Use coarse grit sandpaper for initial sanding or when dealing with heavily textured or weathered surfaces.
2. Medium Grits (80-120)
- Medium grit sandpaper is suitable for general sanding tasks.
- It can be used for light material removal, smoothing uneven surfaces, and preparing surfaces for painting or staining.
- Medium grit sandpaper is often used for sanding bare wood or removing smaller imperfections.
3. Fine Grits (150-180)
- Fine grit sandpaper is used for finishing touches and achieving a smooth, polished surface.
- It is perfect for sanding between coats of paint or varnish to create a smooth and seamless finish.
- Use fine grit sandpaper for final sanding before applying a finish or for delicate materials that require a lighter touch.
Remember to always start with a coarser grit and gradually work your way to a finer grit for the best results. Additionally, consider the material you are sanding and adjust the sandpaper grit accordingly. Following these guidelines will help you achieve a professional finish with the Power Devil Orbital Sander.
Techniques for Using Power Devil Orbital Sander
When using a Power Devil orbital sander, there are several techniques that can help you achieve the best results:
- Select the right sandpaper grit: Depending on the project, you may need to choose a different sandpaper grit. Coarser grits, such as 60 or 80, are ideal for removing material quickly, while finer grits, like 120 or 240, are better for achieving a smooth finish.
- Start with a lower speed: It’s recommended to start with a lower sanding speed and gradually increase it as needed. This will allow you to have better control over the sander and minimize the risk of damaging the surface.
- Use steady and even pressure: Applying too much pressure can result in uneven sanding or swirl marks, while applying too little pressure may not remove the desired amount of material. Use steady and even pressure to achieve consistent results.
- Move in the direction of the grain: When sanding wood surfaces, it’s important to follow the direction of the grain. Sanding against the grain can cause scratches and make the surface appear uneven.
- Keep the sander moving: To prevent excessive heat buildup or uneven sanding, keep the sander moving at all times. Avoid leaving the sander in one spot for too long, as this can cause damage to the surface.
- Inspect your work regularly: Pause periodically to inspect your work and ensure that you’re achieving the desired results. This will allow you to make any necessary adjustments and ensure a high-quality finish.
- Clean the sander regularly: Dust and debris can accumulate on the sanding pad, affecting its performance. Clean the sander regularly by using a vacuum or brush to remove any buildup and maintain optimal sanding efficiency.
- Use proper safety gear: Always wear safety goggles and a dust mask when using a Power Devil orbital sander. This will protect your eyes from flying debris and prevent inhalation of harmful dust particles.
By following these techniques, you’ll be able to use your Power Devil orbital sander effectively and achieve professional-looking results on your woodworking projects.
Sanding in Straight Lines
When using the Power Devil Orbital Sander, it is important to sand in straight lines to achieve a smooth and even finish on your project. Sanding in straight lines allows you to cover more surface area efficiently and effectively.
1. Prepare the Workpiece
Before starting to sand, make sure the workpiece is clean and free of any dirt or debris. This will prevent any damage to the sander and ensure a desirable end result. Additionally, if there are any rough areas or imperfections on the workpiece, it is beneficial to pre-sand them by hand to create a more even surface.
2. Start with Light Pressure
When beginning to sand, start with light pressure on the sander. This will allow you to have better control and prevent the sander from digging in or creating uneven grooves. Keep the sander flat against the workpiece and use smooth, steady movements to ensure that you are sanding in straight lines.
Note: It is important to avoid applying too much pressure as this can cause the sandpaper to wear out quickly and potentially damage the workpiece.
3. Work in Sections
To achieve the best results, it is recommended to work in sections. Divide the workpiece into manageable areas and sand each section individually. This will help you maintain control and ensure that you are reaching all areas evenly.
Tip: You can use a pencil or masking tape to mark the areas you have already sanded, providing a visual guide and preventing you from missing any spots.
4. Overlapping Technique
To ensure consistent sanding, use the overlapping technique. This involves overlapping each pass of the sander by about one-third of the sanding pad’s width. This technique helps to eliminate any visible lines or marks that may occur if you were to sand in a single direction.
By following these steps and sanding in straight lines with your Power Devil Orbital Sander, you can achieve a professional and smooth finish on your woodworking projects.
Sanding in Circular Motions
When using the Power Devil Orbital Sander, it’s important to sand in circular motions to achieve a smooth and even finish. This technique helps to evenly distribute the sanding pressure and prevents any uneven or streaky results.
To start sanding in circular motions, first secure the sandpaper onto the orbital sander’s base. Make sure the sandpaper is aligned properly and tightly attached, as loose sandpaper can cause an uneven sanding surface.
Once the sandpaper is secured, hold the orbital sander with both hands to ensure stability and control. Place the sander on the surface you want to sand, and switch it on. Begin moving the sander in circular motions, applying gentle and even pressure.
Keep the sander moving continuously in circular motions, making sure to cover the entire area you want to sand. Avoid pressing too hard or staying in one spot for too long, as this can result in over-sanding and uneven surfaces.
Continue sanding in circular motions until you achieve the desired smoothness and level of sanding. It’s always a good idea to periodically check the surface to ensure you are achieving the desired results.
Remember, practicing proper technique and using the Power Devil Orbital Sander to sand in circular motions will help you achieve professional-looking results and avoid any potential damage to your workpiece.
Questions and answers
What is a Power Devil Orbital Sander?
A Power Devil Orbital Sander is a type of power tool used for sanding wood and other materials. It is equipped with a sanding pad that moves in a circular or orbital motion, allowing for smoother and more precise sanding.
How do I use a Power Devil Orbital Sander?
Using a Power Devil Orbital Sander is relatively simple. First, make sure you have the appropriate sanding disc attached to the sander. Then, turn on the sander and position it over the surface you want to sand. Apply light pressure and move the sander in a back-and-forth or circular motion. Be sure to sand evenly and avoid applying too much pressure, as this can damage the surface.


Meet Harrison Clayton, a distinguished author and home remodeling enthusiast whose expertise in the realm of renovation is second to none. With a passion for transforming houses into inviting homes, Harrison's writing at https://thehuts-eastbourne.co.uk/ brings a breath of fresh inspiration to the world of home improvement. Whether you're looking to revamp a small corner of your abode or embark on a complete home transformation, Harrison's articles provide the essential expertise and creative flair to turn your visions into reality. So, dive into the captivating world of home remodeling with Harrison Clayton and unlock the full potential of your living space with every word he writes.