How To Use A Ryobi Orbital Sander
Do you want to achieve a smooth and professional finish on your woodworking projects? Look no further than the Ryobi Orbital Sander. This handy power tool is designed to quickly and effectively sand a variety of surfaces, making it an essential tool for any DIY enthusiast or professional woodworker.
In this article, we will guide you through the step-by-step process of using the Ryobi Orbital Sander, from setting it up correctly to achieving the best results.
Step 1: Prepare the surface
Before you begin sanding, it’s important to prepare the surface of your project. Make sure it is clean, free from any dust or debris, and that any nails or staples are removed. This will ensure that you get the best results and prevent any damage to the sander.
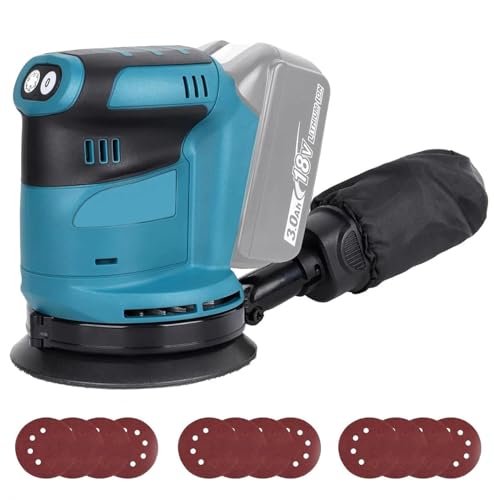
Step 2: Attach the sanding pad

Next, it’s time to attach the sanding pad to the Ryobi Orbital Sander. This is a straightforward process – simply align the holes on the pad with the holes on the sander’s base and press down firmly until it snaps into place. Make sure it’s securely attached before moving on.
Step 3: Adjust the speed and sanding motion
Once the sanding pad is attached, you can adjust the speed and sanding motion to suit your project. The Ryobi Orbital Sander usually has multiple speed settings, allowing you to choose the most appropriate one for the task at hand. Additionally, you can select between orbital or random orbital motion, depending on your desired finish.
Step 4: Begin sanding
Now it’s time to start sanding. Hold the Ryobi Orbital Sander firmly with both hands, applying light to moderate pressure on the surface you are sanding. Move the sander in a smooth, back-and-forth motion, following the grain of the wood for the best results. Remember to keep the sander moving at all times to avoid creating deep scratches.

Step 5: Finishing touches
Once you are satisfied with the level of sanding, you can remove the sanding pad and attach a finer-grit sandpaper for the finishing touches. This will help you achieve an even smoother and more polished surface. Repeat the sanding process with the finer-grit sandpaper, following the same technique as before.
Using a Ryobi Orbital Sander may seem daunting at first, but with these simple steps, you’ll be able to achieve professional-looking results on all your woodworking projects. So go ahead and give it a try!
Choosing the Right Ryobi Orbital Sander
When it comes to choosing a Ryobi orbital sander, there are a few factors to consider that will help you find the right tool for your needs. Here are some tips to keep in mind:
1. Sanding Power
One of the most important factors to consider is the sanding power of the sander. Different models will have varying levels of power, and it’s essential to choose one that can handle the types of projects you will be working on. If you’re planning to tackle large, heavy-duty projects, you’ll want a sander with more power. On the other hand, if you primarily work on smaller, more delicate projects, a less powerful sander may be sufficient.

2. Variable Speed Settings
Another feature to look for in a Ryobi orbital sander is variable speed settings. This allows you to adjust the speed of the sander to match the requirements of your project. Lower speeds are ideal for removing paint or smoothing surfaces, while higher speeds are better suited for more aggressive sanding. Having the flexibility to adjust the speed can greatly improve your sanding results.
3. Dust Collection
Messy dust can be a significant annoyance when sanding, so choosing a sander with good dust collection capabilities is crucial. Look for models with built-in dust collection systems or those that can connect to a vacuum cleaner for efficient dust removal. This will not only keep your workspace cleaner but also ensure you’re not breathing in excess dust particles.
4. Ergonomics and Comfort
Considering the ergonomics and comfort of the sander is another important aspect. Look for a Ryobi orbital sander with an ergonomic grip that feels comfortable in your hand. The weight and balance of the tool are also factors to consider, especially if you’ll be working for extended periods. Test a few different models to find one that feels comfortable and easy to handle.
5. Compatibility with Sanding Pads
Finally, make sure the Ryobi orbital sander you choose is compatible with a wide range of sanding pads. Different projects will require different grits of sandpaper, so having flexibility and options in this area is essential. Also, check if the sander has a quick-change system for easy and convenient pad swapping.
By considering these factors, you can choose the right Ryobi orbital sander that will help you achieve the best sanding results for your projects. Whether you’re a DIY enthusiast or a professional woodworker, having the right tool in your hand can make all the difference.

Proper Use and Safety Precautions
When using a Ryobi orbital sander, it’s important to follow these proper use and safety precautions:
- Read the user manual before operating the sander to understand its features and specifications.
- Wear appropriate safety gear, such as safety glasses, a dust mask, and ear protection to protect yourself from flying debris and noise.
- Make sure the sander is securely plugged into a grounded outlet before turning it on.
- Avoid using the sander on wet surfaces or in wet conditions to prevent electric shock.
- Inspect the sanding pad and sandpaper before each use. Replace any worn-out or damaged parts to ensure optimal performance and prevent accidents.
- Start sanding with a low speed setting and gradually increase it as necessary. This will help prevent gouging or damaging the surface you’re working on.
- Always move the sander in the direction of the wood grain to achieve better results and avoid swirl marks.
- Do not apply excessive pressure on the sander. Let the weight of the machine do the work for you.
- Avoid leaving the sander in one spot for too long, as it can create uneven sanding or burn the surface.
- Keep your hands and fingers away from the sanding area and any moving parts of the sander to prevent injury.
- Regularly clean the sander and remove any accumulated dust or debris to maintain its performance and extend its lifespan.
- When finished using the sander, turn it off and unplug it from the power source. Store it in a safe and dry place.
By following these proper use and safety precautions, you can effectively use the Ryobi orbital sander while ensuring your personal safety and achieving professional results.
Tips and Techniques for Effective Sanding
When using a Ryobi orbital sander, there are several tips and techniques that can help you achieve the best results. Whether you are sanding a DIY project or preparing a surface for painting or staining, these tips will ensure that your sanding is efficient and effective.
1. Choose the Right Grit
One of the most important factors in effective sanding is selecting the right grit sandpaper for the job. Coarse grits, such as 60 or 80, are ideal for removing paint or varnish, while finer grits, like 120 or 150, are better for smoothing surfaces and preparing them for finishing. Start with a coarse grit and gradually work your way up to a finer grit for smooth and even results.
2. Apply Even Pressure
When sanding with a Ryobi orbital sander, it is important to apply even pressure to the surface. Avoid pressing too hard, as this can cause the sander to leave marks or create an uneven surface. Let the weight of the sander do most of the work, and simply guide it along the surface with smooth and consistent movements.

3. Avoid Over-Sanding
Over-sanding can result in damage to the surface and create uneven patches. It is important to keep the sander moving at all times to prevent over-sanding in one area. Use sweeping motions and make sure to sand evenly across the entire surface. It can be helpful to periodically check your progress and adjust your technique as needed.
4. Use a Vacuum or Dust Collection System
Sanding creates a lot of dust, which can be harmful when inhaled and can also make it difficult to see your progress. To keep your work area clean and safe, use a vacuum or dust collection system to extract the dust. This will also help prevent the dust from settling back onto the surface you are working on, ensuring a smoother finish.
By following these tips and techniques, you can make the most of your Ryobi orbital sander and achieve professional-looking results. Remember to always wear appropriate safety gear, such as goggles and a dust mask, when sanding, and take breaks if needed to avoid fatigue. Happy sanding!
Maintenance and Care for Your Ryobi Orbital Sander
Proper maintenance and care of your Ryobi orbital sander will not only extend its lifespan but also ensure optimal performance. Here are some essential maintenance tips to keep your sander in top shape:
1. Cleaning
After each use, make sure to clean the sander thoroughly. Use a soft brush or a cloth to remove any dust, debris, or residue from the sanding pad and the body of the sander. This will prevent any buildup that could affect the sander’s performance.

2. Sanding Pad Replacement
Regularly inspect the sanding pad for signs of wear and tear. If you notice any damage or if the pad has become ineffective, it’s time to replace it. Refer to the user manual for instructions on how to remove and install a new sanding pad.
3. Dust Collection
Check the dust collection bag or canister regularly and empty it when it reaches capacity. This will help maintain optimal dust collection efficiency and prevent any clogging that could affect the sander’s performance. Additionally, ensure that the dust port and vacuum attachment are clean and free from obstructions.
4. Lubrication
Periodically lubricate the moving parts of the sander, such as the motor bearings and the pad brake, according to the manufacturer’s recommendations. This will help reduce friction and wear, ensuring smooth operation.
5. Storage
When not in use, store your Ryobi orbital sander in a clean and dry location. Keep it away from extreme temperatures and humidity, as these can cause damage to the sander’s components. Consider using a case or a storage bag to protect the sander from dust and potential impacts.
By following these maintenance and care tips, you can keep your Ryobi orbital sander in excellent condition for years to come, ensuring optimal performance and longevity.

Questions and answers
What is a Ryobi orbital sander?
A Ryobi orbital sander is a power tool that is used for sanding wood, metal, or other surfaces. It is a versatile tool that features a sanding pad that moves in a circular motion, which helps to remove material quickly and evenly.
How do I use a Ryobi orbital sander?
Using a Ryobi orbital sander is quite simple. First, make sure to wear safety goggles and a dust mask to protect yourself from the dust. Next, choose the appropriate sandpaper grit for your project and attach it to the sanding pad. Then, turn on the sander and move it in smooth, even strokes across the surface you are sanding. Make sure not to apply too much pressure, as the sander is designed to do the work for you. Finally, when you are finished, turn off the sander and clean up any remaining dust.
What are the advantages of using a Ryobi orbital sander?
There are several advantages to using a Ryobi orbital sander. First, it is a powerful tool that can quickly and efficiently remove material. It also provides a smooth and even finish, thanks to its circular sanding motion. Additionally, the sander is quite versatile and can be used on a variety of surfaces. Finally, Ryobi is a reputable brand known for its quality and durability, so you can trust that their orbital sander will be reliable for your projects.
Can I use a Ryobi orbital sander on metal surfaces?
Yes, you can definitely use a Ryobi orbital sander on metal surfaces. However, it is important to use the appropriate sandpaper grit for metal and be cautious not to apply too much pressure. Metal can heat up quickly and cause damage to the sandpaper or the sander itself. It is also recommended to use a sanding lubricant or coolant on metal surfaces to prevent overheating and extend the life of the sandpaper.


Meet Harrison Clayton, a distinguished author and home remodeling enthusiast whose expertise in the realm of renovation is second to none. With a passion for transforming houses into inviting homes, Harrison's writing at https://thehuts-eastbourne.co.uk/ brings a breath of fresh inspiration to the world of home improvement. Whether you're looking to revamp a small corner of your abode or embark on a complete home transformation, Harrison's articles provide the essential expertise and creative flair to turn your visions into reality. So, dive into the captivating world of home remodeling with Harrison Clayton and unlock the full potential of your living space with every word he writes.