How To Change Motor Brushes On A Makita Palm Sander
Is your Makita palm sander not working as efficiently as it used to? It’s possible that the motor brushes may need to be replaced. The motor brushes in a palm sander are essential for proper functioning, as they conduct the electrical current to power the motor. Over time, these brushes can wear down and become less effective, causing the sander to lose power or stop working altogether. In this article, we’ll walk you through the step-by-step process of changing the motor brushes on a Makita palm sander so you can get back to your woodworking projects in no time.
Before we begin, it’s important to note that this guide is specifically for Makita palm sanders. The process may be slightly different for other brands or models, so be sure to consult your user manual if you’re not working with a Makita sander.
The first step in changing the motor brushes is to locate them. On a Makita palm sander, the motor brushes are typically located on the sides of the motor housing, near the fan vents. You may need to remove a cover or access panel to access the brushes.
Once you’ve located the brushes, you can begin the removal process. Carefully disconnect any wires attached to the brushes, making note of their placement for reassembly. Gently pull the old brushes out of their holders, taking care not to damage the holders or surrounding components.
With the old brushes removed, it’s time to install the new ones. Take your new motor brushes and align them with the holders, making sure they fit snugly. Reattach any wires according to your earlier notes, ensuring a secure connection.

After the new brushes are in place, replace any covers or access panels that were removed and give your sander a test run to ensure everything is working properly. If your sander is still not functioning correctly, you may need to seek further assistance or consult a professional.
By following these simple steps, you can easily change the motor brushes on your Makita palm sander, extending the life of your tool and ensuring optimal performance. With properly functioning motor brushes, you’ll be able to tackle your woodworking projects with ease and precision.
What Are Motor Brushes
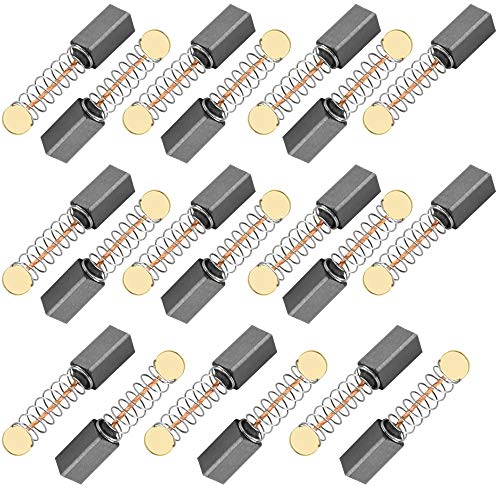
Motor brushes are essential components of electric motors, including those found in power tools like the Makita palm sander. They are small, rectangular blocks made of carbon or graphite that play a crucial role in conducting electricity between the stationary parts of the motor (stator) and the moving parts (rotor).
The purpose of motor brushes is to provide a continuous electrical connection between the power source and the rotating armature of the motor. As the armature spins, the brushes make constant contact with the commutator, which is a segmented cylindrical component attached to the rotor. This interaction allows electrical current to flow to the armature, creating the necessary magnetic field that drives the motor.
Over time, motor brushes can wear down due to the friction and heat generated during operation. When brushes become worn or damaged, the quality and consistency of the electrical connection can be compromised. This can result in a decrease in performance, reduced power output, and potential motor failure.

To ensure optimal performance and longevity of the motor, it is important to regularly inspect and replace worn motor brushes. This maintenance task is relatively simple and can be done with the appropriate tools and a basic understanding of the motor’s construction.
Types of Motor Brushes
There are different types of motor brushes available, depending on the specific application and motor design. Carbon brushes are the most common type, known for their durability, low electrical resistance, and ability to withstand high temperatures. Graphite brushes, on the other hand, are softer and often used in applications where low friction and minimal wear are desired.
Replacing Motor Brushes
When it comes to replacing motor brushes on a Makita palm sander or any other power tool, it is crucial to use genuine replacement brushes recommended by the manufacturer. These brushes are designed to fit correctly and provide the necessary electrical conductivity for optimal performance.
To replace the brushes, start by removing the screws or clips that secure the brush covers on the tool. Carefully remove the old brushes, taking note of their orientation and positioning. Insert the new brushes, making sure they are properly aligned with the brush holders. Replace the brush covers and secure them back in place. Finally, test the tool to ensure that the new brushes are making good contact and the motor is functioning correctly.
Regular maintenance and timely replacement of motor brushes can help extend the lifespan of your power tools and ensure their efficient operation. By understanding what motor brushes are and how to replace them, you can keep your Makita palm sander running smoothly and effectively for years to come.

When and Why Should You Change Motor Brushes
Motor brushes are critical components in power tools like the Makita palm sander. Over time, these brushes wear down due to friction with the commutator. Eventually, the brushes will no longer make proper contact, leading to decreased motor performance or complete motor failure.
Here are some signs indicating that it is time to change the motor brushes:
- Decreased Motor Performance: If you notice a significant decrease in the power or speed of your Makita palm sander, it could be a sign that the motor brushes are worn and need to be replaced. Worn brushes might not be making proper contact with the commutator, resulting in reduced motor efficiency.
- Sparking: Excessive sparking around the brushes is a clear indication that they need to be replaced. This can occur when the brushes are worn down too much and no longer make proper contact with the commutator.
- Overheating: If the motor of your palm sander is getting excessively hot during use, it could be due to worn motor brushes. When the brushes are worn and not making proper contact, it can cause the motor to work harder and generate more heat.
- Noise: Unusual noises coming from the motor can also be a sign of worn brushes. If the brushes are not making proper contact, it can cause the motor to make grinding or squealing noises.
Regular inspection and maintenance of the motor brushes on your Makita palm sander are essential to ensure optimal performance and prevent unnecessary motor damage. It is recommended to replace the brushes when they are worn down to approximately 1/8 inch.
Conclusion
Knowing when and why to change the motor brushes in your Makita palm sander is crucial for maintaining its performance and prolonging its lifespan. By keeping an eye out for signs of wear and promptly replacing the brushes when necessary, you can ensure that your sander continues to operate at its best.
Step-by-Step Guide
Follow these steps to change the motor brushes on your Makita palm sander:

- Before starting, make sure you have unplugged the sander from the power source to prevent any accidents.
- Locate the motor brush housing on the side of the sander. It is usually near or around the motor assembly.
- Using a small screwdriver or a flat-head screwdriver, gently remove the screws holding the brush housing in place. Keep these screws in a safe place as you will need them later.
- Carefully remove the brush housing cover to reveal the brushes inside.
- Inspect the brushes for any signs of wear or damage. If the brushes are worn down or cracked, they will need to be replaced.
- Using a pair of needle-nose pliers, carefully pull out the old brushes from their holders. Be gentle to avoid damaging any of the surrounding components.
- Insert the new brushes into the brush holders, making sure they fit securely.
- Replace the brush housing cover and secure it back in place by tightening the screws.
- Plug the sander back into the power source and test it to ensure the new brushes are functioning properly.
- If everything is working correctly, you can now resume using your Makita palm sander with its new motor brushes.
Remember to regularly inspect and replace the motor brushes on your sander to ensure optimal performance and prolong the life of the tool.
Step 1: Power Off and Unplug the Sander
Before you begin the process of changing the motor brushes on your Makita palm sander, it is crucial to power off the sander and unplug it from the electrical outlet. This step is necessary to ensure your safety and prevent any accidents or electric shock.
Step 2: Remove the Brush Caps
Before you can replace the motor brushes on your Makita palm sander, you will need to remove the brush caps. The brush caps are small plastic covers that hold the brushes in place.
Supplies You Will Need:
- Small flathead screwdriver
Here’s how to remove the brush caps:
- Disconnect the power cord from the sander to ensure your safety.
- Locate the brush caps on the sides of the sander. They are usually circular and have a small groove on the outer edge.
- Take the small flathead screwdriver and insert it into the groove of the brush cap.
- Gently pry the brush cap upwards to release it from the sander.
- Repeat the process for the other brush cap.
Once you have removed both brush caps, you will have access to the motor brushes. Continue to the next step to learn how to remove and replace them.

Step 3: Remove the Old Brushes
Before you can replace the motor brushes on your Makita palm sander, you need to remove the old ones. Follow these steps to safely remove the old brushes:
- Unplug the power cord from the electrical outlet to ensure your safety.
- Locate the brush caps on both sides of the motor housing.
- Using a small flathead screwdriver, gently pry off the brush caps. Be careful not to damage the surrounding housing or components.
- After removing the brush caps, you will see the old brushes nestled inside the brush holders. Take note of their position and orientation for reference when installing the new brushes.
- Grasp the brass collar on the old brush and pull it straight out of the brush holder. The brush might be secured with a spring, so take care not to lose or damage it.
- Repeat the previous step for the other brush, ensuring you keep track of the springs.
Once you have successfully removed the old brushes from your Makita palm sander, you can proceed to the next step of the replacement process.
Step 4: Install the New Brushes
Now it’s time to install the new motor brushes. Follow these simple steps:
- Take the new brushes out of their packaging.
- Inspect the brushes to ensure they are clean and free from any debris.
- Locate the brush caps on top of the sander’s motor housing. They are usually located on opposite sides.
- Using a screwdriver or a coin, carefully unscrew the brush caps in a counterclockwise direction to remove them.
- Inside each brush cap, you will find the old brush. Gently pull it out of its socket.
- Take one of the new brushes and insert it into the empty socket. Make sure it fits securely.
- Repeat the same process for the other brush.
- Once both brushes are in place, screw the brush caps back on in a clockwise direction.
- Tighten the brush caps firmly, but be careful not to overtighten.
Congratulations! You have successfully installed the new brushes on your Makita palm sander. Now you can proceed to reassemble the sander and test it to ensure it is working properly.
Questions and answers
Can I change the motor brushes on my Makita palm sander by myself?
Yes, you can change the motor brushes on your Makita palm sander by yourself. It is a relatively simple process that can save you money on repairs.

What tools do I need to change the motor brushes on my Makita palm sander?
To change the motor brushes on your Makita palm sander, you will need a screwdriver, a pair of pliers, and replacement motor brushes that are compatible with your sander.
How often do I need to change the motor brushes on my Makita palm sander?
The frequency of motor brush replacement depends on the usage of your Makita palm sander. Generally, it is recommended to change the brushes every 50 to 100 hours of use or when you notice a decrease in performance.
What are the signs that indicate the need to change the motor brushes on my Makita palm sander?
There are a few signs that indicate the need to change the motor brushes on your Makita palm sander. These include reduced power or speed, intermittent operation, excessive sparking, or a burning smell coming from the sander.


Harrison Clayton
Meet Harrison Clayton, a distinguished author and home remodeling enthusiast whose expertise in the realm of renovation is second to none. With a passion for transforming houses into inviting homes, Harrison's writing at https://thehuts-eastbourne.co.uk/ brings a breath of fresh inspiration to the world of home improvement. Whether you're looking to revamp a small corner of your abode or embark on a complete home transformation, Harrison's articles provide the essential expertise and creative flair to turn your visions into reality. So, dive into the captivating world of home remodeling with Harrison Clayton and unlock the full potential of your living space with every word he writes.

