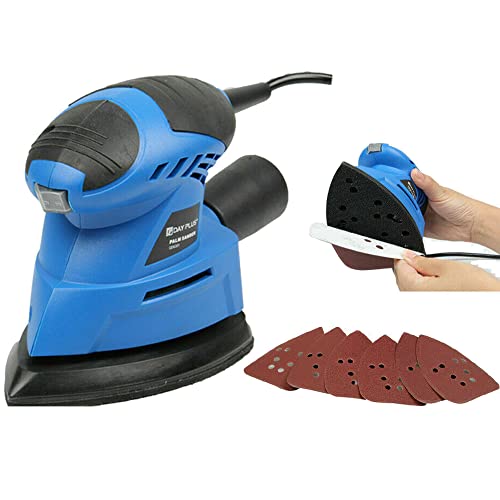
How To Attach Sanding Pad To Orbital Sander


Sanding pads are crucial attachments for ensuring a smooth and flawless finish when using an orbital sander. They come in various grits and are designed to be easily attached and detached from the sander to accommodate different sanding needs. Whether you are a beginner or experienced DIY enthusiast, learning how to properly attach a sanding pad to your orbital sander is essential for achieving professional-looking results.
In this article, we will guide you through the step-by-step process of attaching a sanding pad to an orbital sander.
Step 1: Turn off and unplug the orbital sander. Safety first! Always make sure your sander is turned off and unplugged before attaching or detaching any accessories. This will prevent any accidental starts and potential injuries. Additionally, make sure the sander is placed on a stable surface to avoid any movement during the attachment process.
Step 2: Choose the appropriate sanding pad. Depending on the task at hand, select the sanding pad with the appropriate grit. Coarser grits are suitable for removing heavy layers of material, while finer grits are ideal for achieving a smooth and polished finish. Make sure the sanding pad is compatible with your orbital sander model to ensure a secure fit.

Step 3: Align the holes on the sanding pad with those on the sander. Most sanding pads come with multiple holes that line up with the dust collection system or ventilation on the sander itself. Align the holes on the sanding pad with those on the sander’s base, ensuring a proper fit. This alignment will also facilitate effective dust extraction during sanding, keeping your workspace clean and reducing airborne particles.
Step 4: Press the sanding pad firmly onto the sander’s base. Once the holes are aligned, press the sanding pad firmly onto the sander’s base. Apply even pressure to ensure a secure attachment. Make sure the sanding pad is centered and level on the base, as an uneven attachment can result in uneven sanding or damage to the pad.
Step 5: Verify the sanding pad is securely attached. Give the sanding pad a gentle tug to ensure it is securely attached. If it comes off easily, repeat steps 3 and 4 to achieve a more secure fit. It’s essential to have a properly attached sanding pad during operation to prevent accidents and maintain control over the sander.
Once you have successfully attached the sanding pad to your orbital sander, you are ready to tackle your sanding projects with confidence. Remember to always follow safety guidelines and choose the appropriate sanding pad for each task to achieve the best results.
Step-by-Step Guide
Attaching a sanding pad to an orbital sander can seem like a daunting task, but with these simple steps, you’ll have it done in no time. Follow along with this guide to ensure a smooth and successful attachment process.
Step 1: Gather Your MaterialsBefore you begin, make sure you have all the necessary materials handy. This includes your orbital sander, sanding pad, and any additional tools required, such as an Allen wrench or screwdriver. |
Step 2: Remove Any Existing Sanding PadIf your orbital sander already has a sanding pad attached, you’ll need to remove it before attaching a new one. Depending on the model, this may involve loosening screws or using a tool to unscrew it. |
Step 3: Prepare the Orbital SanderInspect the bottom of your orbital sander and ensure it is clean and free of debris. This will help to ensure a secure attachment of the new sanding pad. Additionally, some orbital sanders may have alignment holes or pins that need to be properly aligned with the sanding pad. Check your user manual for specific instructions. |
Step 4: Align the Sanding PadTake your new sanding pad and align it with the holes or pins on the orbital sander. Make sure it sits flush against the bottom of the sander to ensure even sanding. Must-Have
12-Pc Drill Sanding Disc Attachment Set Perfect for rotary tool sanding
This versatile kit includes various grits and a durable attachment for drilling, ideal for polishing and smoothing surfaces. Designed for ease of use with quick fitting and dust extraction features.
|
Step 5: Secure the Sanding PadOnce the sanding pad is aligned, use the provided screws or tightening mechanism to secure it in place. Be careful not to overtighten, as this could damage the pad or sander. If your orbital sander requires an Allen wrench or screwdriver to tighten the screws, make sure to use the appropriate tool and tighten them evenly. |
Step 6: Test the AttachmentAfter securing the sanding pad, give it a gentle tug or spin the sander without any sandpaper attached to ensure it is securely attached. If the pad feels loose or wobbly, double-check the alignment and tightness of the screws. |
Now that you’ve successfully attached the sanding pad to your orbital sander, you are ready to start your sanding project. Remember to always follow the manufacturer’s instructions and safety precautions when using power tools.
Tools You Will Need
Before you can attach a sanding pad to your orbital sander, you will need to gather a few essential tools. Make sure you have these items on hand:
- Orbital Sander: This is the main tool you will be using to attach the sanding pad. Make sure it is in good working condition before you begin.
- Sanding Pad: You will need to have the appropriate sanding pad for your orbital sander. Check the specifications of your sander to determine the correct pad size and type.
- Screws or Clips: Depending on the design of your orbital sander, you may need screws or clips to attach the sanding pad. Check the user manual of your sander to find out what type of attachment is required.
- Phillips Screwdriver: If your sander requires screws for pad attachment, you will need a Phillips screwdriver to tighten them securely.
- Protective Gloves: It is always a good idea to wear protective gloves when working with power tools. This will help prevent any injuries or accidents.
Additional Optional Tools
While not necessary, the following tools can be helpful when attaching a sanding pad to an orbital sander:
- Allen Wrench: Some sanders use an Allen wrench for pad attachment. Check your sander’s manual to see if you need one.
- Compressed Air: If your sander has vents or crevices, using compressed air can help remove any debris or dust that may hinder the pad attachment.
Having these tools ready and easily accessible will make the process of attaching a sanding pad to your orbital sander much smoother and more efficient.
Tips and Precautions
When attaching a sanding pad to your orbital sander, there are a few tips and precautions to keep in mind:
Read the Manufacturer’s Instructions
Before attempting to attach the sanding pad, it’s important to read and understand the manufacturer’s instructions. Different orbital sanders may have different mechanisms for attaching the pad, so familiarizing yourself with the specific instructions for your sander is crucial.
Clean the Surface
Prior to attaching the sanding pad, make sure the surface of the sander is clean and free from debris. This will help ensure a secure and stable attachment.
Inspect the Pad and Sander
Before attaching the sanding pad, inspect it and make sure there are no visible signs of damage. Similarly, check the sander’s hook and loop attachment system to ensure it is in good condition. Using a damaged pad or faulty attachment system can lead to poor results and even accidents.
Align the Holes
Most sanding pads have holes that allow for dust collection. When attaching the pad, make sure to align these holes with the dust collection system of your sander. This will help maximize dust collection and keep your work area cleaner.

Apply Even Pressure
When attaching the sanding pad, apply even pressure and make sure it is securely attached. This will prevent the pad from slipping or flying off during use, which can be dangerous.
Follow Safety Guidelines
When using an orbital sander, always follow the manufacturer’s safety guidelines. Wear appropriate safety gear, such as eye protection and a dust mask, and use the sander in a well-ventilated area. Take breaks if necessary and avoid overexertion.
By following these tips and precautions, you can ensure a safe and effective attachment of a sanding pad to your orbital sander. Remember to always prioritize safety and consult the manufacturer’s instructions for specific guidance.
Questions and answers
What is an orbital sander?
An orbital sander is a power tool designed for sanding and smoothing surfaces. It has a circular sanding pad that moves in an orbital pattern, which helps to prevent swirl marks and ensures consistent sanding.
Can I attach any sanding pad to an orbital sander?
No, you cannot attach any sanding pad to an orbital sander. Orbital sanders usually come with specific sanding pads designed to fit their base. It is important to use the correct sanding pad to ensure proper function and safety.
How do I attach a sanding pad to an orbital sander?
To attach a sanding pad to an orbital sander, first, make sure the sander is unplugged. Then, locate the release lever or button on the sander. Press or lift the lever/button to release the current sanding pad. Align the new sanding pad with the base of the sander and press it firmly until it locks into place. Make sure it is securely attached before using the sander.
What should I do if my sanding pad keeps falling off the orbital sander?
If your sanding pad keeps falling off the orbital sander, there could be a few possible causes. First, make sure you are using the correct sanding pad designed for your specific sander model. If you are using the correct pad, check if the locking mechanism is damaged or worn out. If it is, you may need to replace the part or contact the manufacturer for assistance. Additionally, ensure that you are attaching the sanding pad properly, pressing it firmly until it locks into place.
Is it necessary to clean the sanding pad after each use?
It is a good practice to clean the sanding pad after each use. This helps to remove any debris or residue that may have accumulated during sanding, which can affect the performance of the sander. You can typically clean the sanding pad by gently tapping it against a hard surface or using a brush to remove the dust. If there are stubborn residues, you can also use a mild detergent or warm water to clean the pad. Allow the pad to dry thoroughly before attaching it back to the sander.


Meet Harrison Clayton, a distinguished author and home remodeling enthusiast whose expertise in the realm of renovation is second to none. With a passion for transforming houses into inviting homes, Harrison's writing at https://thehuts-eastbourne.co.uk/ brings a breath of fresh inspiration to the world of home improvement. Whether you're looking to revamp a small corner of your abode or embark on a complete home transformation, Harrison's articles provide the essential expertise and creative flair to turn your visions into reality. So, dive into the captivating world of home remodeling with Harrison Clayton and unlock the full potential of your living space with every word he writes.