How To Polish Rocks With A Rotary Tool

Polishing rocks is a fascinating hobby that allows you to transform rough, unattractive stones into beautiful, shiny gems. One of the most effective tools for this task is a rotary tool, which provides the speed and precision needed to achieve professional-looking results.
Before you begin, it’s important to gather the necessary materials. You will need a variety of rocks, ranging in hardness from soft to hard, as well as different grits of sandpaper and polishing compounds. It’s also helpful to have a water source, such as a basin or bucket, to keep the rocks and tools lubricated.
The first step in polishing rocks with a rotary tool is to inspect and prepare the stones. Look for any rough edges or imperfections that need to be removed before polishing. Use a coarse grit sandpaper to file down any high spots or uneven surfaces, making sure to wear safety glasses and gloves for protection.
Once the rocks are prepared, it’s time to move on to the polishing stage. Start with a medium grit sandpaper and work your way up to a fine grit, using a circular motion to evenly distribute the pressure. As you progress, you will notice the rocks becoming smoother and more lustrous.
To achieve the final polish, apply a polishing compound to a felt or cloth wheel attachment on your rotary tool. Gently press the wheel onto the rock’s surface, moving it back and forth in a controlled motion. This will help to bring out the stone’s natural shine and enhance its beauty.

In conclusion, polishing rocks with a rotary tool is a rewarding and artistic endeavor. With the right materials and techniques, you can transform ordinary rocks into stunning gems that will impress your friends and family. So grab your rotary tool and start polishing – you’ll be amazed at the stunning results you can achieve!
Choosing the Right Rotary Tool for Rock Polishing
When it comes to polishing rocks with a rotary tool, choosing the right tool is essential. There are several factors to consider when selecting a rotary tool for rock polishing:
Power: Look for a rotary tool with sufficient power to handle the hardness of the rocks you plan to polish. Harder rocks may require a tool with more power to achieve the desired results.
Variable Speed: Opt for a rotary tool with adjustable speed settings. Different rocks may require different speeds for optimal polishing, so having the ability to adjust the speed is crucial.
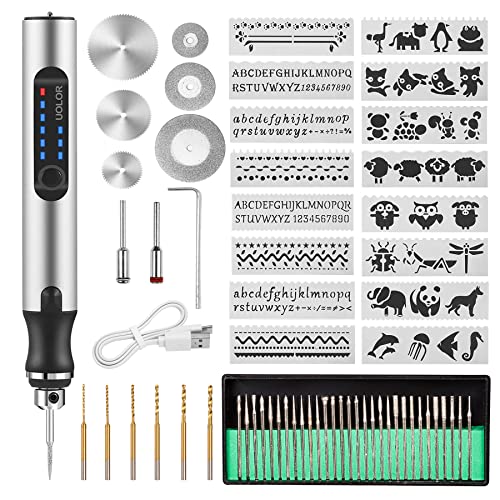
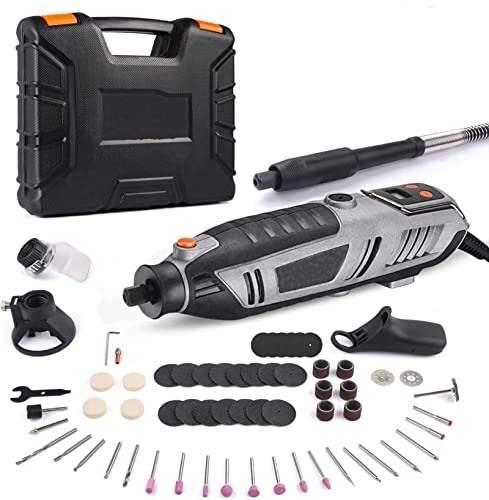
Attachments: Consider the availability of appropriate attachments for rock polishing. Look for attachments such as grinding wheels, sanding drums, and polishing pads that are compatible with the rotary tool you choose.
Durability: Choose a rotary tool that is made with quality materials and built to last. Rock polishing can be a demanding task, so it’s important to have a tool that can withstand the wear and tear.
Comfort and Ergonomics: Take into account the comfort and ergonomics of the rotary tool. Look for a tool with a comfortable grip and lightweight design, as this will help reduce fatigue during extended polishing sessions.
By considering these factors and choosing the right rotary tool for rock polishing, you’ll be well-equipped to achieve professional-looking results. Happy rock polishing!
Factors to Consider When Selecting a Rotary Tool
When it comes to polishing rocks, having the right rotary tool is essential. To achieve the best results and maximize efficiency, there are several factors to consider when selecting a rotary tool:
1. Power: One of the most important factors to consider is the power of the rotary tool. The power of the tool will determine how effectively and quickly it can polish rocks. Look for a rotary tool with sufficient power to handle the materials you plan to work with.
2. Speed: The speed at which a rotary tool operates is another crucial factor. Different materials and polishing techniques require different speeds. Look for a rotary tool with variable speed control, allowing you to adjust the speed to suit your needs.
3. Accessories: Consider the range of accessories available for the rotary tool. Different accessories are designed for specific tasks and materials. Look for a rotary tool that comes with a variety of accessories or has the option to purchase additional ones.
4. Durability: Since polishing rocks can be a demanding task, it’s important to choose a rotary tool that is durable and built to last. Look for a tool made from high-quality materials and with a solid construction.
5. Ergonomics: Comfort is key, especially if you plan to spend extended periods using the rotary tool. Look for a tool that has a comfortable grip and is lightweight, allowing you to work for longer periods without strain.
6. Price: Consider your budget when selecting a rotary tool. While it’s important to invest in a quality tool, there are options available at different price points. Compare prices and features to find the best value for your money.

By considering these factors when selecting a rotary tool for polishing rocks, you can ensure that you choose the right tool for your needs and achieve excellent results in your rock polishing endeavors.
Safety Precautions for Polishing Rocks with a Rotary Tool
When using a rotary tool to polish rocks, it is important to prioritize safety to prevent accidents and injuries. Here are some essential safety precautions to keep in mind:
1. Protective Gear: Always wear appropriate protective gear such as safety glasses, a face shield, and gloves to protect your eyes, face, and hands from flying debris.
2. Workspace: Set up your workspace in a well-ventilated area with proper lighting. Ensure that the work area is clean and free from clutter to minimize the risk of accidents.
3. Power Source: Make sure that the rotary tool is properly grounded and that the power source is stable. Avoid using extension cords or power sources that are damaged or frayed.

4. Tool Inspection: Before using the rotary tool, carefully inspect it for any signs of damage or wear. Check the cord, plug, and switch for any defects. Do not use a tool that is damaged.
5. Secure Workpiece: Prioritize safety by securely clamping the rocks to be polished in a vice or holding them with a rubber grip to prevent them from slipping while operating the rotary tool.
6. Speed Control: Familiarize yourself with the speed control settings of the rotary tool. Start with a low speed and gradually increase it as necessary. Avoid running the tool at high speeds that can cause accidents.
7. Proper Technique: Learn and practice the correct technique of using a rotary tool to polish rocks. Follow the manufacturer’s instructions and avoid putting excessive pressure on the rocks, which can cause them to crack or shatter.
8. Ventilation: Work in a well-ventilated area or use a dust collection system to minimize dust and debris in the air. Breathing in fine rock particles can be harmful to your health.

9. Breaks: Take regular breaks while polishing rocks to prevent fatigue and maintain focus. Prolonged use of a rotary tool without breaks can lead to accidents due to reduced concentration.
10. Unplug and Store: After you have finished polishing rocks with a rotary tool, unplug the tool and store it in a safe place. Keep the tool out of reach of children to prevent accidents.
By following these safety precautions, you can enjoy the process of polishing rocks with a rotary tool while minimizing the risk of accidents and injuries.
Important Safety Measures to Take Before Starting
Before using a rotary tool to polish rocks, it is essential to take certain safety measures to protect yourself and others. Here are some important safety precautions to follow:
1. Wear protective gear: Always wear safety goggles to protect your eyes from flying rocks or debris. Additionally, wear a dust mask to avoid inhaling any potentially harmful dust particles.

2. Use a well-ventilated area: Make sure to work in a well-ventilated area or use a dust collection system to prevent the buildup of dust and fumes.
3. Check for any damage: Before starting, inspect the rotary tool and its accessories for any signs of damage or wear. Do not use any damaged or worn-out parts, as they can pose a safety risk.
4. Secure your workpiece: Secure the rocks you are polishing firmly in a vice or holder to prevent them from slipping or flying off during the polishing process.
5. Keep a firm grip: When operating the rotary tool, make sure to have a firm grip on the tool to maintain control and avoid accidents.
6. Take regular breaks: Polishing rocks can be a time-consuming process, so it is important to take regular breaks to prevent fatigue and maintain focus.
7. Follow the manufacturer’s instructions: Read and understand the instructions provided by the manufacturer of the rotary tool and any polishing compounds or abrasives you are using. Follow the recommended operating procedures and guidelines.
8. Keep bystanders at a safe distance: Make sure to keep bystanders, especially children and pets, at a safe distance from your work area to avoid accidents or injuries.
By following these safety measures, you can ensure a safe and enjoyable rock polishing experience with your rotary tool.
Step-by-Step Guide to Polishing Rocks with a Rotary Tool
If you have a collection of rough rocks and you want to turn them into shiny, polished gems, a rotary tool is the perfect tool for the job. Polishing rocks with a rotary tool not only enhances their natural beauty but also allows you to showcase them in jewelry or display them as decorative pieces. Here is a step-by-step guide to help you polish rocks with a rotary tool.
| Step 1: Choose the Rocks | Select the rocks you want to polish. Look for rocks with interesting patterns, colors, and textures. Make sure the rocks are large enough to hold securely with your rotary tool. |
| Step 2: Safety First | Before you start polishing, it’s essential to prioritize safety. Wear safety goggles, gloves, and a dust mask to protect yourself from flying debris and inhaling dust particles. |
| Step 3: Prepare the Work Area | Cover your work area with a soft cloth or towel to cushion the rocks and prevent scratching. Ensure the area is well-ventilated to minimize dust accumulation. |
| Step 4: Attach the Polishing Wheel | Start by attaching a polishing wheel or buffing pad to your rotary tool. Make sure it is securely tightened. |
| Step 5: Apply Grit | Apply a small amount of polishing grit to the wheel or pad. For the initial stage, use a coarse grit that matches the hardness of your rocks. |
| Step 6: Begin Polishing | Hold your rock against the spinning wheel or pad at a slight angle. Move the rock back and forth, allowing the grit to remove scratches and imperfections. Keep adding water to prevent the rock from overheating. |
| Step 7: Gradually Increase Grit | Repeat steps 5 and 6 with increasingly finer grits until you achieve the desired level of smoothness and shine on your rocks. Each grit will remove the scratches left by the previous one, gradually smoothing the surface. |
| Step 8: Final Polishing | Switch to a polishing compound or a polishing wheel with a higher grit. This final step will give your rocks a brilliant, mirror-like finish. |
| Step 9: Rinse and Dry | Once you are satisfied with the polishing, rinse your rocks to remove any leftover grit or debris. Dry them thoroughly before handling or displaying. |
| Step 10: Admire Your Polished Rocks | Take a moment to admire your handiwork. Your rocks are now ready to be incorporated into jewelry, used for crafts, or displayed as stunning natural decor. |
With this step-by-step guide, you can transform rough rocks into beautiful, polished gems using a rotary tool. Remember to take your time and be patient, as the polishing process can be time-consuming but rewarding. Happy polishing!
Preparing the Rocks and Tools
Before you begin polishing rocks with a rotary tool, it’s important to properly prepare both the rocks and the tools you’ll be using. Follow these steps to ensure the best results:
1. Choose the right rocks:
Start by selecting rocks that are suitable for polishing. Look for rocks that are smooth and have a relatively hard surface. Avoid rocks with cracks or fractures, as these may break during the polishing process.
2. Clean the rocks:
Before polishing, it’s important to clean the rocks thoroughly. Use warm water and mild soap to remove any dirt, debris, or oils. Rinse the rocks well and allow them to dry completely before proceeding.
3. Inspect the tools:
Check your rotary tool for any damage or worn-out parts. Make sure the tool is in good working condition and that all attachments are securely fastened. Additionally, inspect the polishing attachments or discs you’ll be using to ensure they are in good shape.
4. Attach the polishing wheel:
If your rotary tool doesn’t have a built-in polishing attachment, you’ll need to attach a polishing wheel. Follow the manufacturer’s instructions to do this properly. Make sure the wheel is tightly secured to the tool and that it spins freely without wobbling.
5. Gather safety equipment:
Polishing rocks can generate dust and debris, so it’s important to protect yourself. Wear safety goggles to protect your eyes and a dust mask or respirator to prevent inhalation of fine particles. Additionally, consider wearing gloves to protect your hands from rough or sharp edges.
6. Set up a polishing station:
Choose a clean and well-ventilated area where you can set up your polishing station. Place a plastic drop cloth or a tarp on your work surface to catch any debris or water splashes. It’s also a good idea to have a nearby water source for rinsing the rocks and tools.
By properly preparing the rocks and tools, you’ll ensure a safe and effective polishing process. With everything set up, you’re ready to move on to the next step: polishing the rocks with your rotary tool.
Questions and answers
What is a rotary tool?
A rotary tool is a handheld power tool that operates by spinning a small, abrasive accessory at a high speed. It can be used for various tasks, including polishing rocks.
What materials do I need to polish rocks with a rotary tool?
To polish rocks with a rotary tool, you will need a rotary tool with a polishing attachment, a variety of sandpapers with different grits, and a polishing compound.
Can I polish any type of rock with a rotary tool?
Not all rocks can be successfully polished with a rotary tool. It is best to choose rocks that are hard and durable, such as agates, jaspers, and quartz. Soft rocks like limestone or sandstone may not yield good results.
What is the process of polishing rocks with a rotary tool?
The process of polishing rocks with a rotary tool involves several steps. First, you need to shape the rock using sandpaper with a low grit. Then, you gradually work your way up to higher grit sandpapers to refine the shape and smooth the surface. Finally, you use a polishing compound and a polishing attachment to achieve a smooth and shiny finish.
Are there any safety precautions I should take while using a rotary tool to polish rocks?
Yes, it is important to take safety precautions while using a rotary tool. It is recommended to wear safety goggles to protect your eyes from flying debris, and to use the tool in a well-ventilated area to avoid inhaling dust. Additionally, make sure to read and follow the manufacturer’s instructions for operating the tool safely.


Harrison Clayton
Meet Harrison Clayton, a distinguished author and home remodeling enthusiast whose expertise in the realm of renovation is second to none. With a passion for transforming houses into inviting homes, Harrison's writing at https://thehuts-eastbourne.co.uk/ brings a breath of fresh inspiration to the world of home improvement. Whether you're looking to revamp a small corner of your abode or embark on a complete home transformation, Harrison's articles provide the essential expertise and creative flair to turn your visions into reality. So, dive into the captivating world of home remodeling with Harrison Clayton and unlock the full potential of your living space with every word he writes.