How To Engrave With Guild Rotary Tool

Engraving is a beautiful and intricate art form that allows you to leave a lasting mark on a variety of materials. Whether you want to personalize a piece of jewelry, create unique gifts, or add a personal touch to your woodworking projects, engraving with a Guild Rotary Tool is a great way to bring your creative vision to life.
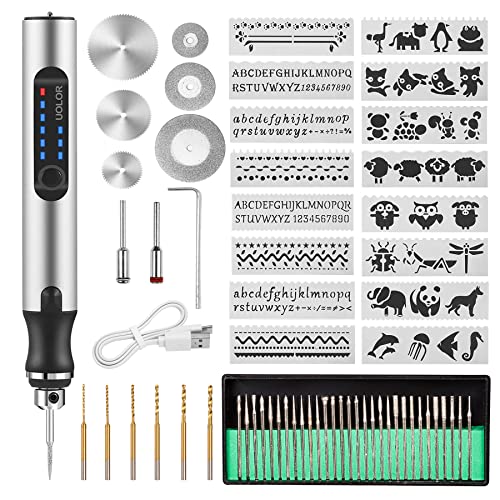
With its versatile and precise cutting capabilities, a Guild Rotary Tool is the perfect tool for engraving intricate designs and patterns. The small, handheld design allows for ease of use and maximum control, making it ideal for both beginners and experienced engravers alike. Whether you’re working with metal, glass, wood, or even plastic, a Guild Rotary Tool can help you achieve a professional-looking engraving.
Before you start engraving, it’s important to choose the right engraving bit for the material you’re working with. Different materials require different types of bits to achieve the desired effect. For example, a diamond-tipped bit is ideal for engraving on glass or ceramics, while a carbide or high-speed steel bit is better suited for metal or wood.
Once you have selected the appropriate bit, it’s time to start engraving. Begin by securing the material you’re engraving on a stable surface, such as a workbench or table, to prevent slipping or movement. Then, using a light touch and steady hand, guide the Guild Rotary Tool along the desired path of your design.
Remember to take breaks and assess your progress as you engrave. This will help you avoid mistakes or overworking the material. If you make a mistake, don’t worry! You can always sand or buff out small errors, or start over completely if needed.

In conclusion, engraving with a Guild Rotary Tool is a rewarding and creative way to add a personal touch to your projects. By following these steps and using the right tools, you can create beautiful and intricate designs on a variety of materials. So, grab your Guild Rotary Tool and let your artistic abilities shine!
Choosing a Guild Rotary Tool for Engraving
If you are interested in engraving, a Guild rotary tool can be a great investment. With its versatility and precision, it allows you to create intricate designs on various materials. However, with so many options available, choosing the right Guild rotary tool for engraving can be a bit overwhelming.
Consider the Power
One of the first things to consider when choosing a Guild rotary tool for engraving is its power. The power of the tool determines its ability to cut through different materials. If you plan to engrave harder materials like metal or glass, you will need a rotary tool with higher power. On the other hand, if you will mainly be engraving softer materials like wood or plastic, a tool with lower power can suffice.
Look for Variable Speed Control
Variable speed control is another important feature to consider. This feature allows you to adjust the speed of the tool to match the requirements of your engraving project. Engraving delicate designs may require slower speeds, while working on larger areas might require higher speeds. Having the ability to control the speed will give you more control over your engraving process.
Check for Available Attachments and Accessories
Before making a purchase, it’s essential to check for the variety of attachments and accessories available for the Guild rotary tool. Different attachments can provide you with different engraving options, such as different tip shapes or sizes. Additionally, having compatible accessories like grinding or polishing bits can expand the tool’s functionality for other projects.

| Feature | Considerations |
|---|---|
| Power | Determine the materials you will be engraving and choose a rotary tool with appropriate power. |
| Variable Speed Control | Ensure the tool has adjustable speed settings to match your engraving requirements. |
| Attachments and Accessories | Check for a variety of attachments and accessories to expand the tool’s capabilities. |
By considering the power, speed control, and available attachments and accessories, you can choose the right Guild rotary tool for your engraving needs. Remember to also read customer reviews and compare prices to make an informed decision. With the right tool in hand, you’ll be able to create beautiful engraved designs with ease.
Features to Consider When Buying a Guild Rotary Tool
When it comes to purchasing a Guild rotary tool, there are several important features to consider. These features can greatly impact your overall experience and the results you can achieve with the tool. Below are some key factors to keep in mind before making your purchasing decision:
- Power: One of the most crucial aspects of a rotary tool is its power. Make sure to check the motor’s wattage or horsepower rating to ensure it is suitable for your intended applications. Higher wattage or horsepower ratings generally indicate a more powerful tool that can handle tougher tasks.
- Speed Control: Look for a rotary tool that offers variable speed control. This feature allows you to adjust the tool’s speed to match the specific project or material you are working with. Having the ability to set different speeds can improve precision and prevent accidental damage to delicate materials.
- Attachments and Accessories: Assess the availability and compatibility of different attachments and accessories that can be used with the rotary tool. Having a range of attachments like cutting discs, grinding stones, sanding drums, and drill bits can enhance the tool’s versatility and its suitability for various tasks.
- Compact Design and Comfortable Grip: Consider the size and ergonomic design of the rotary tool. A compact and lightweight tool is easier to handle and maneuver, especially when working on intricate projects. Additionally, a comfortable grip can reduce hand fatigue during extended use.
- Durability and Build Quality: Invest in a rotary tool that is built to last. Look for models made with high-quality materials and sturdy construction. This will ensure that the tool can withstand heavy-duty tasks and frequent use without prematurely wearing out or breaking down.
- Noise and Vibration Levels: Rotary tools can produce varying levels of noise and vibration during operation. It is advisable to choose a model that features noise and vibration reduction technology to minimize discomfort and potential hearing damage.
- Warranty: Check the warranty offered by the manufacturer. A longer warranty period indicates the company’s confidence in the product’s quality and durability. Additionally, a warranty can provide peace of mind in case any malfunctions or defects arise.
By carefully considering these features, you can make an informed decision when purchasing a Guild rotary tool that suits your specific needs and preferences. Remember to also read customer reviews and seek recommendations from professionals to gather more insights that can help you make the best choice.
Tips for Setting Up Your Guild Rotary Tool
Setting up your Guild Rotary Tool properly is essential for successful engraving. Here are a few tips to help you get started:
1. Familiarize yourself with the tool: Take some time to read the user manual and become familiar with all the parts and functions of your Guild Rotary Tool. Understanding how the tool works will allow you to use it more effectively.

2. Choose the right bit: There are various engraving bits available for rotary tools, so make sure to select the appropriate one for your project. Consider factors such as the material you are engraving and the level of detail required. Different bits have different cutting capabilities, so choose wisely.
3. Prepare your work area: Engraving can create a lot of dust and debris. To avoid any mess or damage, set up your work area properly. Use a sturdy workbench or table and cover it with a protective cloth or newspaper. Consider using a dust collection system or wearing a dust mask to protect yourself from airborne particles.
4. Secure your material: Depending on the size and shape of your material, you may need to secure it in place before engraving. Clamps, vices, or double-sided tape can be used to keep the material stable while you work. This will help ensure precision and avoid any accidental slips.
5. Adjust the speed: Guild Rotary Tools usually have adjustable speed settings. Experiment with different speeds to find the one that works best for your project. Higher speeds are typically used for metal or hard materials, while lower speeds are better for softer materials like wood or plastic.
6. Practice on scrap materials: Before working on your final piece, practice your engraving skills on scrap materials of similar nature. This will give you a chance to get used to the tool and refine your technique. It’s always better to make mistakes and learn from them on a practice piece rather than on your actual project.

By following these tips, you’ll be well on your way to setting up your Guild Rotary Tool for engraving success. Remember to prioritize safety and take your time to ensure precise and high-quality results.
Step-by-Step Guide to Engraving with a Guild Rotary Tool
Engraving with a Guild rotary tool is a simple and effective way to add unique and personalized designs to various materials. Whether you want to engrave metal, wood, glass, or plastic, a Guild rotary tool can help you achieve professional-looking results. Here is a step-by-step guide to get you started:
-
Choose the right bit
The first step in engraving with a Guild rotary tool is to choose the right bit for your desired design and material. There are various types of bits available, including diamond bits for hard materials like glass or ceramic, and carbide bits for softer materials like wood or plastic. Consider the depth and width of your design when selecting a bit.
-
Prepare the material
Clean and prepare the material you want to engrave. If you’re working with wood or plastic, sand it to create a smooth surface. For metal or glass, wipe it clean to remove any oils or dirt. Make sure the surface is flat and secure to avoid slipping during the engraving process.
-
Secure the rotary tool
Attach the selected bit to the Guild rotary tool securely. Make sure it fits tightly and is properly aligned. A loose or misaligned bit can cause uneven or inaccurate engraving.
-
Set the speed
Adjust the speed of the rotary tool depending on your material and design. Lower speeds are suitable for delicate designs and softer materials, while higher speeds are better for more intricate designs and harder materials. Start with a lower speed and gradually increase it as needed.
-
Start engraving
Hold the rotary tool firmly and start engraving your design on the prepared surface. Begin with light pressure and gradually increase it to achieve the desired depth. Move the tool in a steady and controlled motion, following your design. Take breaks if needed to avoid overheating the tool or material.
-
Clean and inspect
Once you’re done engraving, clean the surface to remove any debris or dust. Inspect your work to ensure the design is clear and well-defined. If needed, you can use sandpaper or a polishing cloth to refine the engraved area.
Engraving with a Guild rotary tool may require practice to master, so start with simple designs and materials before moving on to more complex projects. Always follow safety guidelines and wear protective gear, such as goggles and gloves, when operating the rotary tool. With time and patience, you’ll be able to create beautiful and intricate engravings with your Guild rotary tool.
Best Practices for Achieving Professional Engraving Results
Engraving with a rotary tool can be a rewarding and creative hobby or profession. To ensure the best possible results, follow these best practices:
1. Choose the Right Accessories:

Using the right accessories and attachments is crucial for achieving professional engraving results. Make sure to select the appropriate engraving bits, collets, and other accessories that are compatible with your rotary tool.
2. Practice Proper Technique:
Engraving requires precision and control. Practice using your rotary tool with scrap materials before working on your desired surface. Start with light pressure and gradually increase it as you get comfortable with the tool.
3. Secure the Workpiece:
Make sure your workpiece is securely clamped or held in place to prevent any movement or vibration while engraving. This will ensure clean and accurate lines in your design.

4. Plan Your Design:
Before engraving, plan out your design on paper or digitally. This will help you visualize the final result and ensure you have a clear direction while engraving. Having a well-thought-out design will also save you time and avoid mistakes.
5. Take Breaks:
Engraving can be a time-consuming process, so it’s important to take breaks to rest your hand and avoid fatigue. This will help maintain your focus and precision throughout the engraving session.
6. Clean and Maintain Your Tools:

Regularly clean your engraving bits and rotary tool to keep them in optimal condition. Remove any debris or buildup that may affect the performance or quality of your engraving. Lubricate the moving parts as necessary to ensure smooth operation.
7. Experiment and Innovate:
Don’t be afraid to experiment with different techniques, materials, and designs to create unique and innovative engravings. Push yourself to try new methods and explore your creativity to achieve distinctive results.
By following these best practices, you can enhance your engraving skills and achieve professional-quality results with your guild rotary tool. Remember, practice makes perfect, so keep refining your technique and enjoy the art of engraving.
Common Mistakes to Avoid When Using a Guild Rotary Tool for Engraving
Engraving with a Guild rotary tool can be an exciting and rewarding experience. However, beginners often make some common mistakes that can lead to unsatisfactory results. In order to achieve the best possible outcomes, it’s important to avoid these mistakes:
| Mistake | Solution |
| Not choosing the right attachment | Before starting, make sure to select the appropriate engraving attachment for the task at hand. Different attachments are designed for different materials and styles of engraving. Refer to the tool’s manual for guidance on selecting the right attachment. |
| Using excessive force | Engraving requires a delicate touch. Applying too much pressure can lead to the tool slipping or damaging the surface. Instead, allow the tool to do the work by applying a light, even pressure to achieve clean and precise lines. |
| Skipping safety precautions | It’s crucial to prioritize safety when working with a rotary tool. Always wear protective goggles to shield your eyes from debris. Additionally, consider wearing gloves to protect your hands from possible injuries. Familiarize yourself with the safety guidelines provided by the tool’s manufacturer. |
| Moving too quickly | Engraving requires patience and precision. Avoid rushing through the process as it can result in uneven or wobbly lines. Take your time, move the tool steadily, and let the bit do the work to achieve clean and professional-looking engravings. |
| Not practicing on scrap materials first | If you’re new to engraving, it’s always a good idea to practice on scrap materials before working on your final project. This allows you to familiarize yourself with the tool, experiment with different techniques, and gain confidence in your abilities. |
| Overlooking maintenance | Proper maintenance is essential for keeping your rotary tool in top condition. Regularly clean and lubricate the tool as recommended by the manufacturer’s instructions. This will help prolong the life of your tool and ensure consistent performance. |
By avoiding these common mistakes and following best practices, you can make the most out of your Guild rotary tool for engraving. With practice and patience, you’ll be able to create impressive engravings on various materials with ease.
Questions and answers
What is a rotary tool?
A rotary tool is a handheld power tool that operates at a high speed and spins a variety of different attachments. It can be used for a wide range of tasks, including engraving.
Can I use a guild rotary tool for engraving?
Yes, a guild rotary tool can be used for engraving. It is a versatile tool that can be fitted with different attachments, including engraving bits.
How do I engrave with a guild rotary tool?
To engrave with a guild rotary tool, you will need to attach an engraving bit to the tool. Then, use the tool to carefully carve or etch the design onto the surface you want to engrave.
What materials can I engrave with a guild rotary tool?
A guild rotary tool can be used to engrave a variety of materials, such as wood, metal, glass, plastic, and even stone. However, the type of engraving bit you use will depend on the material you are working with.
Are there any safety precautions I should take when engraving with a guild rotary tool?
Yes, it is important to take safety precautions when using a guild rotary tool for engraving. Always wear protective goggles to shield your eyes from flying debris. Additionally, make sure to secure your workpiece and keep your hands away from the spinning bit to avoid accidental injuries.

Meet Harrison Clayton, a distinguished author and home remodeling enthusiast whose expertise in the realm of renovation is second to none. With a passion for transforming houses into inviting homes, Harrison's writing at https://thehuts-eastbourne.co.uk/ brings a breath of fresh inspiration to the world of home improvement. Whether you're looking to revamp a small corner of your abode or embark on a complete home transformation, Harrison's articles provide the essential expertise and creative flair to turn your visions into reality. So, dive into the captivating world of home remodeling with Harrison Clayton and unlock the full potential of your living space with every word he writes.