How To Carve Wood With A Rotary Tool

Wood carving is a captivating and rewarding craft that allows you to transform a simple piece of wood into a work of art. With the right tools and techniques, anyone can learn to carve intricate designs and patterns. One of the most versatile tools for wood carving is a rotary tool.
A rotary tool, also known as a Dremel tool, is a handheld power tool that spins a small, abrasive accessory at high speeds. It can be used for a variety of tasks, including cutting, sanding, polishing, and of course, carving wood. The high-speed rotation of the accessory allows for precise and detailed carving, making it ideal for both beginners and experienced craftsmen.
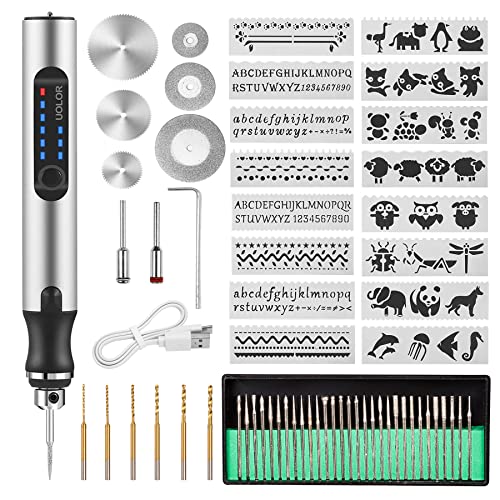
Before you begin carving, it’s important to choose the right accessory for your project. There are countless attachments available for rotary tools, including different shapes and sizes of carving bits. You’ll want to select a bit that matches the design you have in mind and suits the type of wood you’re working with. For intricate designs, a smaller, pointed bit will give you more control, while a larger bit will allow you to remove more material quickly.
Once you have your rotary tool and carving bit ready, it’s time to start carving. Begin by outlining your design on the wood with a pencil or marker. This will serve as a guide as you carve. Take care to hold the tool steadily and move it slowly and smoothly along the lines of your design. Allow the tool to do the work for you and avoid applying excessive pressure, as this can cause the bit to dig too deep into the wood.
Overview of rotary tools
Rotary tools are versatile and powerful handheld devices that are commonly used for woodworking and carving. They are equipped with a rotating bit that allows for precise and intricate cuts on various materials, including wood.

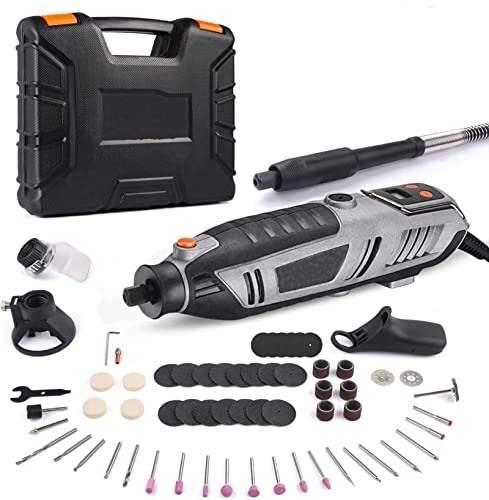
These tools can be corded or cordless, providing flexibility and portability depending on your needs. Corded rotary tools offer unlimited power supply, while cordless options provide convenience and mobility.
Rotary tools come with a variety of attachments and accessories, such as cutting wheels, sanding drums, grinding stones, and polishing pads. These attachments can be easily interchanged, allowing you to perform different tasks with one tool.
- Cutting wheels are commonly used for carving and shaping wood. They come in different sizes and can be used to make both straight cuts and intricate designs.
- Sanding drums are useful for smoothing and refining the surface of the wood. They are available in various grits, allowing you to achieve different levels of smoothness.
- Grinding stones are ideal for removing material or sharpening edges. They can be used to shape and contour the wood, as well as to remove burrs and imperfections.
Rotary tools are known for their precision and control. They offer variable speed settings, allowing you to adjust the tool’s speed to match the requirements of your project. This enables you to work with different types of wood and achieve desired results.
Before using a rotary tool, it is important to take necessary safety precautions. Always wear protective eyewear and gloves, and work in a well-ventilated area. Additionally, make sure to secure the workpiece properly to prevent it from moving or slipping during the carving process.
Overall, rotary tools are invaluable tools for wood carving. Whether you are a beginner or an experienced woodworker, a rotary tool can help you bring your creative ideas to life with precision and ease.
Choosing the right wood for carving
When it comes to carving wood with a rotary tool, choosing the right type of wood is essential for achieving the best results. Different types of wood have different characteristics and properties that can affect the ease and quality of your carving. Here are some important factors to consider when selecting the right wood for your carving projects:
1. Hardness
The hardness of the wood will determine how easily it can be carved. Hardwoods, such as oak, maple, or walnut, are generally more difficult to carve but can result in a more detailed and refined finish. Softwoods, like pine or cedar, are easier to carve but may not hold fine details as well.
2. Grain
The grain pattern of the wood can add depth and texture to your carvings. Consider the direction and quality of the grain when choosing your wood. Straight grain is generally easier to carve, while interlocking or irregular grain can present challenges. Experiment with different grain patterns to achieve unique effects in your carvings.
3. Availability
Consider the availability and cost of the wood you choose. Local hardwood suppliers or online stores can offer a variety of wood types, including exotic or specialty woods. However, keep in mind that some wood species may be more expensive or harder to come by. It’s generally a good idea to start with more readily available woods until you gain more experience.
In addition to these factors, it’s important to consider your project requirements and personal preferences when choosing the right wood for carving. Practice and experimentation with different wood types will help you develop your skills and find the wood that works best for your carving style. Remember, carving is both a skill and an art form, and the wood you choose can greatly influence the final outcome of your project.

Preparing the wood for carving
Before you begin carving wood with a rotary tool, it is essential to properly prepare the wood for the process. This step ensures that you have a smooth and even surface to work with, allowing for better control and precision in your carving.
Selecting the right type of wood
Choosing the right type of wood is crucial for successful wood carving. Softwoods like pine or basswood are ideal for beginners as they are easier to carve and work with. Hardwoods like oak or maple are more difficult to carve but can create intricate details and a beautiful finished product.
Preparing the wood surface
Once you have chosen the wood, it is important to prepare the surface before carving. Start by sanding the wood with coarse-grit sandpaper to remove any rough spots and create a smooth working area. Then, gradually work your way up to finer-grit sandpaper to achieve a polished finish.
After sanding, wipe down the wood with a damp cloth or tack cloth to remove any dust or debris. This will ensure that your carving tools can glide smoothly across the surface without any interference.
For intricate designs or delicate areas, consider using a wood conditioner or sealer to prevent the wood from splintering or cracking during the carving process.

Tip: Before starting any carving project, it is a good idea to practice on a small piece of scrap wood. This will allow you to familiarize yourself with the rotary tool and test different techniques before working on your main piece.
By taking the time to properly prepare the wood for carving, you can achieve better results and enjoy a more satisfying carving experience. Remember to always prioritize safety by wearing protective gear and working in a well-ventilated area.
Using different types of bits and attachments
When it comes to carving wood with a rotary tool, using the right bits and attachments can make all the difference. There are a variety of options available, each suited for different carving techniques and finishes. Here are some of the most common types:
1. Carving bits: These bits have a variety of shapes and sizes, such as cone, cylinder, and ball, allowing for detailed and intricate carving. They are perfect for creating fine lines and intricate patterns on the surface of the wood.
2. Engraving bits: Engraving bits are designed specifically for creating deep and precise engravings on wood. They have a sharp tip that allows for smooth and controlled cutting, making them ideal for adding text or decorative designs to your carvings.

3. Grinding bits: If you need to remove a large amount of wood quickly, grinding bits are the way to go. These bits have a flat surface with abrasive particles, allowing you to shape and smooth the wood efficiently. They are particularly useful for rough shaping and removing imperfections from the wood’s surface.
4. Sanding drums: After you’ve finished carving or shaping your wood, sanding drums can be used to smooth the surface and achieve a polished finish. These attachments come in various grits and sizes, allowing you to fine-tune the level of smoothness you desire.
5. Cutting wheels: Cutting wheels are perfect for making clean and precise cuts in wood. They are thin and flat, ideal for trimming edges and cutting shapes. However, it’s important to note that cutting wheels can be more aggressive and should be used with caution to avoid any accidents.
Before using any of these bits or attachments, it’s crucial to wear safety goggles and protective gloves to protect yourself from any flying debris. It’s also recommended to practice on scrap wood before moving on to your actual project to get a feel for the tool and learn how to handle it properly.
Carving techniques and tips
Carving wood with a rotary tool can be a fun and rewarding hobby. Here are some techniques and tips to help you get started:

1. Choose the right carving bit
When selecting a carving bit for your rotary tool, consider the type of wood you’ll be working with and the depth of the carving you want to achieve. For fine detail work, a small, pointed bit is recommended. For larger carvings or rough shaping, a larger, rounded bit may be more suitable.
2. Practice proper technique
Hold the rotary tool firmly but comfortably, and make sure the wood is securely clamped or held in place. Start with light pressure and gradually increase as needed. Move the tool in a smooth and controlled motion, letting the bit do the work. Avoid forcing the tool or applying excessive pressure, as this can lead to accidents or damage to the wood.
3. Start with simple designs
If you’re new to carving, start with simple designs to build your skills and confidence. Practice basic shapes and lines before moving on to more intricate patterns. As you gain experience, you can gradually take on more complex projects.
4. Take breaks and rest your hands
Carving can be physically demanding, especially if you’re working on a large or detailed piece. Take regular breaks to rest your hands and prevent fatigue. Stretching exercises can also help prevent muscle strain and provide relief.
5. Use safety precautions
Always wear appropriate safety gear, such as safety goggles and a dust mask, to protect your eyes and respiratory system from wood dust and debris. Keep your work area well-ventilated and clean up regularly to prevent the accumulation of debris.
Following these techniques and tips will help you master the art of carving wood with a rotary tool. Remember to start small, be patient, and enjoy the process as you create unique and beautiful pieces of art.
Finishing and preserving your wood carving
Once you have completed your wood carving using a rotary tool, it is essential to properly finish and preserve it to enhance its beauty and ensure its longevity. Here are some steps to follow:
Clean the surface
Start by cleaning the surface of your wood carving. Use a soft cloth or brush to remove any dust, debris, or loose wood particles. This will help ensure a smooth and even finish.
Sand the carving
Next, sand the surface of your wood carving. Start with a medium-grit sandpaper to remove any rough spots or tool marks. Gradually work your way up to finer grits for a smoother finish. Sand in the direction of the wood grain to avoid scratches.
After sanding, use a damp cloth to wipe away any sanding residue. Once the carving is dry, examine it closely to ensure a smooth and even surface.
Apply a finish
There are various finishes you can use to protect and enhance the appearance of your wood carving. Some popular options include:
- Oil finishes: These penetrate the wood and provide a natural look. Apply the oil using a brush or cloth and allow it to soak in. Wipe away any excess oil after a few minutes.
- Wax finishes: These provide a protective layer and a soft sheen. Apply the wax using a cloth or brush and buff it to a shine.
- Clear varnishes or lacquers: These create a hard and durable finish. Apply multiple thin coats with a brush, sanding lightly between coats for a smooth surface.
Choose a finish based on your desired look and the type of wood you are working with. Follow the manufacturer’s instructions for application and drying times.
Preserve the carving
After applying the finish, it is important to maintain and preserve your wood carving. Avoid exposing it to direct sunlight, excessive heat, or humidity, as these can cause damage over time.
Regularly dust your carving using a soft cloth or brush to prevent buildup. If your carving becomes dirty, gently clean it with a damp cloth and mild soap, taking care not to soak the wood.
Consider displaying your wood carving in a protective case or cabinet to minimize the risk of accidental damage. With proper care, your wood carving can be enjoyed for years to come.
Questions and answers
What is a rotary tool?
A rotary tool is a handheld power tool that operates by rotating a variety of attachments or bits at high speeds. It is commonly used for cutting, shaping, carving, engraving, grinding, and polishing different materials.
Can I use a rotary tool for wood carving?
Yes, a rotary tool can be used for wood carving. It offers precision and control, making it suitable for intricate designs and details. However, it is important to use the right attachments and techniques to achieve the desired results.
What attachments can be used for wood carving with a rotary tool?
There are several attachments that can be used for wood carving with a rotary tool. Some common ones include carving bits, engraving cutters, sanding drums, and cutting wheels. Each attachment serves a different purpose and can be used for specific wood carving techniques.
What safety precautions should I take when using a rotary tool for wood carving?
When using a rotary tool for wood carving, it is essential to wear safety goggles or a face shield to protect your eyes from flying debris. Also, make sure to wear gloves to protect your hands and keep a safe distance from the spinning attachment. It is also advisable to work in a well-ventilated area and to secure the wood piece properly to avoid any accidents.
Are there any tips for beginners to wood carving with a rotary tool?
For beginners in wood carving with a rotary tool, it is recommended to start with simple designs and gradually progress to more complex ones. It is also important to practice proper technique and to be patient, as wood carving requires precision and skill. Additionally, it is helpful to research and learn from experienced wood carvers, as well as to experiment with different attachments and carving techniques to find what works best for you.


Harrison Clayton
Meet Harrison Clayton, a distinguished author and home remodeling enthusiast whose expertise in the realm of renovation is second to none. With a passion for transforming houses into inviting homes, Harrison's writing at https://thehuts-eastbourne.co.uk/ brings a breath of fresh inspiration to the world of home improvement. Whether you're looking to revamp a small corner of your abode or embark on a complete home transformation, Harrison's articles provide the essential expertise and creative flair to turn your visions into reality. So, dive into the captivating world of home remodeling with Harrison Clayton and unlock the full potential of your living space with every word he writes.