Step-by-Step Guide: Installing Door Trim without a Nail Gun

Installing door trim without a nail gun can seem like a daunting task, especially for beginners. However, with the right tools and techniques, it is possible to achieve a professional-looking installation. In this step-by-step guide, we will walk you through the process of installing door trim without a nail gun, using basic hand tools.
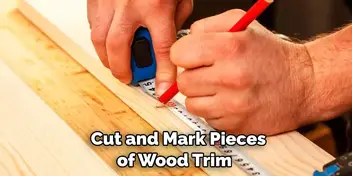
Step 1: Measure and cut the trim
Start by measuring the height and width of the door frame, and then cut the trim to the appropriate size. Use a miter saw to make angled cuts for the corners, ensuring a seamless fit.
Step 2: Apply adhesive
Apply a bead of construction adhesive to the back of the trim, near the edges. This will help secure the trim to the wall and prevent it from shifting over time. Be sure to use an adhesive that is specifically designed for trim installation.

Step 3: Position the trim
Hold the trim in position and press firmly against the wall. Use a level to ensure that it is straight and plumb. You can also use shims to help adjust the position of the trim if needed.
Step 4: Secure the trim
To secure the trim, use finishing nails and a hammer. Place the nails at an angle, using the pre-drilled holes in the trim as a guide. Be careful not to hammer too hard, as this can damage the trim.
Step 5: Fill and sand

Once the trim is secure, fill any nail holes and gaps with wood filler. Allow the filler to dry, and then sand the surface smooth. This will give the trim a polished finish.
Step 6: Paint or stain
Finally, you can paint or stain the trim to match your desired aesthetic. Make sure to use a high-quality paint or stain that is suitable for interior trim.
By following these step-by-step instructions, you can successfully install door trim without a nail gun and achieve a professional result. With practice and patience, you can become proficient in this skill and create a beautiful finished look for your doors.
Gather the Necessary Tools
Before starting the installation process, it’s important to gather all the necessary tools and materials. Here is a list of tools you will need:

- Measuring tape
- Miter saw
- Pencil
- Hammer
- Finishing nails
- Wood putty
- Sandpaper
- Level
- Construction adhesive
- Caulk gun
-
Measure and Cut the Trim
Before you begin installing the door trim, you will need to measure and cut it to the appropriate size. Here are the steps to follow:
- Start by measuring the height and width of the door frame. Use a tape measure to get accurate measurements.
- Once you have the measurements, add a couple of inches to each side to ensure you have enough trim to work with.
- Using a miter saw or a hand saw with a miter box, cut the trim to the correct length and angle according to your measurements.
- Remember to make a 45-degree miter cut at each end of the trim to create a clean and seamless look when the pieces are joined together.
- If your door frame is not square, you may need to make additional angled cuts to ensure a proper fit. Take the time to measure and mark these cuts accurately.
Once you have cut the trim pieces to size, you are ready to move on to the next step in the installation process.
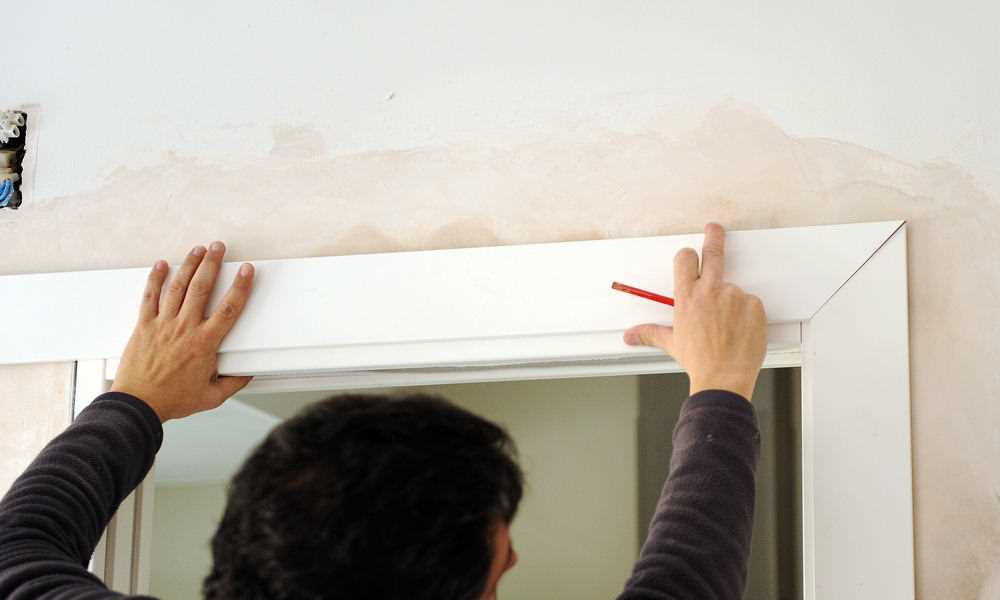
Test Fit the Trim
The first step in installing door trim without a nail gun is to test fit the trim. This involves holding each piece of trim up to the door frame to ensure it fits properly. It’s important to measure and mark where each piece will be cut before test fitting to ensure an accurate fit.
Start by grabbing one piece of trim and holding it up to the side of the door frame. Ensure that the top of the trim is flush with the top of the frame and that the bottom of the trim is flush with the bottom of the frame. Adjust as necessary.
Next, check the side of the trim to make sure it is flush with the edge of the door frame. You may need to use a level to ensure the trim is straight. If the trim is too long, mark where it needs to be cut. If it is too short, you may need to get a new piece of trim.
Once you are satisfied with the fit of the first piece of trim, move on to the next piece. Repeat the process of holding it up to the door frame, ensuring it is flush and straight, and marking any necessary cuts.
Continue test fitting each piece of trim until all the pieces have been checked. It’s important to take your time during this step to ensure an accurate fit. Making proper adjustments now will save you time and frustration later on.
Apply Adhesive
Before applying the adhesive, make sure the surface of the door trim and the wall are clean and free from dust. Use a damp cloth to wipe away any dirt or debris.
Next, apply a bead of adhesive along the back of the door trim. It’s important to use an adhesive that is specifically designed for trim installation, as it will provide a strong bond and ensure the trim stays in place. Follow the manufacturer’s instructions for application and drying time.
Start by applying adhesive to the areas where the trim will come in contact with the wall. This includes the top, bottom, and sides of the trim. Apply the adhesive in a continuous line, ensuring it is evenly distributed along the entire length of the trim.
 Zsanhua Barn Door Floor Guide Adjustable Sliding Door Roller Guide Wall Mounted Carbon Steel Barn Door Guide Wall/Door Bottom Guide Hardware for Barn Door...Amazon.co.uk
Once you have applied the adhesive, press the door trim firmly against the wall, aligning it with the marks you made earlier. Use a level to ensure the trim is straight. Apply firm pressure to the trim for several seconds to allow the adhesive to bond.
If any adhesive squeezes out from behind the trim, use a putty knife or a damp cloth to remove the excess before it dries.
Repeat this process for each piece of door trim, making sure to align them properly and ensure they are all straight and level.
Allow the adhesive to dry completely before moving on to the next step. Refer to the manufacturer’s instructions for specific drying times.
Secure the Trim
Once you have positioned the trim in place, it’s time to secure it. There are a few different methods you can use to secure the trim without a nail gun.
1. Use a Hammer and Finish Nails
If you have a hammer and some finish nails, this is a simple and effective way to secure the trim. Start by pre-drilling pilot holes along the length of the trim where you will be placing the nails. This will help prevent the trim from splitting. Then, hold the trim in place and tap a finish nail into each pilot hole using the hammer. Make sure to countersink the nails slightly below the surface of the trim.
2. Use Construction Adhesive
If you want to avoid using nails altogether, you can opt for construction adhesive. Apply a thin bead of adhesive along the back of the trim, then press it firmly against the wall or door frame. Use clamps or heavy objects to hold the trim in place while the adhesive cures. Follow the adhesive manufacturer’s instructions for drying time.
3. Combination of Nails and Adhesive

If you want extra security, you can use a combination of nails and adhesive. Apply the adhesive as described above, then secure the trim with finish nails as mentioned in method 1. This combination will provide added stability and ensure the trim stays in place.
Remember to wipe off any excess adhesive using a damp cloth before it dries, as it can be difficult to remove once hardened.
4. Wood Filler and Sanding
After securing the trim, you might notice small gaps or nail holes. To give the trim a finished appearance, you can fill these imperfections with wood filler. Apply the wood filler with a putty knife, making sure to smooth it out and remove any excess. Once the wood filler has dried, use sandpaper to sand down the filled areas until they are flush with the trim. This will leave you with a smooth, seamless finish.
By following these steps, you can install door trim without a nail gun and achieve professional-looking results.
Fill Nail Holes
After attaching the door trim, you may have some exposed nail holes that need to be filled in order to achieve a seamless and finished look. Here is a step-by-step guide on how to fill nail holes:
Materials You Will Need:
- Wood filler or spackle
- Putty knife
- Sandpaper
- Paint or stain (optional)
- Paintbrush or stain applicator (optional)
Steps:
- Clean the surface: Before filling the nail holes, make sure the door trim is clean and free from dust or debris. You can use a damp cloth or sponge to wipe the surface.
- Prepare the filler: If you are using wood filler, follow the manufacturer’s instructions to mix it properly. If you are using spackle, it is generally ready to use straight out of the container.
- Apply the filler: Using a putty knife, take a small amount of filler and press it into the nail hole. Make sure to overfill the hole slightly to compensate for shrinkage during drying.
- Smooth the filler: With the putty knife, scrape off any excess filler to create a smooth and even surface. The filler should be flush with the surrounding door trim.
- Allow the filler to dry: Follow the drying time recommended by the filler manufacturer. It usually takes a few hours for the filler to dry completely.
- Sand the filled nail holes: Once the filler is completely dry, use sandpaper to sand down the filled nail holes. Sand in a circular motion until the filled area is smooth and blends with the rest of the door trim.
- Optional: Paint or stain: If desired, you can paint or stain the door trim, including the filled nail holes, to achieve a uniform finish. Use a paintbrush or stain applicator to apply the paint or stain evenly.
Tips:
- Always follow the manufacturer’s instructions when working with wood filler or spackle.
- Take your time when applying the filler to ensure a neat and clean finish.
- If the filled nail holes are still visible after sanding, you can apply another layer of filler and repeat the sanding process.
- Before painting or staining, make sure the filler is completely dry and sanded smooth.
Sand and Smooth the Trim
Before you begin installing the door trim, it’s important to sand and smooth the edges to ensure a clean and professional finish.
Materials needed:
- Sandpaper (medium and fine grit)
- Sanding block or sanding sponge
Step 1: Prepare the trim
- Remove any existing nails or screws from the trim using a pry bar or pliers.
- Inspect the trim for any rough or uneven spots. If necessary, use a chisel to remove any excess material.
Step 2: Sand the edges
- Start with medium-grit sandpaper (around 80-100 grit) to roughen up the edges.
- Hold your sandpaper securely around a sanding block or sanding sponge to create a smooth and even surface.
- Run the sandpaper along the edges of the trim, applying light pressure to remove any sharp or jagged edges. Be sure to sand in the direction of the grain.
- Once you have finished sanding with the medium-grit sandpaper, switch to a fine-grit sandpaper (around 120-150 grit) to further smooth the edges.
Step 3: Remove dust
- After sanding, wipe the trim with a damp cloth to remove any dust or debris.
By sanding and smoothing the edges of the trim, you will create a seamless look once the door trim is installed. This will also help the paint or stain adhere better to the surface, ensuring a longer-lasting finish.
Paint or Stain the Trim
Before installing the door trim, you will need to decide whether you want to paint or stain it. This decision will determine the finish and color of the trim.
If you choose to paint the trim, you will need to follow these steps:
- Clean the trim thoroughly to remove any dust or dirt.
- Apply a coat of primer to the trim surface. This will help the paint adhere better.
- Once the primer is dry, use a brush or roller to apply your chosen paint color. Be sure to cover the entire surface evenly.
- Allow the paint to dry completely before handling or installing the trim.
If you prefer to stain the trim, you can follow these steps:
- Clean the trim to remove any dirt or debris.
- Use sandpaper to lightly sand the surface of the trim. This will help the stain penetrate the wood more effectively.
- Apply the stain using a brush or cloth, following the manufacturer’s instructions for application and drying time.
- Allow the stain to dry completely before handling or installing the trim.
- If desired, apply a clear coat sealer or varnish to protect the stained trim.
Regardless of whether you choose to paint or stain the trim, it is important to work in a well-ventilated area and follow all safety precautions specified by the paint or stain manufacturer.

FAQ
Is it possible to install door trim without using a nail gun?
Yes, it is definitely possible to install door trim without using a nail gun. In fact, using a nail gun is just one of many ways to install door trim. There are alternative methods available that are just as effective and require less specialized tools.
What tools do I need to install door trim without a nail gun?
To install door trim without a nail gun, you will need a few basic tools such as a miter saw, a coping saw, a coping foot for your jigsaw, a tape measure, a pencil, a hammer, and finishing nails. These tools will allow you to cut and shape the trim, measure and mark the installation points, and secure the trim in place.
Are there any benefits to installing door trim without a nail gun?
Yes, there are several benefits to installing door trim without a nail gun. Firstly, it eliminates the need for a specialized tool, which can be costly to purchase or rent. Secondly, using traditional hand tools allows for more control and precision, especially when making intricate cuts or coping joints. Additionally, installing trim without a nail gun can be a quieter and less disruptive process, as it doesn’t produce the loud noise and strong vibrations associated with nail guns. Lastly, it allows for a more traditional and authentic approach to woodworking, which can be a rewarding experience for enthusiasts.
Video


Meet Harrison Clayton, a distinguished author and home remodeling enthusiast whose expertise in the realm of renovation is second to none. With a passion for transforming houses into inviting homes, Harrison's writing at https://thehuts-eastbourne.co.uk/ brings a breath of fresh inspiration to the world of home improvement. Whether you're looking to revamp a small corner of your abode or embark on a complete home transformation, Harrison's articles provide the essential expertise and creative flair to turn your visions into reality. So, dive into the captivating world of home remodeling with Harrison Clayton and unlock the full potential of your living space with every word he writes.


