How to Secure Baseboards Without a Nail Gun – Easy Step-by-Step Guide

Securing baseboards is an important part of any home improvement project or renovation. However, not everyone has access to a nail gun, or may not feel comfortable using one. Fortunately, there are alternative methods to secure baseboards without a nail gun that are easy and effective.
Step 1: Prepare the Baseboards
Before you begin securing the baseboards, make sure they are clean and free of any dirt or dust. This will help ensure a strong bond between the baseboards and the wall. If necessary, use a vacuum or a damp cloth to clean the baseboards.
Step 2: Use Construction Adhesive
One of the easiest ways to secure baseboards without a nail gun is to use construction adhesive. Apply a thin bead of adhesive along the back of the baseboard, making sure to cover the entire length. Position the baseboard against the wall and press firmly to create a strong bond.

Step 3: Add Weight
To ensure a secure bond, it’s helpful to add some weight to the baseboard while the adhesive dries. This can be done by placing heavy objects, such as books or boxes, along the length of the baseboard. Leave the weight in place for at least 24 hours, or as recommended by the adhesive manufacturer.
Step 4: Fill in Gaps
Once the adhesive has dried and the weight has been removed, inspect the baseboards for any gaps or unevenness. Use a wood filler or caulk to fill in any gaps, and smooth it out with a putty knife or your finger. This will give your baseboards a finished look and help prevent any drafts or moisture from entering.
Step 5: Paint or Stain

Finally, you can paint or stain the baseboards to match the rest of your room. This will not only enhance the appearance of the baseboards, but also provide an additional layer of protection. Use a paintbrush or roller to evenly apply the paint or stain, and allow it to dry completely before touching or placing furniture against the baseboards.
Securing baseboards without a nail gun is not only doable, but also an easy and effective alternative. By following these simple steps, you can achieve professional-looking results while avoiding the use of a nail gun.
Tools You Will Need
- Miter saw or hand saw
- Measuring tape
- Pencil
- Level
- Coping saw
- Screwdriver or drill with a screwdriver bit
- Construction adhesive
- Caulk gun
- Putty knife
- Baseboard adhesive
- Painter’s tape
- Hammer
- Sanding block or sandpaper
- Paint or stain (optional)
- Paintbrush or stain applicator (optional)
Prepare the Baseboards
Before attaching the baseboards to the wall, it’s important to prepare them properly. Here are the steps you need to follow:
- Measure the Baseboards: Start by measuring the length of each baseboard using a tape measure. Take accurate measurements to ensure a proper fit.
- Cut the Baseboards: Use a miter saw or a handsaw to cut the baseboards to the required length. Make sure to cut at a 45-degree angle for corners.
- Sand the Edges: After cutting the baseboards, use sandpaper or a sanding block to smooth out any rough edges or splinters. This will help achieve a clean and polished look.
- Prime and Paint: If desired, apply a coat of primer to the baseboards before painting them. This will help the paint adhere better and provide a more even finish.
- Paint the Baseboards: Choose a paint color that complements the overall design of the room and apply at least two coats of paint to the baseboards. Allow each coat to dry completely before applying the next one.
By following these steps, you will ensure that your baseboards are properly prepared before installing them on the wall. This will not only improve the overall appearance of the room but also help in securing the baseboards without a nail gun.
Measure and Mark Placement
To secure baseboards without a nail gun, you first need to measure and mark the placement of the baseboards. Here is a step-by-step guide to help you with this process:
- Start by measuring the length of the wall where the baseboards will be installed. Use a tape measure to ensure accurate measurements.
- Once you have the measurement, transfer it to the baseboard by marking the length with a pencil or marker. Make sure to mark both ends of the baseboard.
- Next, measure the height of the baseboards. Use a tape measure to measure from the bottom of the wall to the desired height for the baseboard.
- Transfer the measurement to the baseboard by marking the height with a pencil or marker. Make sure to mark the height at multiple points along the length of the baseboard.
- Now, use a level to ensure that the baseboard markings are straight and level. Place the level against the markings and adjust as needed.
- Once you have confirmed the placement of the baseboards, you can proceed to secure them using alternative methods such as construction adhesive, screws, or finishing nails.
By measuring and marking the placement of the baseboards accurately, you can ensure a professional and secure installation without the need for a nail gun.
Pre-drill Holes
Before you can secure your baseboards without a nail gun, it’s important to pre-drill holes in the baseboard and the wall to prevent splitting. This step is especially necessary if you are working with hardwood or thicker baseboards.
Here is a step-by-step guide on how to pre-drill holes:
- Measure and mark the placement of your baseboard on the wall.
- Using a tape measure or ruler, determine the spacing for your drill holes. This will usually depend on the length of your baseboard, but a common spacing is around 16 to 24 inches.
- Using a pencil, mark the desired drill hole locations along the length of the baseboard.
- Take a drill with an appropriate sized drill bit for your screws and baseboard material.
- Insert the drill bit into the drill and tighten it securely.
- Place the drill bit onto one of the pencil marks and apply steady pressure as you drill a hole into the baseboard. Be sure to drill straight and avoid drilling too deep.
- Repeat the process for each of the pencil marks along the length of the baseboard.
- Once all the holes are drilled in the baseboard, line your baseboard up against the wall and mark the drill hole locations on the wall using a pencil.
- Using the same drill bit, drill holes into the wall at the marked locations. Make sure to drill straight into the wall and avoid drilling too deep.
By pre-drilling holes in both the baseboard and the wall, you will ensure that the baseboard is securely attached without the risk of splitting or damaging the wood. This method is particularly effective when working with delicate materials or when using hand tools instead of a nail gun.
Use Adhesive
If you don’t have a nail gun or would prefer not to use nails, you can secure baseboards using adhesive. There are a few different types of adhesive that work well for this purpose.
1. Construction Adhesive
Construction adhesive is a strong and durable option for securing baseboards. It comes in a tube and is applied using a caulk gun. Make sure to choose a construction adhesive that is specifically designed for bonding wood.
- Clean the baseboard and the wall surface to ensure they are free of dust and debris.
- Apply a generous amount of adhesive to the back of the baseboard. Be sure to apply adhesive to the entire length of the baseboard.
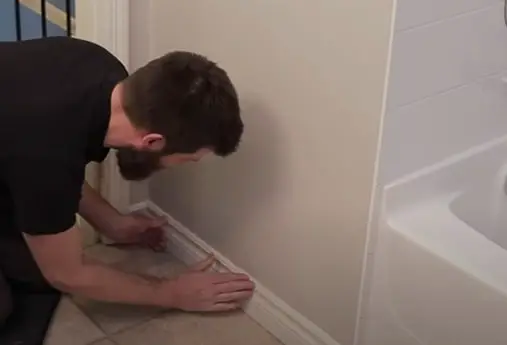
- Press the baseboard firmly against the wall, making sure it is level and straight.
- Use painter’s tape or clamps to hold the baseboard in place while the adhesive cures.
- Allow the adhesive to dry and cure according to the manufacturer’s instructions.
2. Liquid Nails
Liquid Nails is another popular adhesive option for securing baseboards. It comes in a squeeze tube and is applied directly to the back of the baseboard. Like construction adhesive, make sure to choose a Liquid Nails product that is suitable for bonding wood.
- Clean the baseboard and the wall surface to ensure they are free of dust and debris.
- Squeeze a generous amount of Liquid Nails onto the back of the baseboard. Be sure to apply adhesive to the entire length of the baseboard.
- Press the baseboard firmly against the wall, making sure it is level and straight.
- Use painter’s tape or clamps to hold the baseboard in place while the adhesive cures.
- Allow the adhesive to dry and cure according to the manufacturer’s instructions.
Using adhesive to secure baseboards is a great alternative to using a nail gun. It creates a strong bond that will hold the baseboards securely in place.
Insert Screws
Inserting screws is another method for securing baseboards without a nail gun. This method requires a drill and screws suitable for attaching baseboards to the wall. Follow these step-by-step instructions:
- Measure and mark: Measure the length of your baseboard and mark intervals on the wall where you want to insert the screws. Spread out the marks evenly to ensure stability.
- Pre-drill holes: Use a drill bit that is slightly smaller than the screws you are using to pre-drill holes on the marks you made on the wall. This will prevent the baseboards from splitting and make it easier to insert the screws.
- Align the baseboard: Align the baseboard with the marks on the wall, making sure it fits snugly against the floor and the wall.
- Insert screws: Starting at one end of the baseboard, insert a screw through the pre-drilled hole and into the wall. Use a drill and screwdriver bit to drive the screw into the wall until it is flush with the baseboard. Repeat this process for each mark on the wall, ensuring the baseboard is securely attached.
If necessary, you can countersink the screws by using a countersink bit to create a slightly wider hole for the screw head. This will allow you to fill the hole with wood filler and make it less noticeable.
Once all the screws are inserted, you can touch up any visible marks or imperfections with paint or wood filler, if desired.
Inserting screws is an effective alternative to using a nail gun for securing baseboards. It provides a sturdy and secure attachment, ensuring your baseboards stay in place for years to come.
Fill and Sand
After securing the baseboards, it’s important to fill any gaps or holes and sand them down for a smooth finish. This will help to ensure that the baseboards are securely attached and will also improve the overall appearance of the room.
Materials Needed:
- Wood filler
- Putty knife
- Sandpaper (medium grit and fine grit)
Step 1: Fill Gaps and Holes
Use a wood filler that matches the color of your baseboards. Apply the wood filler to any gaps or holes in the baseboards using a putty knife. Press the filler firmly into the gaps or holes, ensuring that they are completely filled.
Step 2: Scrape off Excess Filler

After filling the gaps or holes, use the putty knife to scrape off the excess filler. Hold the putty knife at a slight angle and gently scrape it across the surface of the baseboard to remove any excess filler. This will help to create a smooth, even surface.
Step 3: Sand the Baseboards
Start with medium grit sandpaper to smooth out the surface of the baseboards. Sand the filled areas along with the surrounding areas, being careful not to sand too aggressively and damage the baseboards. Once the surface is smooth, switch to fine grit sandpaper to further refine the finish.
Step 4: Remove Dust
After sanding, use a clean cloth or vacuum to remove any dust particles from the baseboards. This will ensure a clean surface for painting or staining.
Step 5: Optional Finishing Touches
If desired, you can apply a coat of primer or paint to the baseboards to further enhance their appearance and protect them from wear and tear. Alternatively, you can choose to stain the baseboards to showcase their natural wood grain.
Step 6: Clean Up
Properly dispose of any used materials, such as wood filler and sandpaper scraps. Clean up the work area to leave your space looking neat and tidy.
Following these steps will ensure that your baseboards are securely attached and have a professional-looking finish. Taking the time to fill and sand your baseboards will significantly improve the overall appearance of your room while preventing any potential tripping hazards.
Final Touches and Cleaning
Inspect the Baseboards
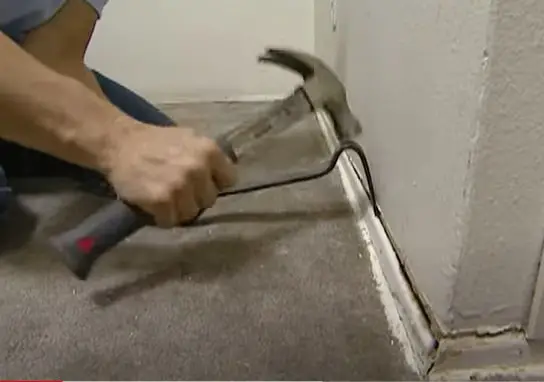
Before you start the final touches and cleaning, it’s important to inspect the baseboards to ensure they are securely in place. Check for any loose or uneven sections. If you find any, use a mallet or a hammer to gently tap them back into place.
Fill the Nail Holes
Next, you’ll need to fill the nail holes to give the baseboards a seamless finish. Use a putty knife to apply wood filler to each nail hole. Smooth it out and let it dry according to the manufacturer’s instructions. Once dry, use sandpaper to lightly sand the filled areas until they are flush with the rest of the baseboard.
Paint or Stain the Baseboards
Depending on your preference, you can paint or stain the baseboards to match the rest of the room. If you choose to paint, make sure to use a high-quality paint and a small brush to carefully apply the paint. If you prefer to stain, use a stain that matches the existing color of the baseboards and apply it with a brush or a cloth. Allow the paint or stain to dry completely before moving on to the next step.
Clean the Baseboards
Lastly, it’s time to give the baseboards a thorough cleaning. Use a damp cloth or sponge to wipe away any dust, dirt, or smudges on the surface of the baseboards. Pay special attention to the corners and edges where dirt tends to accumulate. If necessary, use a mild detergent mixed with water to remove any stubborn stains. Once cleaned, use a dry cloth to remove any excess moisture and leave the baseboards looking fresh and polished.
By following these final touches and cleaning steps, your baseboards will not only be securely attached but also have a flawless finish that enhances the overall appearance of your room.
FAQ
What tools do I need to secure baseboards without a nail gun?
To secure baseboards without a nail gun, you will need a few simple tools such as a hammer, a drill, screws, a pry bar, a tape measure, and a miter saw.
Can I use adhesive instead of nails to secure baseboards?
Yes, you can use adhesive as an alternative to nails to secure baseboards. There are several types of adhesive specifically designed for this purpose that provide a strong and durable bond.
Is it difficult to secure baseboards without a nail gun?
No, securing baseboards without a nail gun is not difficult. It may take a bit more time and effort compared to using a nail gun, but with the right tools and following the step-by-step guide, it can be done easily by anyone.
What is the step-by-step process to secure baseboards without a nail gun?
The step-by-step process to secure baseboards without a nail gun is as follows: 1. Measure and cut the baseboards to the desired length. 2. Use a pry bar to remove any existing baseboards. 3. Mark the studs on the wall where the baseboards will be secured. 4. Attach the baseboards to the wall using screws and a drill. 5. Fill the screw holes with wood filler and sand them smooth. 6. Paint or stain the baseboards to finish.
Can I secure baseboards without using screws?
Yes, you can secure baseboards without using screws by using other methods such as adhesive or finishing nails. However, screws are generally the most secure and durable option for securing baseboards.
Do I need any prior experience or skills to secure baseboards without a nail gun?
No, you do not need any prior experience or skills to secure baseboards without a nail gun. The process is relatively straightforward and can be done by anyone willing to put in a little time and effort.
Video


Meet Harrison Clayton, a distinguished author and home remodeling enthusiast whose expertise in the realm of renovation is second to none. With a passion for transforming houses into inviting homes, Harrison's writing at https://thehuts-eastbourne.co.uk/ brings a breath of fresh inspiration to the world of home improvement. Whether you're looking to revamp a small corner of your abode or embark on a complete home transformation, Harrison's articles provide the essential expertise and creative flair to turn your visions into reality. So, dive into the captivating world of home remodeling with Harrison Clayton and unlock the full potential of your living space with every word he writes.