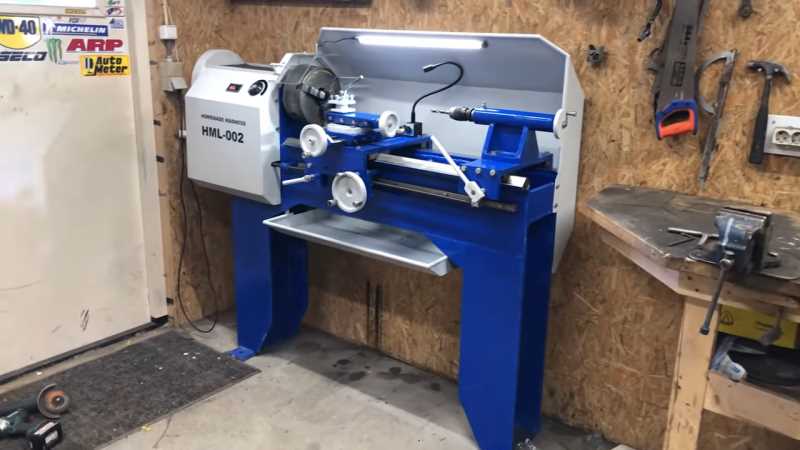
Step-by-Step Guide: How to Build a Metal Lathe from Scratch

Building your own metal lathe from scratch is a rewarding and challenging project that can save you money and provide you with a valuable tool for your workshop. Whether you’re an experienced metalworker or a DIY enthusiast, this step-by-step guide will walk you through the process of creating your own metal lathe.
Why Build a Metal Lathe?
Before we jump into the guide, it’s important to understand the benefits of building your own metal lathe. By building a lathe from scratch, you have complete control over the design and functionality of the machine. You can customize it to meet your specific needs and preferences, ensuring that it performs at its best in your workshop.
Materials and Tools
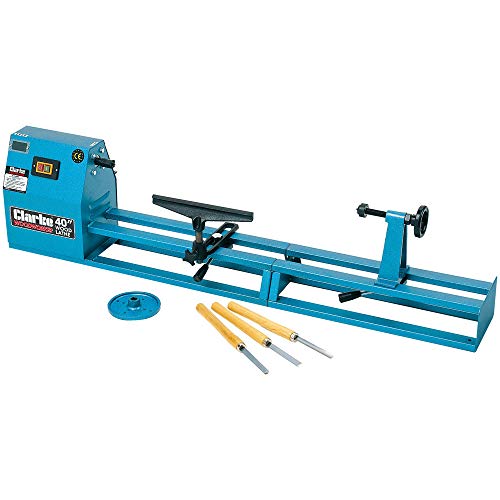
To begin your metal lathe project, you’ll need a list of materials and tools. Some of the essential materials include steel plates, shafts, bearings, gears, and a motor. Additionally, you’ll need a variety of tools such as a drill press, lathe chuck, files, taps, and measuring instruments. It’s important to gather all the necessary materials and tools before starting the project to ensure a smooth building process.

The Building Process
Building a metal lathe involves several steps, including cutting and shaping the metal plates, assembling the parts, and installing the motor. You’ll need to follow precise measurements and use proper techniques to ensure that all the components fit together correctly and the machine functions smoothly. With patience and attention to detail, you can successfully build your own metal lathe from scratch.
Disclaimer: Building a metal lathe from scratch requires advanced metalworking skills and knowledge. It’s important to take safety precautions, wear protective gear, and consult professional resources or experts in the field before attempting this project.
By following this step-by-step guide, you’ll have a solid foundation for building your own metal lathe. Remember to take your time, double-check measurements, and seek guidance when needed. With determination and perseverance, you’ll soon have a functional metal lathe that can handle a wide range of machining tasks in your workshop.
Step-by-Step Guide:
- Prepare Materials and Tools
- Create the Base
- Build the Bed
- Install the Headstock and Tailstock
- Mount the Carriage and Cross Slide
- Add the Apron and Leadscrew
- Install the Chuck
- Check and Test
- Start Machining
Before starting the construction of a metal lathe from scratch, gather all the required materials and tools. This may include metal plates, rods, bearings, gears, nuts, bolts, welding machine, cutting tools, measuring tools, and a lathe chuck.
Start by creating the base of the lathe. This can be done by welding or bolting together metal plates to form a sturdy and stable structure. Ensure that the base is level and securely fastened.

The next step is to build the bed of the lathe. This will serve as the main support for the lathe components. Cut and shape metal plates to create the bed, making sure to leave enough space for the other components.
Attach the headstock and tailstock to the bed. The headstock houses the main spindle, while the tailstock supports the other end of the workpiece. Make sure these components are accurately aligned and securely attached.
Mount the carriage and cross slide onto the bed. The carriage holds the cutting tool and can move along the length of the lathe, while the cross slide allows for movement along the lathe’s width. Ensure smooth and precise movement of these components.
Attach the apron, which contains the gears and mechanisms for controlling the lathe, to the carriage. Connect it to the leadscrew, which provides the power for longitudinal movement. Test the functionality of these components.
Install the lathe chuck onto the spindle of the headstock. This will hold the workpiece securely during machining operations. Make sure the chuck is properly aligned and tightened.

Double-check all the components and connections to ensure everything is secure and aligned correctly. Test the lathe by turning on the motor and running a few trial machining operations. Make any necessary adjustments before proceeding.
Once the lathe is fully assembled and tested, you can start using it for machining tasks. Follow best practices for safe operation and maintenance of the lathe.
Building a metal lathe from scratch can be a complex and time-consuming project. It requires a good understanding of engineering principles, metalworking skills, and access to the necessary tools and materials. However, with careful planning and execution, it is possible to create a functional and reliable metal lathe for personal use.
Required Materials and Tools
Materials
- Steel sheets
- Aluminum stock
- Cast iron parts
- Brass stock
- Fasteners (bolts, screws, nuts)
- Bearings
- Gears
- Belts
- Motor
- Machinable plastic material
Tools
- Welder
- Angle grinder
- Metal cutting saw
- Drill press
- Metal lathe
- Metal milling machine
- Vernier caliper
- Micrometer
- Tap and die set
- Screwdrivers
- Wrenches
- Hammer
- Files
- Cutting tools (turning, milling)
- Nylon mallet
Note:
This is a general list of materials and tools that are commonly used when building a metal lathe from scratch. The specific materials and tools required may vary depending on the design and specifications of the lathe you are building. It is important to carefully plan and research the specific requirements of your project before acquiring materials and tools.

Designing the Metal Lathe
Before you start building a metal lathe from scratch, it is important to have a clear design in mind. Designing the metal lathe involves making decisions about various aspects such as size, materials, and functionality. Here are some steps to consider when designing your metal lathe:
1. Define the Purpose and Requirements
The first step in designing a metal lathe is to define its purpose and requirements. Ask yourself questions like:
- What materials will the lathe be capable of working with?
- What is the maximum size of the workpiece that the lathe needs to accommodate?
- What are the desired accuracy and precision levels?
By answering these questions, you will have a better understanding of the specifications your lathe needs to meet.
2. Research Existing Designs
Before creating your own design, it is always a good idea to research existing metal lathes. Look at different designs and note down their features, strengths, and weaknesses. This will help you in designing a more efficient and functional lathe.

3. Sketch the Design
Using the information gathered from your research, sketch out the design of your metal lathe. This should include the main components such as the bed, headstock, tailstock, and carriage. Consider the placement of controls and accessories for ease of use.
4. Select Materials
Based on your design, select suitable materials for each component. The bed, for example, should be made of a sturdy and rigid material such as cast iron. Choose materials that can withstand the forces and stresses involved in lathe operations.
5. Dimension the Components
Dimension each component of the lathe based on your design requirements. Consider factors such as clearance, tolerances, and fits. Ensure that all components will fit together properly and function as intended.
6. Choose the Drive Mechanism
Decide on the type of drive mechanism for your lathe. Common options include belt-driven systems and gear-driven systems. Consider factors such as power requirements, speed control, and ease of maintenance when choosing the drive mechanism.
7. Consider Safety Features
When designing the metal lathe, don’t forget to incorporate safety features. This can include emergency stop buttons, safety guards, and interlocks to prevent accidents.
8. Test and Refine the Design
Once you have your design ready, it is a good idea to create a prototype or model to test its functionality. Identify any areas for improvement and make necessary refinements to ensure that the final design meets your requirements.
Conclusion
Designing a metal lathe from scratch requires careful planning and consideration of various factors. By defining the purpose and requirements, researching existing designs, sketching the design, selecting materials, dimensioning the components, choosing the drive mechanism, incorporating safety features, and testing the design, you can create a functional and efficient metal lathe that meets your needs.
Sourcing the Necessary Parts
Building a metal lathe from scratch requires a variety of parts. Some of these parts can be purchased online or at a local hardware store, while others may need to be fabricated or salvaged from other machinery. Here is a list of the necessary parts:
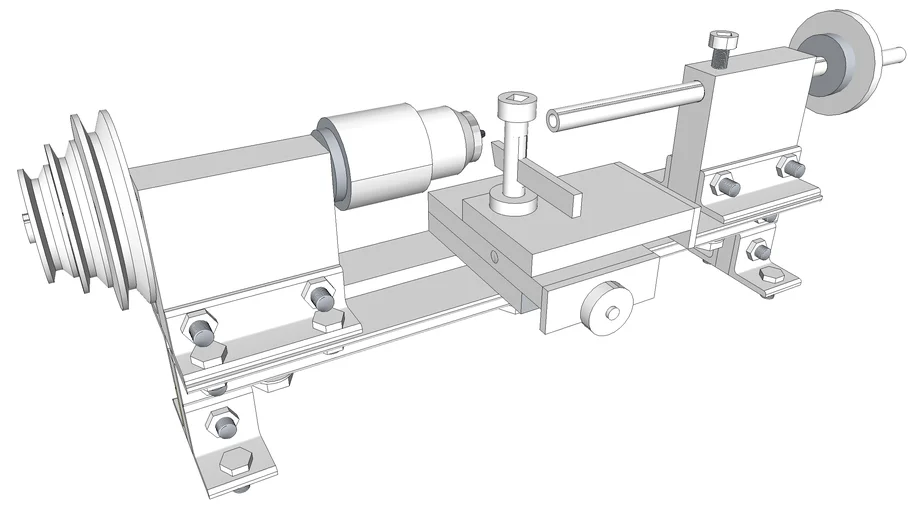
1. Bed
The bed is the main structural component of the lathe and provides support for the other parts. It can be made from cast iron or steel and should have a flat and smooth surface.
2. Headstock
The headstock houses the main spindle, bearings, and gears. It is responsible for driving the workpiece and controlling the rotational speed.
3. Tailstock
The tailstock is used for supporting long workpieces and provides a means of holding tools or drill bits for drilling operations.
4. Carriage
The carriage holds the cutting tool and moves along the bed to perform cutting operations. It is typically equipped with a cross-slide and a tool post.
5. Gears
Gears are essential for controlling the speed and power transmission in the lathe. They are used to connect the headstock and spindle with the motor.
6. Cross-Slide
The cross-slide allows for precise movement of the cutting tool in a perpendicular direction to the workpiece. It is usually adjustable and can be locked in place for accurate cutting.
7. Motor
The motor provides the power needed to drive the lathe. It can be an electric motor or an internal combustion engine, depending on the preference and availability.
8. Chuck
The chuck is used for holding and securing the workpiece during machining operations. It should be capable of gripping the workpiece securely to prevent any movement.
9. Tool Post
The tool post holds the cutting tool and allows for easy tool changes. It should be rigid and adjustable to accommodate different sizes and types of cutting tools.
These are the basic parts needed to build a metal lathe from scratch. Depending on your specific design and requirements, additional parts may be necessary. It is recommended to consult a lathe building guide or seek advice from experienced machinists for a comprehensive parts list.
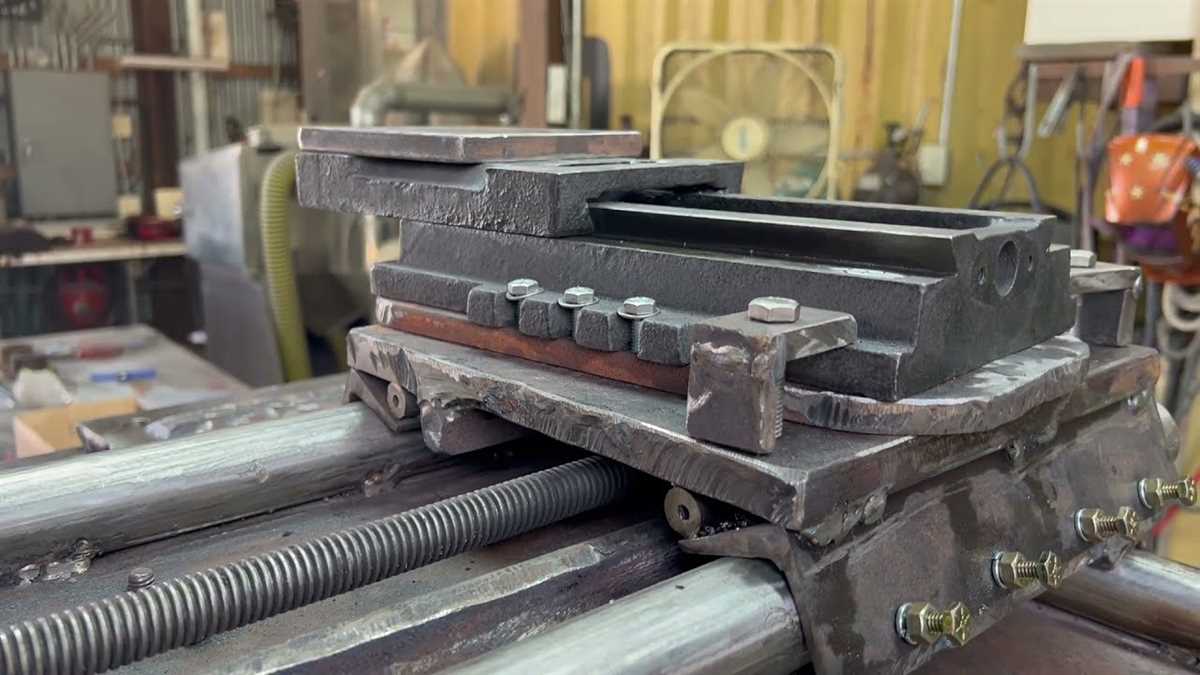
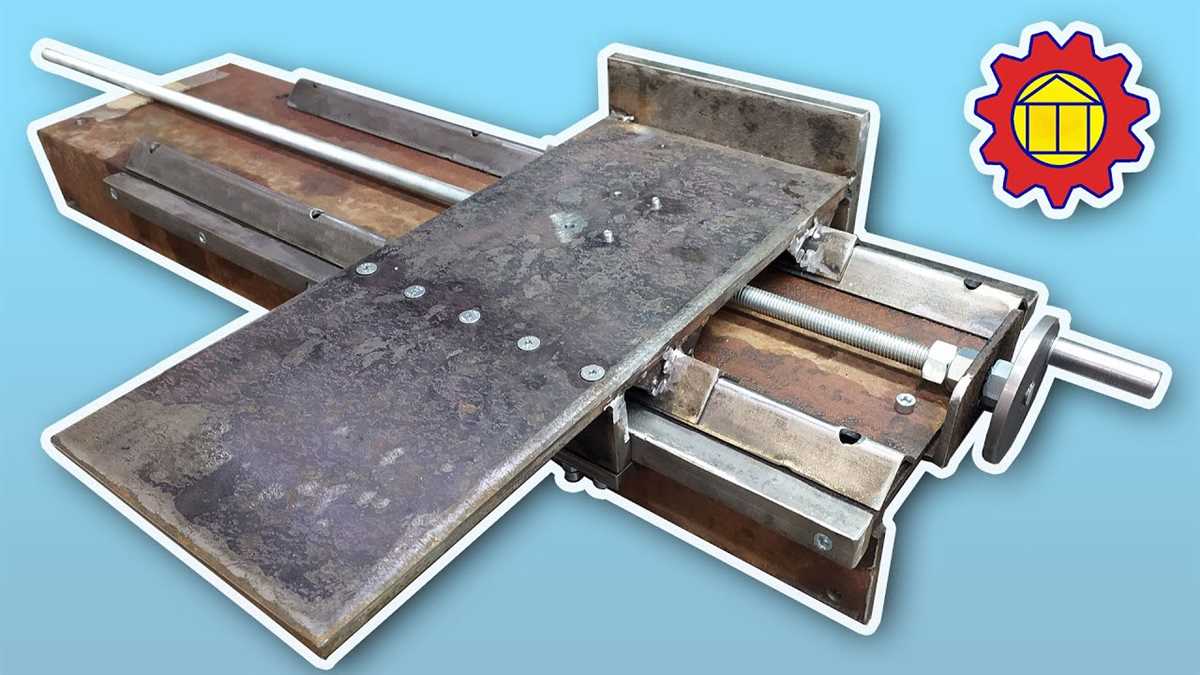
Assembling the Lathe Bed
Once all the parts for the metal lathe have been fabricated or acquired, it’s time to start assembling the lathe bed. The lathe bed is the foundation of the lathe and provides a stable base for all the other components.
Step 1: Gather the Parts
Before starting the assembly process, make sure you have all the necessary parts for the lathe bed.
- Lathe bed rails
- Lathe bed feet
- Bolts and washers
- Nuts
- Allen wrench or socket set
Step 2: Attach the Feet to the Rails
Place the feet on the bottom of the lathe bed rails and align the holes.
- Insert a bolt through the holes in the feet and rails.
- Place a washer on the other side of the bolt.
- Tighten a nut onto the bolt using an Allen wrench or socket set.
- Repeat this process for all the feet and rails, ensuring they are securely fastened.
Step 3: Check for Stability
Once the feet are attached, place the lathe bed on a flat surface and check for stability. Ensure that all the feet are making even contact with the surface and that there is no wobbling or rocking.
Step 4: Install Additional Components
Now that the lathe bed is assembled and stable, you can move on to installing the additional components of the lathe, such as the headstock, tailstock, and tool rest. Refer to the instructions or documentation that came with the specific lathe components for guidance on their installation.
By following these steps, you will have successfully assembled the lathe bed for your homemade metal lathe. This solid foundation will provide the stability needed for precise and accurate metalworking operations.
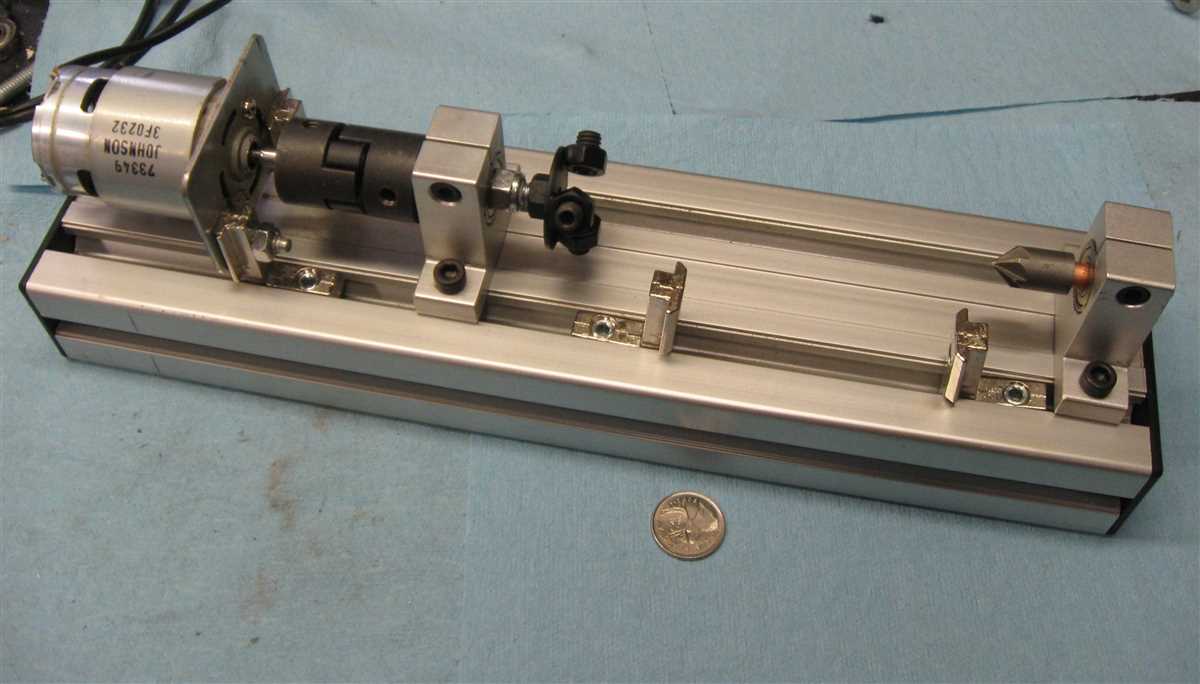
Building the Headstock
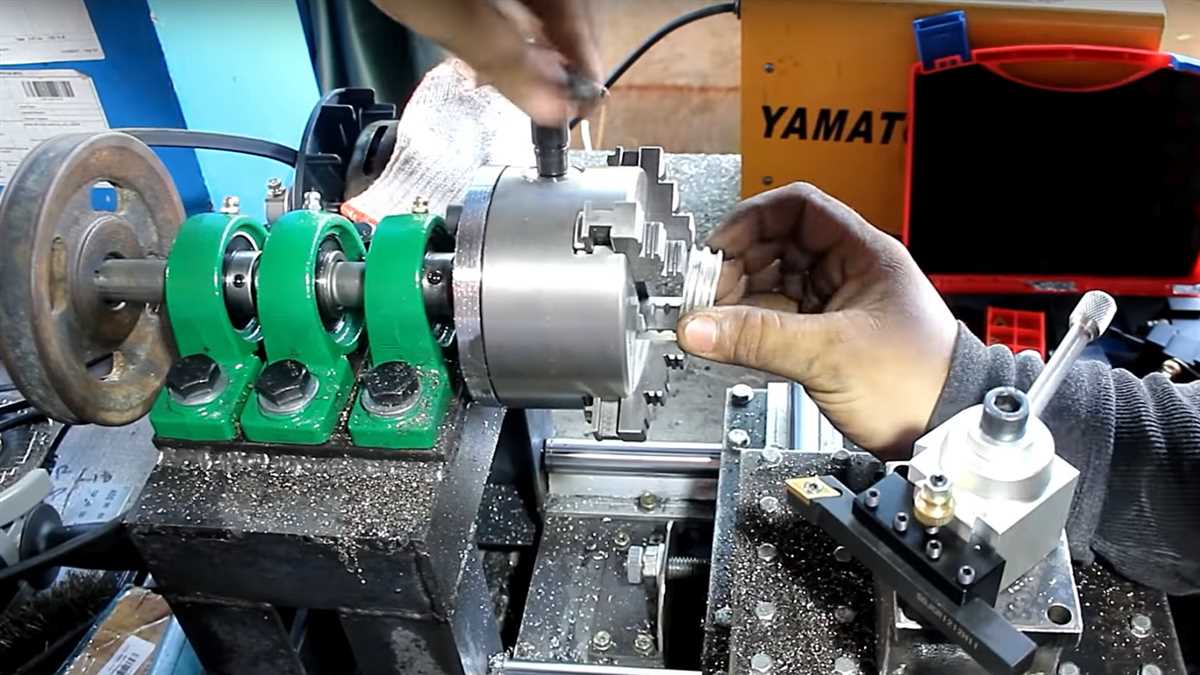
The headstock is an essential part of a metal lathe, as it houses the main spindle and provides the power transmission for the lathe. Building the headstock involves several steps to design and construct a sturdy and functional component.
Materials and Tools
- Steel plates
- Steel rods
- Bearings
- Drill press
- Saw
- Welding machine
- Grinder
- Measuring tools
Step 1: Design
Start by designing the headstock based on your specific requirements and the size of the lathe. Consider the dimensions, spindle size, and mounting options for accessories such as chuck or faceplate. Measure and sketch the design on paper or using CAD software.
Step 2: Cutting and Shaping
Use a saw to cut the steel plates and rods according to the dimensions from the design. Make sure to wear safety goggles and gloves. Use a grinder to smooth the edges and remove any burrs or sharp edges.
Step 3: Drilling Holes
Drill holes in the steel plates and rods as per the design. Use a drill press to ensure accurate and straight holes. The holes will be used for attaching bearings and other components in the headstock assembly.
Step 4: Welding
Assemble the cut steel plates and rods using a welding machine. Weld the pieces together to create a rigid and sturdy structure. Make sure to weld the joints properly and check for any weak points or defects.
Step 5: Installing Bearings
Install the bearings in the designated holes of the headstock. The bearings will support the spindle and allow it to rotate smoothly. Make sure to choose high-quality bearings suitable for the load and speed requirements of your lathe.
Step 6: Final Assembly
Once the welding and bearing installation are complete, assemble the other components of the headstock, such as the spindle, belt pulley, and other accessories. Ensure all parts fit together correctly and are securely fastened.
Step 7: Testing
Before using the lathe, perform thorough testing of the headstock to ensure it functions properly. Check for smooth rotation of the spindle, proper belt tension, and any abnormal noises or vibrations. Make any necessary adjustments or repairs before proceeding.
Building the headstock is a critical step in constructing a metal lathe. Take your time to plan and execute each step carefully to create a sturdy and reliable headstock that will serve you well in your metalworking projects.
Constructing the Tailstock
The tailstock is an important component of a metal lathe, and it helps to support and stabilize the workpiece during machining operations. Here’s how you can construct the tailstock for your homemade metal lathe:
- Begin by cutting a piece of metal stock to the desired length for the tailstock.
- Drill a hole through the center of the metal stock to serve as the spindle hole.
- Next, create a base for the tailstock by cutting another piece of metal stock to the desired size and shape.
- Attach the base to the bottom of the tailstock spindle using screws or welding.
- To provide adjustable support for the workpiece, create a clamping mechanism for the tailstock by attaching a lever arm to the base.
- Attach a clamp or screw mechanism to the lever arm to allow for vertical adjustment of the tailstock.
- Make sure the tailstock is securely attached to the lathe bed, and that it can be moved along the bed as needed.
Once the tailstock is constructed, it can be used in conjunction with the headstock to hold and rotate the workpiece during machining operations. The tailstock should be able to provide stable support for the workpiece and be easily adjustable for different machining tasks.
Note: The specific construction details for the tailstock may vary depending on the design of your homemade metal lathe. It’s important to consult detailed plans or instructions to ensure that your tailstock is properly designed and constructed for safe and effective use.
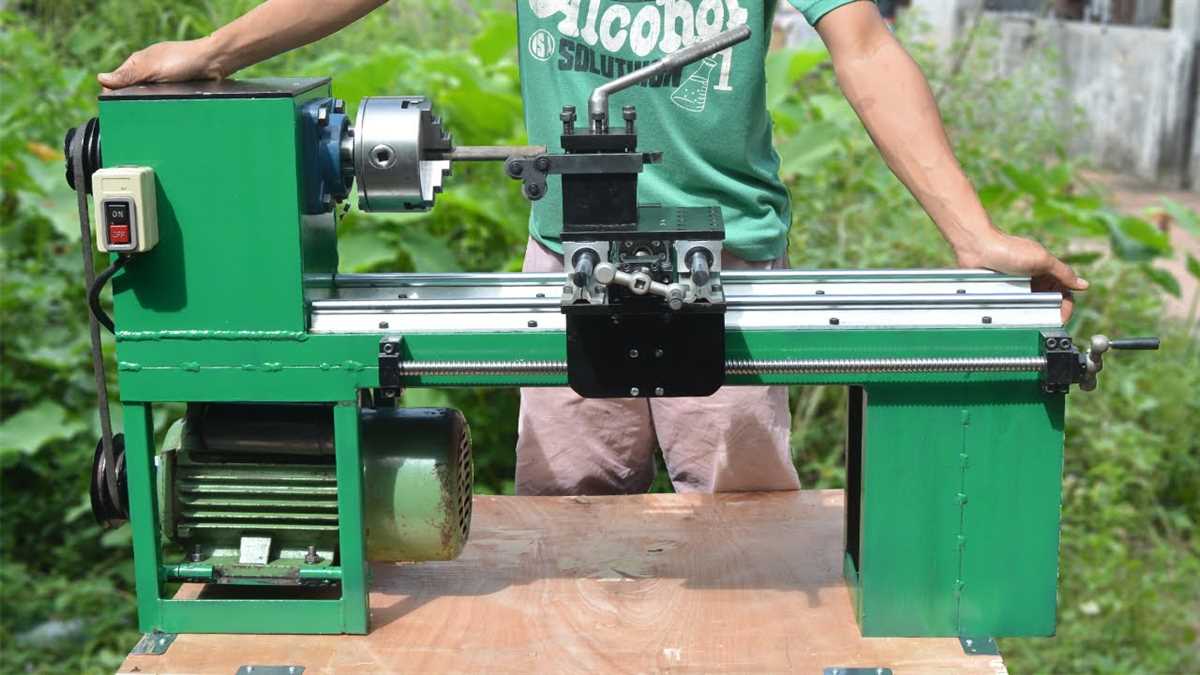
Testing and Fine-tuning the Lathe
Once you have completed building your metal lathe from scratch, it’s time to test and fine-tune the machine to ensure it is running smoothly and accurately. Here are some steps to follow:
1. Safety first
Before starting any testing or fine-tuning, make sure you have appropriate safety equipment, such as safety glasses and gloves, to protect yourself during the process.
2. Power up the lathe
Connect the power supply to the lathe and turn it on. Make sure all electrical connections are secure and there are no loose wires. Check that the motor is running smoothly without any unusual noises or vibrations.
3. Test the speed control
Use the speed control mechanism to test different speeds. Start with the lowest speed and gradually increase it. Ensure that the speed control operates smoothly and the lathe responds accordingly.
4. Check the spindle rotation
Engage the spindle rotation and observe the direction of rotation. The lathe should rotate in the proper direction, which is usually counterclockwise. If it rotates in the wrong direction, you may need to reverse the motor connections.
5. Verify the tool rest and tool post alignment
Place a tool on the tool post and adjust the tool rest to its proper height. Make sure the tool is aligned with the centerline of the lathe’s spindle. This alignment is crucial for accurate and safe turning operations.
6. Test the control knobs
Check all the control knobs, such as the cross-slide and compound rest knobs, for smooth operation. Make sure they are not too loose or too tight and that they move the respective components accurately.
7. Inspect the tailstock and its alignment
Verify that the tailstock is aligned with the lathe’s centerline. Move the tailstock along the bed and lock it securely in place. Ensure that it doesn’t wobble or move during operation, as this can affect the accuracy of your work.
8. Test the accuracy of the lathe
Run test pieces through the lathe to check for accuracy. Measure the diameter and length of the finished piece using precision measuring tools such as calipers and micrometers. Compare the measurements to your desired specifications to determine the lathe’s accuracy.
9. Fine-tune as needed
If the lathe is not performing up to your expectations, identify the specific issues and make necessary adjustments. This may involve adjusting the gib strips, leveling the lathe, or recalibrating the control mechanisms. Follow the manufacturer’s instructions or consult an experienced machinist for guidance on fine-tuning your particular lathe.
By thoroughly testing and fine-tuning your metal lathe, you can ensure that it is operating at its optimal performance level. This will allow you to achieve precise and accurate metal turning results and enjoy a satisfying machining experience.
FAQ
What is a metal lathe?
A metal lathe is a machine tool used in metalworking that rotates a workpiece to perform various operations such as cutting, drilling, and shaping.
Is it difficult to build a metal lathe from scratch?
Building a metal lathe from scratch can be a challenging and time-consuming project, especially for those with limited experience or resources. However, with proper planning, tools, and knowledge, it is possible to complete such a project.
What are the benefits of building a metal lathe from scratch?
Building a metal lathe from scratch allows for customization and the satisfaction of creating a functioning machine on your own. It can also be a more cost-effective option compared to buying a new lathe.
What tools and materials are needed to build a metal lathe from scratch?
Building a metal lathe from scratch requires a variety of tools and materials such as steel stock, bearings, fasteners, a chuck, gears, belts, motor, and various cutting tools. A lathe bed, headstock, and tailstock are also essential components.
How long does it take to build a metal lathe from scratch?
The time it takes to build a metal lathe from scratch can vary depending on factors such as the individual’s skills, available time, and resources. It can take anywhere from several weeks to several months to complete the project.
Are there any resources or guides available to help with building a metal lathe from scratch?
Yes, there are resources and guides available online, including step-by-step instructions, videos, and forums where experienced builders share their knowledge and offer assistance to those undertaking such a project.
Video


Meet Harrison Clayton, a distinguished author and home remodeling enthusiast whose expertise in the realm of renovation is second to none. With a passion for transforming houses into inviting homes, Harrison's writing at https://thehuts-eastbourne.co.uk/ brings a breath of fresh inspiration to the world of home improvement. Whether you're looking to revamp a small corner of your abode or embark on a complete home transformation, Harrison's articles provide the essential expertise and creative flair to turn your visions into reality. So, dive into the captivating world of home remodeling with Harrison Clayton and unlock the full potential of your living space with every word he writes.