How to Sharpen a Lathe Tool: A Step-by-Step Guide

Sharpening your lathe tools is a vital part of maintaining their cutting performance and prolonging their lifespan. A dull tool not only produces poor-quality cuts but also puts unnecessary strain on your lathe and workpiece. With a few simple steps, you can sharpen your lathe tools and ensure they are always ready for the task at hand.
Step 1: Inspect and Clean
Before sharpening your lathe tool, it’s essential to inspect it for any signs of damage or wear. Check for chipped edges, bent tips, or any other issues that may affect its performance. If necessary, use a wire brush to remove any debris or rust from the tool, ensuring a clean surface for sharpening.
Step 2: Choose the Right Grinding Wheel
Choosing the right grinding wheel is crucial for achieving a sharp and precise edge. For sharpening lathe tools, a wheel with a fine grit (around 80-120) is generally recommended. Make sure the wheel is properly installed and secured on your grinding machine before proceeding.

Step 3: Set the Tool Rest Angle
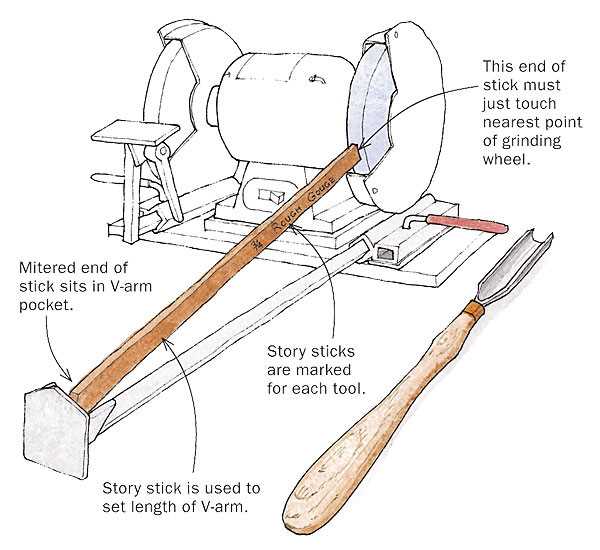
The tool rest angle determines the bevel angle of your lathe tool. The optimal angle typically ranges between 20 to 30 degrees, depending on the type of cutting tool. Use a protractor or angle gauge to set the tool rest to the desired angle, ensuring consistent and accurate sharpening.
Step 4: Grind the Bevel
With your lathe tool securely held against the tool rest, slowly lower it onto the grinding wheel. Apply light and even pressure while moving the tool back and forth across the wheel, maintaining the set bevel angle. Take care not to overheat the tool, as excessive heat can affect its hardness and temper.
Step 5: Hone the Cutting Edge

After grinding the bevel, it’s essential to hone the cutting edge for a sharp and smooth finish. Use a honing stone or a diamond file to remove any burrs or imperfections left by the grinding process. Hold the tool at a slight angle and make several passes along the cutting edge until it feels smooth and sharp.
Step 6: Test and Adjust
Once you have sharpened your lathe tool, it’s essential to test its cutting performance. Use a scrap piece of wood or metal to assess the tool’s sharpness and quality of cuts. If necessary, make any adjustments to the bevel angle or honing until you achieve the desired results.
Conclusion
Sharpening your lathe tools is a skill that every woodworker or turner should master. By following these step-by-step instructions, you can ensure that your lathe tools are always sharp and ready for any project. Regular maintenance and sharpening will not only improve the quality of your cuts but also extend the lifespan of your tools, saving you time and money in the long run.

Understanding the Basics of Lathe Tools
Lathe tools are an essential component of any lathe machine. These tools are used to shape, cut, and finish various materials, such as wood, metal, or plastic. Understanding the basics of lathe tools is crucial to ensure proper usage and achieve desired results.
Types of Lathe Tools
There are several types of lathe tools, each designed for specific purposes. Some common types of lathe tools include:
- Turning Tools: These tools are used to remove material from the workpiece and shape it into the desired form. They usually have a cutting edge that can be ground to different shapes, such as round, square, or diamond.
- Parting Tools: Parting tools are used to create deep grooves or separate the workpiece into smaller sections. They have a thin, straight cutting edge and are ideal for making cuts along the grain of the material.
- Boring Tools: Boring tools are used to enlarge or smooth out existing holes in the workpiece. They typically have a cylindrical shape and are available in various sizes to accommodate different hole diameters.
Components of Lathe Tools
Lathe tools consist of several key components, including:
- Handle: The handle provides the user with a grip and control over the tool. It is usually made of wood or plastic.
- Shank: The shank is the part of the lathe tool that connects the handle to the cutting edge. It is commonly made of high-speed steel or carbide.
- Cutting Edge: The cutting edge is the working part of the lathe tool that comes into contact with the material. It is carefully sharpened to ensure precise cuts and is typically made of carbide or high-speed steel.
Maintaining and Sharpening Lathe Tools
To ensure optimal performance and longevity, lathe tools must be properly maintained and sharpened. This involves regular cleaning, inspection for any damage, and sharpening of the cutting edge using appropriate sharpening techniques and tools.
Properly sharpened lathe tools produce cleaner cuts, reduce the risk of accidents, and improve overall efficiency during the turning process.

Conclusion
Having a solid understanding of the basics of lathe tools is essential for anyone using a lathe machine. By knowing the different types of lathe tools, their components, and how to maintain and sharpen them, users can ensure safe and effective use, leading to better results and increased productivity.
Preparing the Tools and Workspace
Gather the necessary tools
Before you begin sharpening your lathe tools, it’s important to gather all the necessary tools and materials. Here is a list of what you’ll need:
- Lathe tool(s) in need of sharpening
- Bench grinder with a suitable grinding wheel
- Protective gloves and goggles
- Ruler or calipers
- Protractor or angle gauge
- Sharpening stones or honing guides (optional)
Set up your workspace
Creating a suitable workspace is essential for safely and effectively sharpening your lathe tools. Follow these steps to set up your workspace:
- Find a well-lit and spacious area to work in.
- Clean the area of any debris or clutter that may interfere with your work.
- Securely attach your bench grinder to a sturdy workbench or surface.
- Make sure the grinder is stable and properly adjusted.
- Position the grinder in a way that allows for comfortable and safe operation.
- Have a nearby table or flat surface to lay out your tools and materials.
Inspect and prepare your lathe tools
Before sharpening your lathe tools, it’s important to inspect them for any damage or excessive wear. Follow these steps to inspect and prepare your tools:

- Carefully examine each tool for chips, cracks, or other signs of damage.
- If you find any damage, set the tool aside for repair or replacement.
- Check the cutting edges for dullness or uneven wear.
- Measure the angles and bevels of the tool using a protractor or angle gauge.
- Make note of the current angles and bevels for reference during sharpening.
- Clean the tools with a wire brush or cloth to remove any dirt or debris.
By gathering the necessary tools and setting up a proper workspace, you’ll be well-prepared to begin sharpening your lathe tools.
Choosing the Right Sharpening Method
When it comes to sharpening lathe tools, there are several methods you can choose from. Each method has its advantages and disadvantages, so it’s important to consider your specific needs and preferences before making a decision.
1. Bench Grinder
A bench grinder is a popular choice for sharpening lathe tools because it offers speed and precision. The grinder’s rotating wheels make it easy to sharpen tools quickly and accurately. However, it’s important to be cautious when using a bench grinder, as it can generate a lot of heat and potentially damage the tool if not used correctly.
2. Sharpening Jigs
Sharpening jigs are another option for sharpening lathe tools. These jigs hold the tool securely in place and guide the sharpening process, ensuring consistent results. Sharpening jigs are a great choice for beginners or those who prefer a more controlled sharpening process.
3. Diamond Honing Stones
Diamond honing stones are a popular choice for sharpening lathe tools because they offer durability and precision. These stones consist of a layer of diamond abrasive particles bonded to a metal or plastic base. They provide a consistent sharpening surface and can be used wet or dry.
4. Waterstones
Waterstones are another common choice for sharpening lathe tools. These stones are made from natural or synthetic materials and are soaked in water prior to use. Waterstones offer a softer sharpening surface that is less aggressive than diamond stones, making them a good choice for delicate tools.
5. Sharpening Systems
Sharpening systems are an all-in-one solution for sharpening lathe tools. These systems typically include a sharpening platform or jig, along with various abrasive materials such as diamond stones or waterstones. Sharpening systems are a great choice for those who want convenience and versatility.
6. Professional Sharpening Services
If you don’t have the time or inclination to sharpen your lathe tools yourself, you can always take them to a professional sharpening service. These services have the expertise and specialized equipment to sharpen your tools to a high level of precision. However, outsourcing sharpening can be more expensive and less convenient than doing it yourself.
Conclusion
Choosing the right sharpening method for your lathe tools ultimately depends on your personal preferences and needs. Whether you opt for a bench grinder, a sharpening jig, diamond honing stones, waterstones, sharpening systems, or professional sharpening services, the most important thing is to keep your tools sharp and in good working condition.
Setting up the Grinder
Before sharpening your lathe tool, it is important to set up the grinder correctly. This will ensure that you get a precise and accurate sharpening job.
1. Choose the Right Wheel
First, make sure you have the correct grinding wheel for the job. The wheel should be specifically designed for sharpening lathe tools and have the appropriate grit for your needs. A finer grit wheel is best for sharpening high-speed steel tools, while a coarser grit wheel is better for sharpening carbide tools.
2. Mount the Wheel
Next, mount the grinding wheel on your grinder. Follow the manufacturer’s instructions for how to properly attach the wheel to the machine. Make sure it is securely in place and centered correctly.
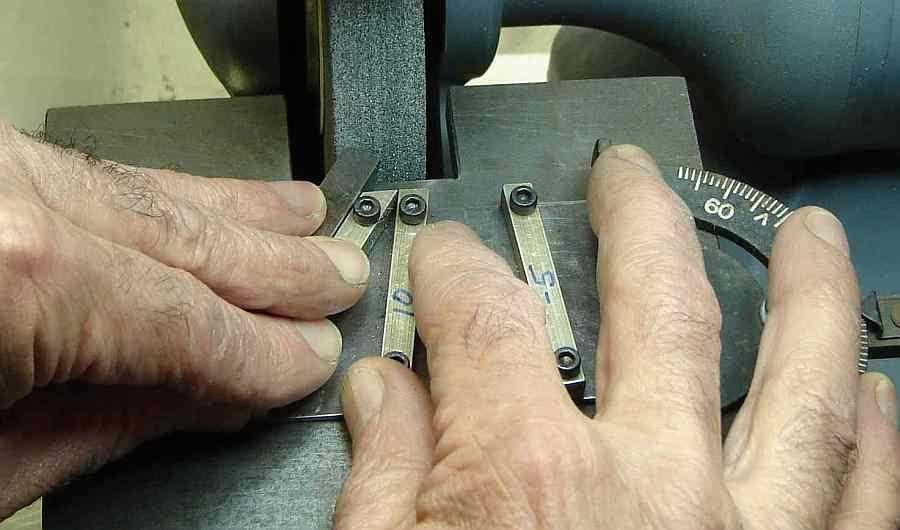
3. Adjust the Tool Rest
Position the tool rest at the correct angle for your lathe tool. The tool rest should be parallel to the grinding wheel and at a height that allows you to easily sharpen your tool. Adjust the tool rest as needed so that you have good control over the tool when sharpening.
4. Adjust the Spark Guard
Make sure the spark guard is properly adjusted to protect you from any sparks or debris that may be generated during the sharpening process. The guard should be positioned close to the grinding wheel, but not so close that it interferes with the tool rest or your ability to see the grinding process.
5. Check the Grinder Speed

Verify that the grinder is running at the correct speed for the grinding wheel you are using. Different wheels may have different speed requirements, so consult the grinder’s manual for the appropriate speed setting. Operating the grinder at the wrong speed can lead to an improper sharpening job or even damage to the wheel.
By properly setting up your grinder, you will create a safe and effective environment for sharpening your lathe tools. This will help you achieve better results and prolong the life of your tools.
Sharpening the Cutting Edge
Sharpening the cutting edge of a lathe tool is a crucial step in maintaining the tool’s performance and achieving quality results. Here is a step-by-step guide to help you sharpen your lathe tool effectively:
1. Safety First
- Before starting the sharpening process, ensure that you are wearing appropriate safety gear, including safety goggles and gloves, to protect yourself from any potential injuries.
2. Select the Sharpening Method
There are various methods for sharpening lathe tools, such as using a bench grinder, a sharpening jig, or sharpening stones. Choose the method that suits your preferences and equipment availability.
3. Grind the Bevel Angle
- Position the tool rest on your chosen sharpening equipment.
- Hold the lathe tool firmly and place it against the grinding wheel or sharpening stones.
- Grind the bevel angle by moving the tool against the grinding wheel in a sweeping motion. Maintain a consistent angle throughout the process.
- Apply light pressure and avoid overheating the tool.
- Pause frequently to cool the tool and examine the progress of the grind.
4. Hone the Cutting Edge
- After grinding the bevel angle, switch to a finer grit grinding wheel or sharpening stone.
- Repeat the sweeping motion to remove any burrs and refine the cutting edge.
- Apply light pressure and ensure that the cutting edge remains sharp and symmetrical.
- Cool the tool as needed and examine the cutting edge for a sharp, polished finish.
5. Test the Tool
- Once you have sharpened the cutting edge, test the lathe tool on a scrap piece of wood or material to ensure that it is cutting smoothly and effectively.
- Make any necessary adjustments or touch-ups if the tool does not perform as desired.
Remember to regularly sharpen your lathe tools to maintain their optimal performance and extend their lifespan. With proper sharpening techniques, you can achieve precise and clean cuts for your lathe projects.
Honing the Tool
After sharpening the lathe tool, it is important to hone it to achieve a smooth cutting edge. Honing is the final step in the sharpening process and helps to refine the edge of the tool for a clean and precise cut.
To hone the lathe tool, you will need a sharpening stone or a honing guide. The stone should have a fine grit to ensure a smooth finish. Begin by applying a small amount of honing oil or water to the stone to lubricate it.
Steps for honing the tool:
- Hold the lathe tool firmly in one hand and the honing stone in the other hand.
- Place the beveled edge of the tool against the stone at a slight angle (around 20 degrees).
- Using light pressure, move the tool back and forth across the stone in a smooth and controlled motion. Make sure to maintain a consistent angle.
- Continue honing the tool for a few minutes, periodically checking the cutting edge for sharpness.
- Once the cutting edge feels smooth and sharp, remove any burrs by gently rubbing the back of the tool against the stone.
- After honing, wipe the tool clean and inspect the cutting edge to ensure it is sharp and ready for use.
Remember to take your time and apply even pressure while honing the tool. Rushing or using excessive force can lead to an uneven edge or damage to the tool. Regular honing of the lathe tool will help maintain its sharpness and prolong its lifespan.
Testing the Sharpness
After sharpening your lathe tool, it’s essential to test its sharpness before using it. Here are a few ways to check if the tool is adequately sharpened:
Visual Inspection
Start by visually inspecting the cutting edge of the tool. It should have a clean and even bevel, with no chips or imperfections. If you notice any dull areas or uneven edges, additional sharpening might be necessary.
Fingernail Test
To evaluate the sharpness of the tool, gently scrape it against your fingernail. A properly sharpened tool will effortlessly shave off a thin layer of your fingernail, leaving a clean and smooth surface. If the tool fails to do so, it needs further sharpening.
Wood Shaving Test
Another way to test the sharpness is by making wood shavings. Take a piece of scrap wood and carefully position the tool at the desired angle. Apply light pressure and advance the tool across the wood. A sharp tool will produce thin and continuous wood shavings. If the shavings are thick or discontinuous, you’ll need to sharpen the tool further.
Cutting Performance

The final test is to observe the cutting performance of the tool on a workpiece. Choose a piece of wood and gently guide the tool along the surface. A sharp tool will cut smoothly and effortlessly, while a dull one will struggle to make clean cuts. If the tool isn’t performing as desired, you should resharpen it.
Note:
Remember, regular maintenance and frequent sharpening are key to keeping your lathe tools in optimal condition. Testing their sharpness before each use ensures better results and a safer working environment.
Proper Maintenance and Care
Maintaining and caring for your lathe tools is essential to ensure their longevity and optimal performance. By following these simple steps, you can keep your tools in top shape and prevent unnecessary damage or wear.
Clean and Dry
- After each use, make sure to clean your lathe tools thoroughly.
- Remove any debris or chips that may have accumulated on the tool.
- Use a stiff brush or compressed air to clean hard-to-reach areas.
- Dry the tools completely to prevent rust or corrosion.
Sharpening
- Regularly check the sharpness of your lathe tools.
- If the tool becomes dull, use a sharpening stone or grinder to restore the edge.
- Follow the manufacturer’s recommendations for the correct angle and technique.
- Take your time and be careful not to overheat the tool while sharpening.
Storage
- Store your lathe tools in a clean and dry area.
- Use a tool rack or drawer to keep them organized and protected.
- Avoid leaving your tools exposed to moisture or extreme temperatures.
- Consider using a tool box or case for additional protection.
Inspect Regularly
- Regularly inspect your lathe tools for any signs of wear or damage.
- Check for cracks, chips, or any other issues that may affect performance.
- If you notice any problems, address them immediately to avoid further damage.
- Replace any tools that are beyond repair or no longer safe to use.
Proper Handling
- Handle your lathe tools with care and avoid dropping or mishandling them.
- Use a proper grip and avoid applying excessive force or pressure.
- Follow recommended techniques and safety guidelines at all times.
- Protect yourself by wearing appropriate safety gear such as gloves and eye protection.
Regular Maintenance Schedule
Establishing a regular maintenance schedule for your lathe tools can help ensure their longevity and keep them in optimal condition. Consider performing the following tasks on a regular basis:
- Clean the tools after each use.
- Inspect for wear or damage.
- Sharpen the tools as needed.
- Properly store the tools.
By following these steps and taking the time to properly maintain and care for your lathe tools, you can enjoy many years of use and achieve excellent results in your woodworking projects.
FAQ
What tools do I need to sharpen a lathe tool?
To sharpen a lathe tool, you will need a bench grinder, a grinding wheel, a tool rest, and a diamond wheel dresser.
Can I sharpen a lathe tool without a bench grinder?
While it is possible to sharpen a lathe tool without a bench grinder, it is recommended to use one for better and more effective results.
How often do I need to sharpen a lathe tool?
The frequency of sharpening a lathe tool depends on how frequently you use it. Generally, it is recommended to sharpen it whenever you notice a decrease in performance or dullness in the tool.
What is the proper angle for sharpening a lathe tool?
The proper angle for sharpening a lathe tool can vary depending on the type of tool and the desired cutting action. However, a common angle range is between 40 and 60 degrees.
Video


Meet Harrison Clayton, a distinguished author and home remodeling enthusiast whose expertise in the realm of renovation is second to none. With a passion for transforming houses into inviting homes, Harrison's writing at https://thehuts-eastbourne.co.uk/ brings a breath of fresh inspiration to the world of home improvement. Whether you're looking to revamp a small corner of your abode or embark on a complete home transformation, Harrison's articles provide the essential expertise and creative flair to turn your visions into reality. So, dive into the captivating world of home remodeling with Harrison Clayton and unlock the full potential of your living space with every word he writes.